
85 Extra Cab Saved from Crusher
 Sep 17, 2014 | 10:54 AM
#421
Thread Starter
Super Moderator
iTrader: (1)
Joined: Aug 2008
Posts: 11,787
Likes: 28
From: Anderson Missouri
I wound up removing the rest of the dash. It has a mat that generates alot of dust and to get it out I removed everything. Then I gave it a good bath on the inside. I should of taken alot more pictures but did get a few. I did pick up enough paint to do the cab and I will paint more then what the factory did. Will get some of those pictures later. I am hoping to paint tomorrow but it could be Friday. The glue that the previous owner used on some things is really slowing me down on getting it off.
Here they did not remove the handles when the truck was painted previously. I am sanding out some runs that they had has well from not removing some things.
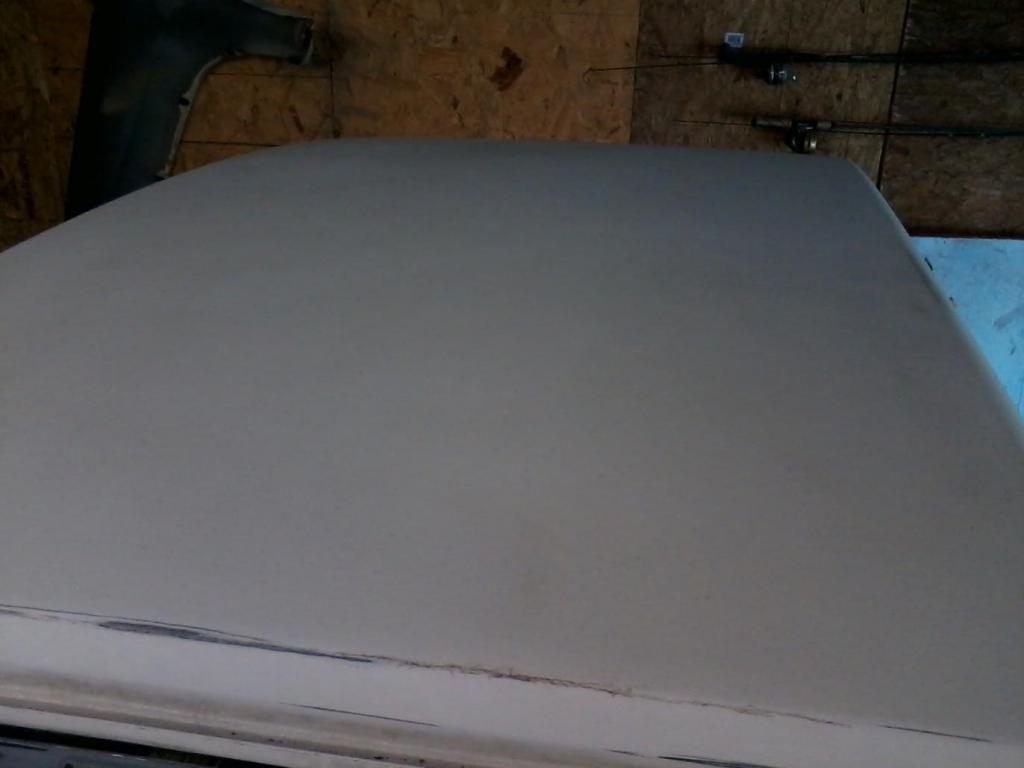
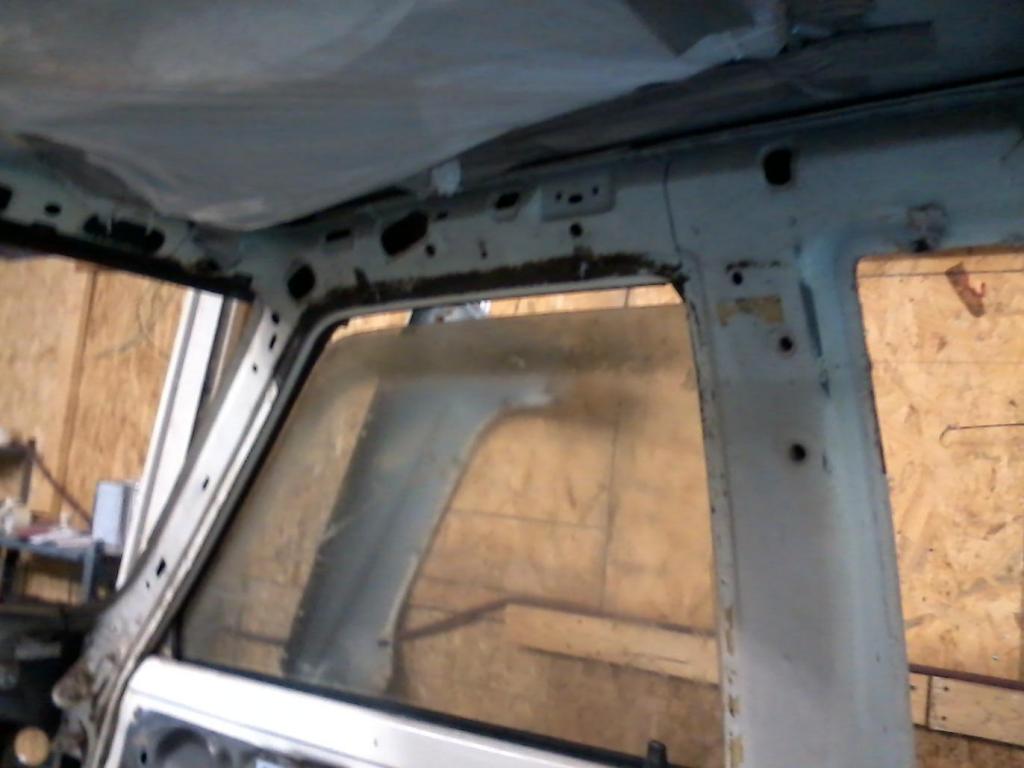
Roof is in great shape. I do have a small spot to fix. Best roof I have ever had to work on. Most look like elephants have danced on them. This one is nearly perfect.
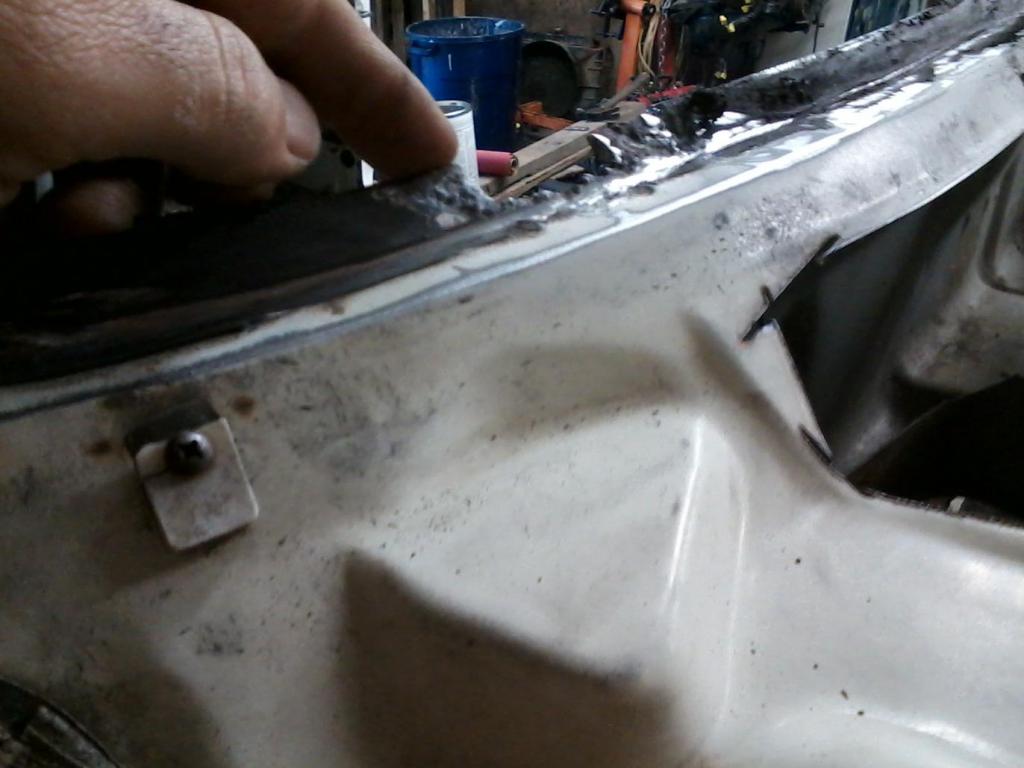
I will have to do some floor repair. A friend will help me do that when I can take it to his house. I used an air hose and a screw driver to get the old sealant off.

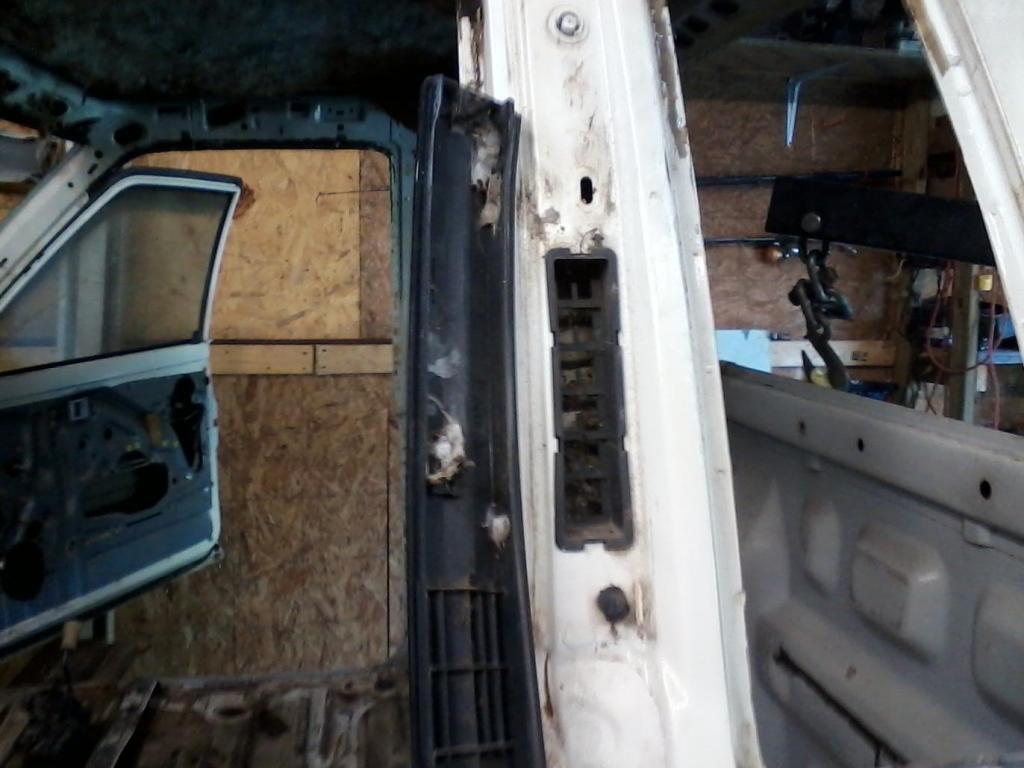
Another reason I remove as much trim as possible. Lots of dust behind the B pillar trim and I used high pressure air to clean the truck before giving it a bath with bleach water. No more mice evidence now. I will Peel and Seal the cab before I put the interior back in. Have done lots more but mostly is cleaning and removing things in preparing to paint.
Here they did not remove the handles when the truck was painted previously. I am sanding out some runs that they had has well from not removing some things.

Roof is in great shape. I do have a small spot to fix. Best roof I have ever had to work on. Most look like elephants have danced on them. This one is nearly perfect.

I will have to do some floor repair. A friend will help me do that when I can take it to his house. I used an air hose and a screw driver to get the old sealant off.

Another reason I remove as much trim as possible. Lots of dust behind the B pillar trim and I used high pressure air to clean the truck before giving it a bath with bleach water. No more mice evidence now. I will Peel and Seal the cab before I put the interior back in. Have done lots more but mostly is cleaning and removing things in preparing to paint.
 Sep 17, 2014 | 11:31 AM
#422
Registered User
Joined: Jul 2012
Posts: 2,365
Likes: 4
From: Idaho
lookin good terry got the box thank you sir thank you bows with a flourish havent done anythin yet with parts working on the lady of the house her project a 3 wheel bike for her hubby who at 6'5" never learned how to ride a bike he needs the exersize SO they call on the dragon to help restoring a 50's AMF bike
new paint, chrome an other bits all need polishing lot of fasteners need replacing kris beefed up the rearend gear housing this thing has a genuine gear pumpkin in the back drives both wheels but lets one slip when going a turn an its a 3 speed she got it for 75 bucks

new paint, chrome an other bits all need polishing lot of fasteners need replacing kris beefed up the rearend gear housing this thing has a genuine gear pumpkin in the back drives both wheels but lets one slip when going a turn an its a 3 speed she got it for 75 bucks
Last edited by Cyberhorn The Dragon; Sep 17, 2014 at 11:38 AM.
Sep 17, 2014 | 01:59 PM
#423
Registered User
Joined: Jun 2010
Posts: 1,448
Likes: 100
From: Virginia

We are finally getting our '89 to where it is ready for paint. I want to strip it down and get a cheap white respray now that the humidity is over with. I think I know how to get the handles off but how do you open and close the doors without them? I think I've seen people rig a wire coat hanger? Also, windows up or down for paint? I've learned so much from your threads. I might be starting a thread soon, boring I guess because it's mostly a resto. Most of my pictures seem to be in Photobucket jail.
Sep 17, 2014 | 06:26 PM
#424
Thread Starter
Super Moderator
iTrader: (1)
Joined: Aug 2008
Posts: 11,787
Likes: 28
From: Anderson Missouri
Hello Cyberhorn...I like seeing anything old restored. I would probably break my neck on a bike now. I rode my fair share of miles on them. You dont see many of those bikes right now. Last winter was the heaviest I have ever been due to being locked in the house due to the cold. You have to stay active or it will catch up with you health wise.
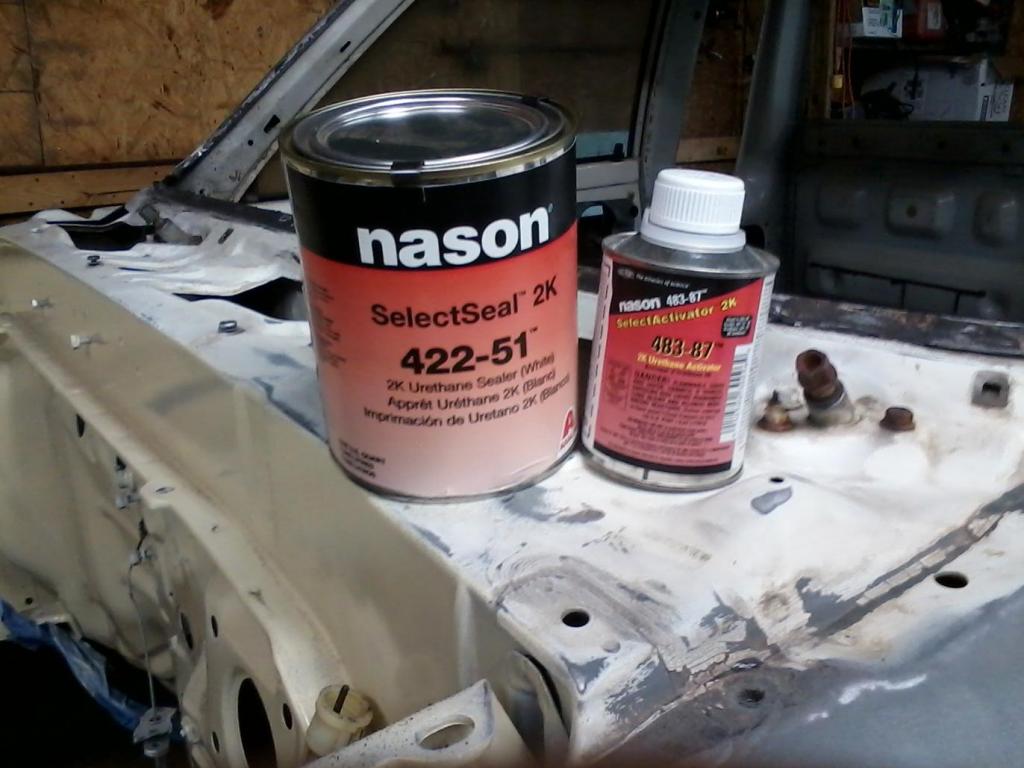
Hello Nervo.. Mine are just plain restores as well but it so rewarding as you just dont see many of these on the road. They are easy to work on as well. I use Nasson paint which all total is around $300 by the time I get sealer, paint and clear coat. You can probably get it a little cheaper elsewhere but Nasson does great for me and is a brand of Dupont. Paint can get expensive quick with other brands.
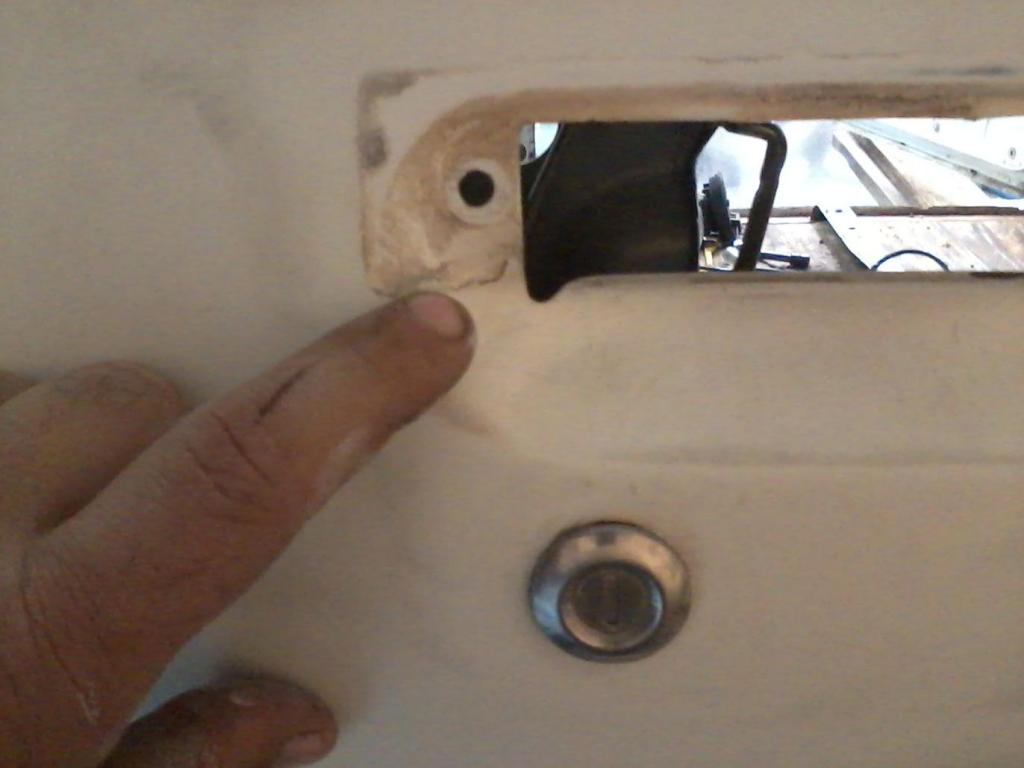
Opening and closing the door is the one reason you will see that the handle is the last thing I remove just for that reason. I tried to rig clothes hangers before but couldnt find away. What I do is just stick my hand thru the opening and push down on the lever after I get the door handle off. I usually just use one finger to access it. Also when I am painting and needing to open and close the door I stick my finger just inside the lip to open and close it with out latching it. I do this so that I can get the jams.
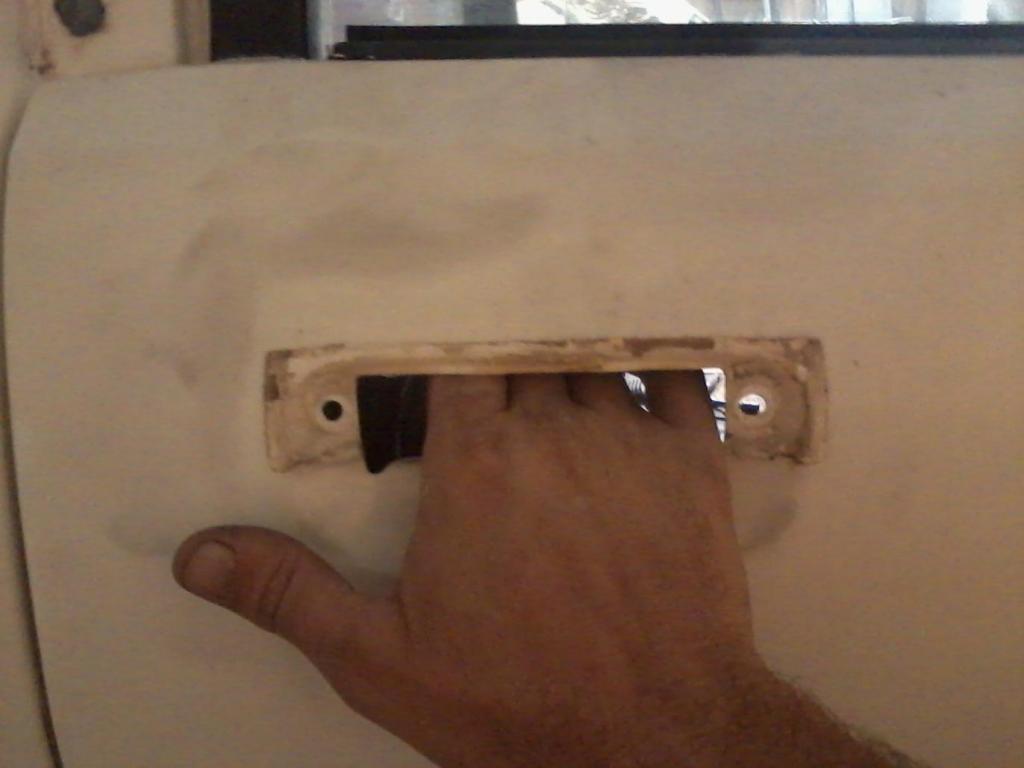
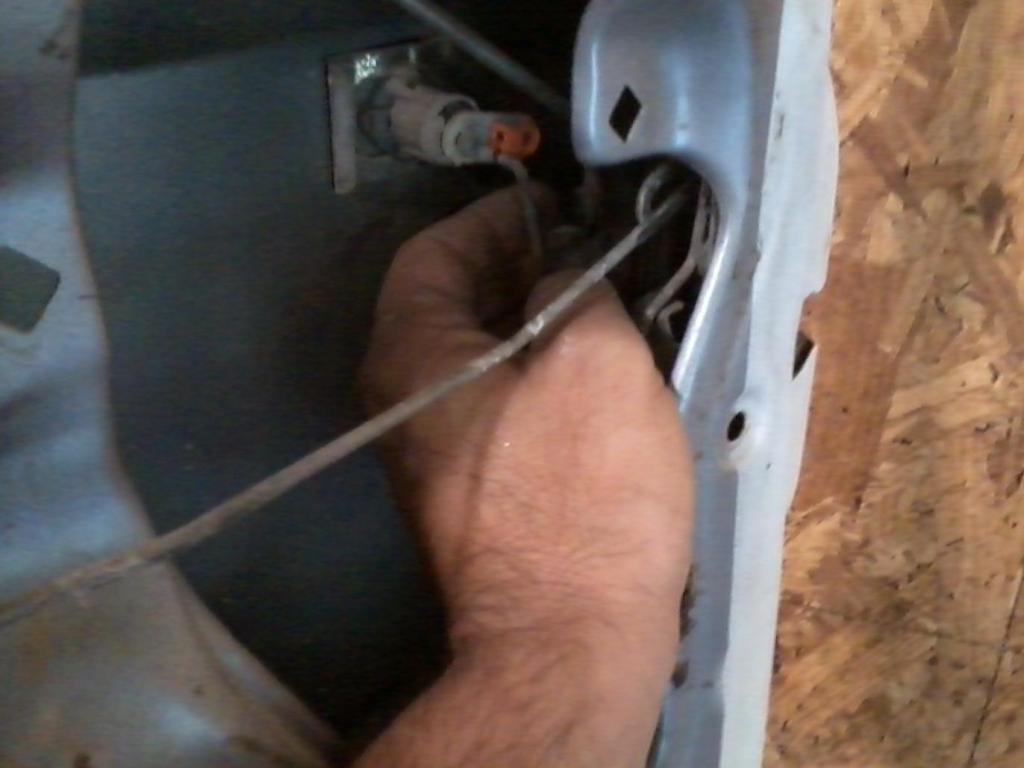
Getting this clip off is a royal pain in the rear. It is going to be brittle and will break on you. They are about $2 new from Toyota. Just be prepared to buy two of them. They go together easily but the clip pops thru the hole and the the rod keeps it seperated. Getting it out is the hard part. I stick a flat blade screw driver between the rod and door handle and twist it. You can see where one of the clips broke on this one and have each one I have ever done.
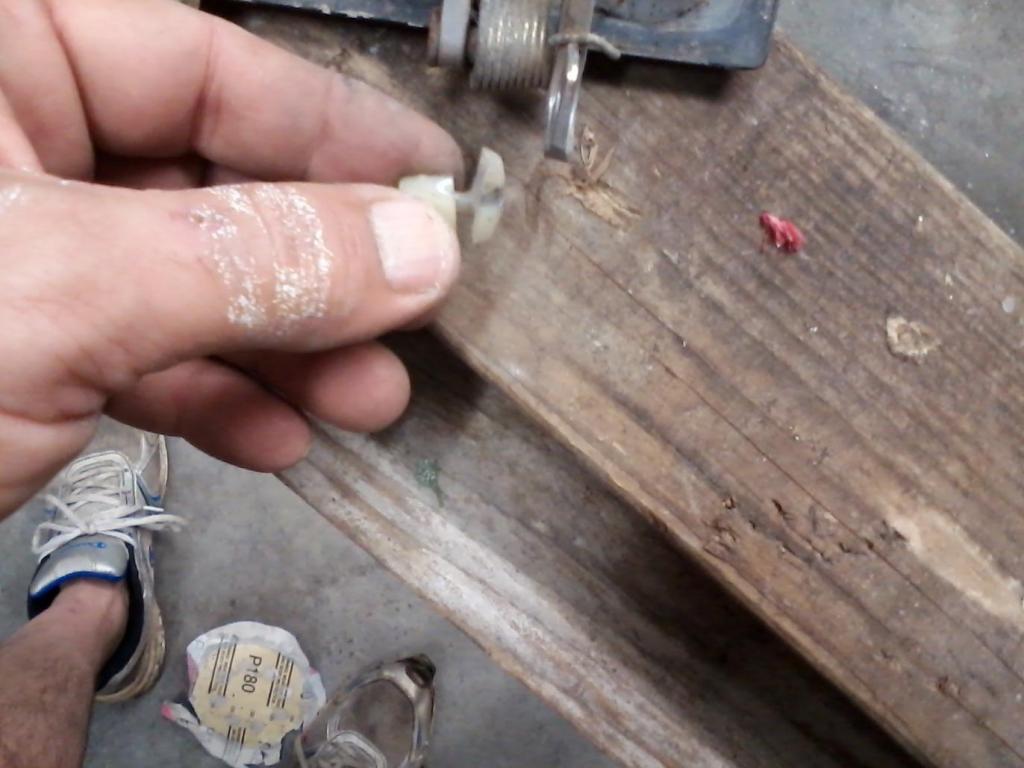
Once you get the clip off, it is easy to just push down on this rod with one finger from the outside. Sometimes it will want to fall to the latch assembly and you just kind of hook your finger to pull it to where you need it to be and then push straight down on it.
There is a plastic cover that you need to remove to get to the other bolt that holds the door handle on. I mask off the door opening and spray the jams when painting the truck. It makes it look as though it was not a respray. With the doors closed, overspray gets into the cracks and it looks bad when you open the doors. With the latch out, you can hook your finger thru the opening and open the door when painting. To close the door, if I have the glass in and it will be masked, I just push on the papered window just before it latches. I can post some pictures of how I mask for painting that way if you need it. When you go to paint, let me know and I can pass on some tips that work for me or any questions you have about removing items.
I have the windows up for painting. On this one I had to remove them to get the tinting off and one of my door latches is broken so I will need to replace it when I get it painted.

Hello Nervo.. Mine are just plain restores as well but it so rewarding as you just dont see many of these on the road. They are easy to work on as well. I use Nasson paint which all total is around $300 by the time I get sealer, paint and clear coat. You can probably get it a little cheaper elsewhere but Nasson does great for me and is a brand of Dupont. Paint can get expensive quick with other brands.
Opening and closing the door is the one reason you will see that the handle is the last thing I remove just for that reason. I tried to rig clothes hangers before but couldnt find away. What I do is just stick my hand thru the opening and push down on the lever after I get the door handle off. I usually just use one finger to access it. Also when I am painting and needing to open and close the door I stick my finger just inside the lip to open and close it with out latching it. I do this so that I can get the jams.

Getting this clip off is a royal pain in the rear. It is going to be brittle and will break on you. They are about $2 new from Toyota. Just be prepared to buy two of them. They go together easily but the clip pops thru the hole and the the rod keeps it seperated. Getting it out is the hard part. I stick a flat blade screw driver between the rod and door handle and twist it. You can see where one of the clips broke on this one and have each one I have ever done.

Once you get the clip off, it is easy to just push down on this rod with one finger from the outside. Sometimes it will want to fall to the latch assembly and you just kind of hook your finger to pull it to where you need it to be and then push straight down on it.

There is a plastic cover that you need to remove to get to the other bolt that holds the door handle on. I mask off the door opening and spray the jams when painting the truck. It makes it look as though it was not a respray. With the doors closed, overspray gets into the cracks and it looks bad when you open the doors. With the latch out, you can hook your finger thru the opening and open the door when painting. To close the door, if I have the glass in and it will be masked, I just push on the papered window just before it latches. I can post some pictures of how I mask for painting that way if you need it. When you go to paint, let me know and I can pass on some tips that work for me or any questions you have about removing items.
I have the windows up for painting. On this one I had to remove them to get the tinting off and one of my door latches is broken so I will need to replace it when I get it painted.

Last edited by Terrys87; Sep 17, 2014 at 06:31 PM.
Sep 17, 2014 | 06:34 PM
#425
Thread Starter
Super Moderator
iTrader: (1)
Joined: Aug 2008
Posts: 11,787
Likes: 28
From: Anderson Missouri
Here is how I paint the inside of the door so as to make it blend in a little better with the exterior. I remove the trim and then run tape where the trim was on the inside. Then I paper against the exposed tape and run another strip of tape on top of that. Top has been taped again and still need to run tape down the left side.
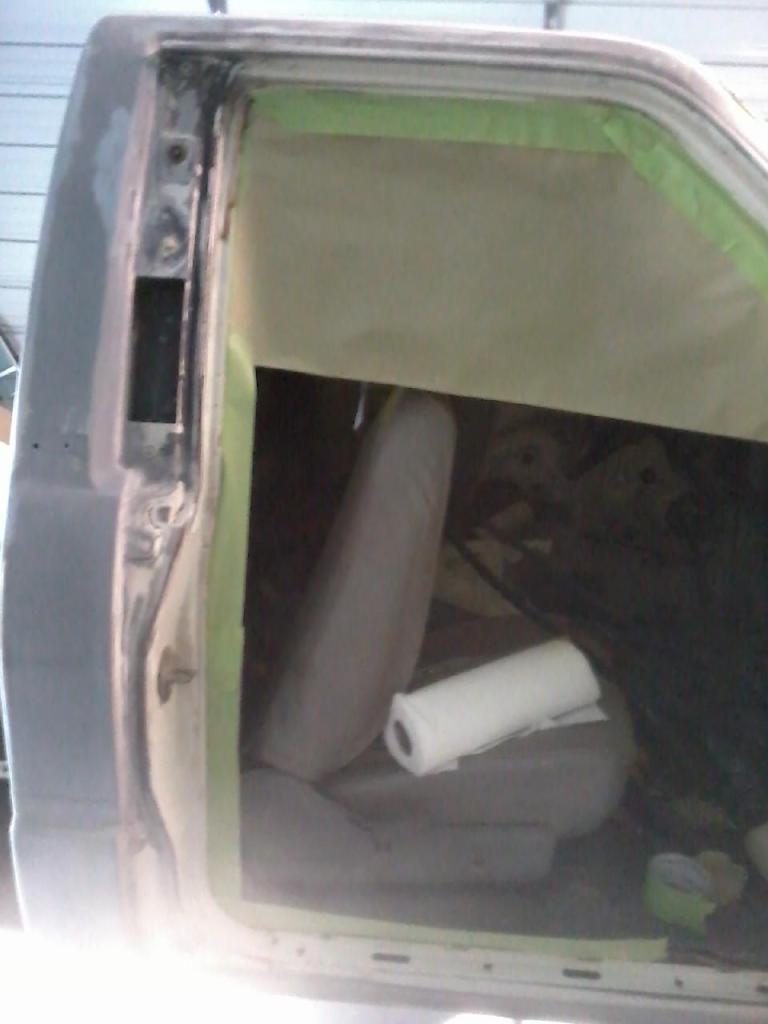
Not to worried about the center as it will have a door panel covering it and I will cover the seal as I just now seen that I didnt mask it off.

If you remove the trim and tape on the pinch welds, the trim will hide where the tape was and you can not see the difference in the old paint and new.
This isnt the 85 painted yet. Just posting for some tips. I still have a ways to go on sanding the old paint off. cleaning, and removing trim. Then I still need to prime and block sand and I want to spray some places that the factory did not spray. I show that the cowl, rocker panels, and behind the front fenders are dirt traps. Some of the reasons are for cleanliness but it also is where dust can be and spray painting, that is when it will come out. I didnt show me washing the truck and then going over everything with an air hose. I am generating tons of dust just with sanding.
I have the drivers fender well clean and still need to do the passenger side. I spent alot of time cleaning the windshield channel yserterday and the rust magnet did alot of damage to it. I think I have it good enough that the windshield shop can seal it and make it water tight. It has some damage and I will post some pics of it later today.
I havent started any filler work and dont have much to do. I have been getting dirty with grease and dont want it to contaminate the filler. When I do start priming and block sanding I will take a rag with some water and paint thinner to clean my hands to keep body oil out of the filler and primer. I did cut my hands yesterday cleaning out the windshield channel and that stuff burns when you get it into a cut.
Not to worried about the center as it will have a door panel covering it and I will cover the seal as I just now seen that I didnt mask it off.
If you remove the trim and tape on the pinch welds, the trim will hide where the tape was and you can not see the difference in the old paint and new.
This isnt the 85 painted yet. Just posting for some tips. I still have a ways to go on sanding the old paint off. cleaning, and removing trim. Then I still need to prime and block sand and I want to spray some places that the factory did not spray. I show that the cowl, rocker panels, and behind the front fenders are dirt traps. Some of the reasons are for cleanliness but it also is where dust can be and spray painting, that is when it will come out. I didnt show me washing the truck and then going over everything with an air hose. I am generating tons of dust just with sanding.
I have the drivers fender well clean and still need to do the passenger side. I spent alot of time cleaning the windshield channel yserterday and the rust magnet did alot of damage to it. I think I have it good enough that the windshield shop can seal it and make it water tight. It has some damage and I will post some pics of it later today.
I havent started any filler work and dont have much to do. I have been getting dirty with grease and dont want it to contaminate the filler. When I do start priming and block sanding I will take a rag with some water and paint thinner to clean my hands to keep body oil out of the filler and primer. I did cut my hands yesterday cleaning out the windshield channel and that stuff burns when you get it into a cut.
Last edited by Terrys87; Sep 18, 2014 at 01:40 AM.
Sep 18, 2014 | 06:50 AM
#426
Thread Starter
Super Moderator
iTrader: (1)
Joined: Aug 2008
Posts: 11,787
Likes: 28
From: Anderson Missouri
I will try and add some more details to help others on disassembly. A lot of this I learned on trial and error and would of liked to seen it myself on the first time.
Here so some of the places Toyota does not paint. The very front white spot is where I did a practice shoot to make sure my paint gun was functioning correctly.

Using a sealer in between the primer and base coat gives you one last oppurtunity to fix any flaws before paint and makes everything one color so as you dont have to add an extra layer of paint over a light or dark spot. I really recommend using this. Not needed and adds about $65 to the cost of the paint job. I wont seal where you cant see, just the outside panels. One quart will cover an entire truck.
I had my paint gun stand mounted on the end of the work bench, but it got in the way. This works great and I can store the stand when not in use. If I find a convient place to mount it later I will but the bench is used for mechanics and think this is my new mount.

PO used this glue on the headliner and everywhere else. Really slowing me down getting it off.
I jumped the gun on putting my head liner insulation up so just covered it with duct tape and plastic to avoid dust. More glue above the passenger door. Urgh!!!
Damage from the rust maker. Hoping the windshield shop can fix this for me. I have hours on cleaning this windshield track.
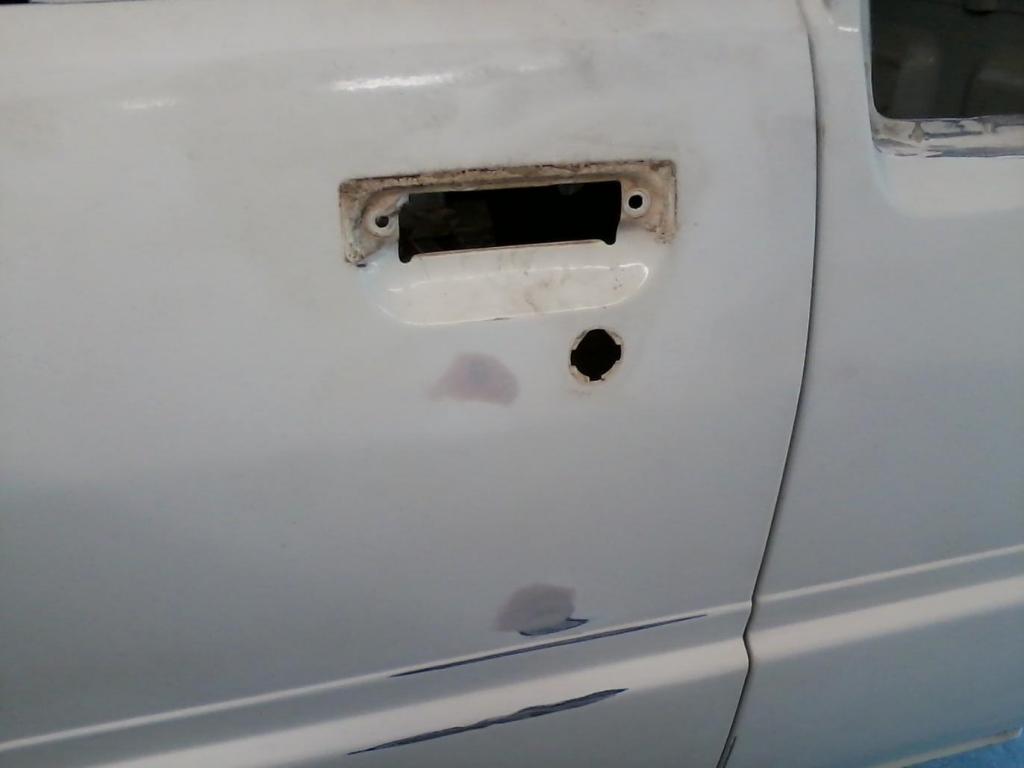
Passenger door where I am spending time removing paint build up from not removing door handles.
To remove the door seals, on top squeeze and work down the sides.

When you get to the door stop, I remove the pin and also you can pull the strip up and down to get it off of some little "T" tabs. I eventually will replace mine with new seals. I have them marked in one of my thread for new ones some where. The rubber seals are usually dry rotted and need replace. I have found some nice one in the salvage. Look on campers if you see one in a salvage. Usually in great shape.

Door stop, I just slide it way back in the door.
Lots of dirt behind seal. The lower corner is drain holes for the door. They get dirty. Preventive maintainace is to remove panels when you see the dirt and clean with an air hose. Save doors from rusting.

Two of the four drain holes on mine were clogged. Even though my trucks start out as junk, going thru one like I do, mine are cleaner then a used truck. I have seen nice used trucks that are filthy. Even with rat droppings, feel mine are cleaner as I use bleach and will peel and seal. Not trying to be gross but project trucks and some used trucks can be nasty.

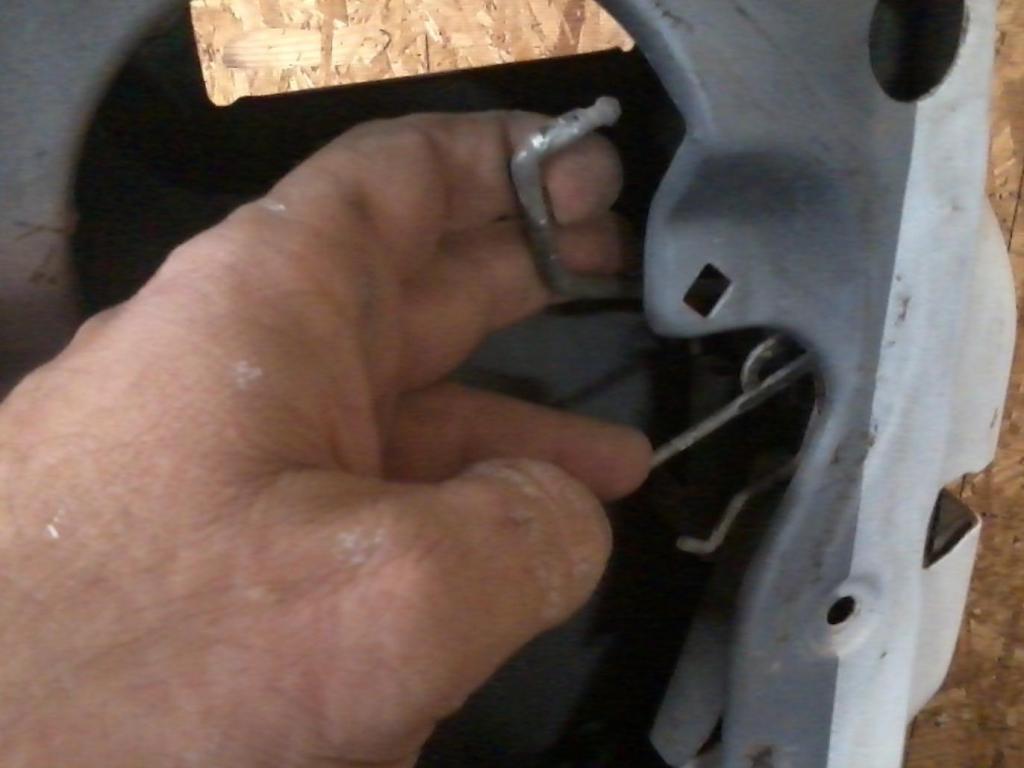
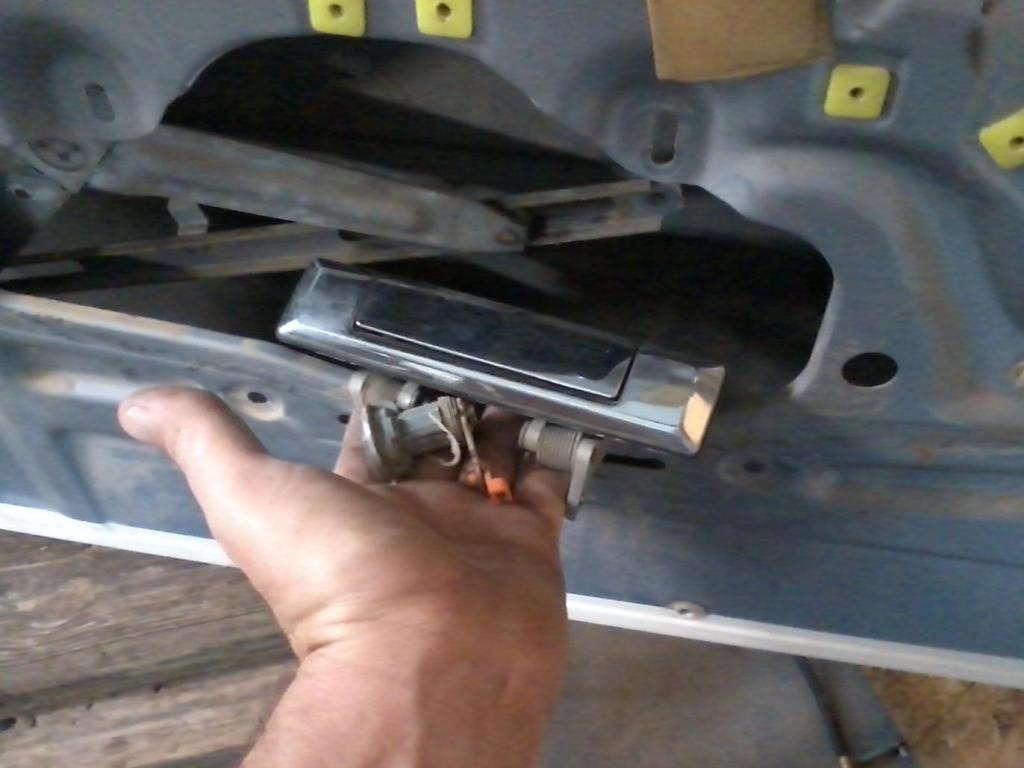
Door Lock removal. These are side specific. Passenger clip is orange. I turn it 90 degrees to remove from rod.

Once turned, just pop the rod out and the lock will come out from the front.
I store all of my door parts inside the door. They wont get over spray on them sitting as deep as they do and make reassembly easier.
The door lock is just held on with a tab. Just get a good hold and pull toward the front of the truck.

Here so some of the places Toyota does not paint. The very front white spot is where I did a practice shoot to make sure my paint gun was functioning correctly.

Using a sealer in between the primer and base coat gives you one last oppurtunity to fix any flaws before paint and makes everything one color so as you dont have to add an extra layer of paint over a light or dark spot. I really recommend using this. Not needed and adds about $65 to the cost of the paint job. I wont seal where you cant see, just the outside panels. One quart will cover an entire truck.

I had my paint gun stand mounted on the end of the work bench, but it got in the way. This works great and I can store the stand when not in use. If I find a convient place to mount it later I will but the bench is used for mechanics and think this is my new mount.

PO used this glue on the headliner and everywhere else. Really slowing me down getting it off.

I jumped the gun on putting my head liner insulation up so just covered it with duct tape and plastic to avoid dust. More glue above the passenger door. Urgh!!!

Damage from the rust maker. Hoping the windshield shop can fix this for me. I have hours on cleaning this windshield track.

Passenger door where I am spending time removing paint build up from not removing door handles.

To remove the door seals, on top squeeze and work down the sides.

When you get to the door stop, I remove the pin and also you can pull the strip up and down to get it off of some little "T" tabs. I eventually will replace mine with new seals. I have them marked in one of my thread for new ones some where. The rubber seals are usually dry rotted and need replace. I have found some nice one in the salvage. Look on campers if you see one in a salvage. Usually in great shape.

Door stop, I just slide it way back in the door.

Lots of dirt behind seal. The lower corner is drain holes for the door. They get dirty. Preventive maintainace is to remove panels when you see the dirt and clean with an air hose. Save doors from rusting.

Two of the four drain holes on mine were clogged. Even though my trucks start out as junk, going thru one like I do, mine are cleaner then a used truck. I have seen nice used trucks that are filthy. Even with rat droppings, feel mine are cleaner as I use bleach and will peel and seal. Not trying to be gross but project trucks and some used trucks can be nasty.

Door Lock removal. These are side specific. Passenger clip is orange. I turn it 90 degrees to remove from rod.

Once turned, just pop the rod out and the lock will come out from the front.

I store all of my door parts inside the door. They wont get over spray on them sitting as deep as they do and make reassembly easier.

The door lock is just held on with a tab. Just get a good hold and pull toward the front of the truck.

Last edited by Terrys87; Feb 10, 2015 at 06:53 AM.
Sep 18, 2014 | 07:52 AM
#428
Thread Starter
Super Moderator
iTrader: (1)
Joined: Aug 2008
Posts: 11,787
Likes: 28
From: Anderson Missouri
Hello Cyberhorn... I have heard of that. Is it on the lock itself? I will look into that in a few moments. Also I painted my engine red. That is not going to look good in a tan bay. I have thought of silver and black or even a tan color. Got any suggestions for color?
Sep 18, 2014 | 07:56 AM
#429
Thread Starter
Super Moderator
iTrader: (1)
Joined: Aug 2008
Posts: 11,787
Likes: 28
From: Anderson Missouri
Got the rest of the dash assembly out.

Been using a drill and wire brush to get under the fender clean.

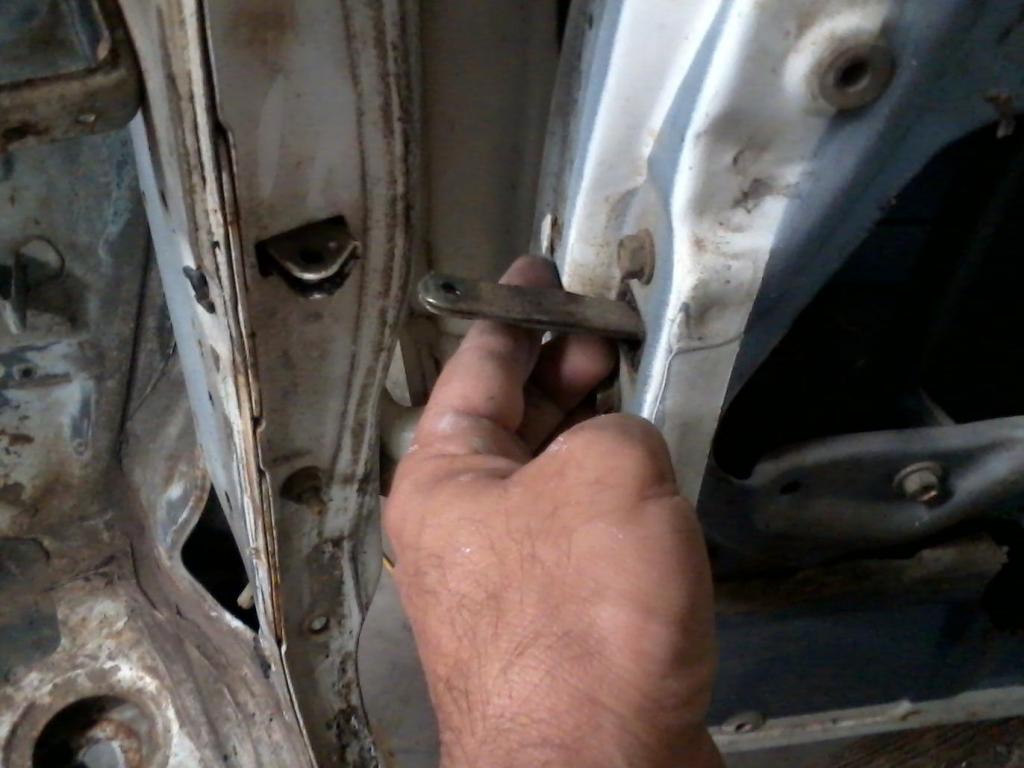
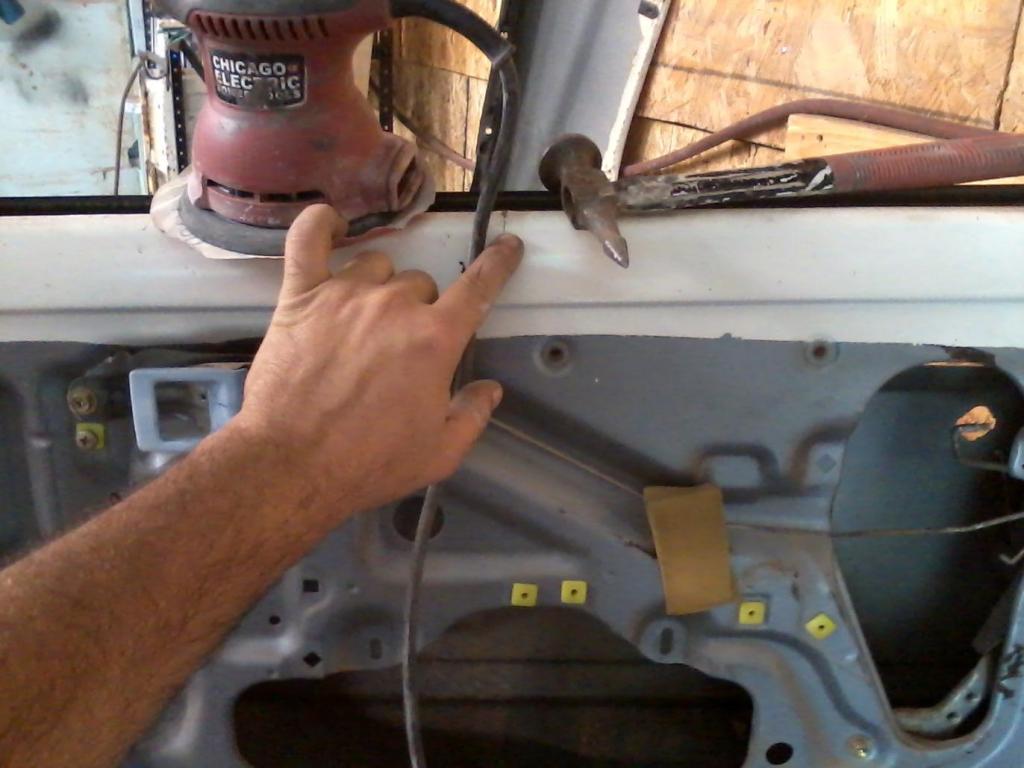
No tools to get the surface rust off of the door post. Have to do it by hand. Another place Toyota hasnt painted.

I see this crack in alot of doors. It had a peak to it. I just tapped it down with a body hammer. I have SR5 panels so that will cover it up. Also I like to use electric tools to keep from hearing the air compressor running all the time. Works great for the hobbyist, might not be a good idea if using every day. I am a cheap scape so get alot of my electric tools from pawn and flea markets.

Been using a drill and wire brush to get under the fender clean.

No tools to get the surface rust off of the door post. Have to do it by hand. Another place Toyota hasnt painted.

I see this crack in alot of doors. It had a peak to it. I just tapped it down with a body hammer. I have SR5 panels so that will cover it up. Also I like to use electric tools to keep from hearing the air compressor running all the time. Works great for the hobbyist, might not be a good idea if using every day. I am a cheap scape so get alot of my electric tools from pawn and flea markets.
 Sep 18, 2014 | 08:52 AM
#430
Nice work Terry, and some really good tips on the weatherstripping and door handle/lock removal! I haven't had to do any of that yet, but am sure I will down the road eventually. I do need to replace my driver side window regulator, its stripped and I have to pull the window up by hand the last half when rolling it up. I've been putting it off for 2 yrs, its funny how certain maintenance issues I just don't look forward to addressing, lol I'll get to it eventually!
Great work on the body prep, can't wait to see it painted!
Great work on the body prep, can't wait to see it painted!
Sep 18, 2014 | 10:13 AM
#431
Thread Starter
Super Moderator
iTrader: (1)
Joined: Aug 2008
Posts: 11,787
Likes: 28
From: Anderson Missouri
Hello Ed...The window regulator isnt hard to pull out at all. I think 3 bolts hold it to the door and two bolts hold the window to the regulator. I will try and get some pics of that in a while. Thanks, I have been working hard on it and still some of the pictures just dont show what has been done. I sure hope it shows in the paint. I am hoping tomorrow that I get it painted. Wife and kids are going to pitch in and help me when they get home.
Sep 18, 2014 | 10:25 AM
#432
Thread Starter
Super Moderator
iTrader: (1)
Joined: Aug 2008
Posts: 11,787
Likes: 28
From: Anderson Missouri
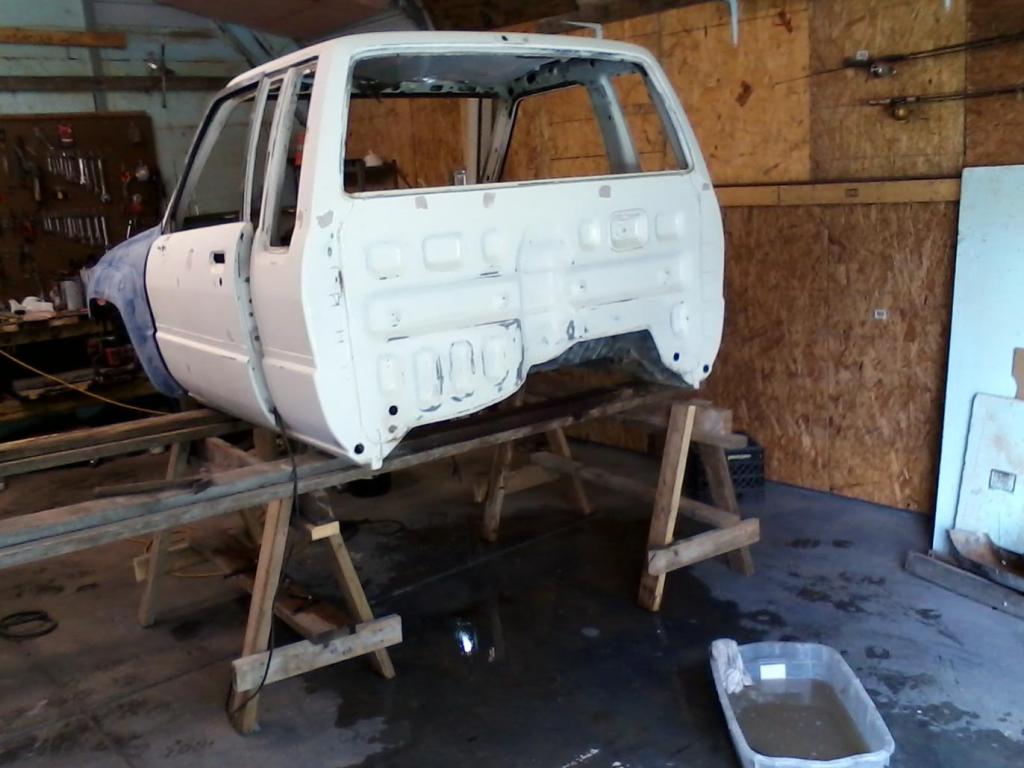
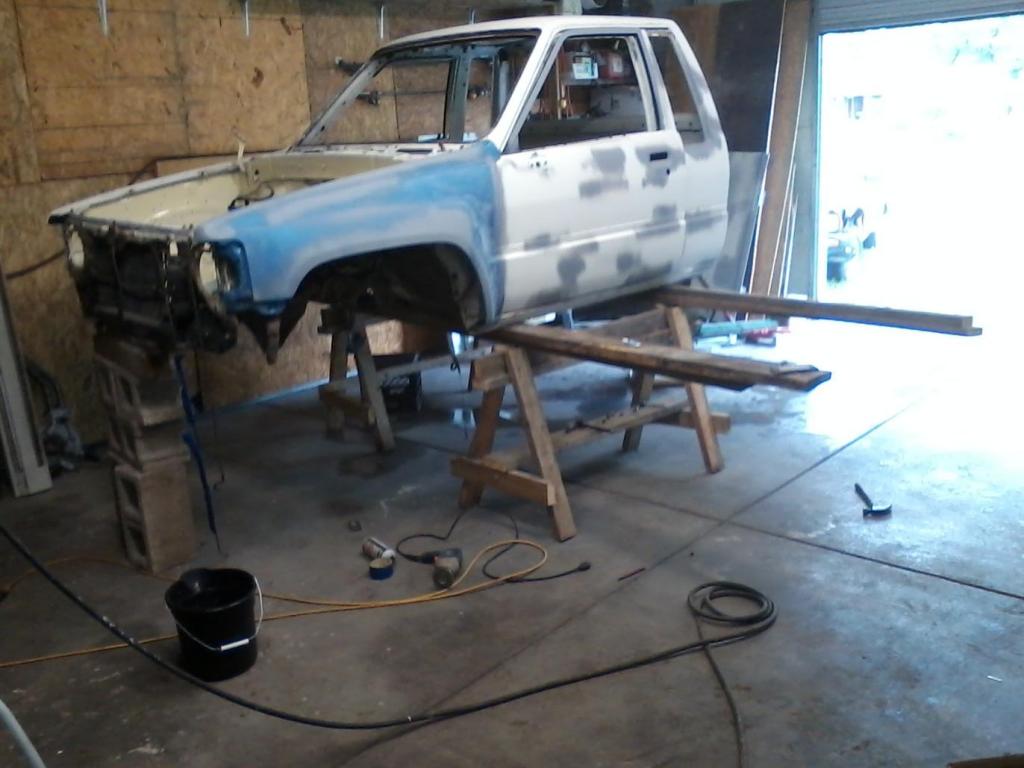
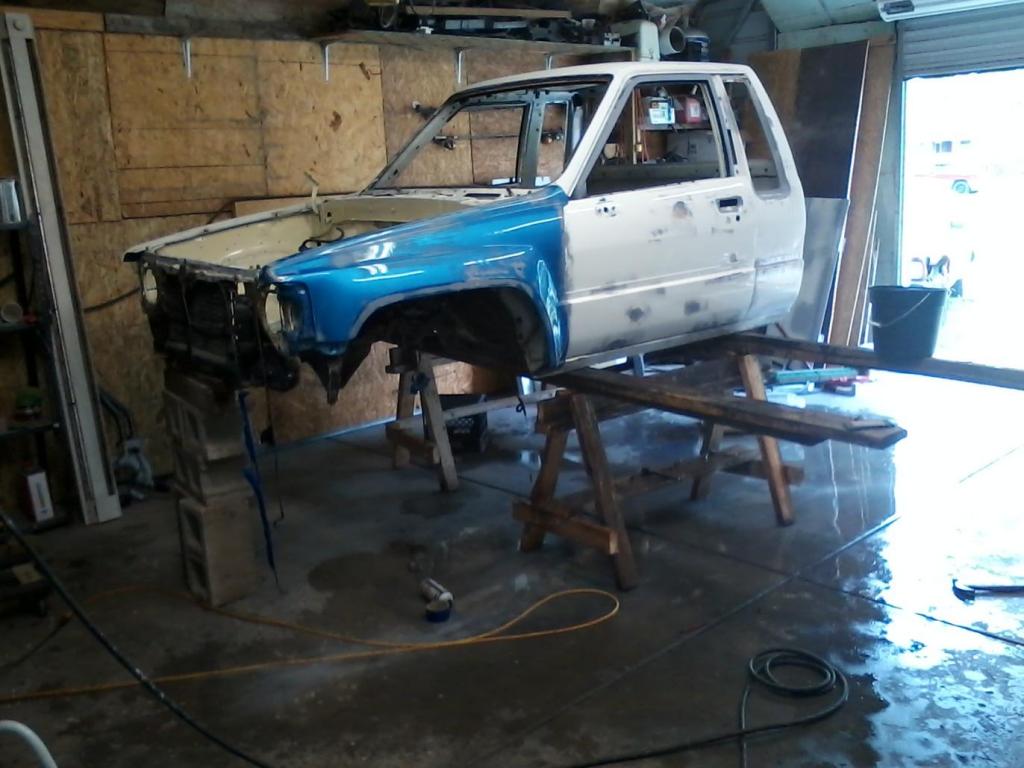
I got the fenders on with two bolts to start sanding on them. Have some paint chips to fix and they should be done.

Going to have to raise it higher to do some repair work and will wait til they get home for that.

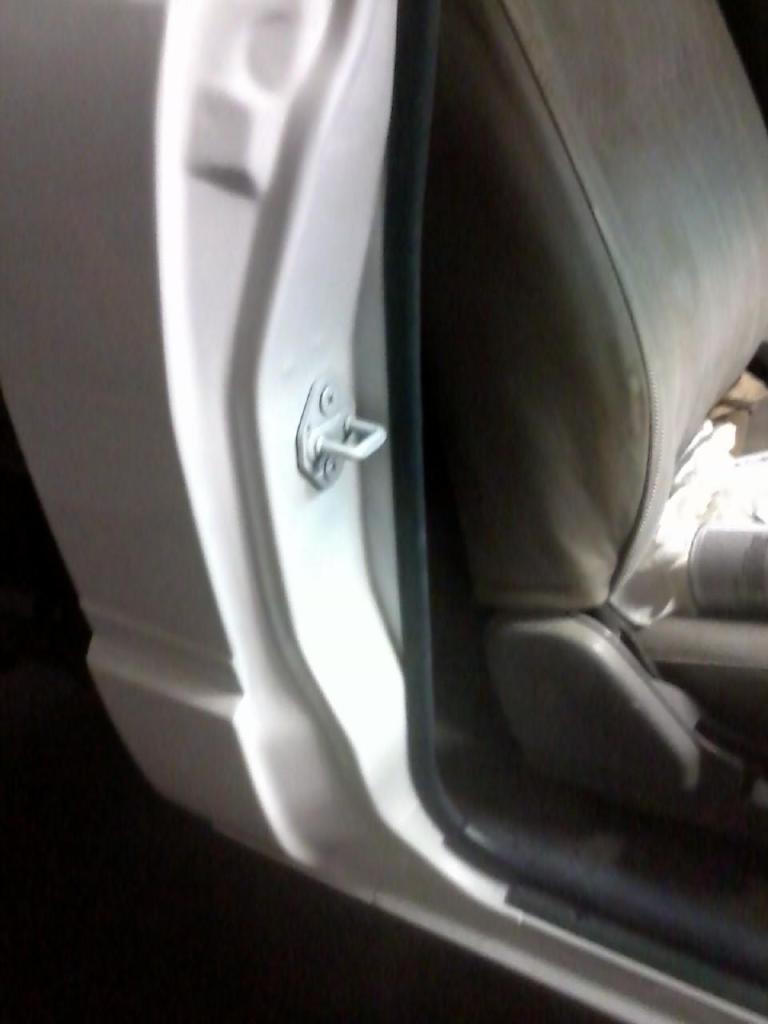
I will mask it off better when I go to paint. This just keeps the door from shutting and what I do when painting as well, that way I can get to the jams. You can still open and close the doors while painting. I hook a finger thru the door handle opening and close it with the window. Since I have the window out I will need to figure another way of closing the door.
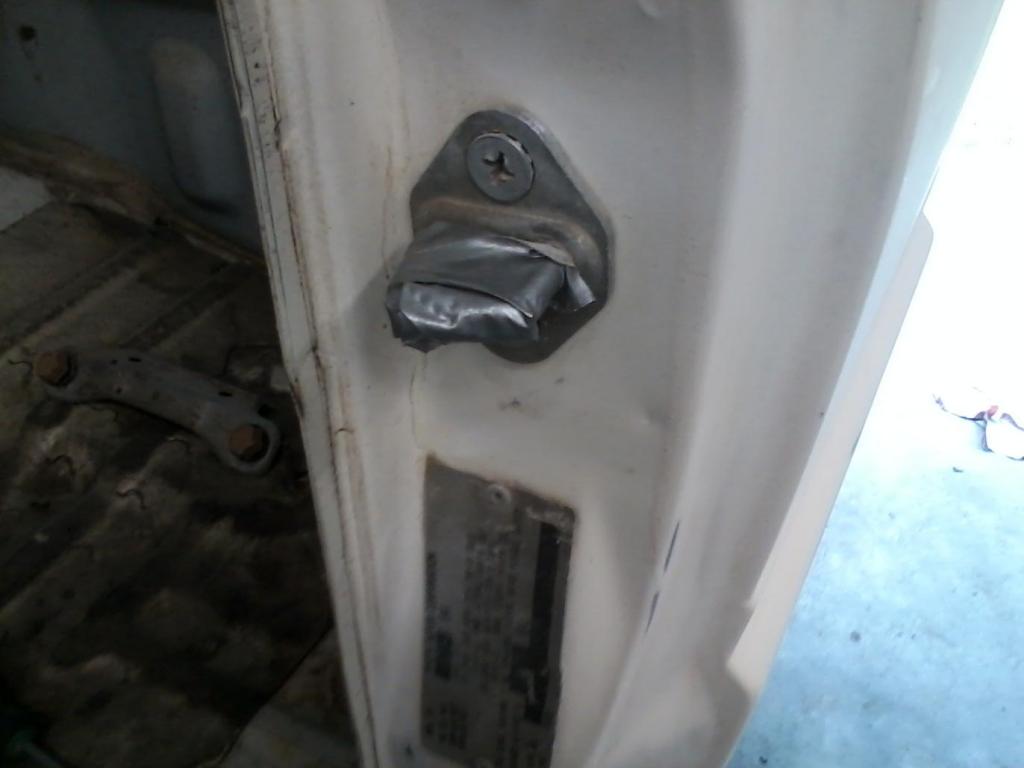
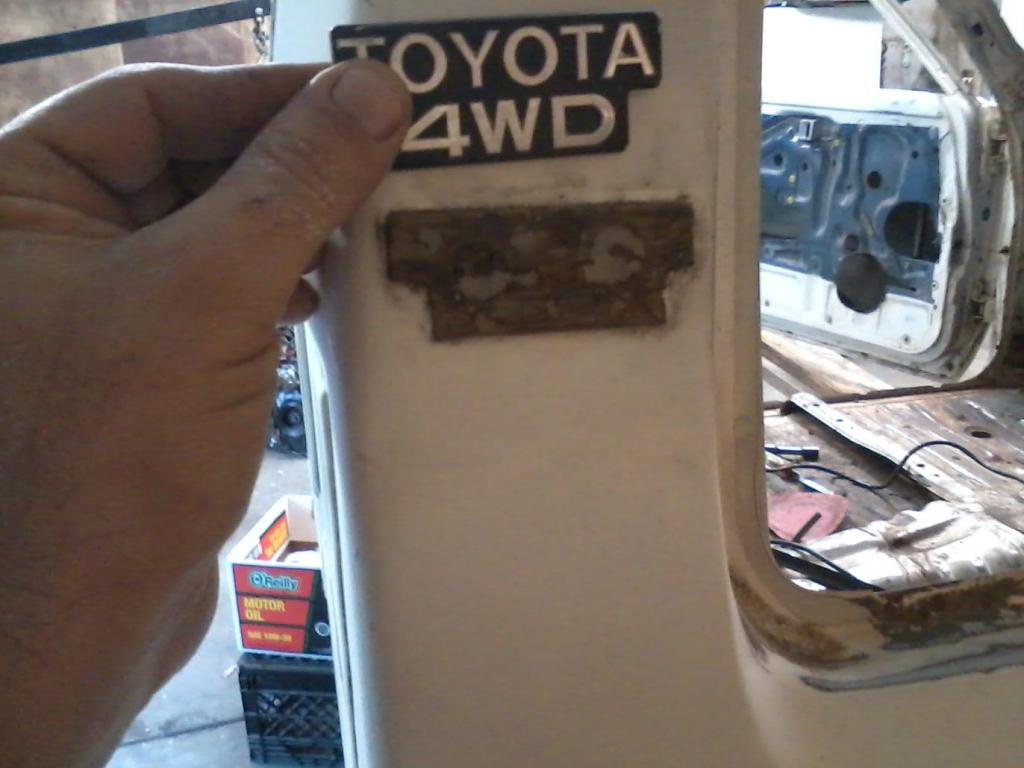
The previous paint job they got paint all over the VIN tag so I drilled it out and will reinstall with rivets. Just gives a cleaner look when painted.

I try to get every bit of use out of my sanding paper. When I am done with the body, I go to the underside and use what is left on the paper. Another area not painted by Toyota.

This is like the 4th time I have cleaned the dust up while doing this. Just shows how much dust and dirt is in a project like this. This is after I have washed it out and blown it out with the air hose before I started. I get all surrounding areas in hopes of when I do final cleaning of the shop there wont be much loose dust around.

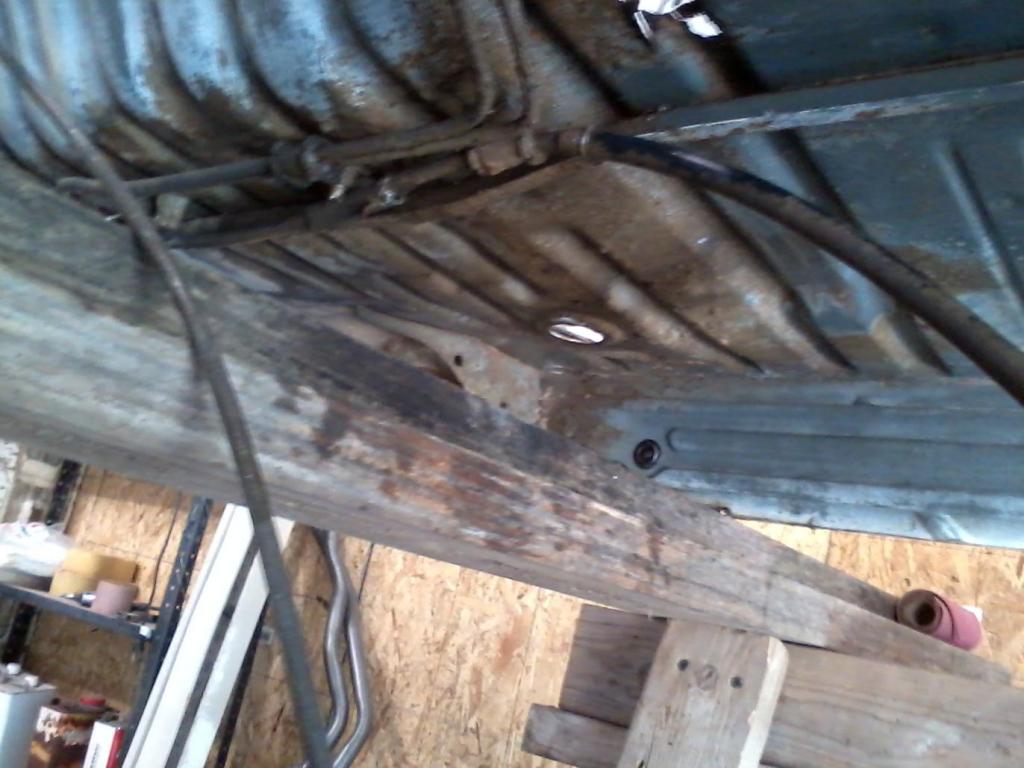
Been doing some work on the under side as well. This is a heat shield. Still have another greasy one to go.
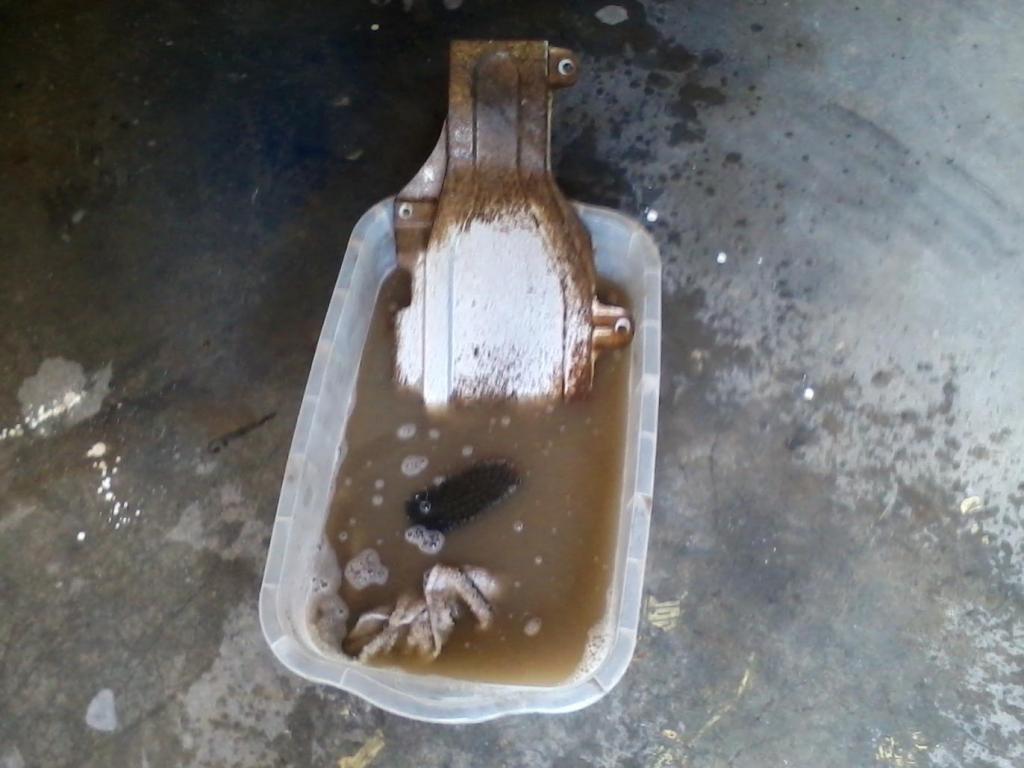
I have started some body work. The 5 spots are about the size of a hail ding. I am also working on the underside. I was going to use bedliner for the bottom but am afraid it will crack out and cause a place for water build up. I will just paint under there to prevent any rust. ( I hope)

Going to have to raise it higher to do some repair work and will wait til they get home for that.

I will mask it off better when I go to paint. This just keeps the door from shutting and what I do when painting as well, that way I can get to the jams. You can still open and close the doors while painting. I hook a finger thru the door handle opening and close it with the window. Since I have the window out I will need to figure another way of closing the door.

The previous paint job they got paint all over the VIN tag so I drilled it out and will reinstall with rivets. Just gives a cleaner look when painted.

I try to get every bit of use out of my sanding paper. When I am done with the body, I go to the underside and use what is left on the paper. Another area not painted by Toyota.

This is like the 4th time I have cleaned the dust up while doing this. Just shows how much dust and dirt is in a project like this. This is after I have washed it out and blown it out with the air hose before I started. I get all surrounding areas in hopes of when I do final cleaning of the shop there wont be much loose dust around.

Been doing some work on the under side as well. This is a heat shield. Still have another greasy one to go.

I have started some body work. The 5 spots are about the size of a hail ding. I am also working on the underside. I was going to use bedliner for the bottom but am afraid it will crack out and cause a place for water build up. I will just paint under there to prevent any rust. ( I hope)
 Sep 18, 2014 | 10:32 AM
#433
Registered User
Joined: Jul 2012
Posts: 2,365
Likes: 4
From: Idaho
leave it red it'll look fine you put good work in the color with the clean black hoses an other parts itll be fine
also with a good ruberized undercoat terry OVER the paint & primer your going to spray it should be great protection but just undercoat on bare metal usually isnt enough
Last edited by Cyberhorn The Dragon; Sep 18, 2014 at 10:38 AM.
Sep 18, 2014 | 10:44 AM
#434


Man Terry!! Seriously some amazing work you are doing here. I love how you are so meticulous at removing every little piece of trim and various components. You are a true example of how this work should be done.
I also dislike the door and lock rod clips. They always break or get brittle and break when you mess with them. Sometimes they are in a compromising position and seem near impossible to get off. I too, usually keep some on hand for when I have to mess with them.
I like the idea of using the sealer in between primer and base. Plus it adds another solid layer to help against shipping off later down the road.
Keep up the great work!!
Sep 18, 2014 | 12:01 PM
#436
Thread Starter
Super Moderator
iTrader: (1)
Joined: Aug 2008
Posts: 11,787
Likes: 28
From: Anderson Missouri
Hello Cyberhorn... I looked and did not see it but I am half blind in one eye and cant see out the other. lol, I used to have better then average vision but age is taken its toll on my eyesight. It was great having outstanding vision. I will get Mistys glasses and take a look. I am still on the fence on the motor color. The coating over the paint might be a good idea.
Thanks Mark...I hope when it is done it looks like I put some effort into it. This one and my runner is my keepers. I figure 5-10 years I will be painting it again and it will just be the outside. Will probably be to old to do all of the work to it then. Trying to make it count.
I see how those clips are supposed to come out. You should be able to squeeze the end of them and that would let the rod out. It doesnt work that way or at least for me. Those clips are a pain. Now I got to find that re assembly manual, lol, It isnt bad at all, the heater controls and a few wire connections is the most difficult.
Your Welcome Nervo19.. Not many painting projects on here but if there is some info you want or need let me know and I will post it up for you.
Last edited by Terrys87; Sep 18, 2014 at 12:04 PM.
Sep 18, 2014 | 12:08 PM
#437
Thread Starter
Super Moderator
iTrader: (1)
Joined: Aug 2008
Posts: 11,787
Likes: 28
From: Anderson Missouri
Super Glue will fix anything. I got a little rip and might see if I can replace it later.

I pretty much have the drivers side done. Still need to do rockers and roof. Started blocking it out.
Not a sure fire way of determining if it is smooth, but when it is wet and you run your hand across where the damage was at, without looking, you cant feel where it starts or begins. Also the whole panel kind of feels like a freshly waxed surface in my opinon.
Here is what most of the underside looked like.
Getting most of it cleaned.
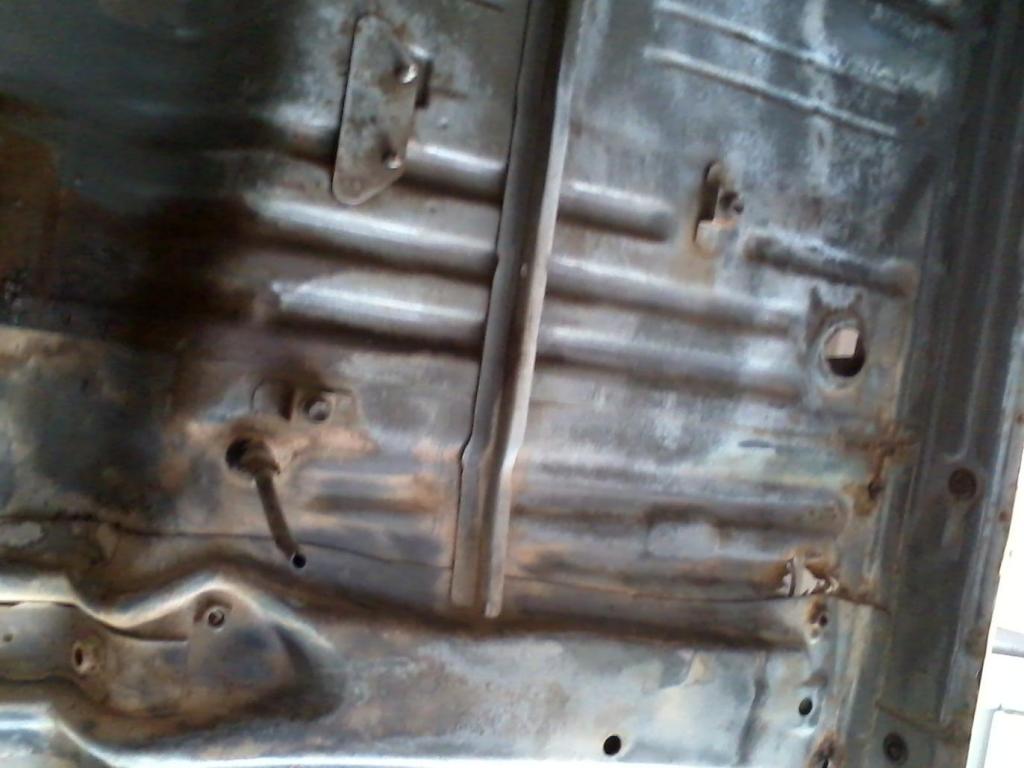
View of drain holes from bottom side.

Got the heat sheilds cleaned.

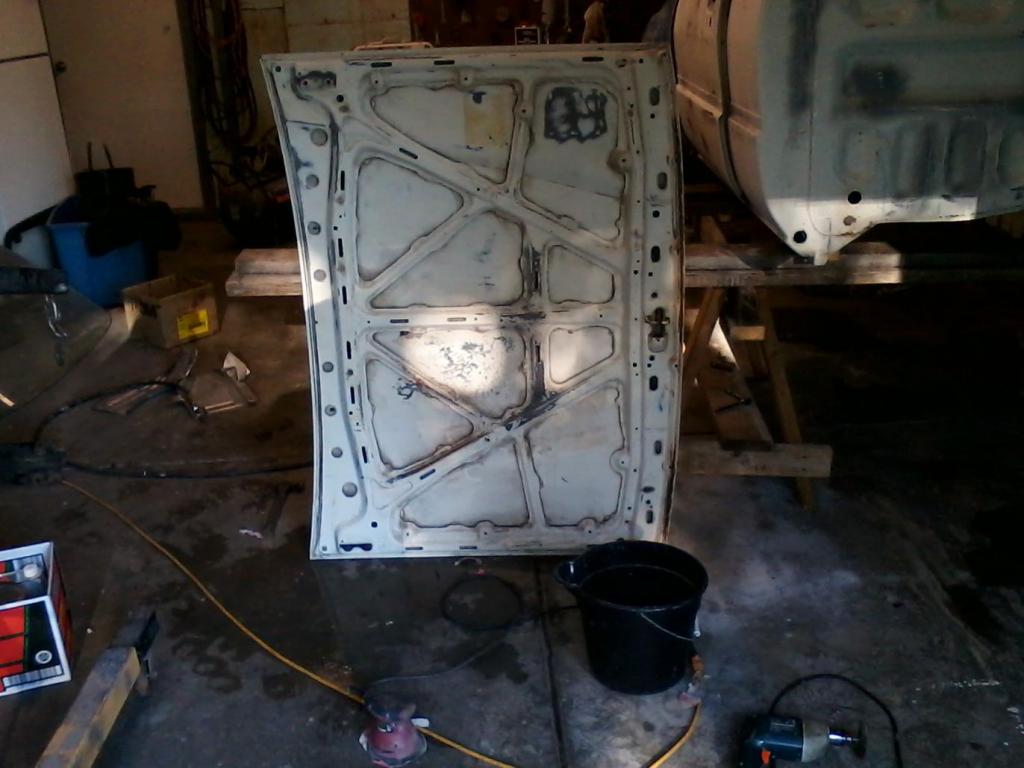
Starting on the inside of the hood. It is dirty and taking alot of time to get prepped.

Making some progress but still have a ways to go til it is done. Mosquitos arebugging me. Will try to get out there after awhile.

I pretty much have the drivers side done. Still need to do rockers and roof. Started blocking it out.

Not a sure fire way of determining if it is smooth, but when it is wet and you run your hand across where the damage was at, without looking, you cant feel where it starts or begins. Also the whole panel kind of feels like a freshly waxed surface in my opinon.

Here is what most of the underside looked like.

Getting most of it cleaned.

View of drain holes from bottom side.

Got the heat sheilds cleaned.

Starting on the inside of the hood. It is dirty and taking alot of time to get prepped.

Making some progress but still have a ways to go til it is done. Mosquitos arebugging me. Will try to get out there after awhile.

Last edited by Terrys87; Oct 4, 2014 at 11:16 PM.
Sep 18, 2014 | 04:33 PM
#438
Very nice Terry.
I do the same when I'm prepping a body panel. I helps me to wet it down and take some time to find where the low or high spots are at. Sometimes I win I knew more about body work, or took that path rather than the mechanics end of it.
Of course, after a good day or block sanding I don't usually say the same. Haha
Sep 19, 2014 | 02:21 AM
#440
Thread Starter
Super Moderator
iTrader: (1)
Joined: Aug 2008
Posts: 11,787
Likes: 28
From: Anderson Missouri
Hello Mark..I really like mechanics when I was in school, I graduated in 86 and that is when the emissions and front wheel drives started coming in strong that turned me off of being a mechanic. I was really good on the older motors and things. The new stuff I could probably do but it is getting more difficult all the time. I wish now I would of done body school now looking back but even it is changing. Wish I could stop for a year and go to school and get into it full time. Electronics was supposed to be the way of the future when I got out of school and I was trying to follow the money. Big mistake on my part so I am doing what I should of done 20 some years ago. Urgh!!! I figure it is better late then never.
Thanks Chris... Not many really watch the 84/85 section so I wasnt putting alot of details up. I have seen some intrest in how to get things apart so I will do a better job when I reassemble.
Mark and Chris..I am going to give it my best shot to make the Tuttle meeting. We have a guy that is going into surgery sometime around that time. If I can get off of work I will come up. I will do my best to make that happen. Looking forward to that event. I am ready for some time off myself.


