KawaZX636's 1983 Toyota Pickup Restoration


 Sep 4, 2015 | 08:27 AM
#1302
Thread Starter
Super Moderator
iTrader: (3)
Joined: Jan 2012
Posts: 3,218
Likes: 26
From: Salisbury, MD
Well...I drove my truck to work this morning and started thinking to myself, "this thing really needs to get more air and fuel..." Given the wide range of adjustability with minimal positive or negative operating effects with my 32/36 and the fact that the accelerator pump won't keep up with the volume demand when I get into the secondary barrel, I decided to get compulsive this morning and ordered a new Weber 38 DGES. While my truck is pretty peppy to begin with, I know it isn't reaching its full power potential. Now before everybody screams at me "but you'll lose your fuel economy!" I know, I know, but I've been driving a V8 Tundra getting 13-14 mpg for the past 10 years so I'm used to it. I do a lot of highway driving anyway and at highway speeds I have to almost constantly have my foot in the secondary to maintain anything above 60mph. Besides, not having enough fuel can actually decrease efficiency and cause an engine to burn more fuel to do less work so it might actually be a wash when it is all said and done. I'm hoping to get a few horses out of the swap and possibly retain most of my fuel economy. I may also couple the 38 with a LCE Street Performer Camshaft and adjustable cam gear. I actually checked the degreeing on my cam last week and I'm not even a degree retarded after decking the block, but an adjustable cam gear would still allow me to advance or retard the camshaft timing to my needs.
Sep 4, 2015 | 09:06 AM
#1303
Well...I drove my truck to work this morning and started thinking to myself, "this thing really needs to get more air and fuel..." Given the wide range of adjustability with minimal positive or negative operating effects with my 32/36 and the fact that the accelerator pump won't keep up with the volume demand when I get into the secondary barrel, I decided to get compulsive this morning and ordered a new Weber 38 DGES. While my truck is pretty peppy to begin with, I know it isn't reaching its full power potential. Now before everybody screams at me "but you'll lose your fuel economy!" I know, I know, but I've been driving a V8 Tundra getting 13-14 mpg for the past 10 years so I'm used to it. I do a lot of highway driving anyway and at highway speeds I have to almost constantly have my foot in the secondary to maintain anything above 60mph. Besides, not having enough fuel can actually decrease efficiency and cause an engine to burn more fuel to do less work so it might actually be a wash when it is all said and done. I'm hoping to get a few horses out of the swap and possibly retain most of my fuel economy. I may also couple the 38 with a LCE Street Performer Camshaft and adjustable cam gear. I actually checked the degreeing on my cam last week and I'm not even a degree retarded after decking the block, but an adjustable cam gear would still allow me to advance or retard the camshaft timing to my needs.
You'll need to up size your mains and air jets and put '40' sized idle jets in. They come with 45's and 40 is as small as you can get for the 38/38. I got mine to run pretty good on 45's but 40's are much better. You'll probably need to special order them like I did but they're cheap. The 38's even easier to tune than the 32/36 since it's synchronous.
This is the best combo you can run without cutting reliefs in the pistons. It's a drastic power improvement over a stocker or any of the tiny little upgrade cams most use while still falling into the mild category.
Jury's out in my mind whether to step up to a .500 lift cam or do a 3rz swap/go for a 1996-2000 Taco. As a daily these trucks are a bit much for us tall people.


 Sep 15, 2015 | 05:30 AM
#1305
Thread Starter
Super Moderator
iTrader: (3)
Joined: Jan 2012
Posts: 3,218
Likes: 26
From: Salisbury, MD
Yep, Got them last week! I haven't even had my truck out of the garage in the last couple weeks (It's not exactly a family vehicle) so I haven't gotten around to slapping them on yet. I'll post a pic when I do. Thanks again for shooting them down to me.
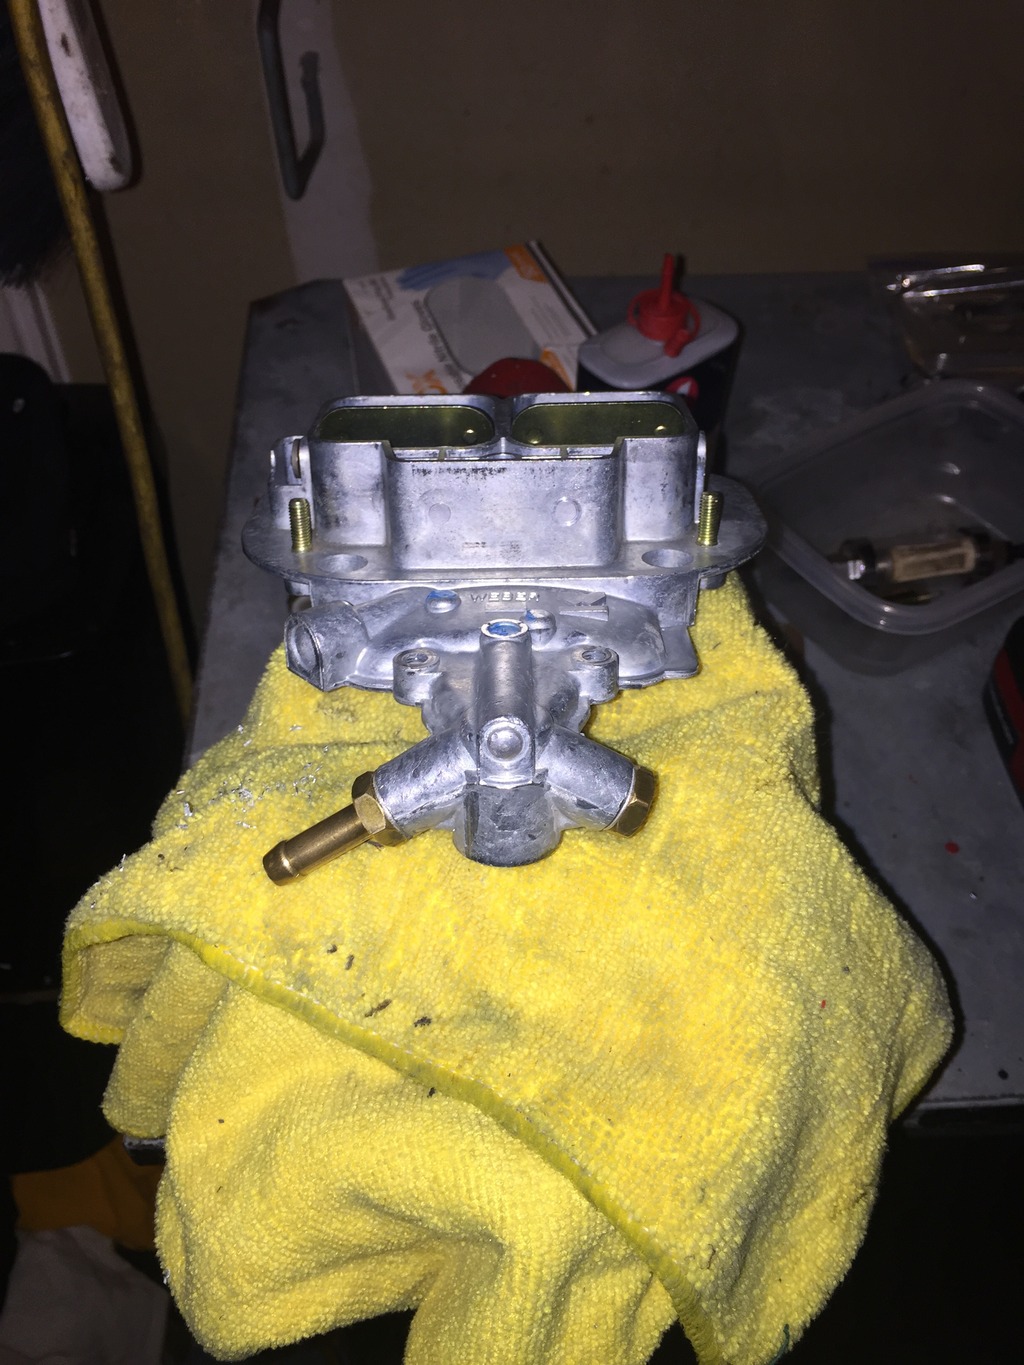
I got my Weber 38 in yesterday so I started getting that thing installed last night. First things first, took it apart.... This is for a few reasons. I wanted to verify the jetting prior to install in the event that I need to re-jet it. Then I had to adjust the float level. Folks, I don't care where you get your carbs from or what brand you buy - you should always take them apart to make/verify adjustments before you install it. Come to find out, my float settings were significantly off. The float level was off by about 5mm and my needle travel was off by about 2mm (per the specs recommended by Weber themselves). Had I simply thrown the carb on without checking, I could have had some fuel supply issues cause by the incorrect float level. Since Weber decided to be lazy when manufacturing these things, they used a pressed in brass fitting on the driver side fuel supply and didn't drill out the fuel supply on the passenger side. As you all know, routing fuel to the driveside of the carb isn't practical, nor is it attractive. Sooooo, I needed to remove the pressed in brass fitting then drill and tap both sides to accept a 1/8 NPT to 1/4" barb fitting and a 1/8" NPT plug. Of course I couldn't find my 1/8 NPT tap anywhere so I need to run out to snag a new one today. I may also do a little re-arranging on my FPR gauge and mount it to the extra fuel inlet on the Weber to get a more accurate and steady fuel pressure reading at the carb.
The new 38 also had an electric choke, so since I'm old school and like to keep things simple I decided to remove the manual choke from my 32/36 and install it on the 38. I NEVER have to use the choke to start my truck anyway and I really don't feel like waiting for it to kick down everytime I start it - It's always bump and go on every start unless it has been sitting for a while (and that is only because I need to turn it a little bit to get fuel back up to the carb).
Assuming that I can find a 1/8 NPT tap today, I should have it back together tonight. I'm terrible at taking pictures these days, but here's one with the 32/36 off...
 Sep 15, 2015 | 10:38 AM
#1306
Thread Starter
Super Moderator
iTrader: (3)
Joined: Jan 2012
Posts: 3,218
Likes: 26
From: Salisbury, MD
I hate it when I have something so minimal holding me back so it burns my brain until it gets fixed. I was sitting at my desk earlier and this damn Weber fuel inlet thing was driving me nuts... I started thinking, "this thing is a European carb...those are fuel fittings... the fittings sit flush on the carb body... they can't be standard tapered threads!" So I immediately ran home and grabbed my set of dies and taps; metric of course... Come to find out, I was having a senior moment (at 32 years old...) in thinking that they were 1/8 NPT fittings; they are metric! I grabbed a 9mm drill bit to drill out the inlets and tapped them with a 10mm x 1.0 tap. Badda bing! Done!! And still had time to grab lunch before I went back to the office!
Here's what I was talking about for those who couldn't follow my ramblings...
Tapping:
Tapped:
Fitted:
Since its metric, I may not be able to find the fittings needed to do what I want with the FPR gauge (which is definitely 1/8 NPT), but we'll see. Just need to stop to grab some fresh fuel hose and this thing should be ready to fire tonight!
Here's what I was talking about for those who couldn't follow my ramblings...
Tapping:

Tapped:

Fitted:

Since its metric, I may not be able to find the fittings needed to do what I want with the FPR gauge (which is definitely 1/8 NPT), but we'll see. Just need to stop to grab some fresh fuel hose and this thing should be ready to fire tonight!
Sep 15, 2015 | 10:11 PM
#1308
Thread Starter
Super Moderator
iTrader: (3)
Joined: Jan 2012
Posts: 3,218
Likes: 26
From: Salisbury, MD
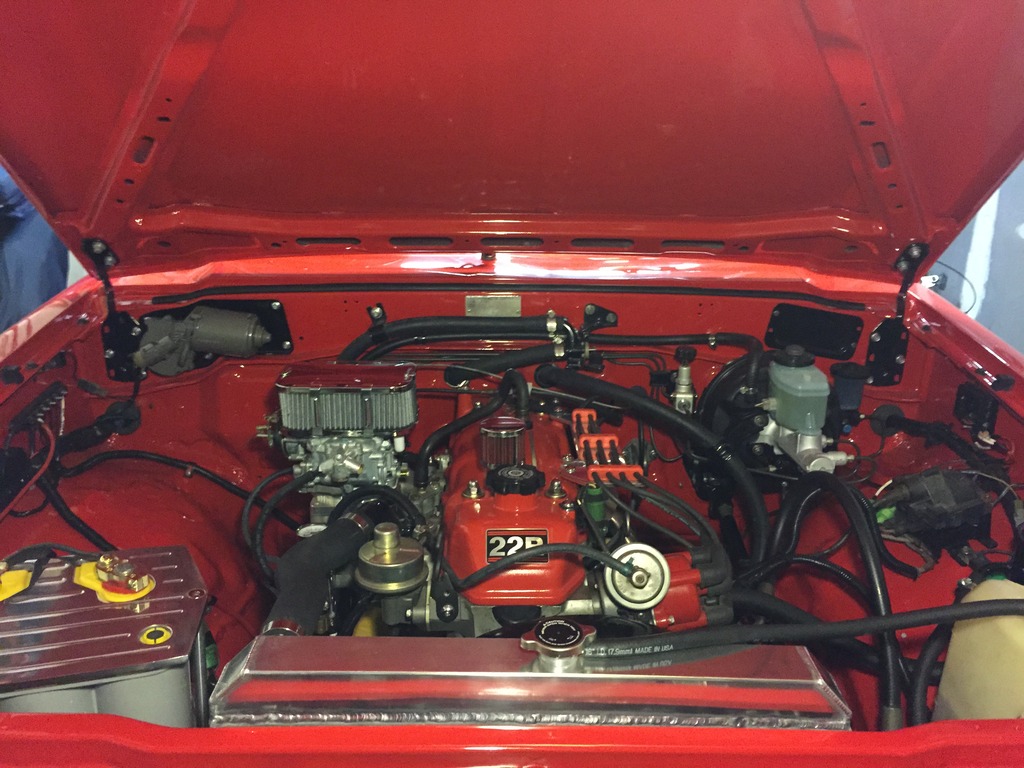
Pretty much finished up the Weber 38 install tonight. I need to snag a 10mm x 1.0 barb fitting for the fuel inlet since there was a slight crack in the old one. Hopefully fastenal has that in stock. For now I have a cheap plastic barb in its place. I would have sparked it tonight but the boys were already in bed and it would have scared the crap out of our 4 month old whose bedroom is directly above the garage. I should be able to get it fired up and dialed in tomorrow.
Looks faster already:
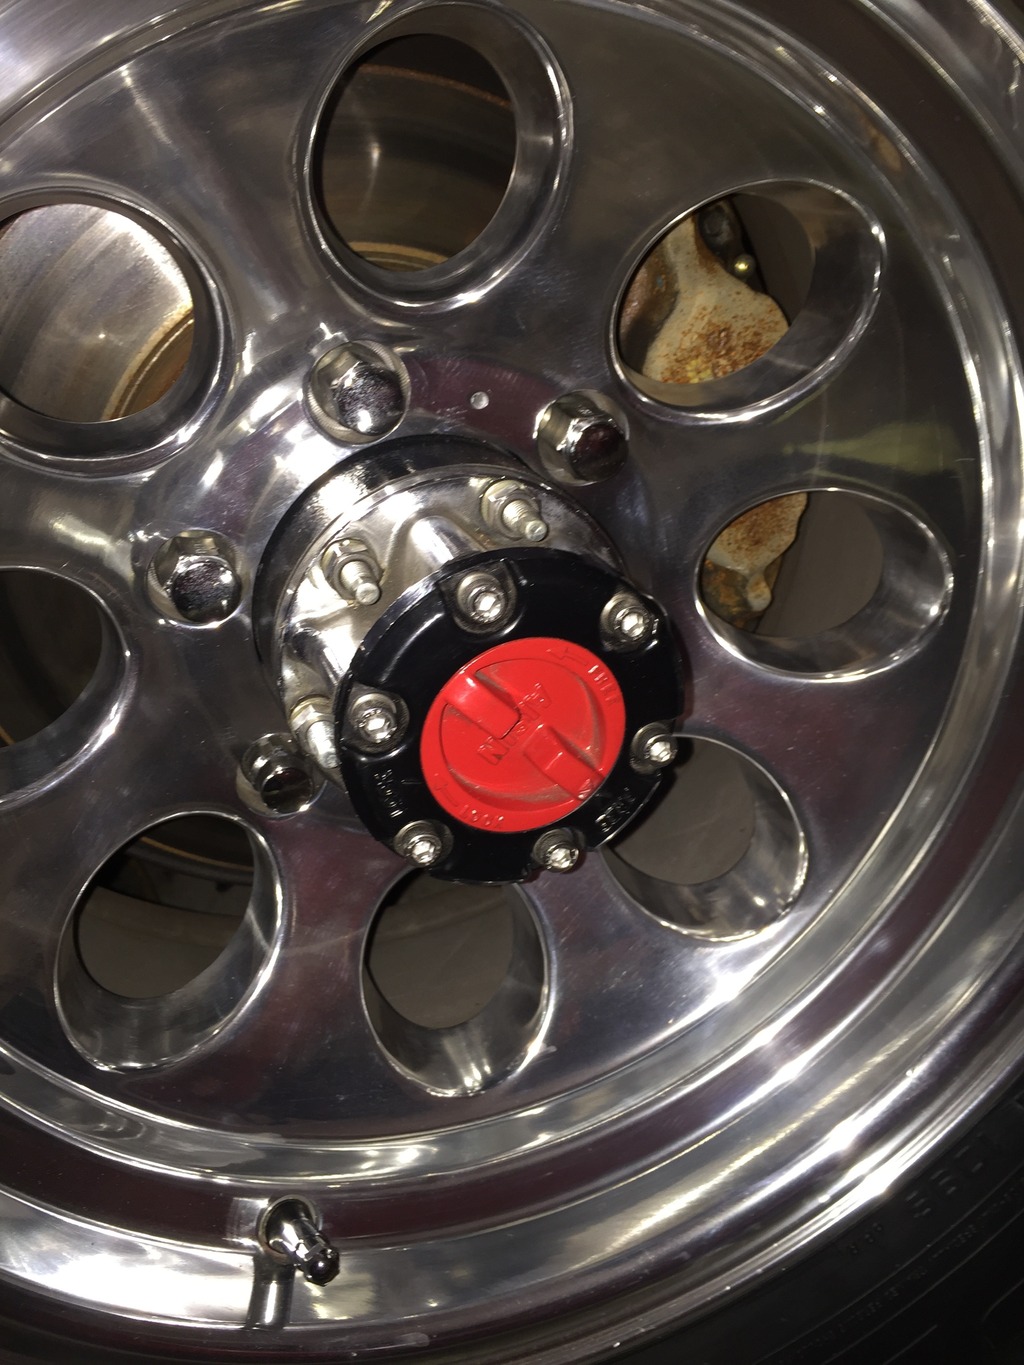
I also stole an idea from Robb (who stole it from somebody else) and replaced the hex bolts on my hub dials with stainless allen cap bolts. Looks so much better! Don't mind the dirty wheels and hubs, I haven't have time to clean them lately:
Looks faster already:

I also stole an idea from Robb (who stole it from somebody else) and replaced the hex bolts on my hub dials with stainless allen cap bolts. Looks so much better! Don't mind the dirty wheels and hubs, I haven't have time to clean them lately:
 Sep 16, 2015 | 01:06 PM
#1309
Thread Starter
Super Moderator
iTrader: (3)
Joined: Jan 2012
Posts: 3,218
Likes: 26
From: Salisbury, MD
So I found a quick fix for my fuel fitting issue - I decided to use an old fitting that I had on my manifold for emissions. Worked like a charm! I'll order a brass fitting soon for the permanent solution.
I had a meeting this morning so on my way back to the office I decided that I'd run by the house to fire up and tune the 38. I had everything setup per the Weber baseline instructions before I installed the carb so it was just a matter of busting out the timing light and turning it over. Once it got fuel it fired right up! I started making adjustments to the mixture and it seems like the Weber baseline adjustment may be spot on for my truck - turning the mixture screws in or out seemed to make the idle worse. All I needed to do was bump the idle speed up about a 1/2 turn to get me around 800 RPM and then set the fast idle to 1,200 RPM. Rechecked the timing and all was good! It literally took longer for the engine to heat up that it did to tune it! 20 minutes later and I was rolling out of the garage. What are the chances of that? It's pretty comforting knowing that the 38 is pretty much a PERFECT match for my engine!
Well...when all seems so easy something has to go wrong, right? I wasn't even a mile down the road heading back to work when the throttle cable snapped when I went to smash the pedal! Luckily I wasn't on a busy road so I pulled over, popped the hood and engaged the fast idle. I was able to turn around and limp home at using the fast idle speed in 1st gear - clutch may not have liked that much though... What are the chances of that happening?! I'm just glad I wasn't further away from home! When I got back home it turns out that the cable stop on the pedal end of the cable broke free so I should be able to fix that fairly easily.
BUUUTTTT...I did get to drive it for that one mile with a throttle cable and boy let me tell you all, the performance is like night and day over my 32/36!!! Much more throttle response, better torque and certainly more power! I only got up to about 45mph in my short journey so I don't know how it is going to perform on the top end, but I will hopefully know soon enough!
Sep 18, 2015 | 07:43 AM
#1310

Glad you like it! When I was buying my weber, almost everyone said the 38 was too much carb even for a cammed 22r, there was so much misinformation. Mine was also almost spot on on the jets, try turning in the mixture screw closer to the engine about 1/16th more, the runners closer to the engine on my 20r flow less well and it seems to like it better, maybe yours will too. I am about 1 turn out maybe a bit less on the mixture screw.
Have you heard about this? http://www.piercemanifolds.com/product_p/52848.015.htm
I want to try it I've seen so much good reviews from it, but the shipping to here is killing me!
Have you heard about this? http://www.piercemanifolds.com/product_p/52848.015.htm
I want to try it I've seen so much good reviews from it, but the shipping to here is killing me!
Sep 18, 2015 | 10:23 AM
#1311
Well, may be a bit of elevation difference involved but I find the idle circuit on the 38/38 too rich on the standard 45's with an LCE street performer cam. Way too rich, but I live at sea level.
The street performer is quite a bit lumpier than even engnbldr's largest profile, .010 higher lift and a decent increase in duration. Most folks tend to buy super mild cams, barely over stock. The street performer is still very much a mild cam, but it has about .050 more lift than a stocker and .035 over the most common cams I see people using here. As a general rule a 38/38 is more than a stock to very mild R engine needs, that doesn't mean it won't run. The 38/38 and 32/36 at WOT are not far off, it's the idle circuit and synchronous operation that make the difference. A 36/36 would literally be perfect for a 22R.
I read on a forum someone who claims to use a 32/36 on a .500 lift race profile. How it even idles is astounding to me. I ran a 32/36 on the street performer cam for about two weeks and had vacuum leaks through the intake manifold like crazy from the lack of incoming air at idle, and it ran like crap.
Suffice it to say, because an engine can RUN on a given carb, it doesn't make it a good match. Everything has to work together.
Sep 18, 2015 | 11:36 AM
#1312
I think you are right, I also feel my 45s are a bit too large and I have a stock cam. I was refering to people telling me the 38 was too big even for a built 22r. The same people said you can tune the ˟˟˟˟ out of a 32/36. I don't want to play with jets or emulsion tubes before I put in my cam and buy a wideband a/f ratio.
Sep 18, 2015 | 11:48 AM
#1313
I think you are right, I also feel my 45s are a bit too large and I have a stock cam. I was refering to people telling me the 38 was too big even for a built 22r. The same people said you can tune the ˟˟˟˟ out of a 32/36. I don't want to play with jets or emulsion tubes before I put in my cam and buy a wideband a/f ratio.
The problem with the 22R is that it's right between the 32/36 and 38/38. It's just a bit big for the 32, just a bit small for the 38. Sadly Weber either doesn't make anymore or doesn't import their 34 and 36 synchronous models, so it's basically pick your poison. The 38/38 is THE carb if you want to run .430 lift or higher. I would NOT use a 32/36 in that case. Sure, you can, but I wouldn't. The whole point of increasing a cam is to increase air/fuel, why bother if you're going to choke it out with a puny 32mm barrel? 32/36 works well enough with the smaller cams most folks use. Not perfect, or even awesome, but well enough.
You can buy 40 sized jets for the 38DGES on the carbs unlimited site. It's not a lot of money and I bet you'll notice a much nicer idle. If I did with a bigger cam it's a good bet you will too unless I'm just really special...
 35's would be good for a stocker but 40 is as low as it gets. Should run well enough though.
Sep 21, 2015 | 01:19 PM
35's would be good for a stocker but 40 is as low as it gets. Should run well enough though.
Sep 21, 2015 | 01:19 PM
#1314
Thread Starter
Super Moderator
iTrader: (3)
Joined: Jan 2012
Posts: 3,218
Likes: 26
From: Salisbury, MD
So I did some fixin' and work on my truck over the past few days. I got the throttle cable fixed which wasn't all that difficult. I basically drilled a small hole in a 1/4" brass cap to feed the cable through. Then I crimped an aluminum cable crimp on the other side to help firmly hold the cable better (since solder doesn't stick to stainless).
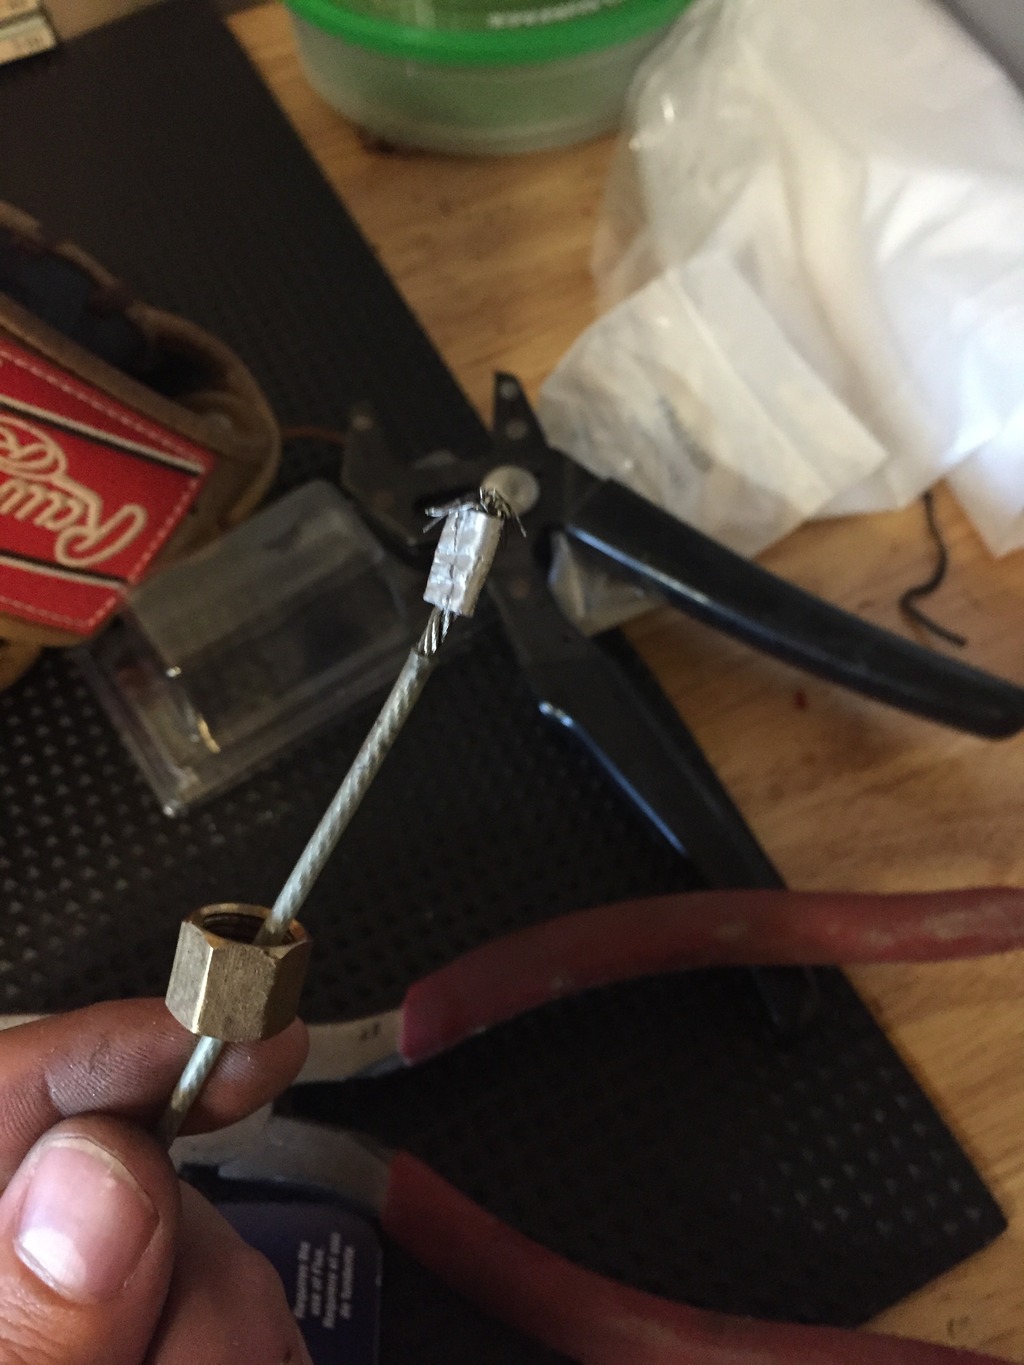
Then I filled the cap with solder to encase the crimp and hold everything in place. This should be a good fix. Aftermarket throttle cables are available but they are garbage and about an inch too long.

After I got the throttle cable connected I took her for a little ride. The extra torque and HP is definitely noticeable. The carb is running slightly rich throughout the RPM range so I have some slight tuning to do to lean it out. I was worried about losing the top end, but that certainly wasn't a problem at all. I buried the speedometer at 85mph (about 94 mph corrected for tire size) on the highway! I took the picture below at about 78 mph (about 86mph) because my truck was a little too "floaty" to risk taking a picture any faster. It was riding fine, but you know how it feels with these like solid axle trucks at high speed - it ain't like driving IFS that's for sure!

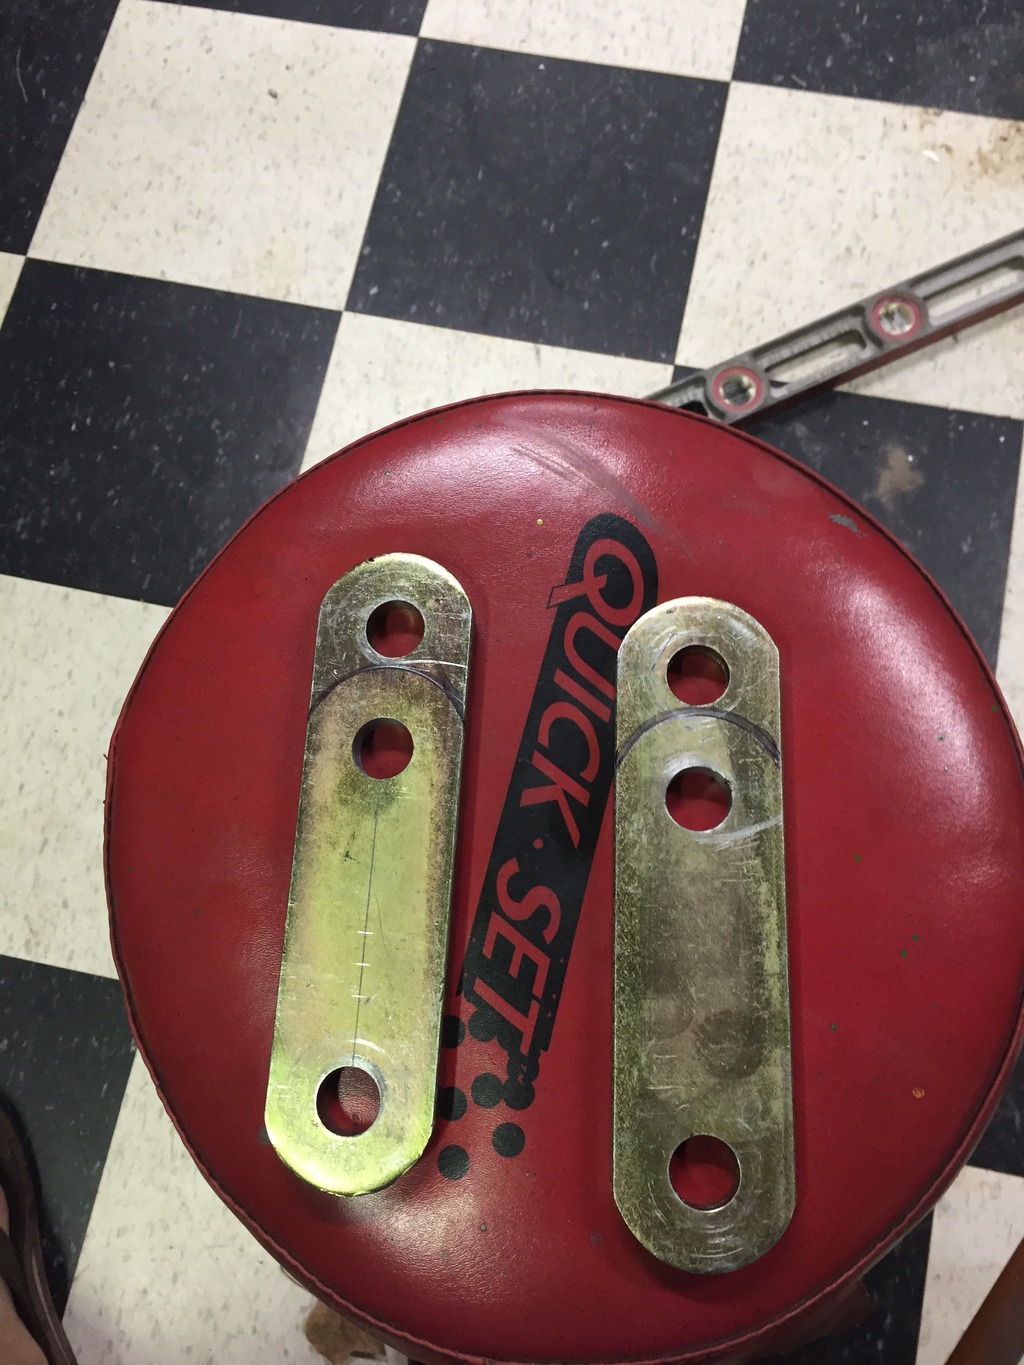
I had some down time this weekend so I decided to tweak my shackles a bit. Trail Gear's shortest shackle plates are 5.5" (stock is 3.5") so I wanted to shorten them a bit to lower the ride height bit (Stop screaming at me guys - I'm only running 31's) and to level it out a little more. I shortened the rear to 4" and the front to 4.5" which dropped me about 3/4 in the rear and 1/2 in the front. It is subtle difference, but I feel like I can definitely tell the difference climbing in and out of the truck. So according to the spring specs, shackle lengths and tire diameter, I should have 2" of spring lift, 1/2" of front shackle lift, 1/4" of rear shackle lift and about 1.5" of tire "lift." That gives me about 3.75" of over all lift in the rear and about 4" of lift in the front.
Basically what I did to shorten my shackles was measure my desired shackle and drill new 18mm holes:
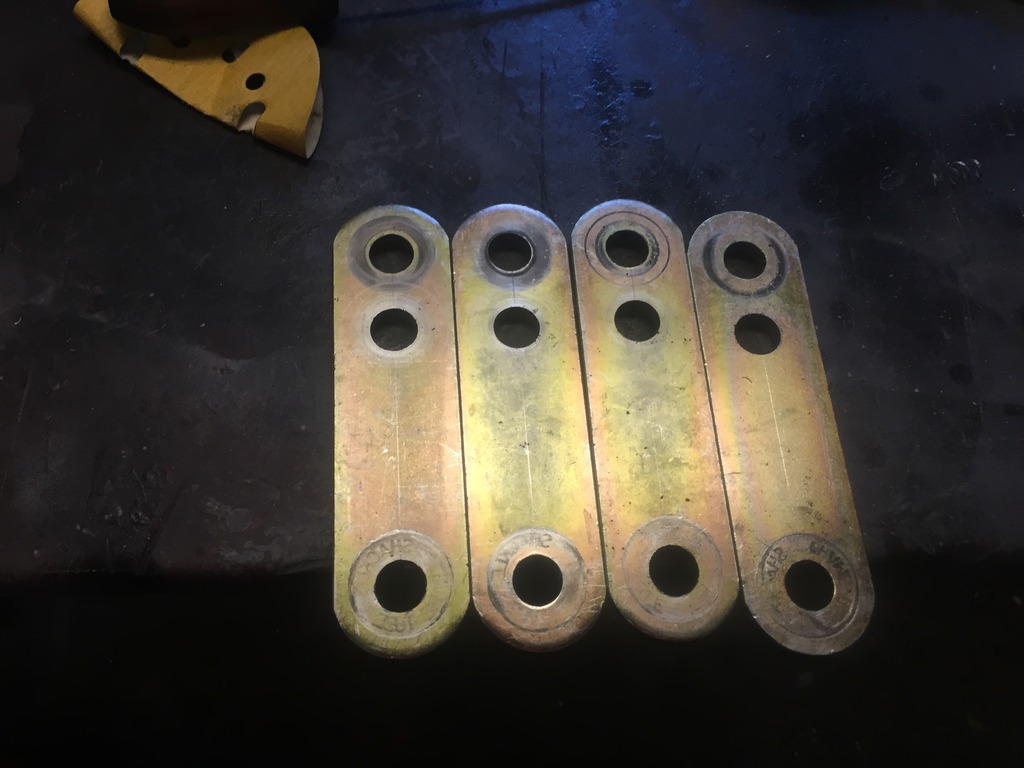
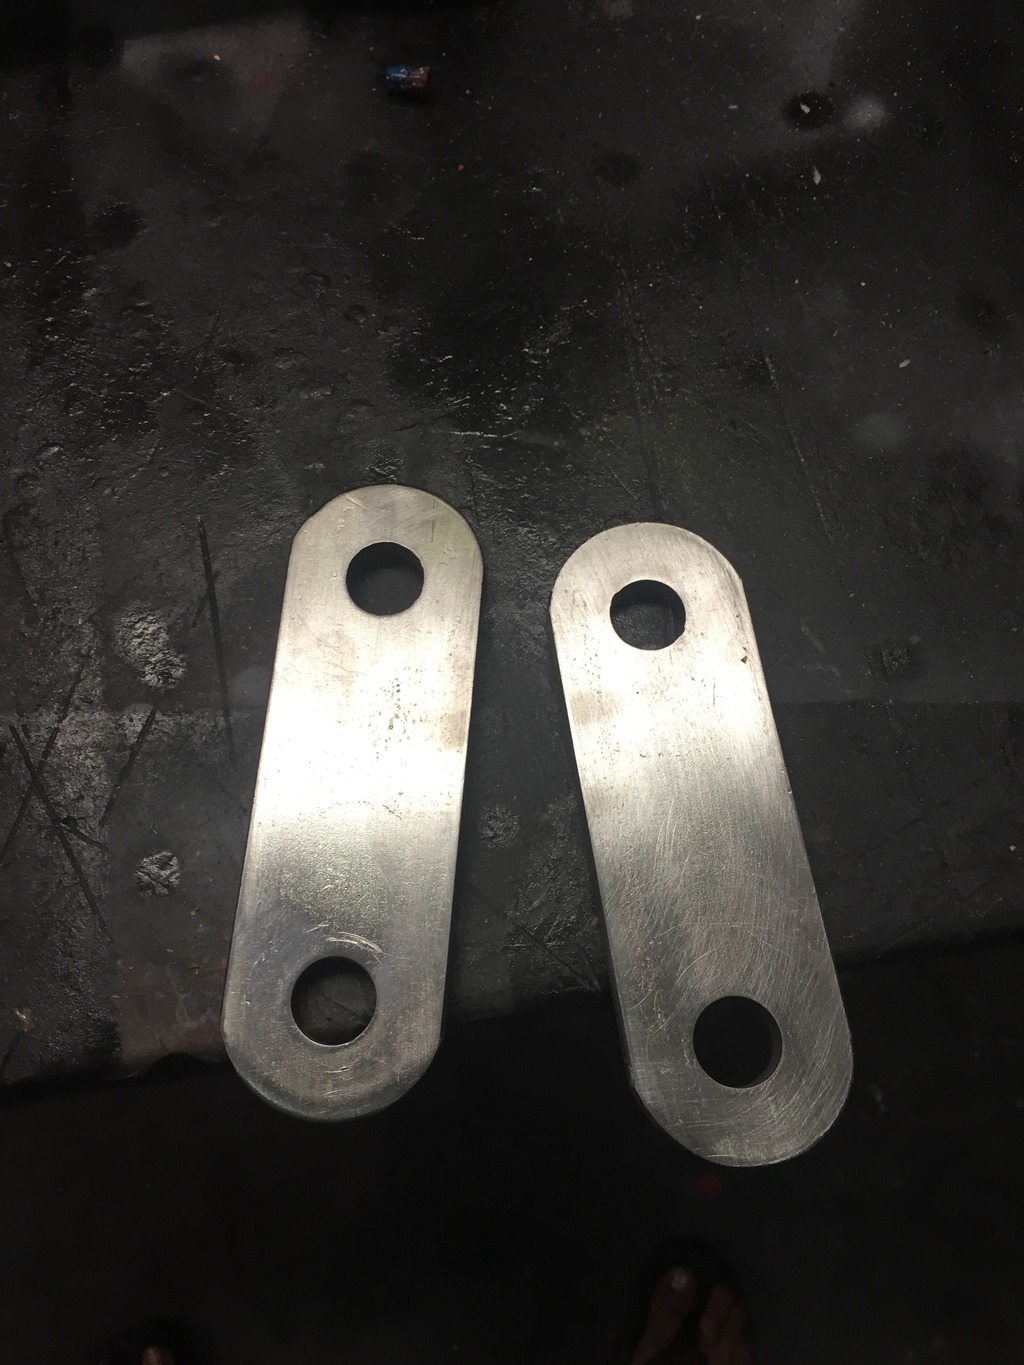
Then I used a punch and a sharpie to trace the ends to round them the same on both ends:
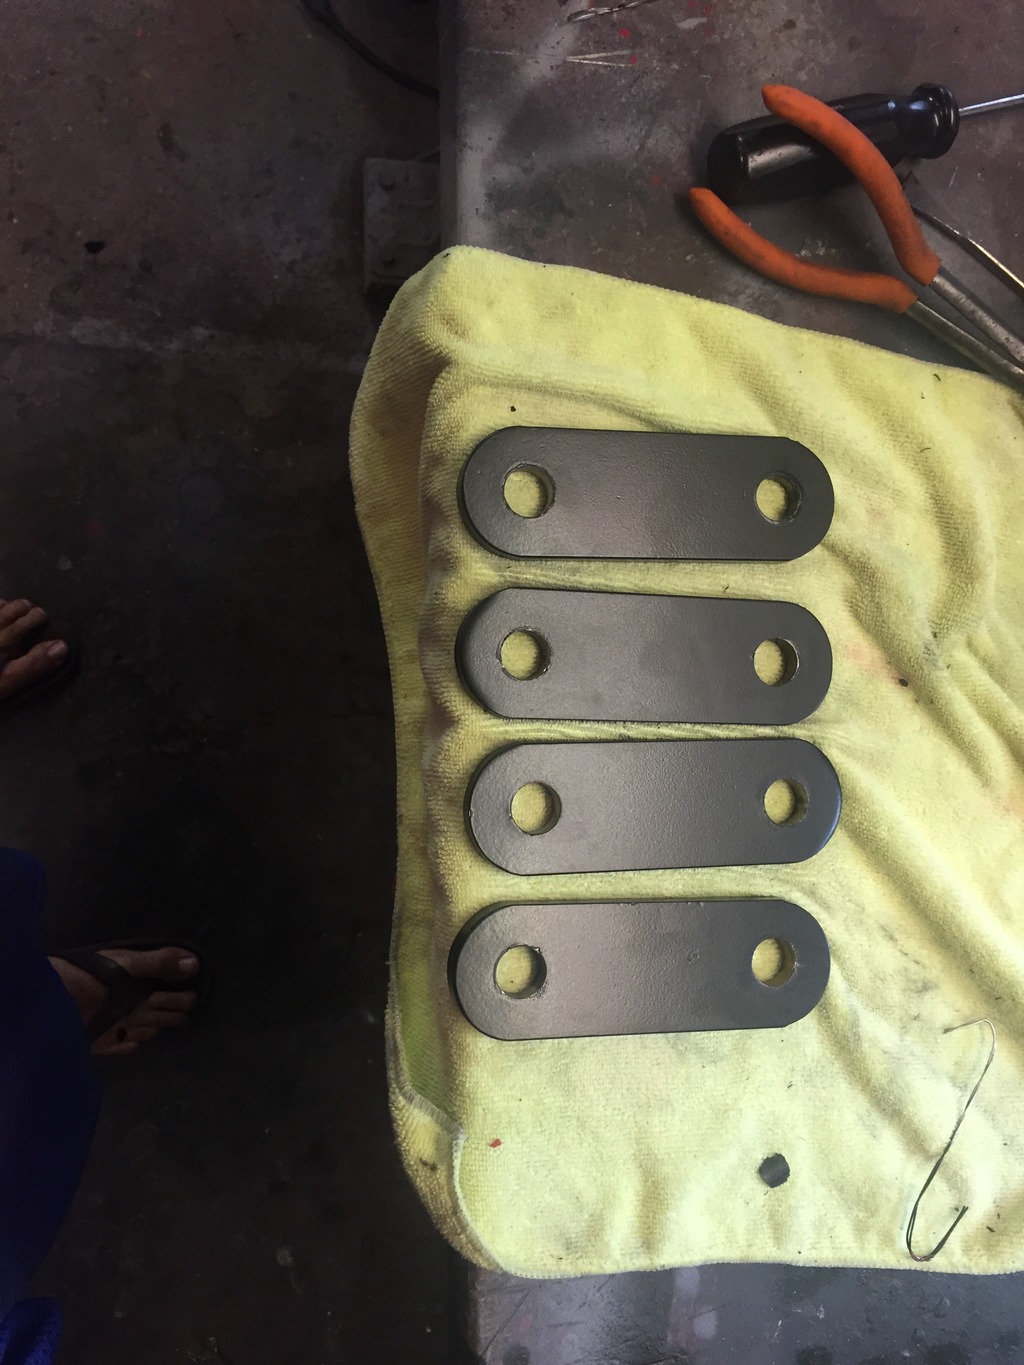
Used a bench grinder get the contour and wire wheel to clean them up:
Of course I powdercoated them:
I forgot to take "After" pics, but you couldn't really tell the difference. Since I made modifications to the shackles, my pinion angles changed. I don't have any noticeable vibrations in my drive lines, but I need to different shims to adjust my pinion angles to where I should be. I had 8* in the rear and none up front before, but now I'm going to need 6* shims in the rear and 2* shims up front to maintain the proper pinion and caster angles.
I also removed the dust shield from my transfer case output flange because it was scrapping and making an awful embarrassing noise. The SORD t-case brake recommends not retaining the dust shield, but I went against the grain on that one... Should have followed the directions to begin with.
I'm getting closer to being completely satisfied; HOWEVER, I did notice a slight "ringing" coming from what I believe to be my transfer case (maybe tranny). I only makes the noise under load any during coast with the clutch engaged. If I push the clutch in and coast then it goes away. I'm hoping that it is just something vibrating, otherwise, I may be looking at a tranny/t-case rebuild which is one of the few things that I simply won't do. But the bright side of that would be that my truck would officially be "Like Brand New" since they are the only components that I didn't rebuild or replace. We'll have to see how it goes...

Then I filled the cap with solder to encase the crimp and hold everything in place. This should be a good fix. Aftermarket throttle cables are available but they are garbage and about an inch too long.

After I got the throttle cable connected I took her for a little ride. The extra torque and HP is definitely noticeable. The carb is running slightly rich throughout the RPM range so I have some slight tuning to do to lean it out. I was worried about losing the top end, but that certainly wasn't a problem at all. I buried the speedometer at 85mph (about 94 mph corrected for tire size) on the highway! I took the picture below at about 78 mph (about 86mph) because my truck was a little too "floaty" to risk taking a picture any faster. It was riding fine, but you know how it feels with these like solid axle trucks at high speed - it ain't like driving IFS that's for sure!

I had some down time this weekend so I decided to tweak my shackles a bit. Trail Gear's shortest shackle plates are 5.5" (stock is 3.5") so I wanted to shorten them a bit to lower the ride height bit (Stop screaming at me guys - I'm only running 31's) and to level it out a little more. I shortened the rear to 4" and the front to 4.5" which dropped me about 3/4 in the rear and 1/2 in the front. It is subtle difference, but I feel like I can definitely tell the difference climbing in and out of the truck. So according to the spring specs, shackle lengths and tire diameter, I should have 2" of spring lift, 1/2" of front shackle lift, 1/4" of rear shackle lift and about 1.5" of tire "lift." That gives me about 3.75" of over all lift in the rear and about 4" of lift in the front.
Basically what I did to shorten my shackles was measure my desired shackle and drill new 18mm holes:

Then I used a punch and a sharpie to trace the ends to round them the same on both ends:

Used a bench grinder get the contour and wire wheel to clean them up:

Of course I powdercoated them:

I forgot to take "After" pics, but you couldn't really tell the difference. Since I made modifications to the shackles, my pinion angles changed. I don't have any noticeable vibrations in my drive lines, but I need to different shims to adjust my pinion angles to where I should be. I had 8* in the rear and none up front before, but now I'm going to need 6* shims in the rear and 2* shims up front to maintain the proper pinion and caster angles.
I also removed the dust shield from my transfer case output flange because it was scrapping and making an awful embarrassing noise. The SORD t-case brake recommends not retaining the dust shield, but I went against the grain on that one... Should have followed the directions to begin with.
I'm getting closer to being completely satisfied; HOWEVER, I did notice a slight "ringing" coming from what I believe to be my transfer case (maybe tranny). I only makes the noise under load any during coast with the clutch engaged. If I push the clutch in and coast then it goes away. I'm hoping that it is just something vibrating, otherwise, I may be looking at a tranny/t-case rebuild which is one of the few things that I simply won't do. But the bright side of that would be that my truck would officially be "Like Brand New" since they are the only components that I didn't rebuild or replace. We'll have to see how it goes...

 Oct 1, 2015 | 08:28 PM
#1316
Thread Starter
Super Moderator
iTrader: (3)
Joined: Jan 2012
Posts: 3,218
Likes: 26
From: Salisbury, MD
I need some help guys... I'm looking for a rear bumper for my truck, specifically a rear bumper for 1989-1995 Pickups in chrome. It is the one with the drop in the middle and no license plate mount (I want to keep my plate mounted on the bed). Availability of these bumpers appears to be scarce.
Toyota Part #00228-35912-13
Aftermarket part # TO1102221 & CB09511
If you have one or know somewhere where I can snag one (not willing to pay $400+ on eBay) please let me know and keep an eye out for me at the pick-n-pulls.
Here is what I'm looking for:
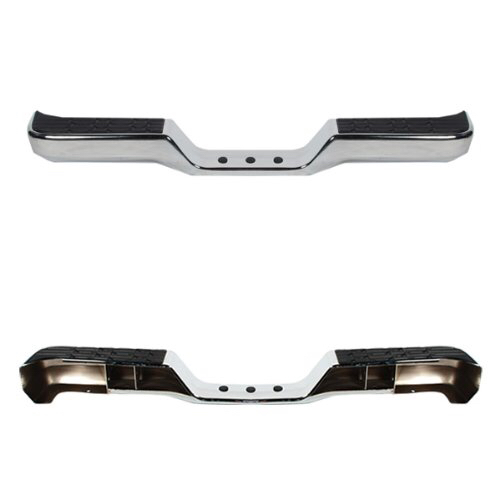
Thanks guys!
Toyota Part #00228-35912-13
Aftermarket part # TO1102221 & CB09511
If you have one or know somewhere where I can snag one (not willing to pay $400+ on eBay) please let me know and keep an eye out for me at the pick-n-pulls.
Here is what I'm looking for:
Thanks guys!
Last edited by kawazx636; Oct 5, 2015 at 06:51 AM.
Oct 5, 2015 | 06:05 AM
#1318
Thread Starter
Super Moderator
iTrader: (3)
Joined: Jan 2012
Posts: 3,218
Likes: 26
From: Salisbury, MD
I don't recall specifically, but I can check for you when I get home. I have it written on my garage wall along with ever other note and spec from my truck while I was building it - my garage walls are like a massive notebook! I would write parts lists, measurements and just random ideas on my walls because I knew that if I wrote them on paper that I would eventually lose it! Only way I lose them now is if my garage burns down or I paint the walls.... LOL
Oct 5, 2015 | 06:45 AM
#1319
Thread Starter
Super Moderator
iTrader: (3)
Joined: Jan 2012
Posts: 3,218
Likes: 26
From: Salisbury, MD
I Photoshopped the rear bumper I want to get on to a photo of my truck so you all can get an idea of exactly what I want and how I want it to look - specifically with the drop in the middle of the bumper so I can retain my license plate mounted to the bed. If you have one or know where I can get one, PLEASE let me know