
KawaZX636's 1983 Toyota Pickup Restoration


 Jul 1, 2013 | 12:33 PM
#105
Thread Starter
Super Moderator
iTrader: (3)
Joined: Jan 2012
Posts: 3,218
Likes: 26
From: Salisbury, MD
I just got paid for coaching baseball this season so I have a little bit of disposable income to blow on my truck here's the list of parts getting ordered tomorrow:
*Sky Manufacturing:
-----Heavy duty tie rod
*Low Range Off Road:
-----Brake rotors for rear disc brake conversion
-----Braided SS brake lines for rear disc brake conversion
-----Front brake hardlines (the short ones - less to worry about bending and flaring)
-----Trail Gear SS Rock Ripper Headers (Non-Smog)
*Advance Auto Parts
-----Front brake calipers
-----Rear brake calipers ('82ish Monte Carlo calipers for rear disc brake conversion)
-----Front brake pads
-----Rear brake pads
*eBay
-----Bilstein 5125 #24-185684 front shocks
-----Bilstein 5125 #33-186542 rear shocks
If you are looking for any of these parts, let me know - I did a lot of research and found all the cheapest sources for all of these parts (I never pay full price for anything!).
Originally, I was going to clean up and use the Pacesetter headers that were on the truck before I broke it down, but earlier this week I started welding together my new 2.25" exhaust with a Turbo Thrush muffler (I'll post pictures later) and decided that I'd rather have nice shiny stainless steel headers under my hood then some cheap black ceramic painted pacesetters. I went with Rock Ripper headers over LCE because 1) they were cheaper, 2) they share the same design and performance from what I understand and 3) the non smog LCE headers do not come with the collector pipe which I want to have to make removal easier in the event that I need to.
After a couple of weeks of bouncing back in forth between the Bilstein 5125 and the Rancho RS9000XL shocks I decided to go with the Bilsteins. Again, they are cheaper - I couldn't justify spending over $500 on shocks for a slightly better ride quality on the road. I did some research and apparently the Bilstein valving has the same ride dampening as the Ranchos do when set on the 3rd softest (1-9) setting. So spending nearly twice as much to get a slightly softer ride wasn't worth it to me.
So all I need to do is install these parts once they come in, bolt up my front OME springs (If the damn things ever come!), plumb the brake and fuel lines, figure out what I want to do for a steering stabilizer and I'll have a completed rolling chassis (I'll figure out the wheels when I'm nearly done the build). Then it's on to the body work!
Last edited by kawazx636; Jul 1, 2013 at 06:17 PM.
Jul 1, 2013 | 02:09 PM
#106
Registered User
Joined: May 2012
Posts: 396
Likes: 2
From: Jackson, TN


 Jul 1, 2013 | 06:15 PM
#108
Thread Starter
Super Moderator
iTrader: (3)
Joined: Jan 2012
Posts: 3,218
Likes: 26
From: Salisbury, MD
Patience Corey, don't go hurting your own feelings... LOL apparently you didn't read to the end: "Then it's on to the body work!"
Last time I checked, Toyota Fiberglass doesn't offer a whole lot when it comes to rolling chassis parts. LOL We'll be talking in time, I promise.
Last time I checked, Toyota Fiberglass doesn't offer a whole lot when it comes to rolling chassis parts. LOL We'll be talking in time, I promise.
Jul 2, 2013 | 04:54 AM
#109
I, for one, would appreciate you posting the part numbers you are using for your brake upgrade, as I will be following your lead on my '81 rebuild. I know there are other threads with a jumble of numbers and posts, it all get somewhat confusing at times
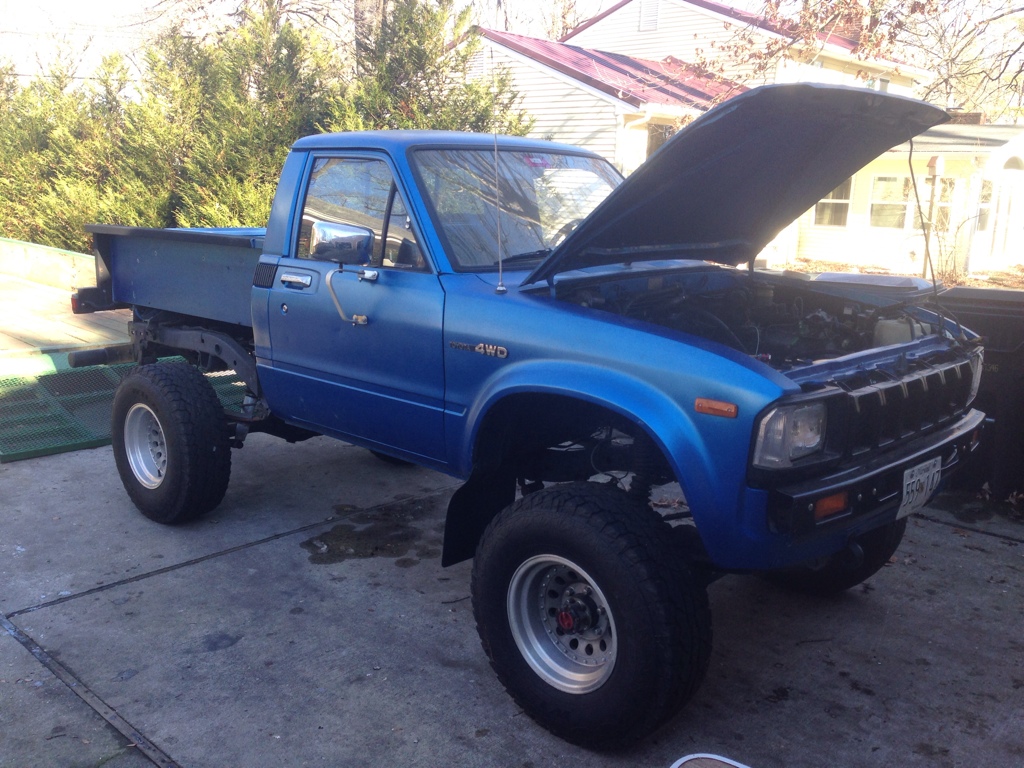
Also, is your truck painted with the original color code? Awesome color
Also, is your truck painted with the original color code? Awesome color
Jul 2, 2013 | 06:50 AM
#110
Thread Starter
Super Moderator
iTrader: (3)
Joined: Jan 2012
Posts: 3,218
Likes: 26
From: Salisbury, MD
I, for one, would appreciate you posting the part numbers you are using for your brake upgrade, as I will be following your lead on my '81 rebuild. I know there are other threads with a jumble of numbers and posts, it all get somewhat confusing at times
Also, is your truck painted with the original color code? Awesome color
Also, is your truck painted with the original color code? Awesome color
You need part numbers, I've got part numbers! Here they are:
*Low Range Off Road:
-----GM Brake rotors for rear disc brake conversion (TB-DBR79-85) $90
-----Braided SS brake lines for rear disc brake conversion (TB-DBL) $90
-----GM Disk Brake Conversion Bracket (TB-DBB) $80
*Advance Auto Parts
-----Rear brake calipers-1982 Monte Carlo (SLC160 & SLC161) $13.99 +$10.00 core each
-----Rear ceramic brake pads-1982 Monte Carlo (CNAD 154) $29.99
Subtotal: $337.97 plus $48.30 from Low Range Off Road (Advanced Auto ships for free or in-store pickup) for a grand total of $386.27.
You can also you Cadillac Eldorado calipers (Not sure which year) if you want to retain your e-brake, but they are marginally more expensive. I'm planning on using a line lock to hold me over until I get a t-case brake.
Jul 2, 2013 | 10:34 AM
#111
Thread Starter
Super Moderator
iTrader: (3)
Joined: Jan 2012
Posts: 3,218
Likes: 26
From: Salisbury, MD
I added a parts list in the first post of this thread for those who may be looking for some parts. I have listed pretty much each part that I have purchased and where it was purchased from. I have receipts from everything so if you are wondering how much something was, just ask. I can almost guarantee you that the source I have listed is the cheapest for that particular part (unless a lower quality part was cheaper - then I went with better quality/higher cost). I'll continue to update it as I go.
Jul 2, 2013 | 08:43 PM
#112
Thread Starter
Super Moderator
iTrader: (3)
Joined: Jan 2012
Posts: 3,218
Likes: 26
From: Salisbury, MD
So I ordered about $1,000 worth of parts today. The 1982 Monte Carlo Brake Calipers and pads for my rear disc conversion were available at my local Advance Auto so I slid by to pickup them up today. I don't have the rotors yet so I decided to mock up the calipers without to make sure I don't have any fitment issues.
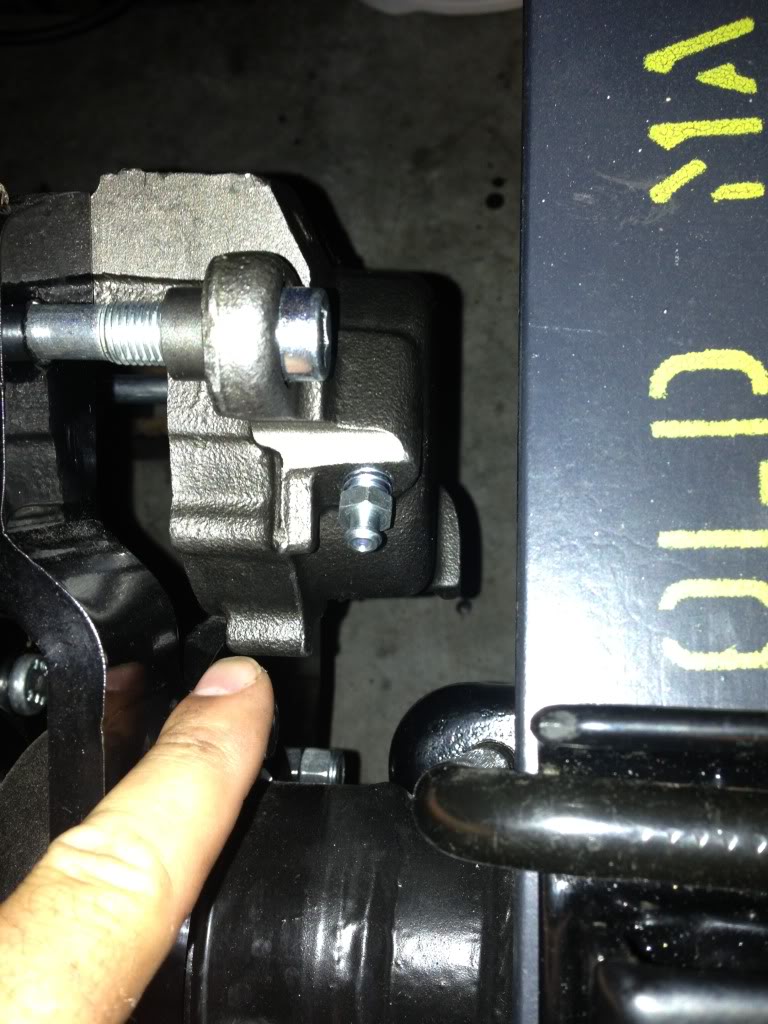
You can see where the "Nub" on the calipers interfere with the conversion bracket:

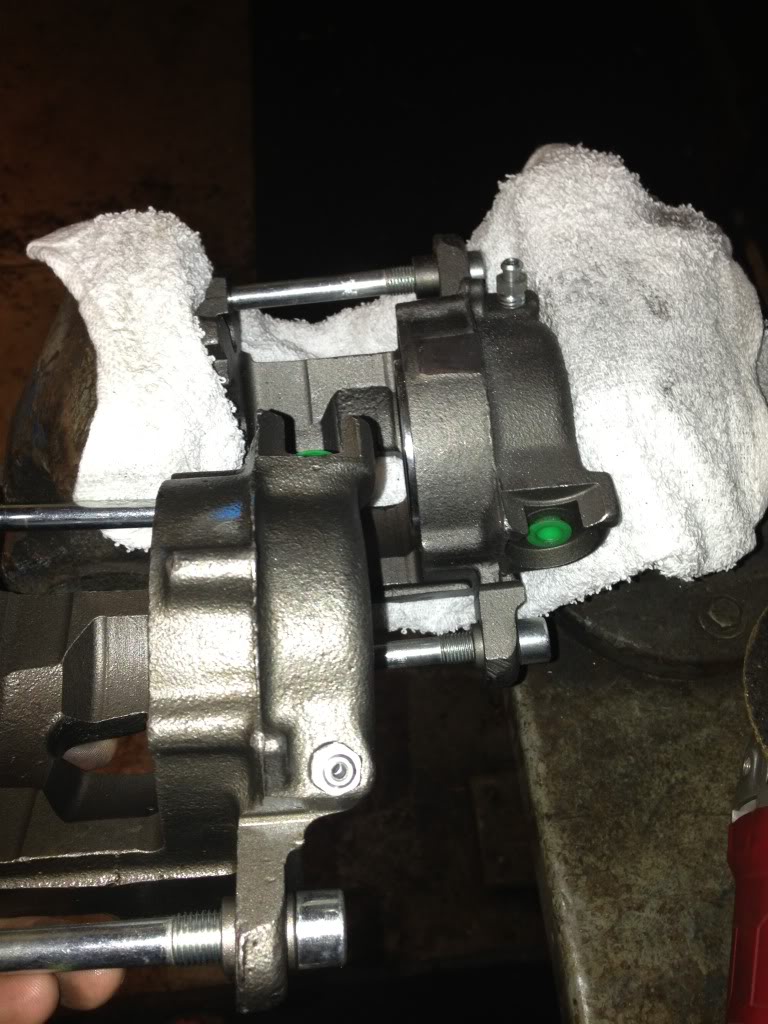
So a little grinding and off with the nub! (Left with nub, right without nub):
Then a quick bolt on:
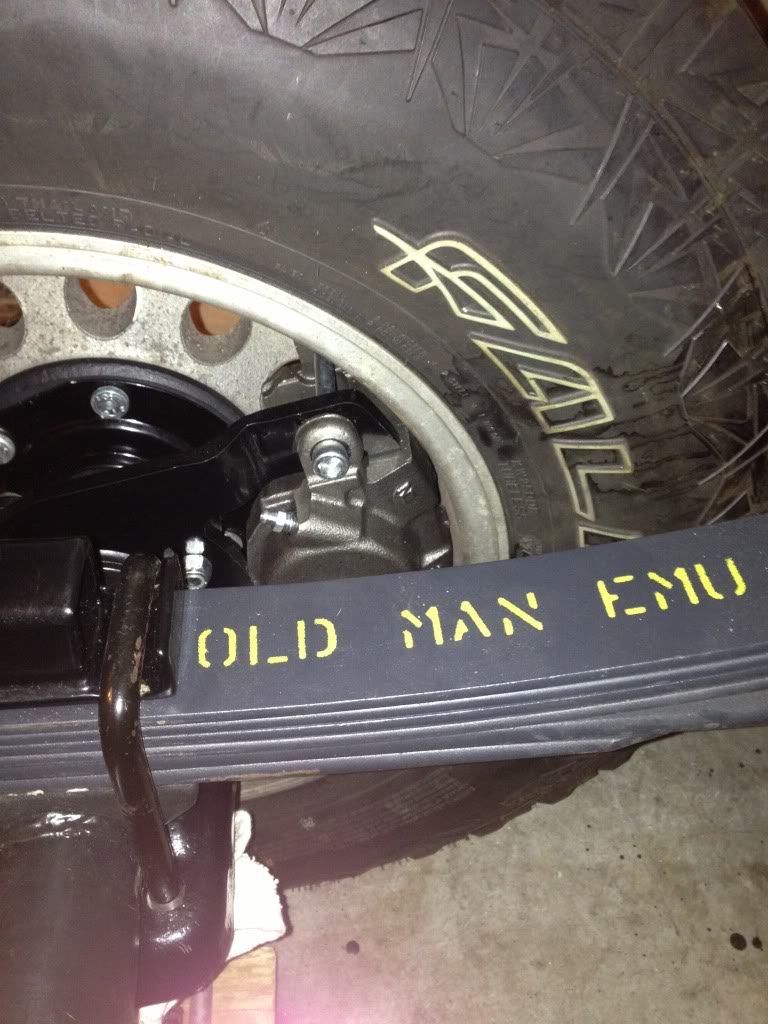

As you can see, there is very little clearance between the caliper and the wheel. There's probably less than 1/4" clearance. Enough, but boy is it close!
Now I play the waiting game for all of these parts to arrive!
You can see where the "Nub" on the calipers interfere with the conversion bracket:


So a little grinding and off with the nub! (Left with nub, right without nub):

Then a quick bolt on:


As you can see, there is very little clearance between the caliper and the wheel. There's probably less than 1/4" clearance. Enough, but boy is it close!
Now I play the waiting game for all of these parts to arrive!
Last edited by kawazx636; Jul 2, 2013 at 08:45 PM.
Jul 3, 2013 | 11:13 AM
#113
Thread Starter
Super Moderator
iTrader: (3)
Joined: Jan 2012
Posts: 3,218
Likes: 26
From: Salisbury, MD
Ok, so I said that I was going to wait to buy wheels...well...I waited. I was browsing my wheel options today and decided to go with the Ion Style 171 Polished wheels.
Specs:
*Part # 171-58839
*Material: Aluminum Alloy
*Finish: Polished
*15" x 8"
*6 x 5.5" (139.7mm)
*Offset: -27mm
*Backspacing: 3.43"
*Center Bore: 108mm
*Cost: $84.99 ($339.96 for 4)
I ordered them online from here:
http://rimzoneonline.com/wheels/ion-...171-5883p.html
Everywhere I looked they were in the neighborhood of $110-124 each. This was by far the cheapest I could find at $84.99 each, shipped! They also come with free lugs and valve stems. I wanted an aluminum wheel with a simple classic look with a mirror polished finish that would be easy to clean and keep clean. I also wanted something that was a little open so that I could show off my rear disc conversion and be able to get a tire brush in easily. I was also looking at the Mickey Thompson Classic II/III wheels, but they didn't have the backspacing that I needed. Plus the price point on this Rimz One took me to the Ion's. I think they fit what I wanted perfectly!
My current wheels are 15x9 with a 3.5" of backspacing which flirts with the J-arm when the wheel weights are installed. I'm not sure if 3.43" is going to be enough to be clear of the J-arms as much as I would like and with the rear disc brakes I doubt I could use sticker weights to balance them so worst case scenario I may have to get some 1" wheel spacers. I'll probably get them either way since I want a wider stance any way.
I'll let you guys know if I have any issues with this company - they have super cheap prices and hopefully they are legit.
Man, my Big Brown Deliver guy is going to hate me! He's going to have a lot of deliveries over the next couple weeks
Last edited by kawazx636; Jul 3, 2013 at 11:18 AM.
Jul 3, 2013 | 04:27 PM
#114
Patience Corey, don't go hurting your own feelings... LOL apparently you didn't read to the end: "Then it's on to the body work!"
Last time I checked, Toyota Fiberglass doesn't offer a whole lot when it comes to rolling chassis parts. LOL We'll be talking in time, I promise.
Last time I checked, Toyota Fiberglass doesn't offer a whole lot when it comes to rolling chassis parts. LOL We'll be talking in time, I promise.

your build is awesome
.
Jul 3, 2013 | 07:27 PM
#116
Thread Starter
Super Moderator
iTrader: (3)
Joined: Jan 2012
Posts: 3,218
Likes: 26
From: Salisbury, MD
For an e-brake, I will probably do a line lock. But I will only do a line lock if i can route it into the cab easily to a convenient location to make it actually practical. What I was thinking was to run the rear brake line down along the driver side of the tranny tunnel before taking it to the passenger side frame rail. That way I can shoot the lines into the cab so that the line lock sit somewhere on the tunnel wall near what would be a center console.
If that doesn't work out then I suppose I will go with a t-case e-brake.
If that doesn't work out then I suppose I will go with a t-case e-brake.
 Jul 4, 2013 | 04:44 AM
#119
For an e-brake, I will probably do a line lock. But I will only do a line lock if i can route it into the cab easily to a convenient location to make it actually practical. What I was thinking was to run the rear brake line down along the driver side of the tranny tunnel before taking it to the passenger side frame rail. That way I can shoot the lines into the cab so that the line lock sit somewhere on the tunnel wall near what would be a center console.
If that doesn't work out then I suppose I will go with a t-case e-brake.
If that doesn't work out then I suppose I will go with a t-case e-brake.
http://www.ebay.com/itm/Brake-Line-Lock-Roll-Control-by-Hurst-Shifters-Performance-/321050676461?pt=Race_Car_Parts&hash=item4ac01c8ced&vxp=mtr

i think I may go this route. I have a transfer case mounted ebrake to use but not sure if I will need to clearance my floor or not.


