
KawaZX636's 1983 Toyota Pickup Restoration

 Feb 14, 2015 | 07:48 AM
#1142
Thread Starter
Super Moderator
iTrader: (3)
Joined: Jan 2012
Posts: 3,218
Likes: 26
From: Salisbury, MD
Happy Valentine's Day to me!!!! Greatest wife on the planet! She really knows the way to my heart - it's through the comfort of my ass in these seats!
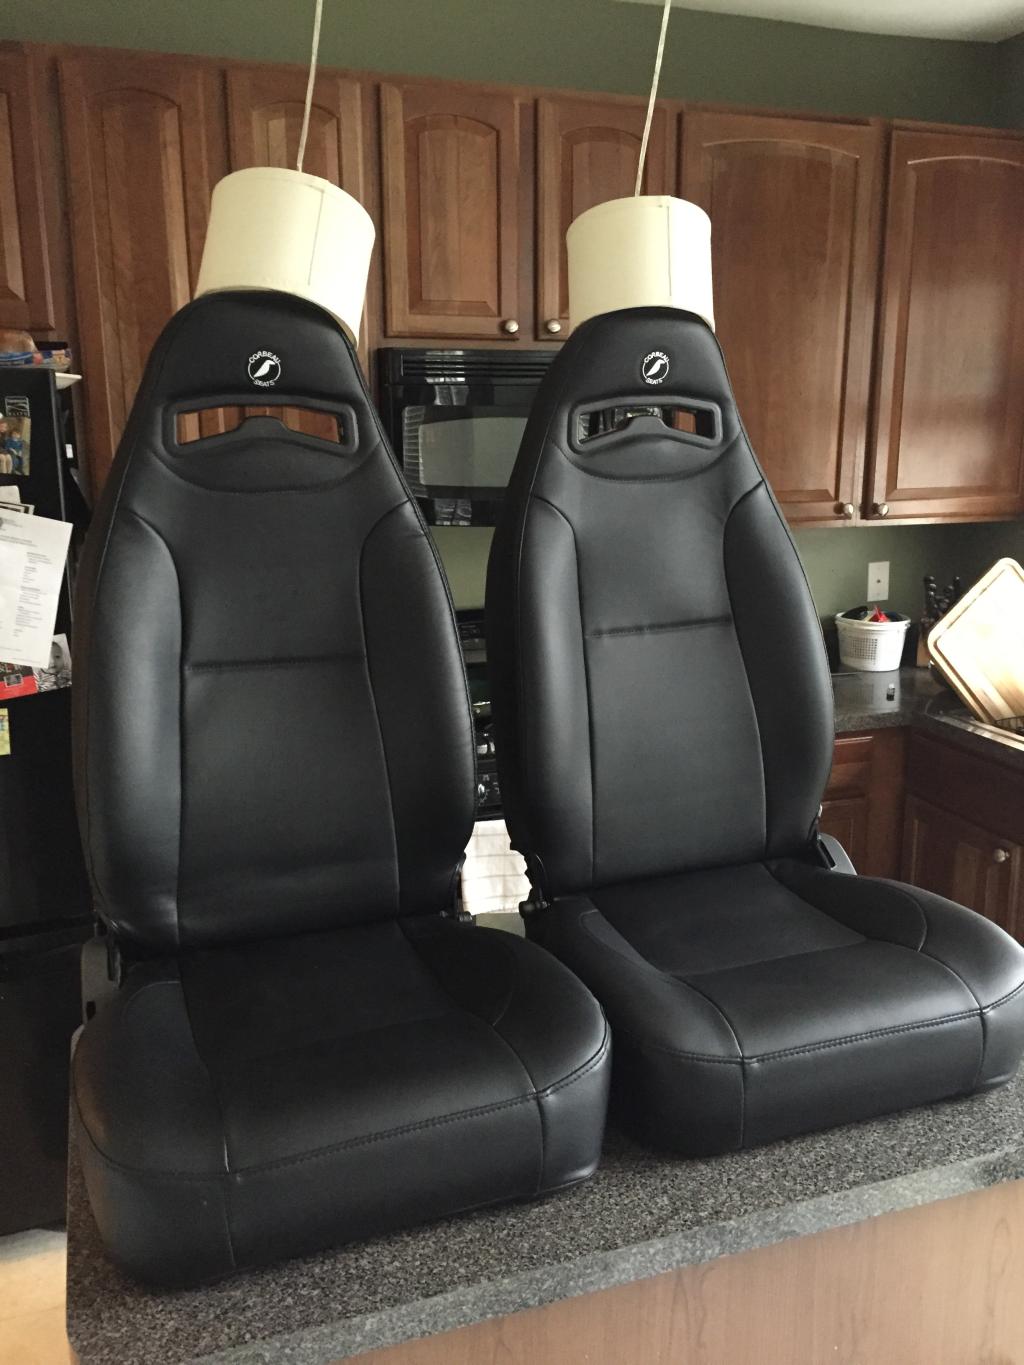
Man, these seats are comfy! I'm even contemplating putting them in my Tundra since my factory seats are getting pretty haggerred.
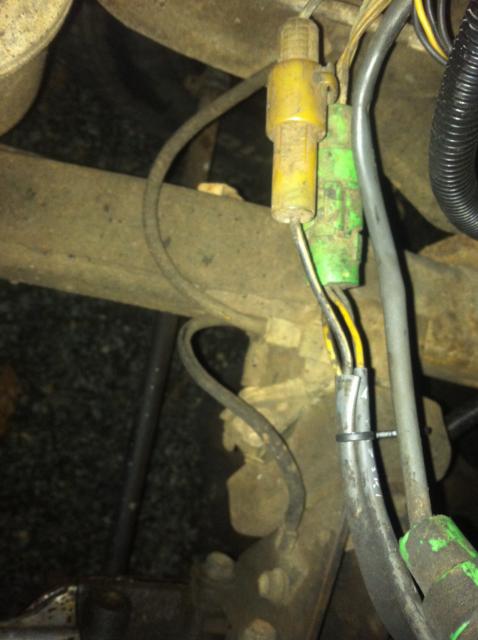
Anybody have any info on my fusible link/fuse box conversion issue?

Man, these seats are comfy! I'm even contemplating putting them in my Tundra since my factory seats are getting pretty haggerred.
Anybody have any info on my fusible link/fuse box conversion issue?
Feb 14, 2015 | 09:59 AM
#1143
Dave, I don't know what fuse link/ fuse box conversion you did.
According to the wire diagram I have for an "81, it shows the white wire coming from the battery through a red fusible link. The white wire continues from the link to a T. One side goes to the B post on the Alternator and to B post of the Voltage Regulator. The other side of the T goes to the Tail light fuse.
The ground wire that what shown in this pic, went to the block side mount bolt, to the frame, then to inner fender. On mine, I tried an 8 gauge lug on the bare wire, and it was too small. So I would think it ground wire is more to the 6 gauge size. The one on the back of the head to firewall, is more to the 10-12 gauge.
Hope that will joggle the mind a little bit to get you going to "fire in the hole" stage
Feb 14, 2015 | 04:12 PM
#1145


 Feb 18, 2015 | 05:22 AM
#1147
Happy Valentine's Day to me!!!! Greatest wife on the planet! She really knows the way to my heart - it's through the comfort of my ass in these seats!

Man, these seats are comfy! I'm even contemplating putting them in my Tundra since my factory seats are getting pretty haggerred.
Anybody have any info on my fusible link/fuse box conversion issue?
Man, these seats are comfy! I'm even contemplating putting them in my Tundra since my factory seats are getting pretty haggerred.
Anybody have any info on my fusible link/fuse box conversion issue?
after my wife caught me putting a ring gear in the oven that was it for parts in the kitchen
 Feb 18, 2015 | 09:22 AM
#1148
Thread Starter
Super Moderator
iTrader: (3)
Joined: Jan 2012
Posts: 3,218
Likes: 26
From: Salisbury, MD
Corey, thanks for the info - I'm still in fusible link hell right now but I'll figure something out soon. I have a possible idea with a distrubtion block and some fusible wire that may work well for me.
JR, those aren't going to work for me, but thanks anyway.
Rob, my wife was out of town when I put them on the counter, but I would get in trouble too and did get in trouble when she came home early and saw them on the counter! Oops... I'm typically a good boy when it comes to my parts since she hates my truck so everything that is at the house stays in the garage or man cave per the peace treaty...
Feb 19, 2015 | 07:24 AM
#1149
http://www.madelectrical.com/catalog/cn-1.shtml
If you PM me your e-mail address, I can send a PDF file for a lot of Toyota wiring diagrams for different circuits, also other manufacturers circuits that might help you in designing a DIY wiring harness .
Feb 19, 2015 | 08:51 PM
#1150
Thread Starter
Super Moderator
iTrader: (3)
Joined: Jan 2012
Posts: 3,218
Likes: 26
From: Salisbury, MD
Lons, that's a pretty nifty block. Looks like a good find. I'm not completely rewiring my truck, just cleaning up the mess that the PO made. After a little more thought and listening to others, I decided to go with the Optima Yellow Top 34/78 battery - I Actually picked it up today and returned the other battery I had bought. The Optima has the top and side mounting options so I'm going to run my starter and ground from the top posts and wire everything else to the side posts. I won't have a lot of accessories so I'm not concerned about clutter around the battery. Plus I am going to wire a 6 circuit fuse block directly off the battery and another one off of the keyed power so that I can easily and cleanly add anything that I may need later (ie: fogs lights, stereo equipment, aux power sources, etc).
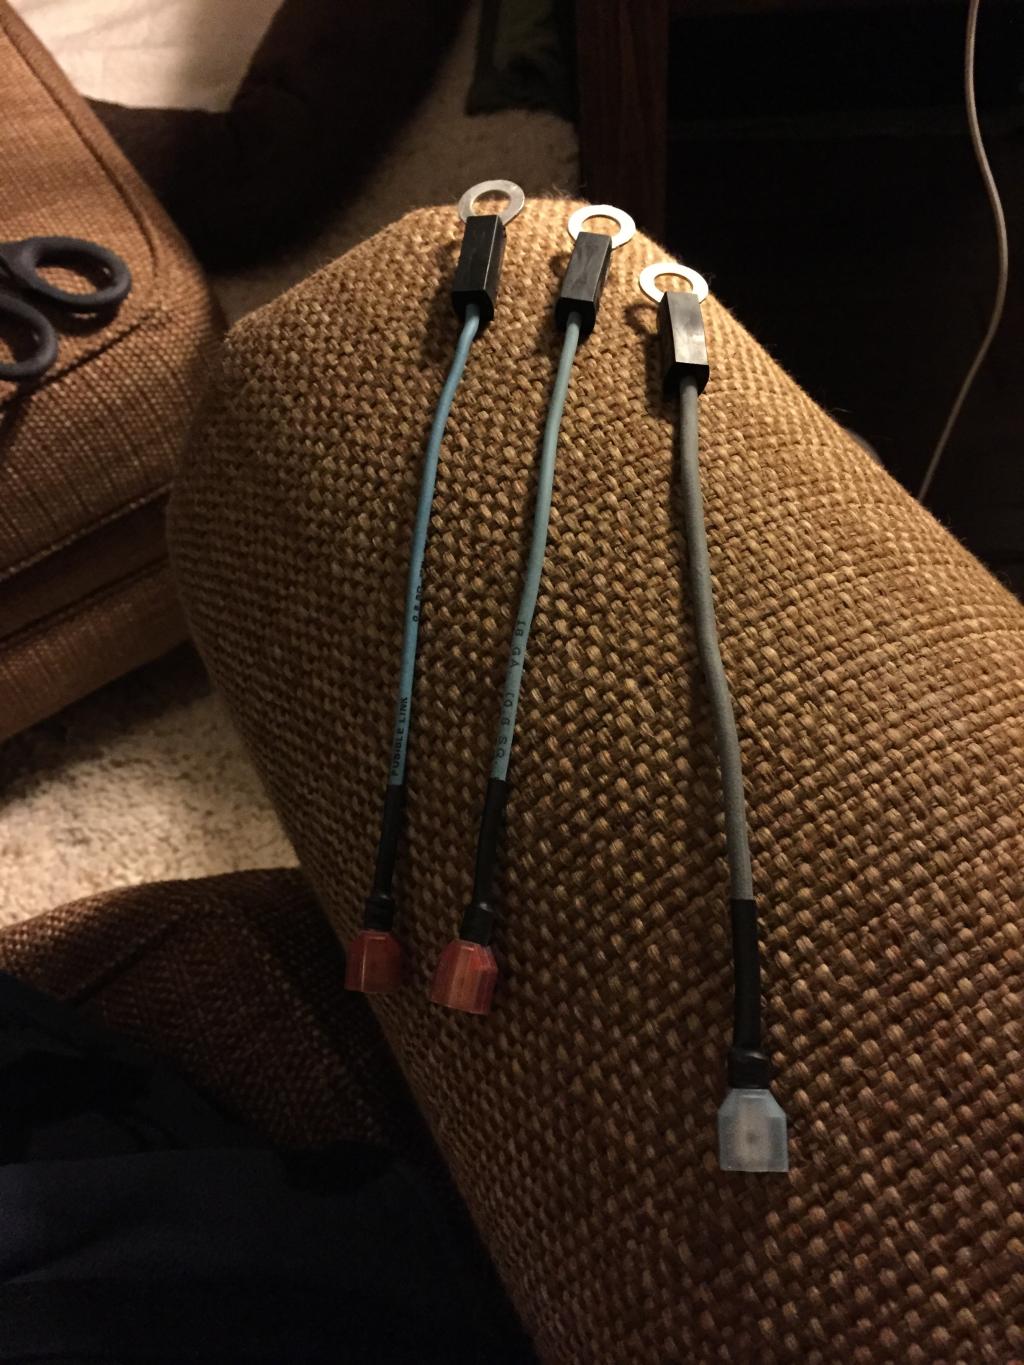
So yesterday I talked to Don (Suncomb) regarding my fusible links and he helped me straighten it all out - THANKS DON! I've had people telling me to do resettable circuit breakers, maxifuses and other options - none of which were completely wrong, but not necessarily completely right. Don told me to just go with the factory fusible links since My build is simple and my draw won't be excessive so that is what I am going to do. I went to NAPA today and got the fusible link wire to replace the hacked up factory links. I crimped and soldered some slide connectors on the links and will do the same on the protected wires so I can easily disconnect and replace the links if ever need be. I used some heat shrink on connectors, but not the whole wire. The idea is to let these wires burn and loose continuity if overloaded but if they are encased in head shrink then the links can't properly do their job. I'll get some of the mesh sheathing to go over them like the factory links. I also made a couple spares to keep in the glove box. Here they are in all their glory:
Other than that, progress has been at a hault on my truck. I've been knocking out the honey-do list that my wife has assigned me. I've got a few things left, but then the weather knocks me down. This is what is is looking like right now:
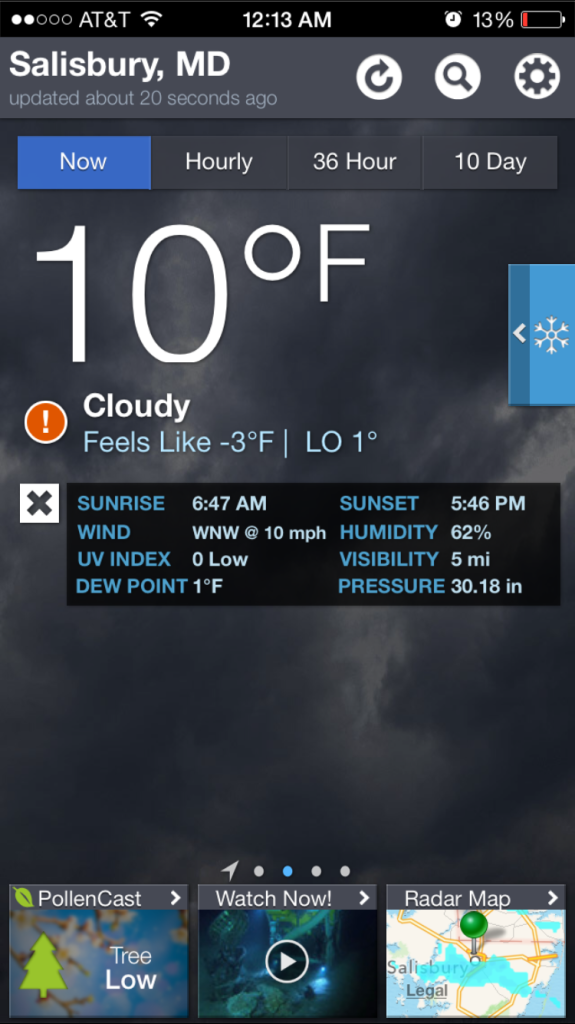
We got about 10" of snow this week and it hasn't been above 28* in two weeks. There is a low of 1*F with a -18*F windchill tonight. Now some of you may not think that is a big deal but these are record lows for this area, we don't typically get snow and the cold here is very wet so it is very bone chilling. The garage isn't heated so I rely on propane and kerosine heaters but they just can't keep up with this cold. I'll get back on it soon hopefully.
So yesterday I talked to Don (Suncomb) regarding my fusible links and he helped me straighten it all out - THANKS DON! I've had people telling me to do resettable circuit breakers, maxifuses and other options - none of which were completely wrong, but not necessarily completely right. Don told me to just go with the factory fusible links since My build is simple and my draw won't be excessive so that is what I am going to do. I went to NAPA today and got the fusible link wire to replace the hacked up factory links. I crimped and soldered some slide connectors on the links and will do the same on the protected wires so I can easily disconnect and replace the links if ever need be. I used some heat shrink on connectors, but not the whole wire. The idea is to let these wires burn and loose continuity if overloaded but if they are encased in head shrink then the links can't properly do their job. I'll get some of the mesh sheathing to go over them like the factory links. I also made a couple spares to keep in the glove box. Here they are in all their glory:

Other than that, progress has been at a hault on my truck. I've been knocking out the honey-do list that my wife has assigned me. I've got a few things left, but then the weather knocks me down. This is what is is looking like right now:

We got about 10" of snow this week and it hasn't been above 28* in two weeks. There is a low of 1*F with a -18*F windchill tonight. Now some of you may not think that is a big deal but these are record lows for this area, we don't typically get snow and the cold here is very wet so it is very bone chilling. The garage isn't heated so I rely on propane and kerosine heaters but they just can't keep up with this cold. I'll get back on it soon hopefully.
Last edited by kawazx636; Feb 19, 2015 at 08:54 PM.
Feb 19, 2015 | 09:33 PM
#1151
Good deal, glad you were to some info from the brothers here. I'm planning on installing a 21 circuit aftermarket wiring harness, maybe overkill but makes circuit chasing easier. The battery power will go to a Maxifuse first, then to terminal block, then to fusible links. Had so much trouble with them directly off the battery, wasn't 100% reliable due to terminals coming loose and corrosion. I wish my build would of stayed along with yours, but health has slowed me. Having knee surgery tomorrow, now can't sleep. Listening to classic rock tunes
Great seat of seats you received from the wife 😄
Great seat of seats you received from the wife 😄
Feb 25, 2015 | 10:34 PM
#1152
Thread Starter
Super Moderator
iTrader: (3)
Joined: Jan 2012
Posts: 3,218
Likes: 26
From: Salisbury, MD
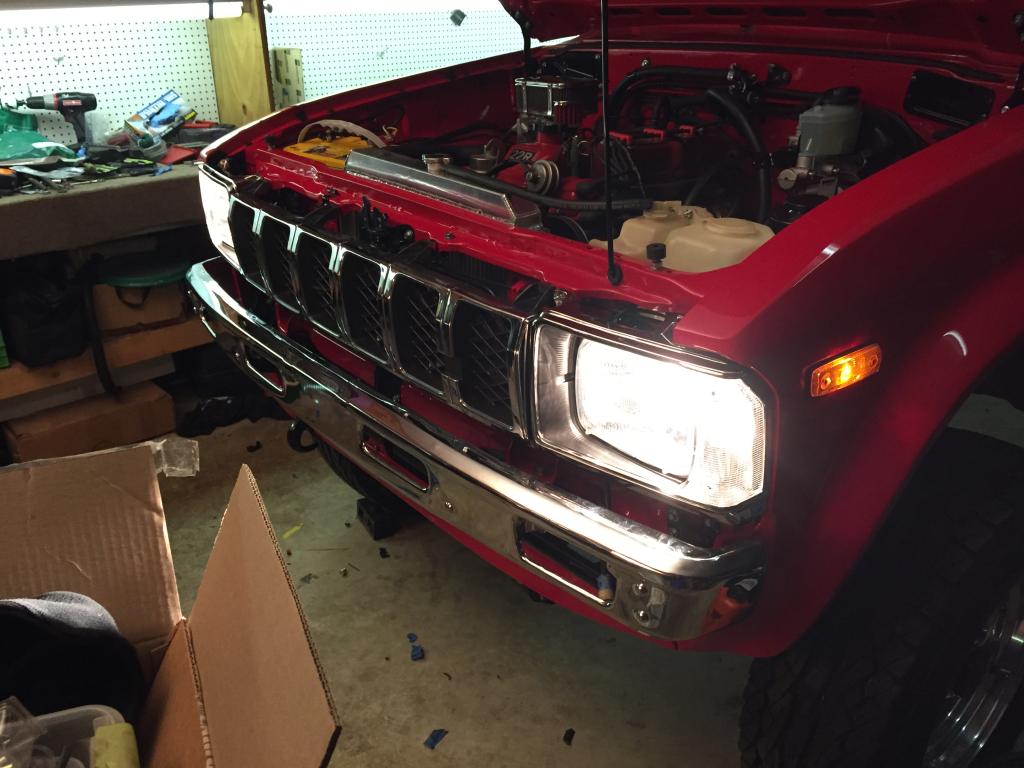
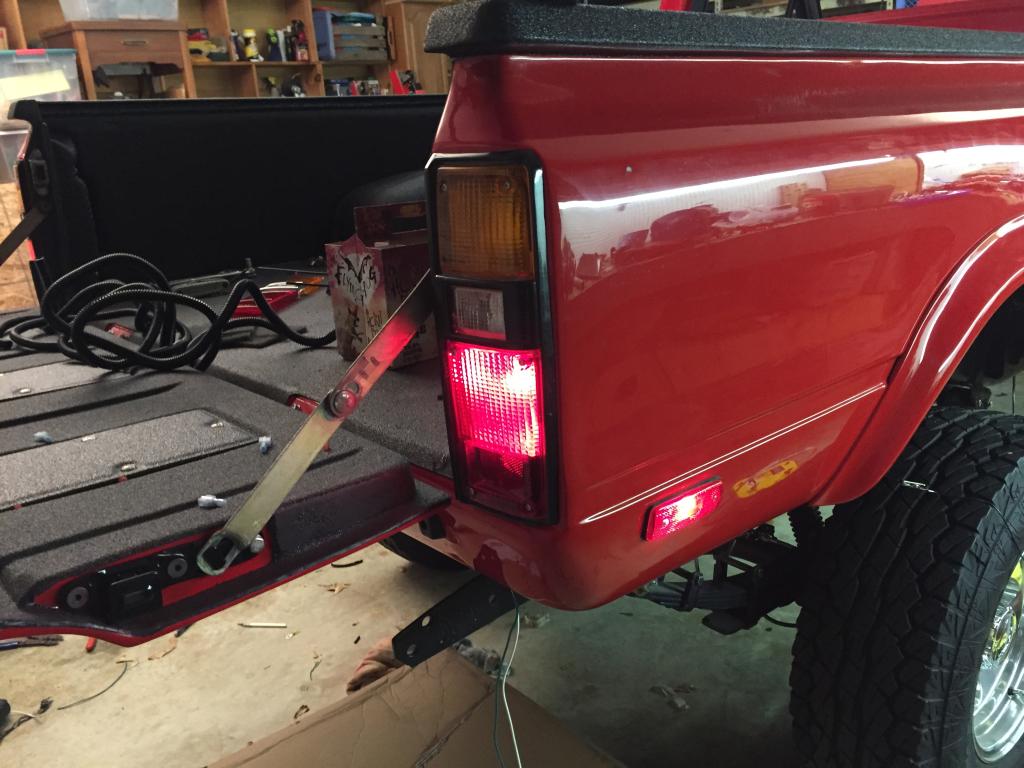
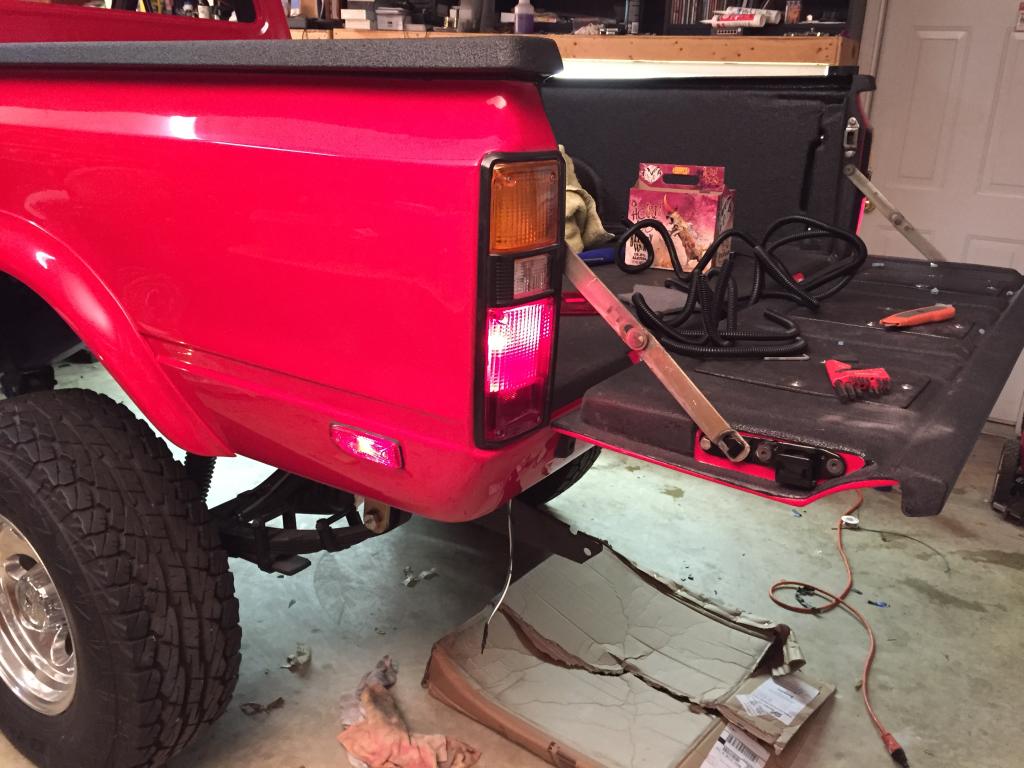
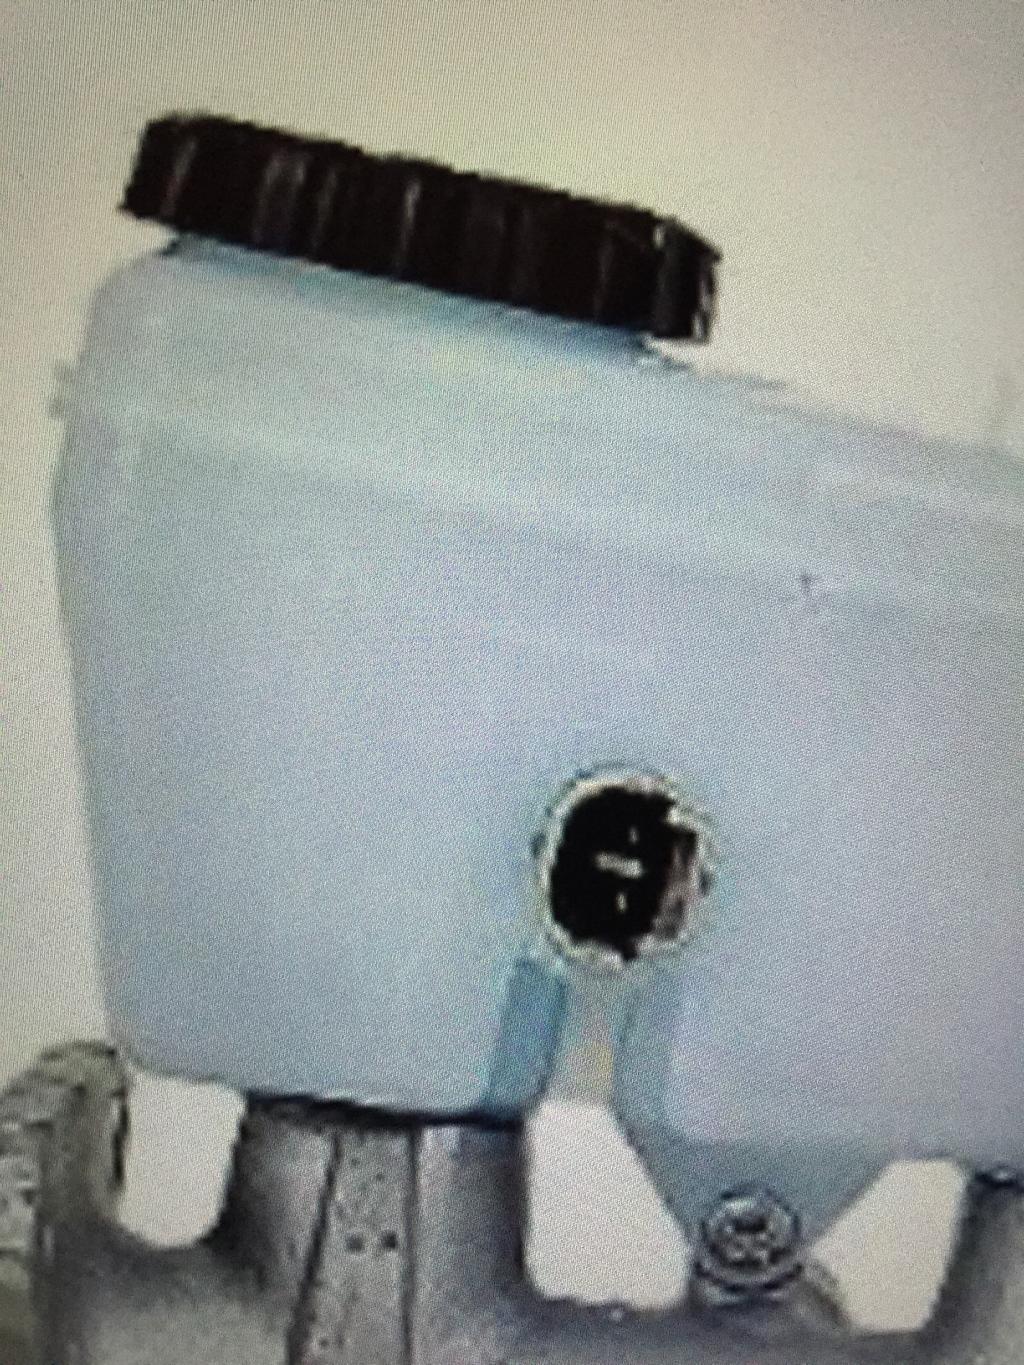
I almost have all the wiring buttoned up. I went through and toned everything out to make sure I have power to everything that needs power for both the constant and keyed circuits. I also toned out all my ground points to make sure I have strong grounds. I then hooked up the battery to run through everything I have connected now - headlights, hazards, turn signals, rear lamps, markers, brake switch (that reminds me that I need to check the reverse switch) and starter solenoid. So far my only failure is my horn - it worked intermitently before so maybe it was on it's way out (isn't the ring and contact issue), but if that is my only problem the I'll be pretty stoked! Right now I am waiting for the bus bar and distribution block to come in so I can finish wiring up the battery. I also need my wiper motor to get here soon. Tomorrow I will wire in my guage pod, wire up my auxilary fuse box and finish wrapping all the electric with split conduit.
Anyway, a lot of you guys are picture porn addicts so here you go; let there be light!
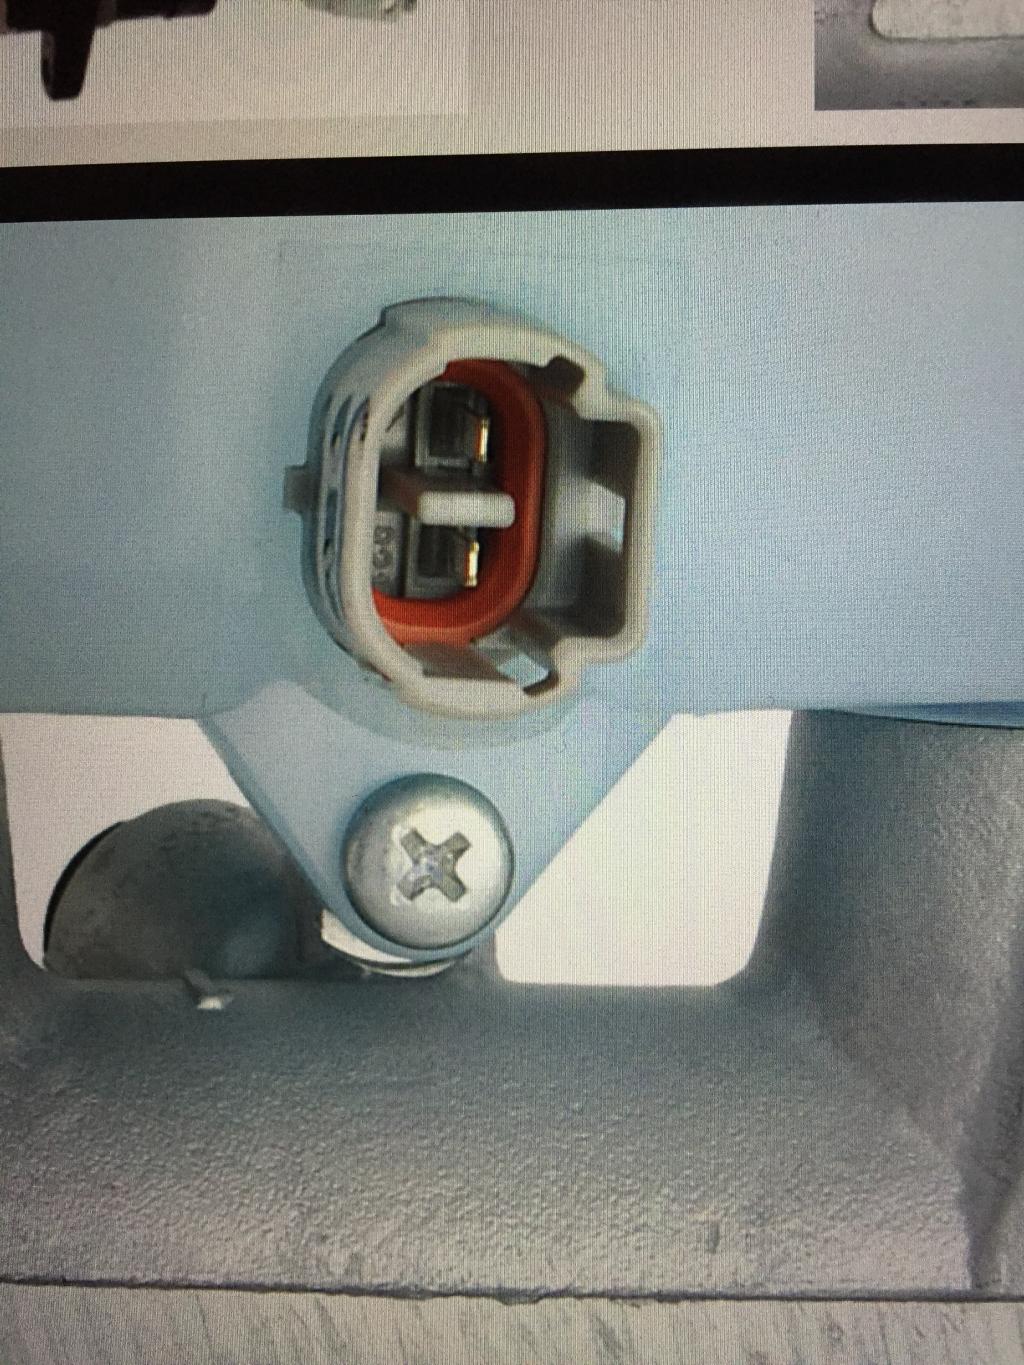
On another note, anybody have a brake light sensor plug for my 1" master cylinder that would be willing to give up? Unfortunately I didn't get the MC with the sensor in the cap so I need the factory plug to splice into my harness to make this one work.
My mother-in-law is in town for the next few days so I'll have plenty of escape time to work on my truck. Hopefully, I get all the wiring finished up so it will be ready to spark on the first semi-warm day.
Anyway, a lot of you guys are picture porn addicts so here you go; let there be light!


On another note, anybody have a brake light sensor plug for my 1" master cylinder that would be willing to give up? Unfortunately I didn't get the MC with the sensor in the cap so I need the factory plug to splice into my harness to make this one work.


My mother-in-law is in town for the next few days so I'll have plenty of escape time to work on my truck. Hopefully, I get all the wiring finished up so it will be ready to spark on the first semi-warm day.
Last edited by kawazx636; Feb 25, 2015 at 10:35 PM.
 Feb 26, 2015 | 07:13 PM
#1154
Registered User
Joined: Nov 2014
Posts: 119
Likes: 0
From: Jackson, MS
I've got that plug for you if you still need it. Saw your post this morning and added it to my list of parts to get at the pull-a-part this afternoon!
Just wanted to say how amazing all your work has been and how helpful to me many of your threads have been. No offense to all the other members with amazing trucks, but this has to be the nicest truck on Yotatech! Checking your thread has become such a daily routine that I may almost be sad when it's done!
But I'm glad you're finally getting it all buttoned up, and I agree 100% with you that wiring is a total pain in the ass...
One question- where did you source your aluminum radiator from? I'm also interested in the type of single stage paint you're using.
Hang in there, I know how tough working late nights can be! Looking forward to seeing this beast completed!
-Austin aka ToyoToler
Feb 26, 2015 | 11:22 PM
#1155
Thread Starter
Super Moderator
iTrader: (3)
Joined: Jan 2012
Posts: 3,218
Likes: 26
From: Salisbury, MD
Thanks Austin! It isn't the best first gen on here (I know of a few that have me beat), but it's surely something to be proud of. Let me know the details for that plug (PM me a picture if you will) - I appreciate you looking out for me especially since there isn't a good pick-n-pull within 500 miles of me. Let me know if you need any help or parts for your 86. I've got a bunch of leftover parts from my build that may work for your truck. By-the-way, I read through your thread, definitely go with OME springs - you won't be disappointed! And let me know when you go to order then because I have a couple cheap sources to buy from. I got mine for close to $100 per corner (shipped). As far as my radiator, it is a Silla radiator that is actually intended for 2nd Gen trucks, but it fit mine well with little struggle. It isn't the best you can get, but it looks good and hopefully will do the job well.
Dog Walker, I use Devilbiss Finish Line guns. One for primer, one for color and a bunch of different tips. They aren't cheap guns, but the less you spend on guns, the more you spend on paint and headaches. I used Eastwood paint on this project. i sprayed a friend's motorcylce a while back with Eastwood products and was rather impressed with how well it flowowed out and covered. Turned out pretty durable too. Eastwood paints are actually rebranded Kirker paint from what I understand so it is a good product. I would definitely recommend it to anybody that wants good results on a budget.
Dog Walker, I use Devilbiss Finish Line guns. One for primer, one for color and a bunch of different tips. They aren't cheap guns, but the less you spend on guns, the more you spend on paint and headaches. I used Eastwood paint on this project. i sprayed a friend's motorcylce a while back with Eastwood products and was rather impressed with how well it flowowed out and covered. Turned out pretty durable too. Eastwood paints are actually rebranded Kirker paint from what I understand so it is a good product. I would definitely recommend it to anybody that wants good results on a budget.
Feb 27, 2015 | 03:19 PM
#1156
Registered User
Joined: Nov 2014
Posts: 119
Likes: 0
From: Jackson, MS
PM sent!
Thanks for the offer and the advice. And yeah, I decided to go with OME because suspension really isn't somewhere that I skimp on since this truck will be a daily driver... And I'll definitely let you know when I'm ready to order, thanks.
By the way, what color of Eastwood paint did you go with? I might go with their regal red since that's a pretty readily available color anywhere you go. I'm going to have to paint the engine bay sometime soon- before I put the engine back in- which will be long before I paint the truck. And since I'm not set up to for auto painting, I'll just have to use aerosol, and I preferably want as close a match as possible when I paint the truck later.
Anyway, enough about my truck, this is your build thread!
Mar 2, 2015 | 07:36 PM
#1158
Thread Starter
Super Moderator
iTrader: (3)
Joined: Jan 2012
Posts: 3,218
Likes: 26
From: Salisbury, MD
Thanks for the part number Corey! I was able to get one from somebody on here so if that falls through I'll check out the dealership. The dealership is typically my last resort since the parts department is absolutely terrible! Hopefully I'll get it fairly quickly though.
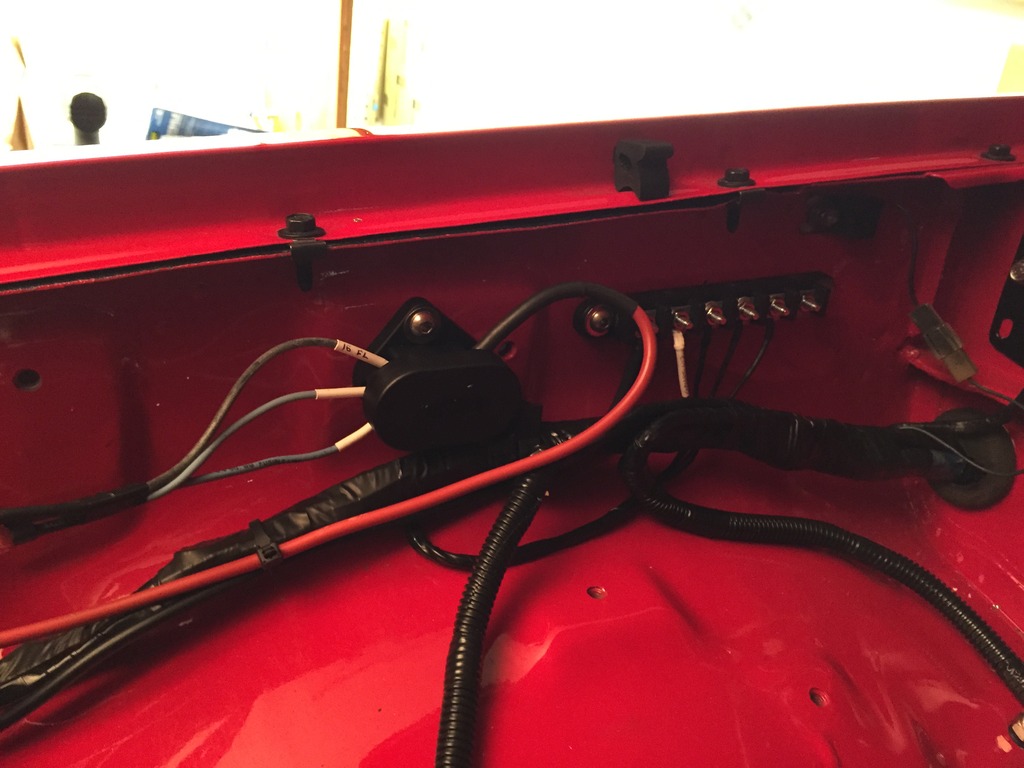
I got the wiring ran for my gauges the other night. It was quite the PITA since I had to drill down through the tunnel under the gauge pod and then back up through the tunnel behind the heater core so I could hide the wires. In a not so clean world or a world where I have carpet then I could just run them inside the cab but that simply isn't an option for me. I also had this issue with the tail light harness - where the factory route ran under the carpet/door sill trim. Instead, I ran the tail light harness under the cab and up the passenger side fender wall of the engine compartment and back through the firewall to where it plugs into the main harness.
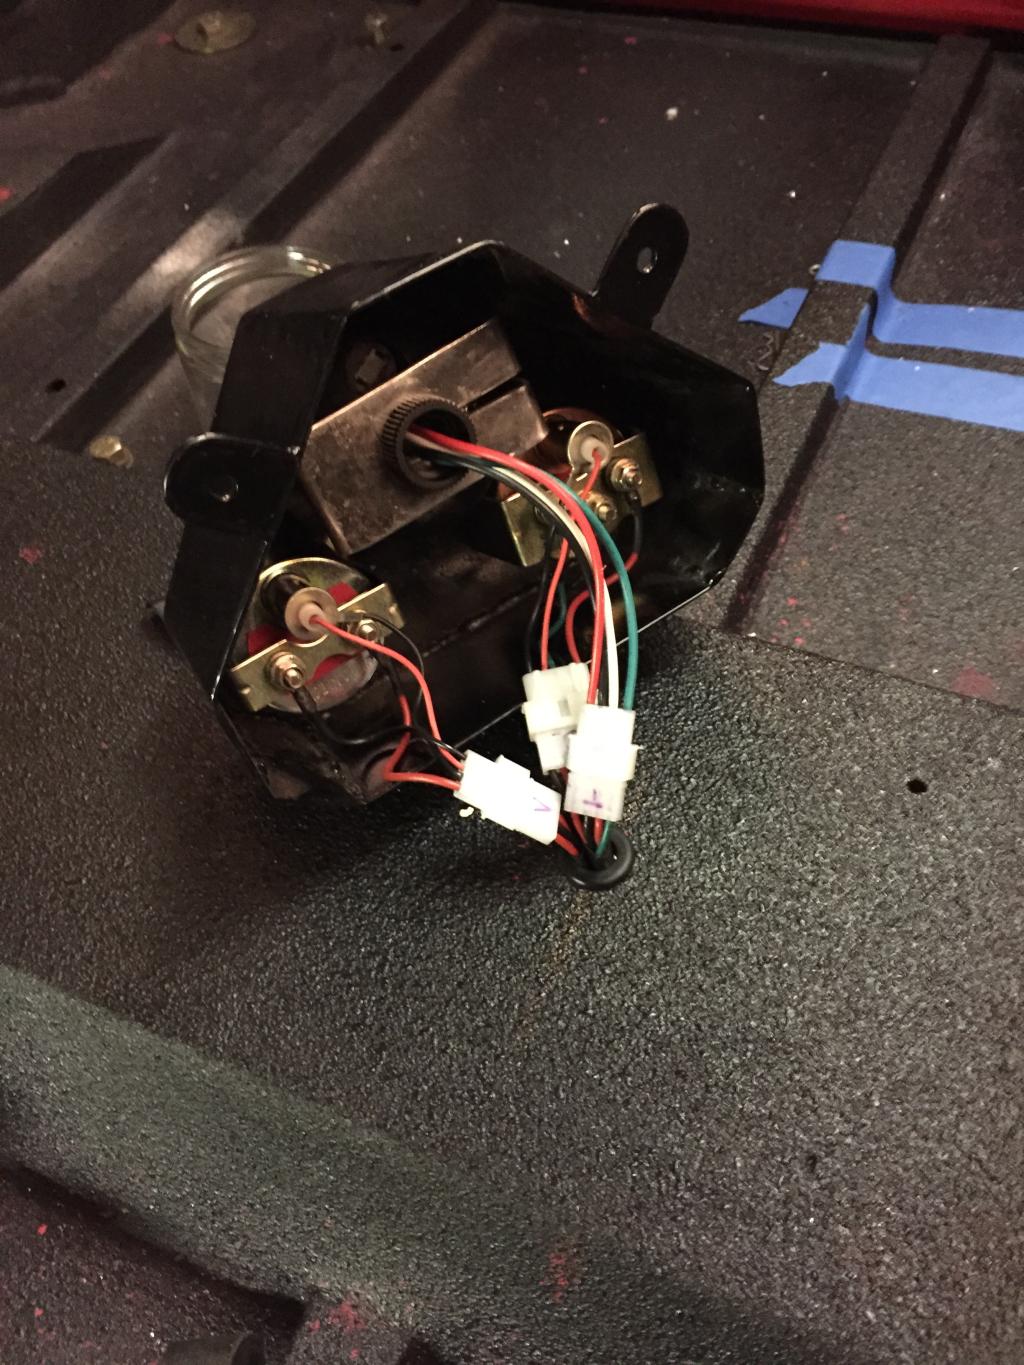
Here's a shot of the gauge pod wiring:
And here they are lit up:
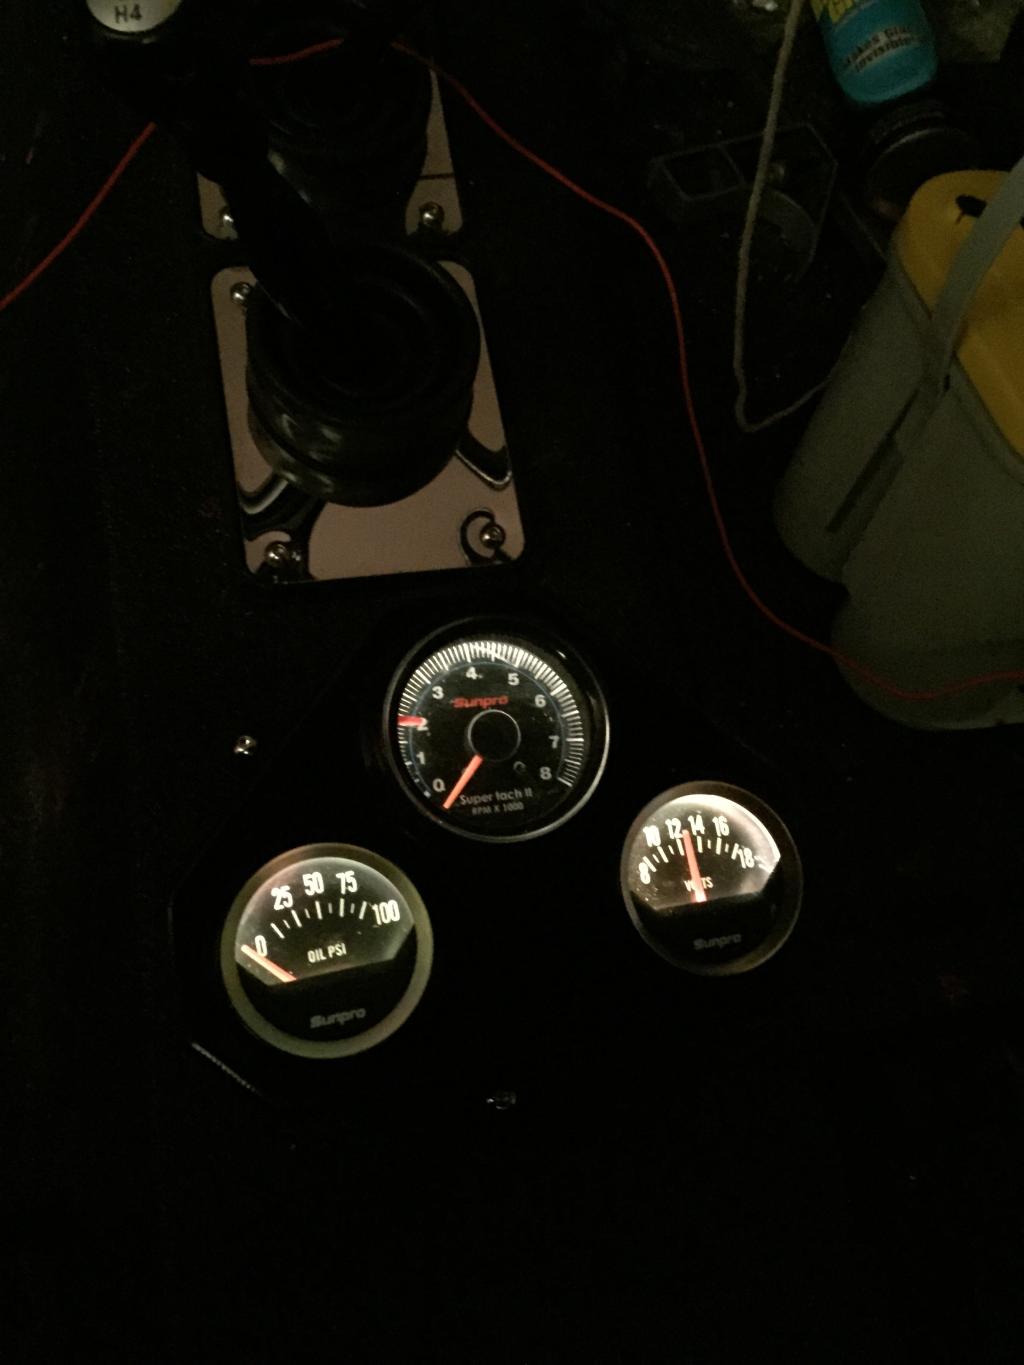
Pretty satisfied with the look - I'll likely get lights to match the factory gauge cluster. I also need to tap into my power source for each guage, but that shouldn't be a big deal. I'm just going wire them into the accessory power off of the ignition for everything. I know what wires I have to tape into, I just need to get be able to get to them! LOL
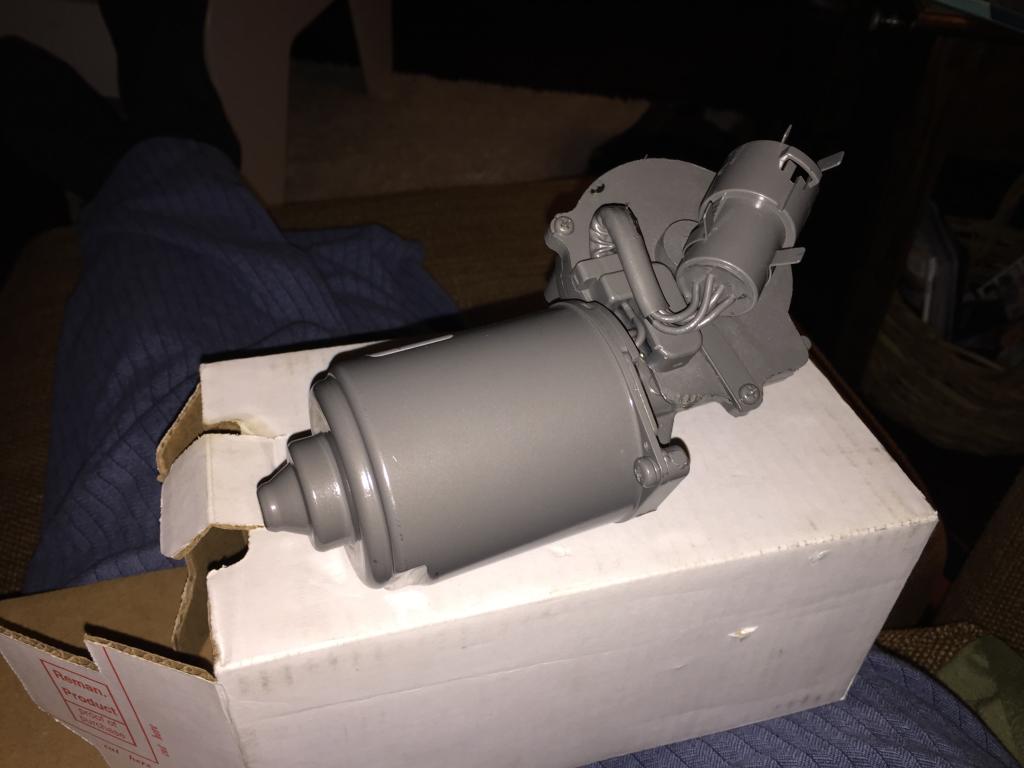
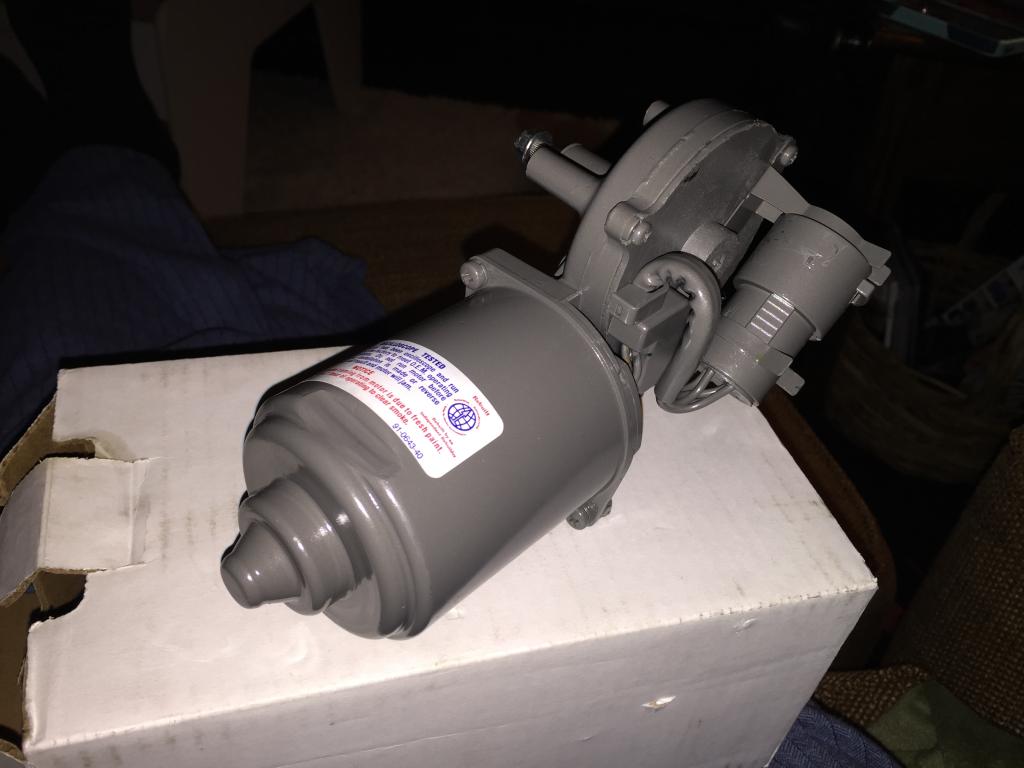
I also got my new wiper motor in today. It is a re-man, but hopefully that will solve the intermittant issue that I had with my old one. It just wish they had painted it black instead of grey - why in the hell would they paint it grey?!
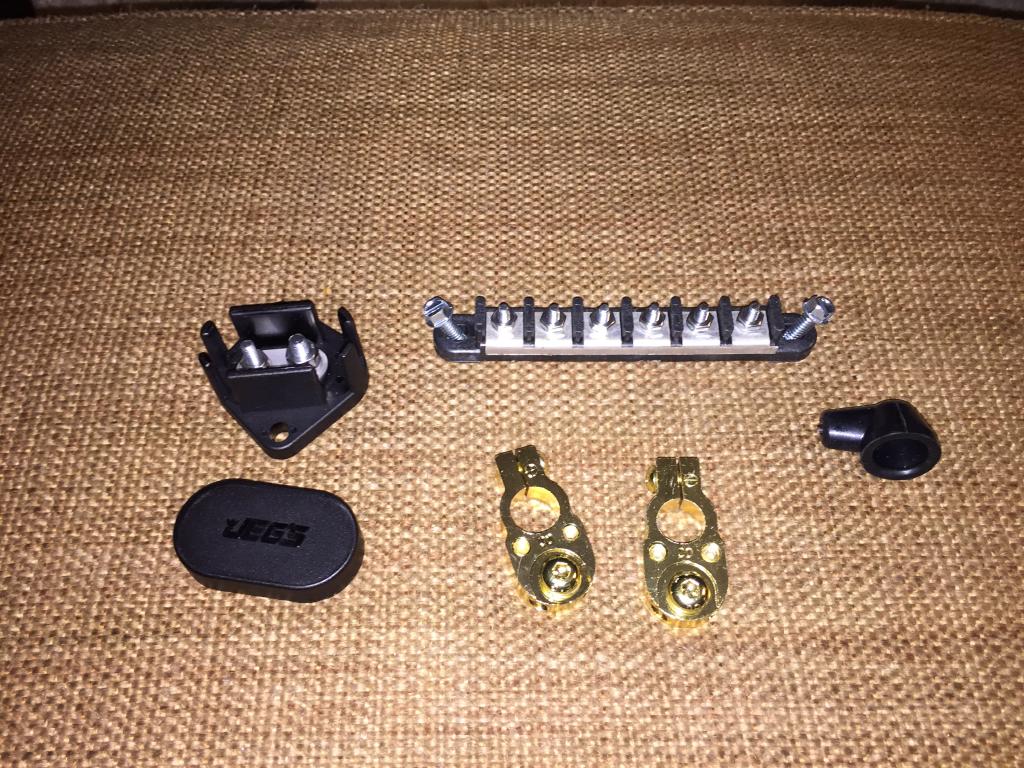
Also got my bus bar (for my accessory grounds), power distribution/junction block (for all of my power leads), battery terminal connectors and starter boot.
I'm going to run a ground directly from the battery to bus bar so I have a good ground to anything that I may add later. I'm also going to run a lead directly off the battery to the junction block and run all of my fusible links to the junction block. This way I 1) get all the extra wires off of the battery and 2) I can easily run my 6" fusible links with a ring connector on the junction block and use insulated spade connectors on the other end going to the protected circuits. This way if I blow a fusible link, I can simply replace it with a new one (I'll keep some pre-made links in the glove box).
Now that I have all the parts I need there isn't much left to do - just a few connections to make and then I need to wrap everything under the hood with some split wire loom to make it all purrrrdy!
I got the wiring ran for my gauges the other night. It was quite the PITA since I had to drill down through the tunnel under the gauge pod and then back up through the tunnel behind the heater core so I could hide the wires. In a not so clean world or a world where I have carpet then I could just run them inside the cab but that simply isn't an option for me. I also had this issue with the tail light harness - where the factory route ran under the carpet/door sill trim. Instead, I ran the tail light harness under the cab and up the passenger side fender wall of the engine compartment and back through the firewall to where it plugs into the main harness.
Here's a shot of the gauge pod wiring:

And here they are lit up:

Pretty satisfied with the look - I'll likely get lights to match the factory gauge cluster. I also need to tap into my power source for each guage, but that shouldn't be a big deal. I'm just going wire them into the accessory power off of the ignition for everything. I know what wires I have to tape into, I just need to get be able to get to them! LOL
I also got my new wiper motor in today. It is a re-man, but hopefully that will solve the intermittant issue that I had with my old one. It just wish they had painted it black instead of grey - why in the hell would they paint it grey?!


Also got my bus bar (for my accessory grounds), power distribution/junction block (for all of my power leads), battery terminal connectors and starter boot.

I'm going to run a ground directly from the battery to bus bar so I have a good ground to anything that I may add later. I'm also going to run a lead directly off the battery to the junction block and run all of my fusible links to the junction block. This way I 1) get all the extra wires off of the battery and 2) I can easily run my 6" fusible links with a ring connector on the junction block and use insulated spade connectors on the other end going to the protected circuits. This way if I blow a fusible link, I can simply replace it with a new one (I'll keep some pre-made links in the glove box).
Now that I have all the parts I need there isn't much left to do - just a few connections to make and then I need to wrap everything under the hood with some split wire loom to make it all purrrrdy!
Last edited by kawazx636; Mar 2, 2015 at 07:40 PM.
Mar 10, 2015 | 09:49 PM
#1160
Thread Starter
Super Moderator
iTrader: (3)
Joined: Jan 2012
Posts: 3,218
Likes: 26
From: Salisbury, MD
Big steps made this week so far. I got all my wiring finished up finally. I have some more wire looming to do, but I think I'm just going to wait to do that in case there are some gremlins that I have to chase down in the main harness.
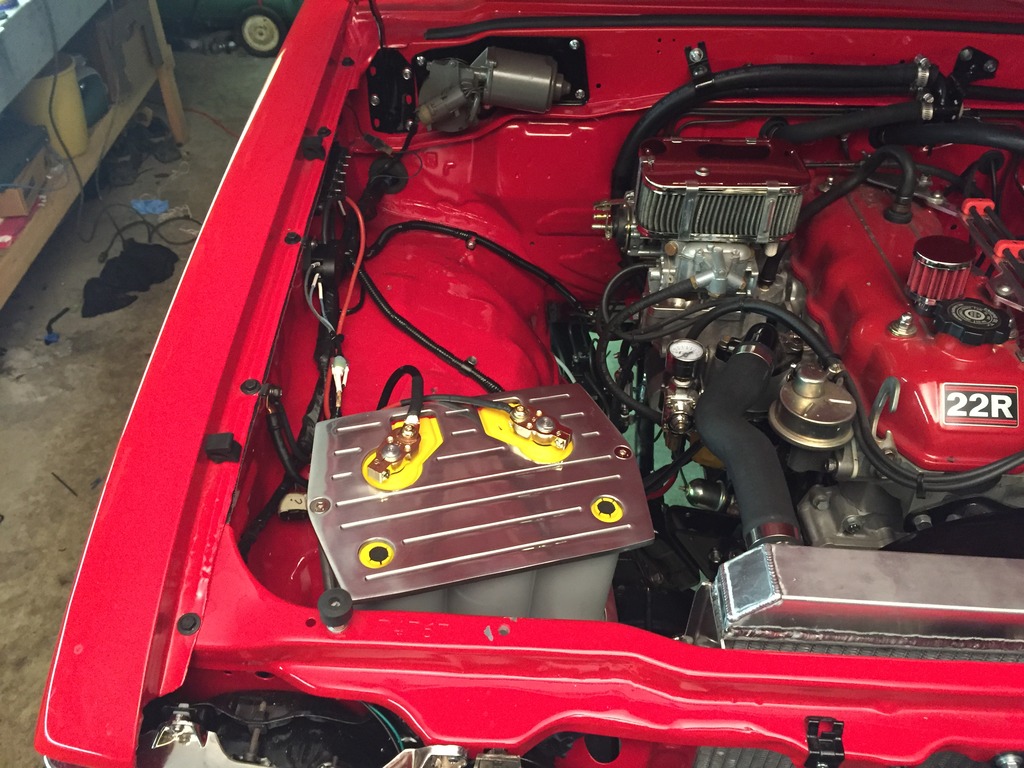
Here's the passenger side (Looks a lot better without all that emissions BS huh?):
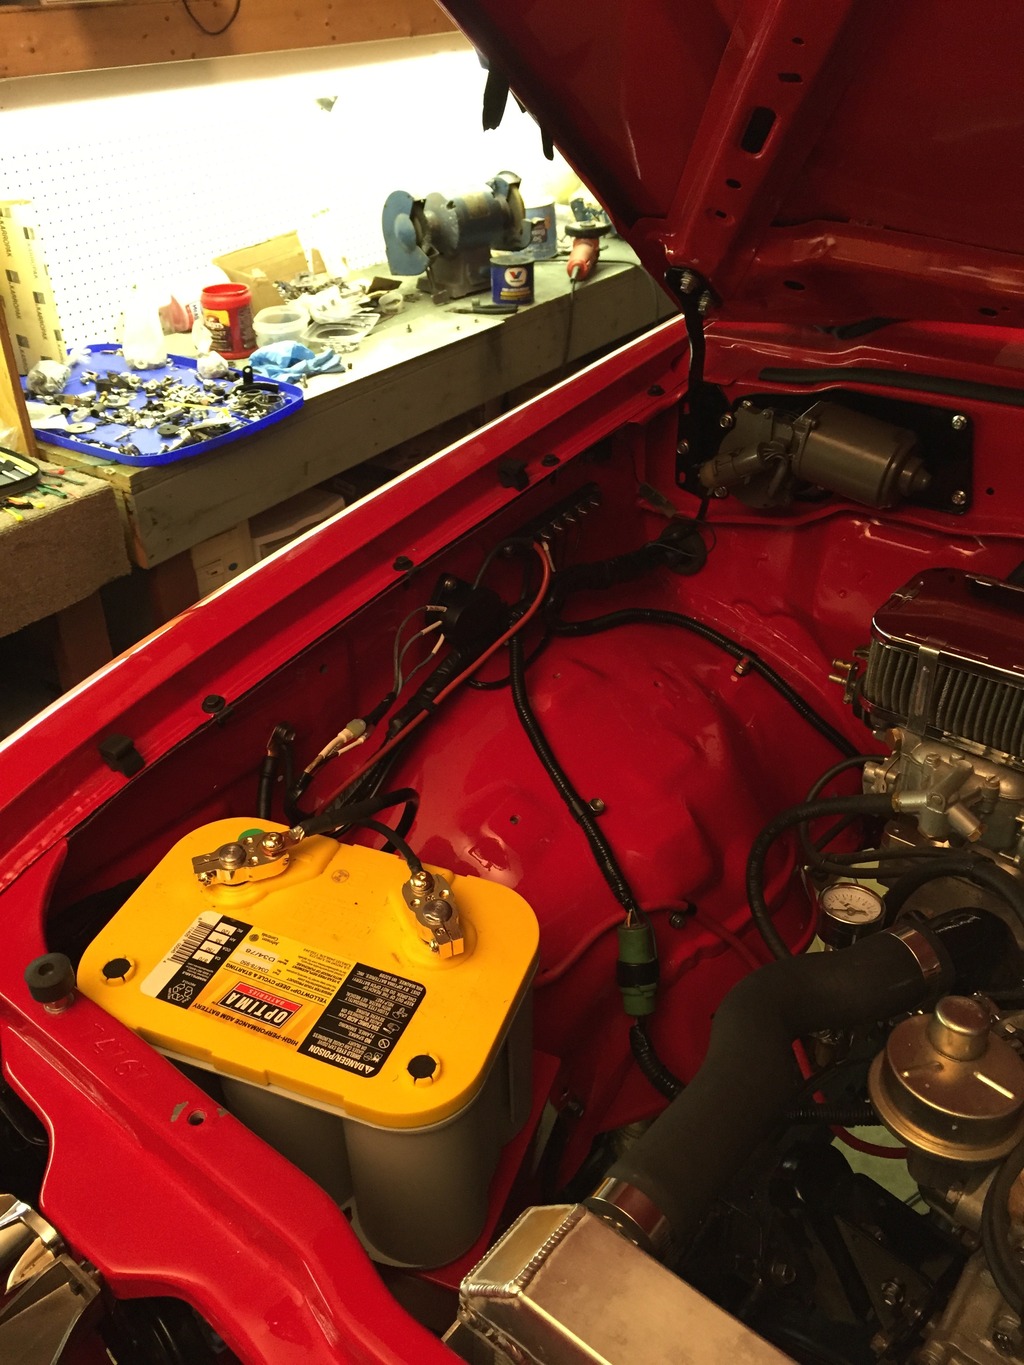
Here is the distribution block that I got so that I could limit all the wiring to the battery. All of my fusible links go directly to the block now. I only have three wires coming off the battery 1) one is the 4ga cable going to the starter from the positive side post, 2) one is the lead going to the distribution block from the top post and 3) one is a 4ga ground ground cable going directly to the fender wall. Also used 4ga cable to run my ground from the body to a bolt on the frame then from the same bolt to the engine so as to not loose any continuity. Also installed a bus bar to run any future accessory grounds to. It is grounded to the same ground point as the cable off of the battery. I should never have any ground issues!
I ordered this battery holder specifically designed for Optima 34/78 batteries. Full billet aluminum and only $59 on eBay. It's a little bulkier than I expected, but it does the job and looks good.

I simply bolted it down to the battery shelf that I fabbed up and voila!!! I think it goes well with my aluminum radiator, but I think I may end up powdercoating the top black and leave the ball milling polished. If I do that then I may also powdercoat my valve cover black and leave the raised lettering polished. I think that may be the way to go to kind of give the engine bay a little cohesiveness and color balance.
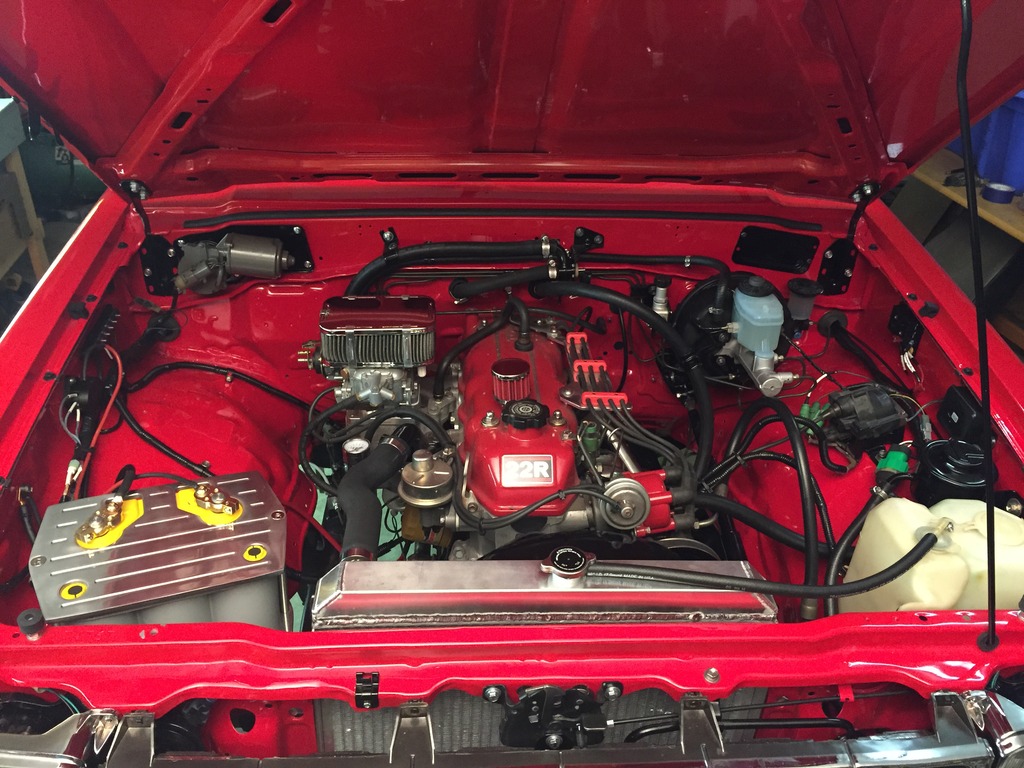
Finished up the wiring on the driver side and installed a fuse block wired to the ignition power for future accessories. Also finished wiring up the gauges - tapped the gauge lights into the headlight power and all the gauge power leads to the ignition power. ToyoToler hooked me up with a plug for my master cylinder (Thanks pal!!) so I spliced that into place too. Everything works as it should right now. Fingers crossed that it stays that way! Here's a final shot of the engine bay after everything is said and done:
Tonight I fabbed up my seat brackets for my new Corbeau seats. This went WAAAAAAY too easy! $20 and about 2 hours of time saved me $180 in seat brackets that probably wouldn't fit right anyway - I fabbed up the seat mounts in my floors based off of the factory seats but they likely aren't exactly like the stock setup so I imagine than aftermarket adapter brackets would likely not fit perfectly. Got the driver side completely fitted up and got half way through the passenger side when my drill crapped out on me. 15 more minutes of work and the fit up will be done. Then I'll take them apart, clean the mills scale off the steel, powdercoat them and reassemble.
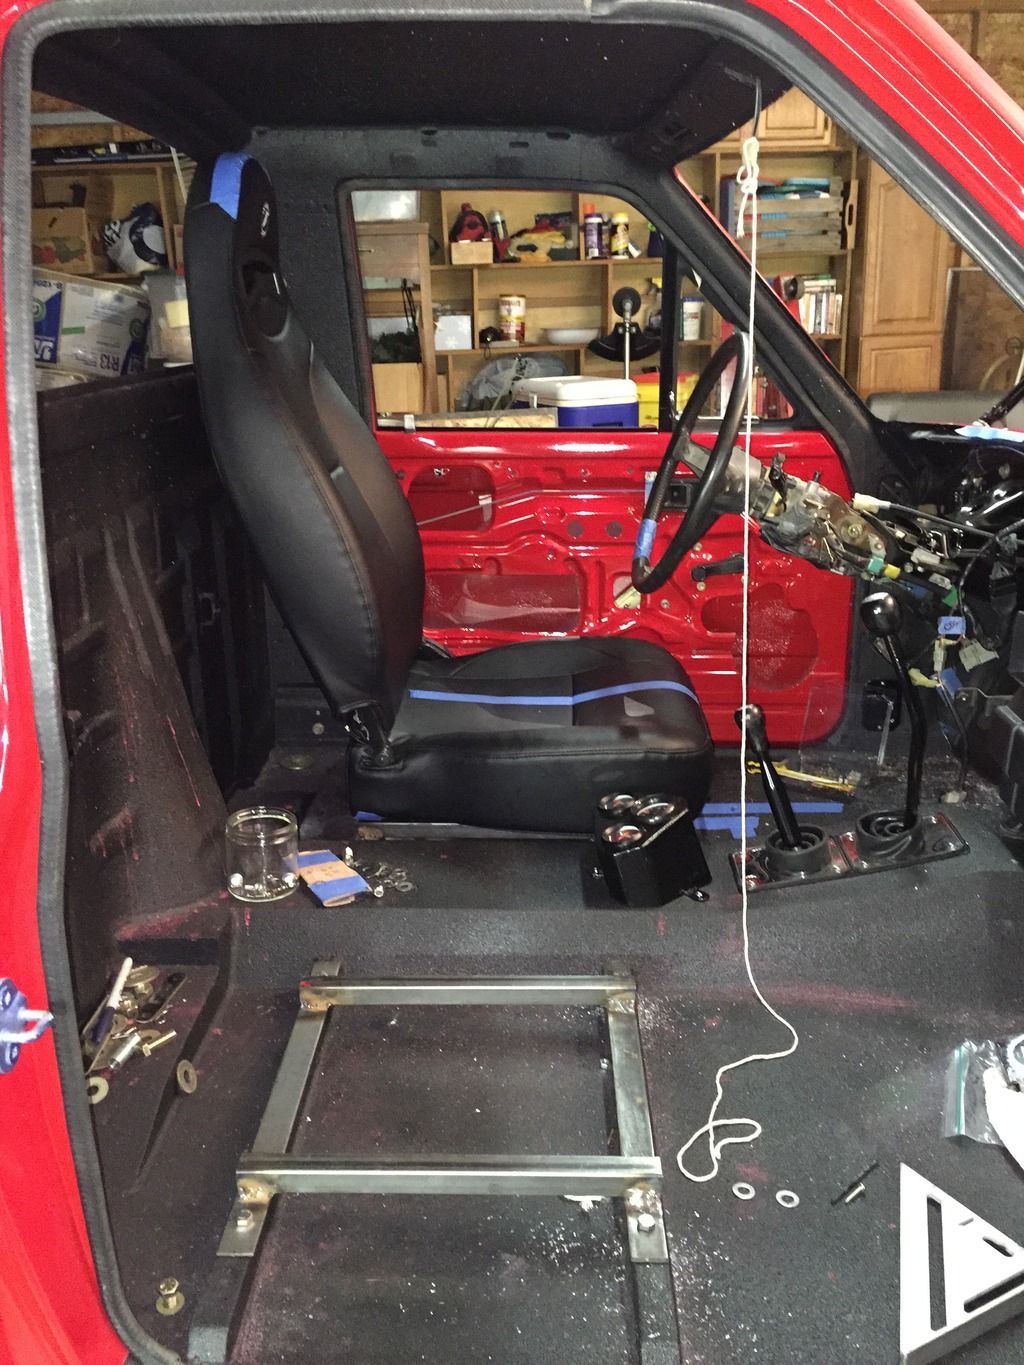
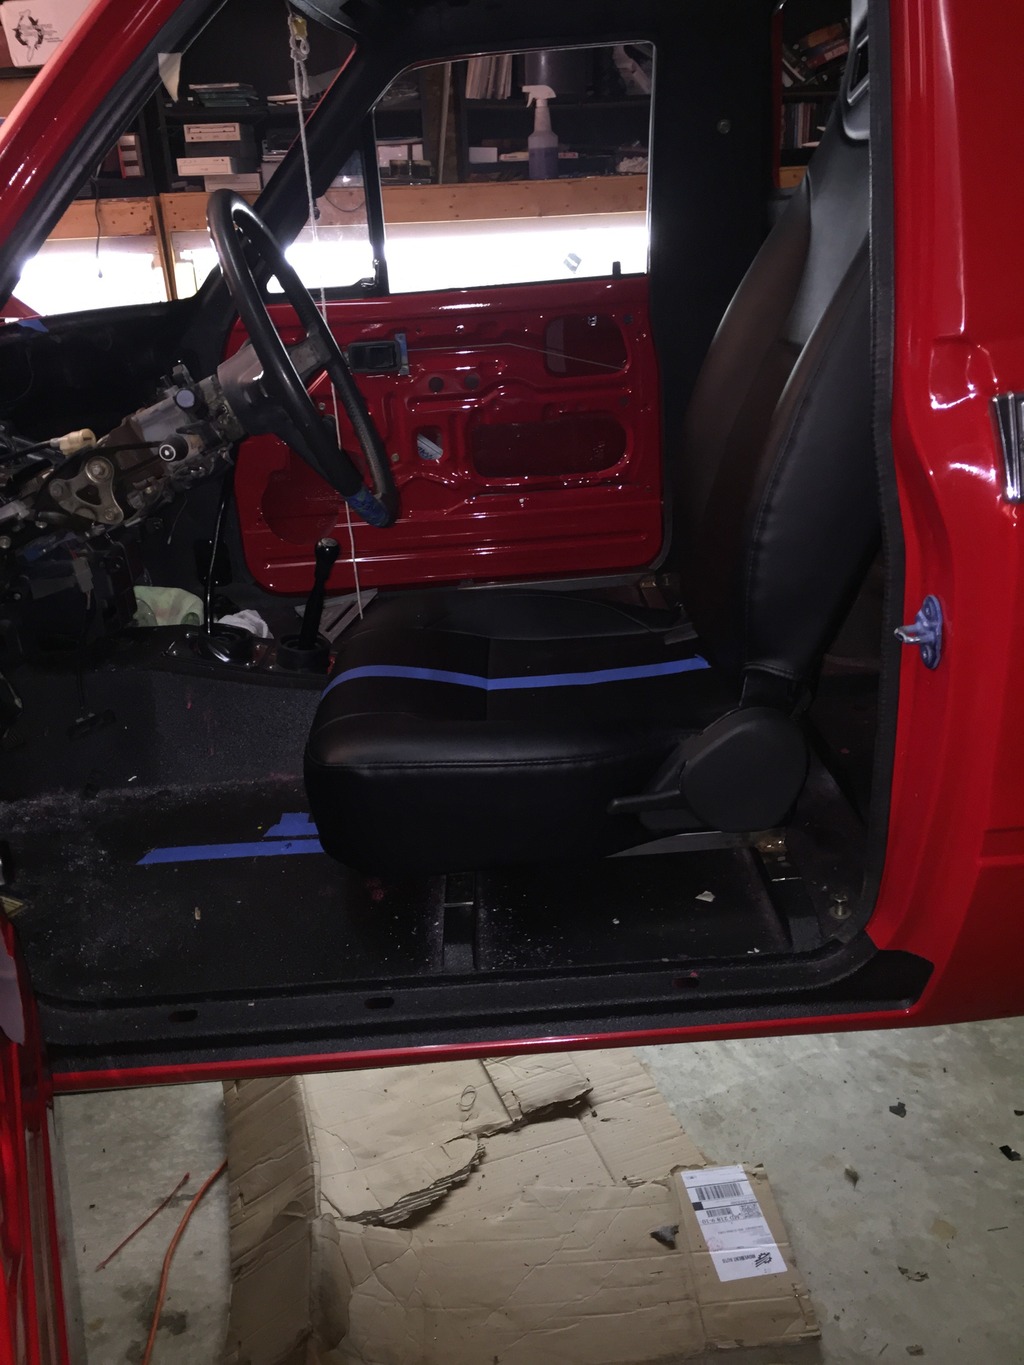
I'm really satisfied with the seats. I'm 6'1" so I like the high back and I mounted them about an inch lower than stock so it gives me a little more head room.
TECHNICALLY, the truck is driveable right now and it's killing me not taking it for a spin but I'm going to try to get as much of the interior put back together before I spark it up. Plus it would be a good idea to have my windshield installed first... I'm quite impressed with my self discipline and patience right now. Not sure how long it will last though....
Here's the passenger side (Looks a lot better without all that emissions BS huh?):

Here is the distribution block that I got so that I could limit all the wiring to the battery. All of my fusible links go directly to the block now. I only have three wires coming off the battery 1) one is the 4ga cable going to the starter from the positive side post, 2) one is the lead going to the distribution block from the top post and 3) one is a 4ga ground ground cable going directly to the fender wall. Also used 4ga cable to run my ground from the body to a bolt on the frame then from the same bolt to the engine so as to not loose any continuity. Also installed a bus bar to run any future accessory grounds to. It is grounded to the same ground point as the cable off of the battery. I should never have any ground issues!

I ordered this battery holder specifically designed for Optima 34/78 batteries. Full billet aluminum and only $59 on eBay. It's a little bulkier than I expected, but it does the job and looks good.

I simply bolted it down to the battery shelf that I fabbed up and voila!!! I think it goes well with my aluminum radiator, but I think I may end up powdercoating the top black and leave the ball milling polished. If I do that then I may also powdercoat my valve cover black and leave the raised lettering polished. I think that may be the way to go to kind of give the engine bay a little cohesiveness and color balance.

Finished up the wiring on the driver side and installed a fuse block wired to the ignition power for future accessories. Also finished wiring up the gauges - tapped the gauge lights into the headlight power and all the gauge power leads to the ignition power. ToyoToler hooked me up with a plug for my master cylinder (Thanks pal!!) so I spliced that into place too. Everything works as it should right now. Fingers crossed that it stays that way! Here's a final shot of the engine bay after everything is said and done:

Tonight I fabbed up my seat brackets for my new Corbeau seats. This went WAAAAAAY too easy! $20 and about 2 hours of time saved me $180 in seat brackets that probably wouldn't fit right anyway - I fabbed up the seat mounts in my floors based off of the factory seats but they likely aren't exactly like the stock setup so I imagine than aftermarket adapter brackets would likely not fit perfectly. Got the driver side completely fitted up and got half way through the passenger side when my drill crapped out on me. 15 more minutes of work and the fit up will be done. Then I'll take them apart, clean the mills scale off the steel, powdercoat them and reassemble.


I'm really satisfied with the seats. I'm 6'1" so I like the high back and I mounted them about an inch lower than stock so it gives me a little more head room.
TECHNICALLY, the truck is driveable right now and it's killing me not taking it for a spin but I'm going to try to get as much of the interior put back together before I spark it up. Plus it would be a good idea to have my windshield installed first... I'm quite impressed with my self discipline and patience right now. Not sure how long it will last though....
Last edited by kawazx636; Mar 11, 2015 at 06:03 AM.


