
KawaZX636's 1983 Toyota Pickup Restoration
 Jan 30, 2015 | 10:57 PM
#1121
Registered User
Joined: May 2013
Posts: 400
Likes: 0
From: San Antonio, Tx.
Im planning to go to monster jam here in Jax, Fl. in feb! fantastic show (still), i hope. this will be my old ladys first time going. I don't think we'll be bringing the little one though, he's still a wee bit small for this.
Your truck looks so damn good... I just found a near pristine 83 cab that I will be using to cheapen my rustoration (by FAR). now all I have to do is strip it and paint it. my 8 gal comp is going to be working so hard!
Your truck looks so damn good... I just found a near pristine 83 cab that I will be using to cheapen my rustoration (by FAR). now all I have to do is strip it and paint it. my 8 gal comp is going to be working so hard!
Feb 2, 2015 | 06:28 PM
#1123
Thread Starter
Super Moderator
iTrader: (3)
Joined: Jan 2012
Posts: 3,218
Likes: 26
From: Salisbury, MD
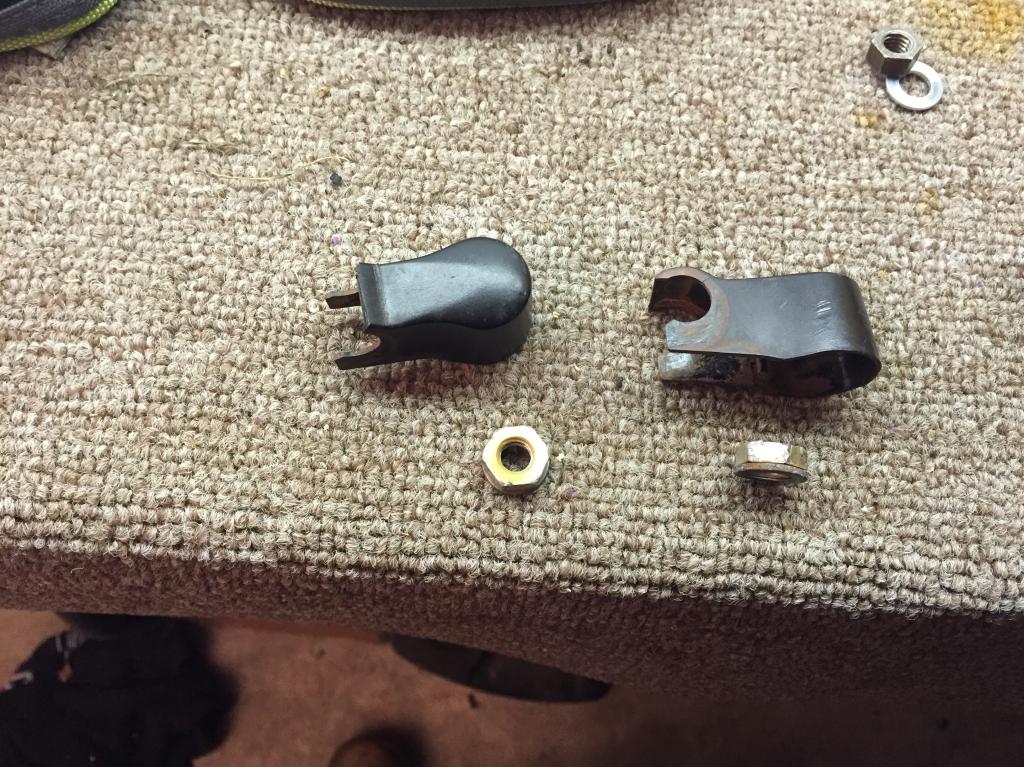
I just went to install my wipers and noticed that one of my wiper cabs was broken and the other was cracked. The nuts were also stripped, but luckily the threads on the wiper posts were ok. Does anybody out there have a set of these available? Pleeeeease!!!

 Feb 5, 2015 | 05:41 PM
#1125
Registered User
Joined: Jul 2010
Posts: 13
Likes: 0
From: NY not C
WOW! : shocked:
I have been reading through your thread the past week. Amazing!
Excellent work and so much great information.
A question related to painting. What brand(s) of paint guns/pressure regulators would you recommend? I am looking into purchasing one and any experience/opinions would be appreciated.
: shocked:I have been reading through your thread the past week. Amazing!
Excellent work and so much great information.
A question related to painting. What brand(s) of paint guns/pressure regulators would you recommend? I am looking into purchasing one and any experience/opinions would be appreciated.

 Feb 6, 2015 | 07:23 PM
#1129
Thread Starter
Super Moderator
iTrader: (3)
Joined: Jan 2012
Posts: 3,218
Likes: 26
From: Salisbury, MD
WOW!: shocked:
I have been reading through your thread the past week. Amazing!
Excellent work and so much great information.
A question related to painting. What brand(s) of paint guns/pressure regulators would you recommend? I am looking into purchasing one and any experience/opinions would be appreciated.
: shocked:I have been reading through your thread the past week. Amazing!
Excellent work and so much great information.
A question related to painting. What brand(s) of paint guns/pressure regulators would you recommend? I am looking into purchasing one and any experience/opinions would be appreciated.
Feb 6, 2015 | 07:27 PM
#1130
Thread Starter
Super Moderator
iTrader: (3)
Joined: Jan 2012
Posts: 3,218
Likes: 26
From: Salisbury, MD
I got a lot of my wiring done, but my wife was getting a little perturbed at the amount of time I have been spending with my girlfriend (my truck) so I decided to knock out a couple items on my honey-do list.
Laid some hardwood flooring in our den:
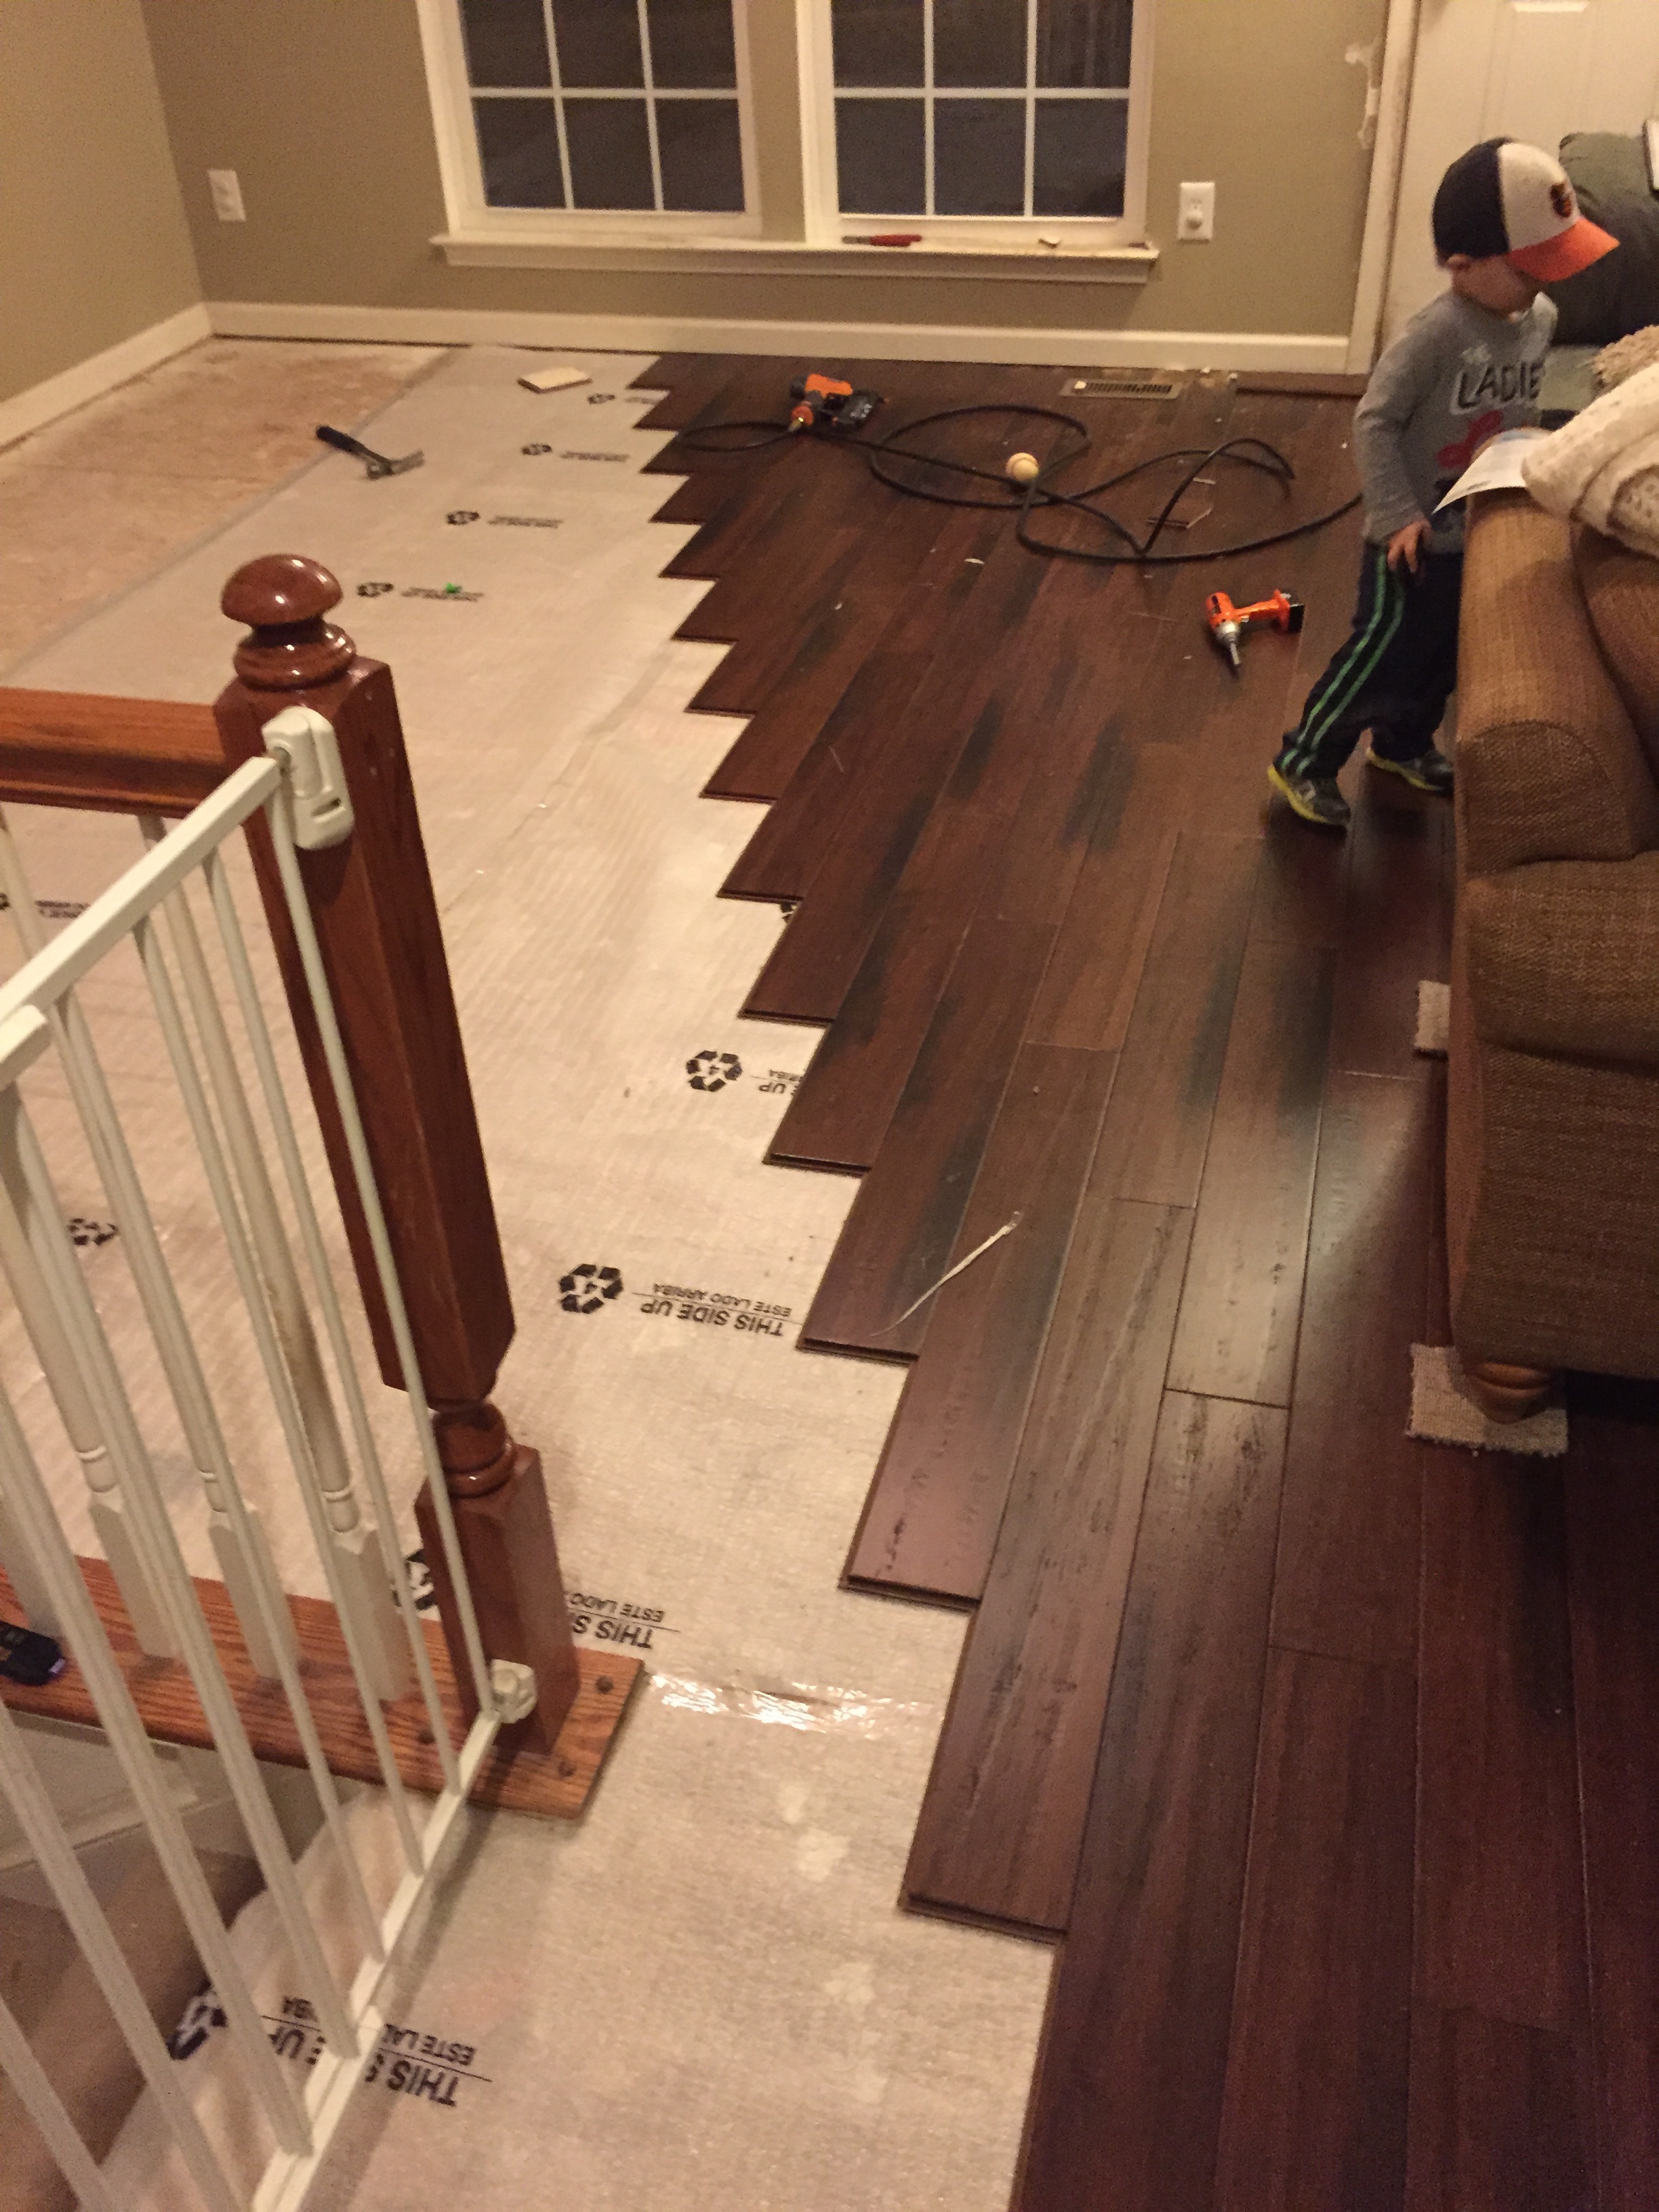
Had my little helper too:

The my little helper quit on me to watch TV. Good help is hard to find these days...
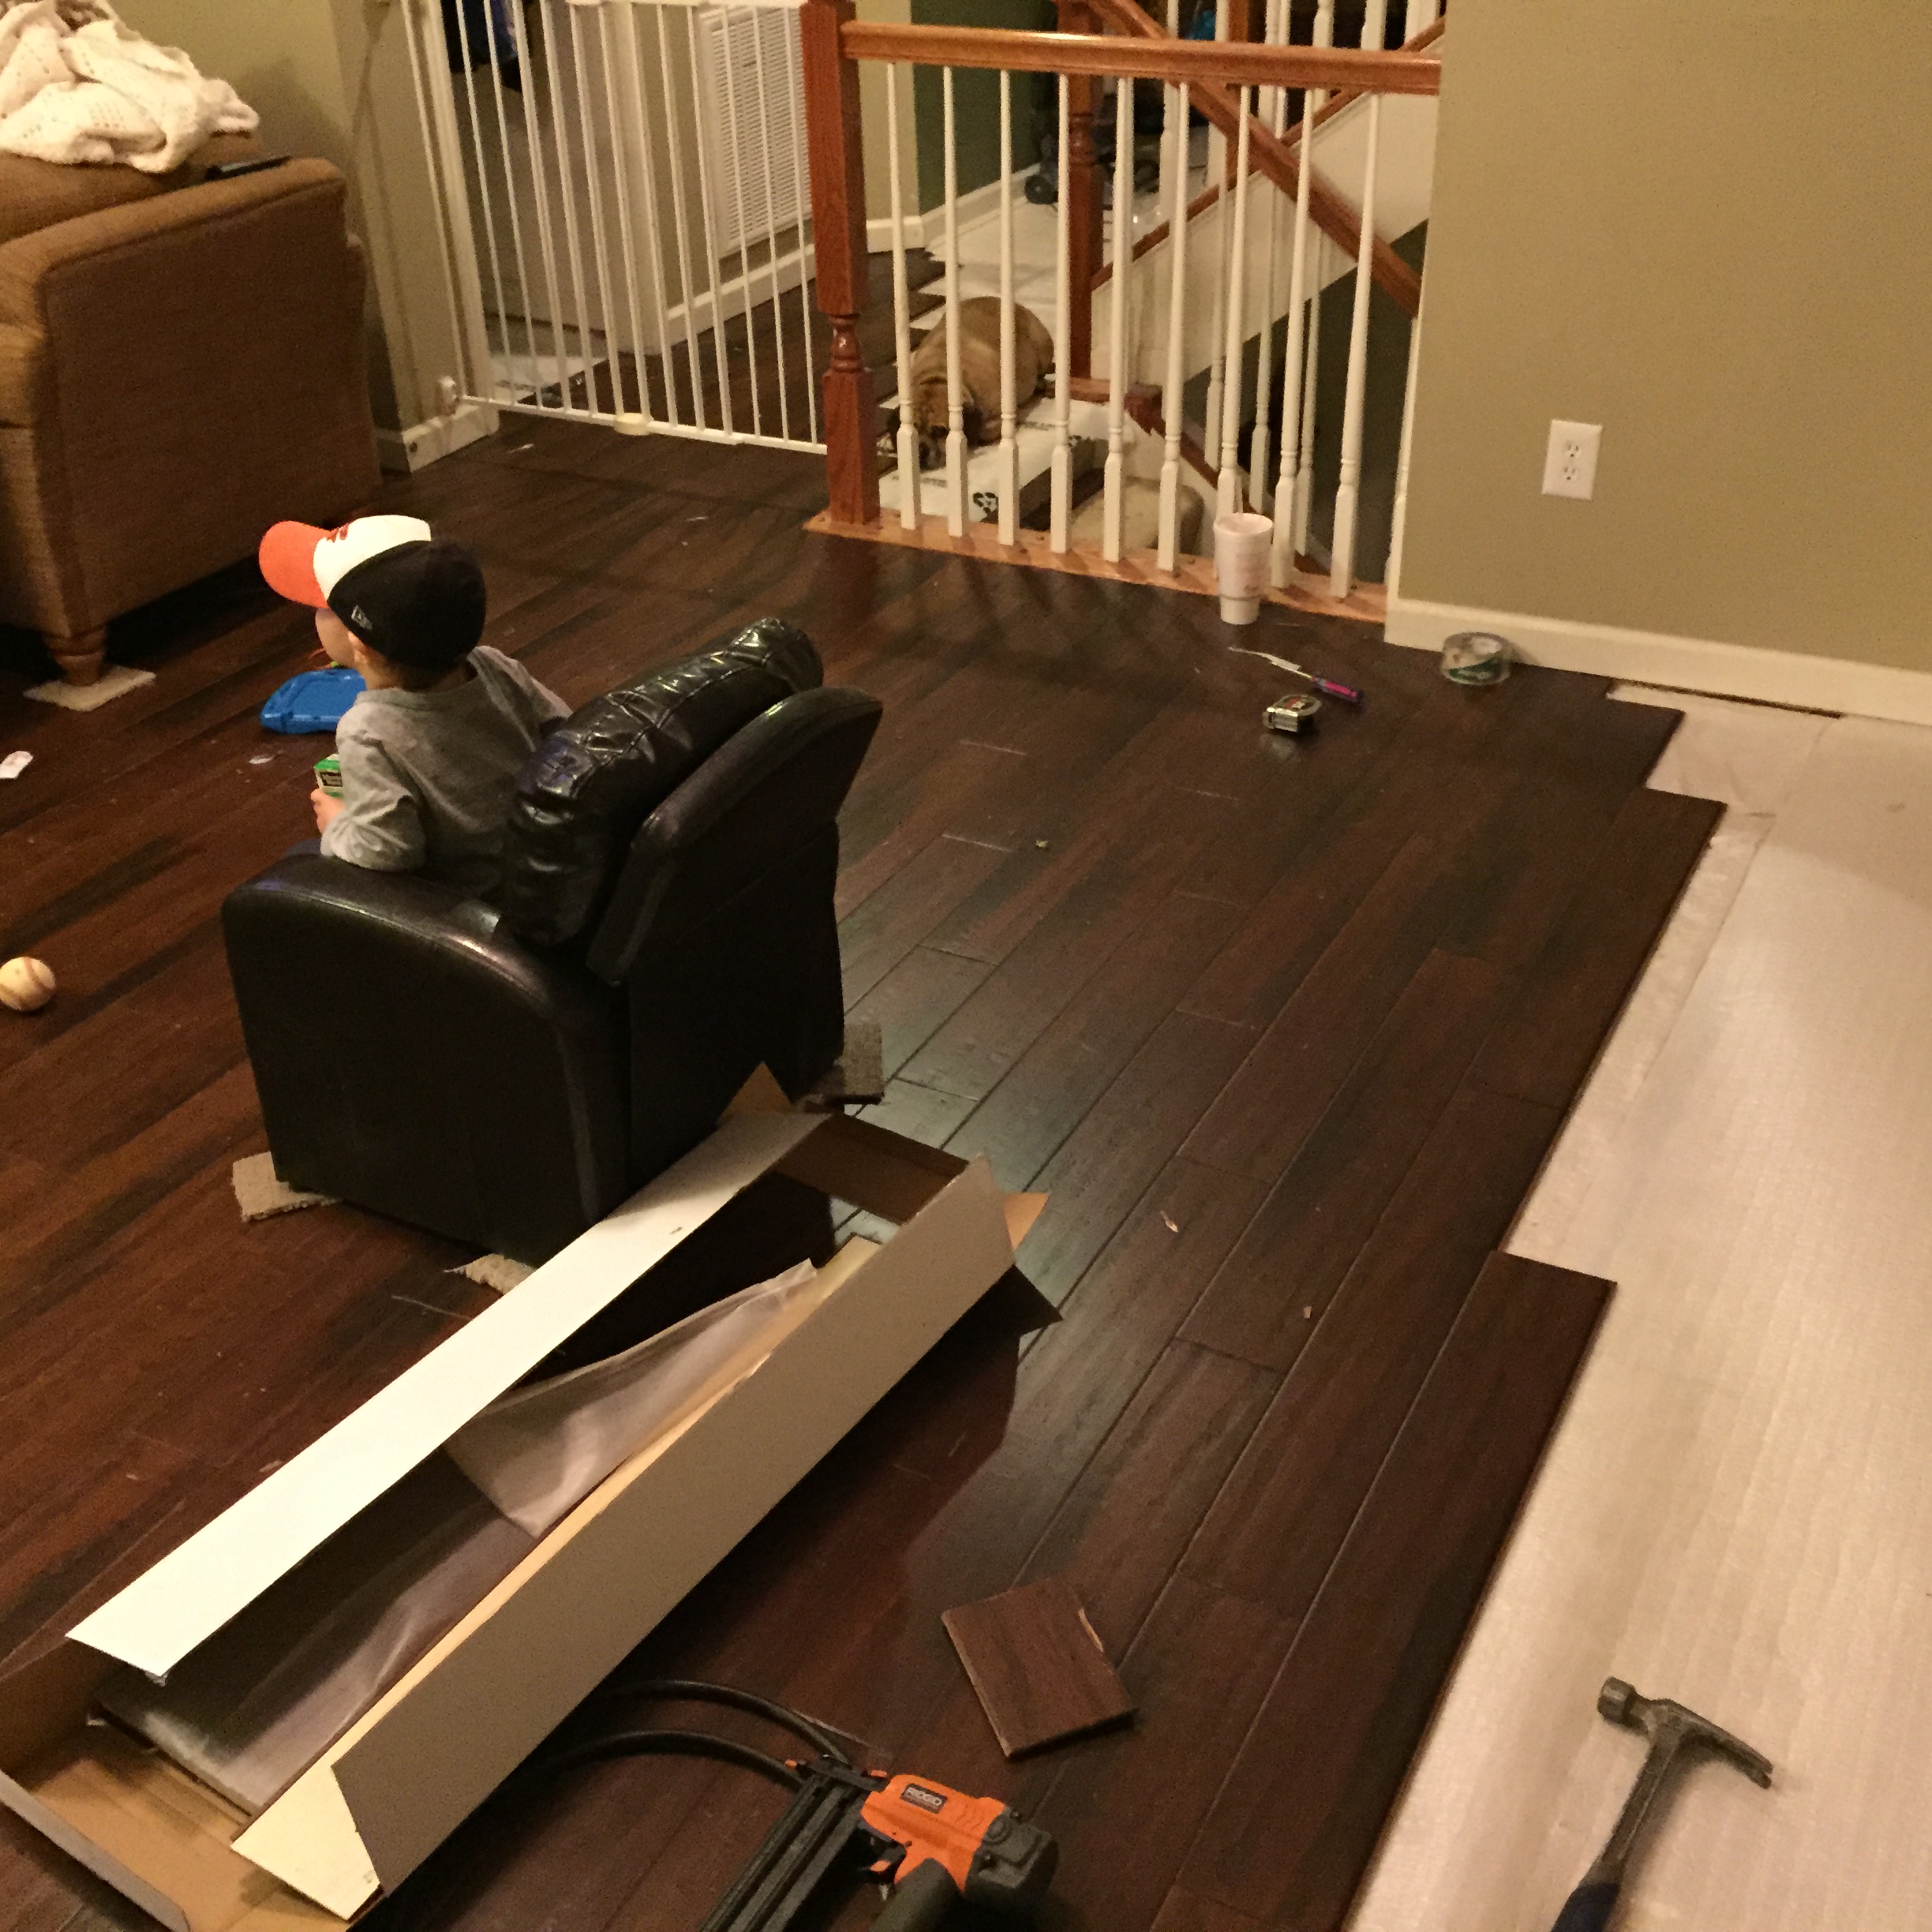
I'll be back on the truck as soon as I finish the floors, trim out the molding and paint the walls...
Laid some hardwood flooring in our den:

Had my little helper too:

The my little helper quit on me to watch TV. Good help is hard to find these days...

I'll be back on the truck as soon as I finish the floors, trim out the molding and paint the walls...
Feb 7, 2015 | 04:18 AM
#1131
Registered User
Joined: Jul 2010
Posts: 13
Likes: 0
From: NY not C
I use Devilbiss Finishline Guns and regulators. You absolutely CANNOT go cheap on guns!! My setup is around $500, but you don't neccessarily have to go that far. I would recommend the Devilbiss Startingline line two gun kits for around $180 if you are just getting in it. It comes with 2 guns and 3 tips. You definitely want a dedication primer and dedicated color gun.

The floor is looking great so far. i think maybe your little helper is trying out a supervisor position

looking forward to more updates!
Feb 10, 2015 | 07:11 PM
#1132
My solution was stainless flat washers and stainless cap-nuts, or acorn nuts. Looks really good. Will send a pic if I don't forget.
Feb 10, 2015 | 08:28 PM
#1133
Registered User
Joined: Oct 2014
Posts: 239
Likes: 1
I also talked to my friend about how my windshield seal leaks at the top edge in heavier rains. I did inject some black RTV silicone in the area that appeared physically buckled in from the outside drivers side, and taped it in place to correct the buckling until it dried. But after a moderately heavy rain recently, it still leaked above that area along the top edge. My friend had a similar experience with his new windshield and seal, and said when he brought it back to the tech who installed it, he shot a tar-based sealant in along the edge of the seal.
Dave, you seem to have some glass installation experience and wisdom. So my friend said to be careful what I decide to shoot in the leak area, and that it should not be any more RTV, but rather the tar-based stuff or similar. I work across the street from a glass company, so I could ask them too.
I also recently disassembled one of the long glass windows on my new camper shell to tuck in a seal that was not tucked in all the way. With the pane and seal removed by it's screws, it was easy to re-tuck the seal and re-install. I used some of the tips you provided here to get the job done.
I'm glad you're to the point of installing the wipers. When my cover cracked, I just tucked it back in and made plans to get another one the next time I'm at the all-toyota junkyard. I'll be pulling a full set of power steering components to convert my truck, and maybe a bed, each of which will be $200. If I find more than one of the wiper blade covers you and I both broke, I'd be happy to send you one. The only thing is that I think they rivet in through the same hole the blade arms pivot on. But guys like us find a way to make stuff like that work! Glad to have you in my network of Vintage Toyota Buffs!
Feb 10, 2015 | 10:55 PM
#1134
Thread Starter
Super Moderator
iTrader: (3)
Joined: Jan 2012
Posts: 3,218
Likes: 26
From: Salisbury, MD
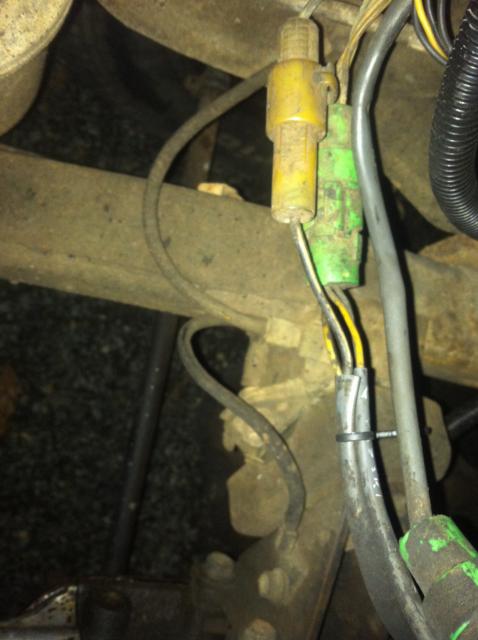
Before I go forward with this little mini update, I have a favor to ask of you all. Dispite all the photos I have taken and the parts that I have labeled, I have seemed to neglected to properly document perhaps one of the most important things to make an engine run... The ground wires! I apparently lost the original wires and I have absolutely no pictures of the ground wires that run down near the driver and passenger side engine mounts. I am re-wiring the grounds anyway, but I need to know what guage they used from the factory and how they were routed to the engine and frame. If anybody could take a picture of the grounds on both sides of the engine, I would greatly appreciate it! Thanks in advance!
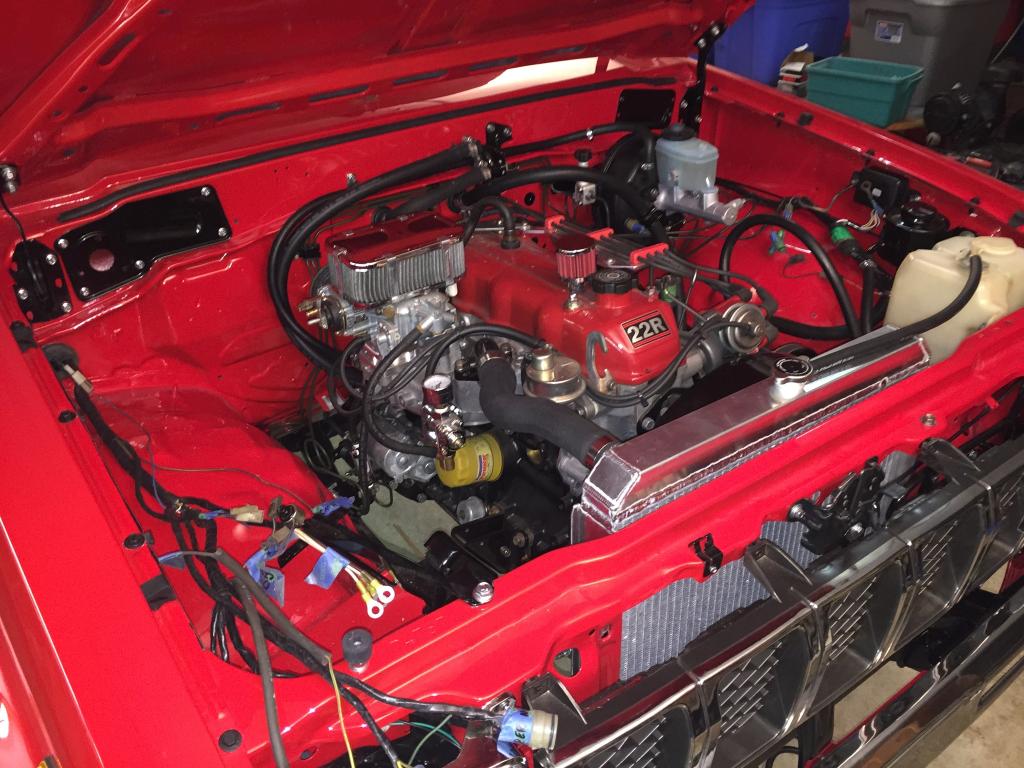
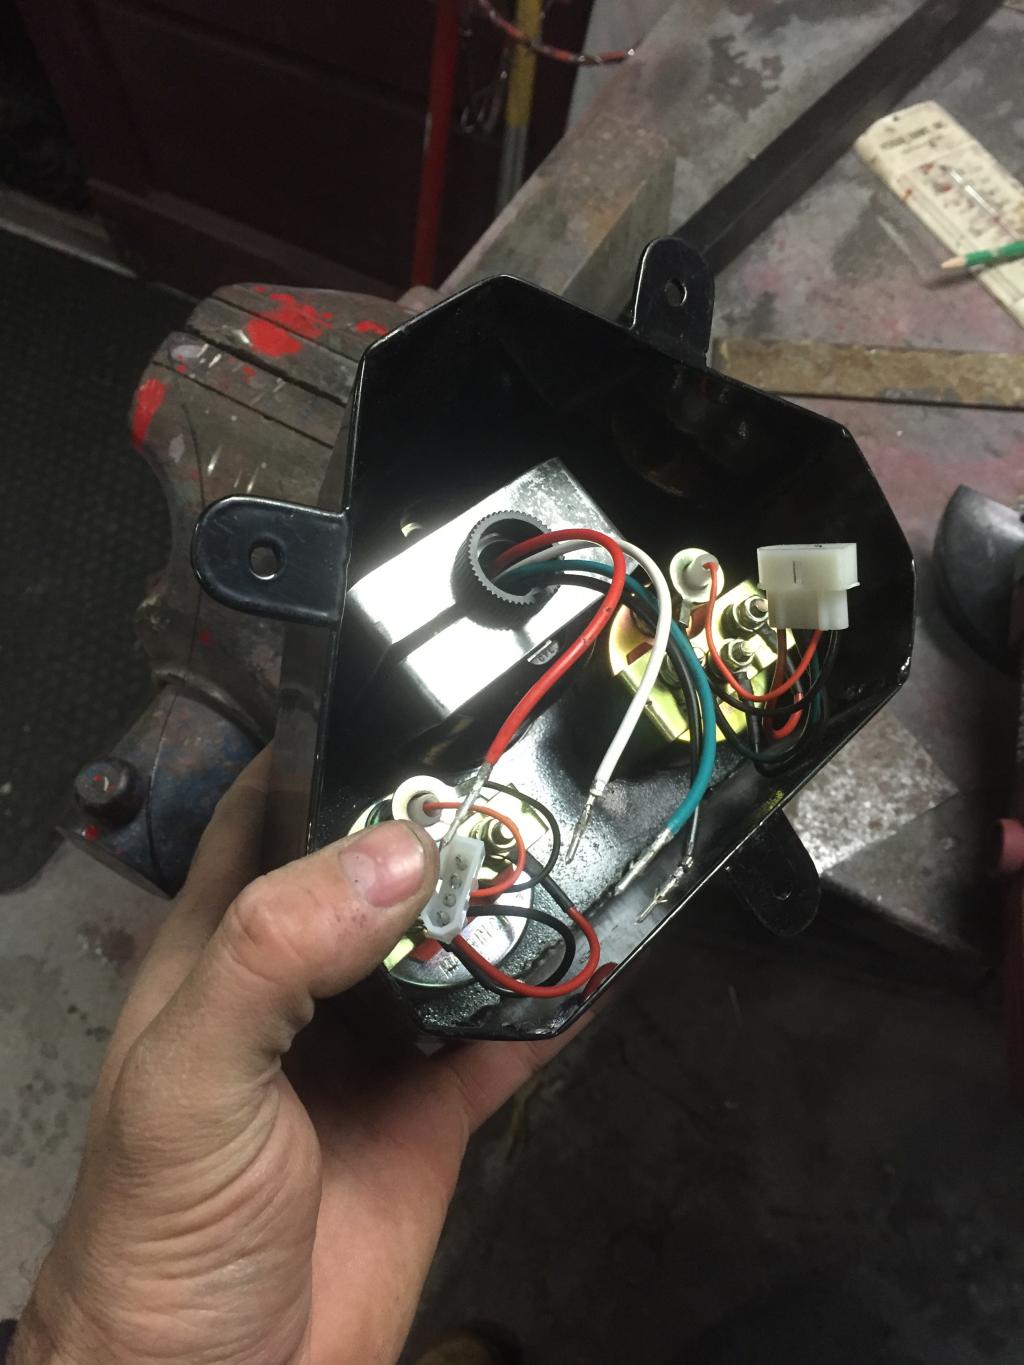
Now for a progress report. The wiring harness is in, but I'm working on re-terminating a few wires and freshening up the harness. I need to re-routing a few things here and there - like the tail light harness. I'm going to be running that under the cab instead of down the passenger side door sill since I am going with bare floors and I don't want wires exposed inside the cab.

I finished the wiring setup on my gauge pod. I ended up getting connectors for each gauge so that I can easily disconnect the gauges to swap them out if I ever need to. I still need to route my "gauge harness" into the truck, but I want to get my core wiring in so that I have something to zip tie to as I go.

My tach isn't really designed to go into a gauge pod like this so I had to fabricate a bracket for it to mount securely into my gauge pod. However, given the plugs that I am using I had to make sure that I could remove the gauge from the bracket and the pod without having to remove or cut off the plugs. I bent up a piece of steel to straddle the gauge like any other gauge other there and drilled a 3/4" hole for the mounting nut. I then cut a slit in the bracket so that the wires could easily be removed from the bracket. I did the slit latitudinally so that it would not compromise the structural integrity of the bracket once torqued down. So this is what I came up with:
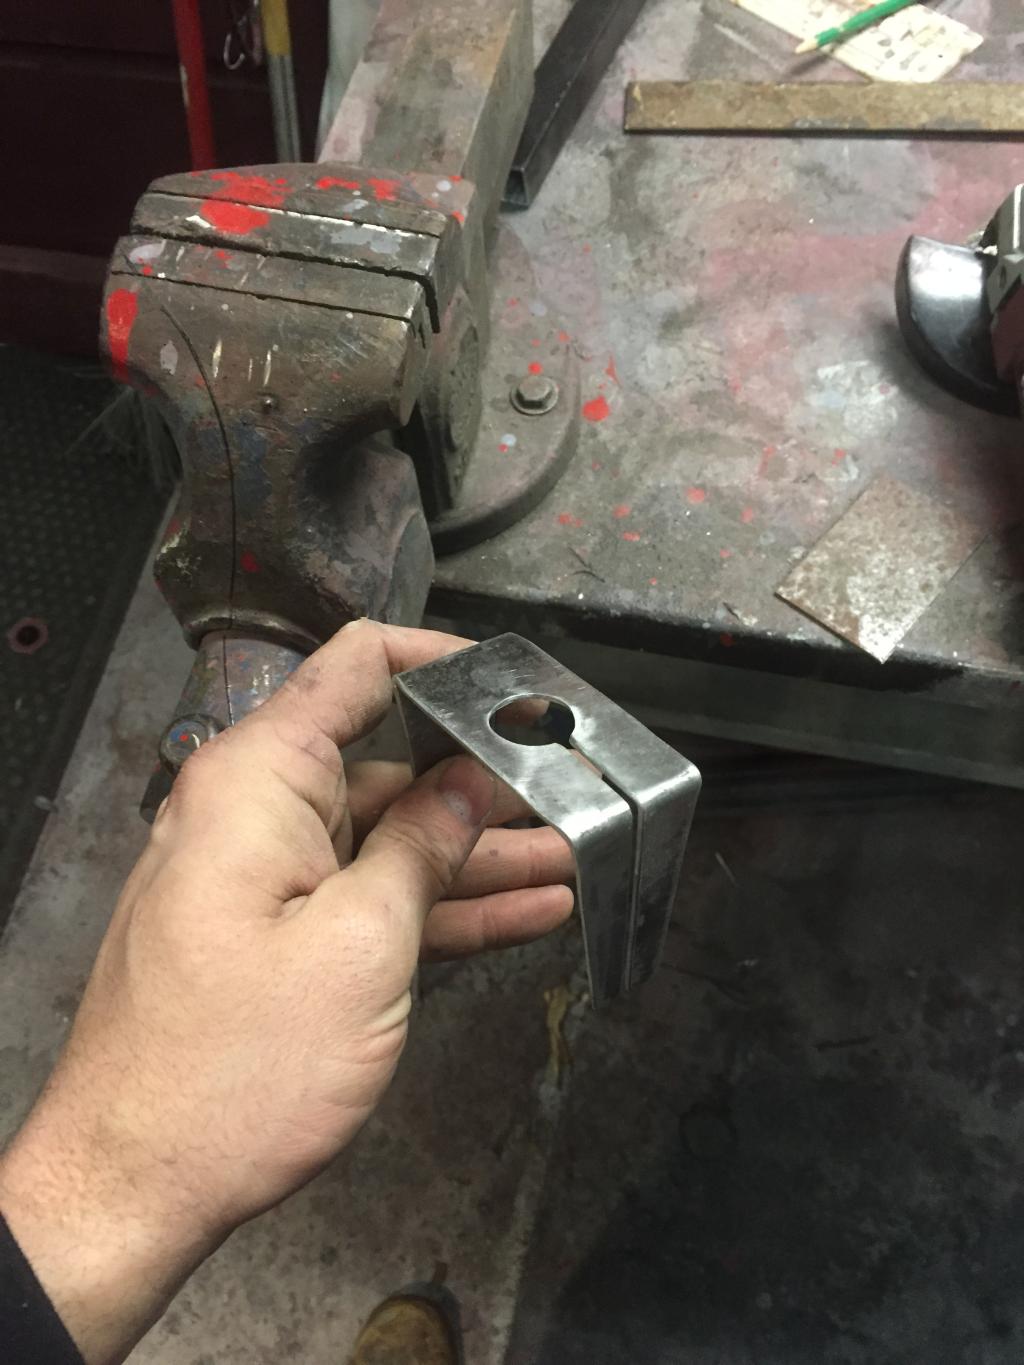
And installed (minus the plug):
So as it stands now, I'm looking pretty good once I get this ground thing figured out and get the right battery. I bought a group 24 battery, but it seemed to be rather tall so I'm going to take it back and get a group 34/78 battery tomorrow. It's about an inch shorter so I won't have to flirt with hood clearance. What size battery are you all running in your trucks?
Shouldn't be too long before I start going through the systems check and closer to sparking this thing up!! My wife also said that she got me something cool for Valentine's day for my truck. This a major super big gigantic deal because she has NEVER bought me anything for my truck so this will be a first! Hopefully it isn't sledgehammer or matches...
Now for a progress report. The wiring harness is in, but I'm working on re-terminating a few wires and freshening up the harness. I need to re-routing a few things here and there - like the tail light harness. I'm going to be running that under the cab instead of down the passenger side door sill since I am going with bare floors and I don't want wires exposed inside the cab.


I finished the wiring setup on my gauge pod. I ended up getting connectors for each gauge so that I can easily disconnect the gauges to swap them out if I ever need to. I still need to route my "gauge harness" into the truck, but I want to get my core wiring in so that I have something to zip tie to as I go.

My tach isn't really designed to go into a gauge pod like this so I had to fabricate a bracket for it to mount securely into my gauge pod. However, given the plugs that I am using I had to make sure that I could remove the gauge from the bracket and the pod without having to remove or cut off the plugs. I bent up a piece of steel to straddle the gauge like any other gauge other there and drilled a 3/4" hole for the mounting nut. I then cut a slit in the bracket so that the wires could easily be removed from the bracket. I did the slit latitudinally so that it would not compromise the structural integrity of the bracket once torqued down. So this is what I came up with:

And installed (minus the plug):

So as it stands now, I'm looking pretty good once I get this ground thing figured out and get the right battery. I bought a group 24 battery, but it seemed to be rather tall so I'm going to take it back and get a group 34/78 battery tomorrow. It's about an inch shorter so I won't have to flirt with hood clearance. What size battery are you all running in your trucks?
Shouldn't be too long before I start going through the systems check and closer to sparking this thing up!! My wife also said that she got me something cool for Valentine's day for my truck. This a major super big gigantic deal because she has NEVER bought me anything for my truck so this will be a first! Hopefully it isn't sledgehammer or matches...

 Feb 11, 2015 | 06:42 PM
#1137
Registered User
Joined: Oct 2014
Posts: 239
Likes: 1
Now about the ground wire routing and wire gauges! The wires at the front lower picture measure 5/16", and the wire at the rear near the head measure a little bit smaller by about 1/32". I don't know what wire gauge they are, I just used some calipers to measure the outer dimension of the insulation. You could go to a Toyota truck salvage yard to get original wires, or I could get them and send them to yoouu.


 Feb 12, 2015 | 03:50 AM
#1139
Registered User
Joined: Jan 2012
Posts: 325
Likes: 2
From: Kansas City, Missouri
another closeout
Dave- I got another announcement from Rock Auto where we got those Japanese made steering unis. I know, you are practically done, but who knows! Maybe you need one or two of these things.
Nice gauge pod, and custom tach retainer. Putting it in front ot the shift levers ?
I hope these links work for a while at least.
Wholesaler closeouts for your 1983 TOYOTA PICKUP:
http://www.rockauto.com/RSS/vehiclef...l=en&html=true
Wholesaler closeouts for your 1979 TOYOTA PICKUP:
http://www.rockauto.com/RSS/vehiclef...l=en&html=true
Last edited by 83pingpong; Feb 12, 2015 at 04:58 AM.
Feb 12, 2015 | 09:40 PM
#1140
Thread Starter
Super Moderator
iTrader: (3)
Joined: Jan 2012
Posts: 3,218
Likes: 26
From: Salisbury, MD
Thanks for the pictures. Now do you have any of the alternator side? I have a two 10ga wires going down towards the alternator that I neglected to label. One is white and one is black. One goes to the alternator post and one grounds to the engine - I just don't know which one goes where. As always, the help is appreciated.
By the way, did I even mention that I hate wiring???
By the way, did I even mention that I hate wiring???


