
KawaZX636's 1983 Toyota Pickup Restoration
 Sep 17, 2014 | 08:29 PM
#881
Thread Starter
Super Moderator
iTrader: (3)
Joined: Jan 2012
Posts: 3,218
Likes: 26
From: Salisbury, MD
I'm in a holding pattern this week. The Raptor Liner takes 5-7 days to fully cure so I don't want to set the cab back up on my cab stand/jig/contraption until I know for sure that I won't have any undesireable effects on my undercoating. It's kind of a bummer because it's just another hurry up and wait scenario. Ideally, if I could flip it back over I could mock up all the panels, finish any remaining bodywork and get the cab completely painted within a couple weeks.
On another note I finally came across a Raptor Liner tech page that had a bunch of answers to questions and issues that I have experiences. Here they are in case anybody needed some guidance.
-Do not apply over 1K primers. Instead use a 2K urethane or epoxy primer, or etch primer
-Raptor is heat-curing and will re-flow uncured primer, allowing acid to bite into Raptor instead of the substrate (Must wait for epoxy to fully cure)
-Do not apply over exposed OEM seam sealer or uncoated aftermarket seam sealers
-In areas that are difficult to scuff use adhesion promoter - When in doubt use an adhesion promoter (I used Bulldog Adhesion Promoter in the aerosol can available at most auto part stores)
These are words directly from an international authorized U-Pol distributor and none of which can be found on the Raptor Liner instructions. From my experiences, they all certainly make sense to me and I can vouche that they are correct
Sep 21, 2014 | 07:09 AM
#882


Looks great!! I would imagine that the adhesion promoter makes it more rock solid than it already is!! I found that with a good scuff and apply some wax and grease remover prep, let dry and then spray raptor liner. Came out super solid for me every time.
Great tech info on the liner
Great tech info on the liner
Sep 21, 2014 | 05:52 PM
#883
Registered User
Joined: Apr 2012
Posts: 64
Likes: 0
From: blue 1983 stolen in chico california 2013
These lessons in raptor liner learned the hard way.(putting the liner down over freshly sprayed primer) It happened to me. Its hard to be patient but body work is tough work. you put some good attention to detail.
Sep 21, 2014 | 06:26 PM
#884
Thread Starter
Super Moderator
iTrader: (3)
Joined: Jan 2012
Posts: 3,218
Likes: 26
From: Salisbury, MD
Looks great!! I would imagine that the adhesion promoter makes it more rock solid than it already is!! I found that with a good scuff and apply some wax and grease remover prep, let dry and then spray raptor liner. Came out super solid for me every time.
Great tech info on the liner
Great tech info on the liner
Thanks! The epoxy primer thing really chapped my rear. I figured that since the Raptor is a 2K urethane coating that I could apply it like any other 2K coating over the epoxy - that turned into a mistake... My only problem/frustration with Raptor Liner is their lack of product intel available on the interwebs. I search A LOT on various products and techniques and even I couldn't find much info until recently.
Sep 21, 2014 | 06:39 PM
#885
Thread Starter
Super Moderator
iTrader: (3)
Joined: Jan 2012
Posts: 3,218
Likes: 26
From: Salisbury, MD
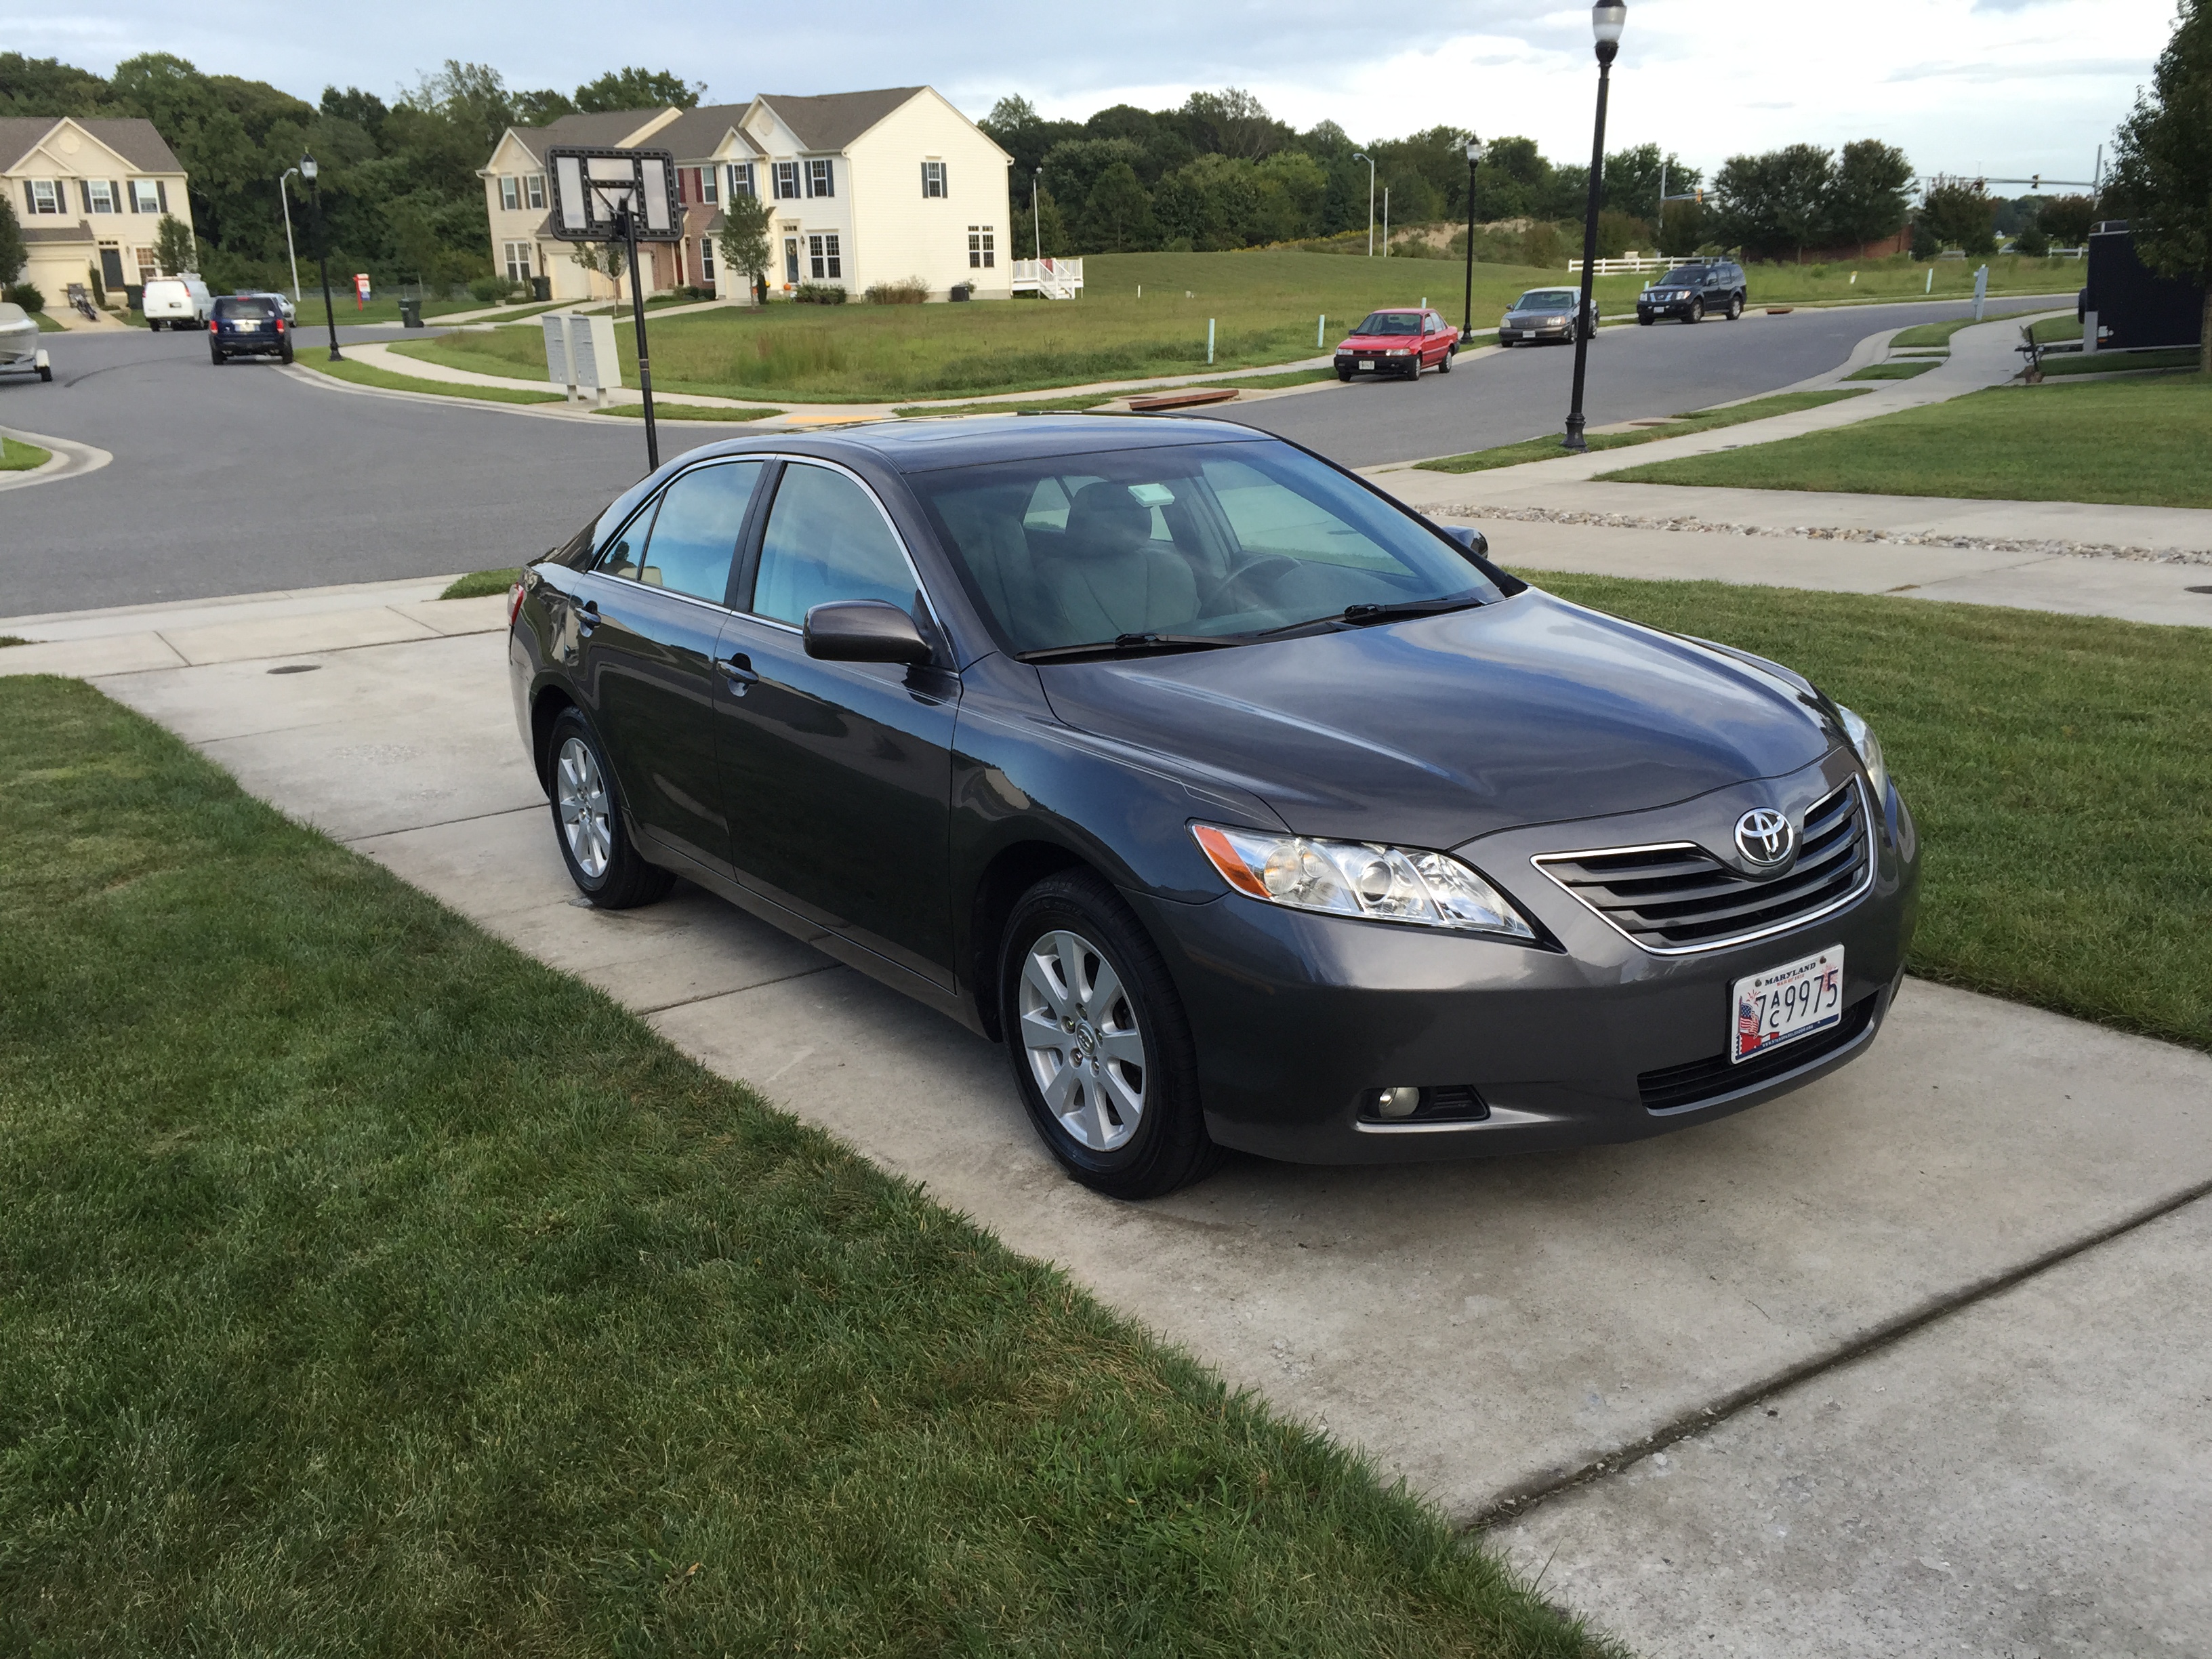
In order to pass my down time a little quicker and more productive I decided to give my Tundra and my wife's Camry and little TLC this weekend - wash and wax for both. My Tundra was in desparate need of attention especially since I am planning on trading it in for a new Tacoma soon, but with my wife about 2 months pregnant I'm not sure how soon that will be. It certainly puts a time deadline to finish my truck though...
Here's the Camry - about to roll 100K miles and still running and looking sharp:
And my Tundra - just shy of 150K hard working miles and never a problem:

My wife even helped my wash my truck (you'll likely never see this again):

I should be back to work on my truck tomorrow night so more to come soon...
Here's the Camry - about to roll 100K miles and still running and looking sharp:
And my Tundra - just shy of 150K hard working miles and never a problem:
My wife even helped my wash my truck (you'll likely never see this again):
I should be back to work on my truck tomorrow night so more to come soon...
Sep 22, 2014 | 09:01 PM
#886
Thread Starter
Super Moderator
iTrader: (3)
Joined: Jan 2012
Posts: 3,218
Likes: 26
From: Salisbury, MD
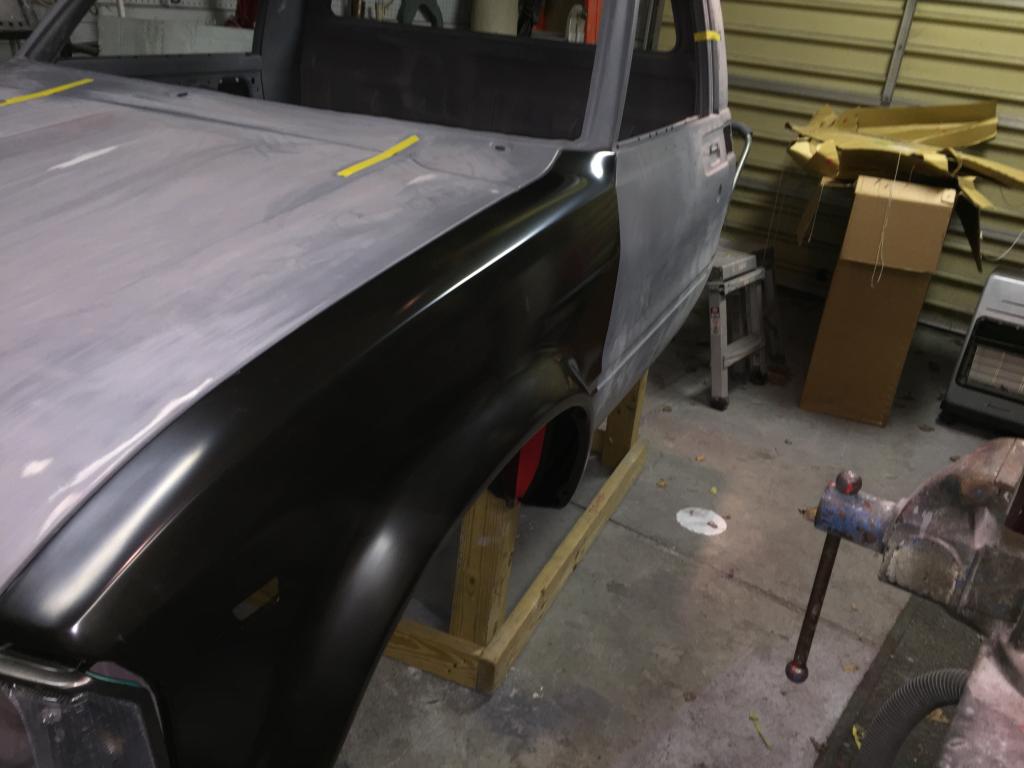
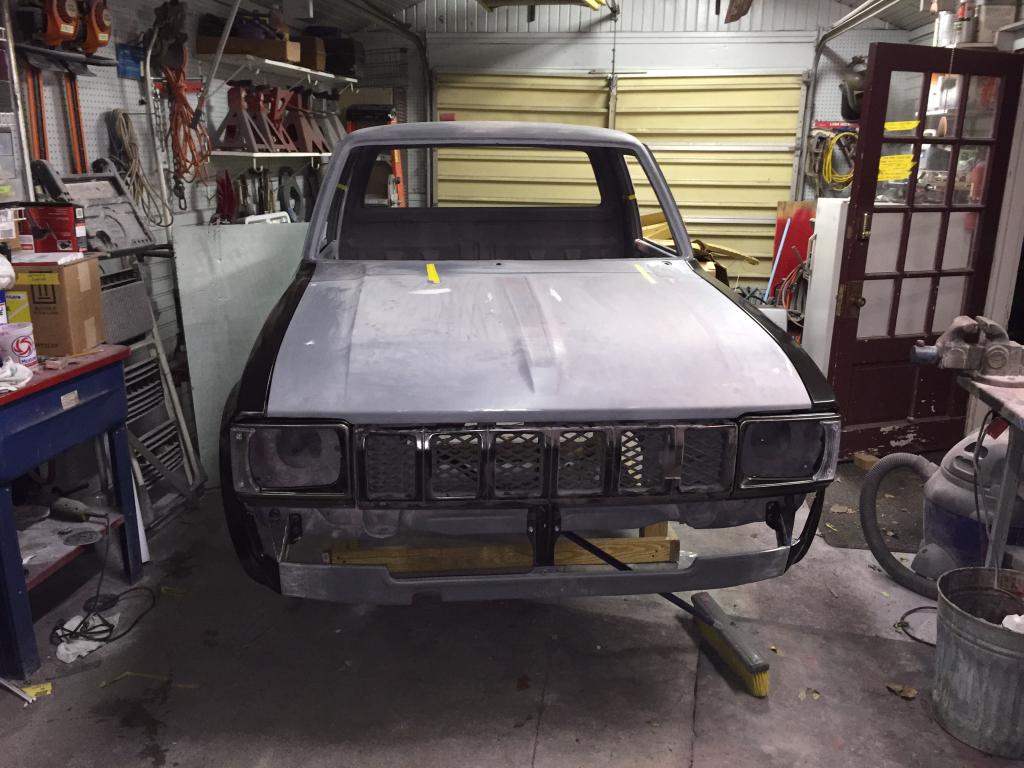
Got most everything assembled on the cab tonight to prep for final bodywork. I still need to installed the valance and I have some old headlight doors and grille that I'm going to use for mock up so I don't cover my chrome parts with body filler. So far all the body gaps are coming together nicely. I still have sone adjustments to make - mainly when the hood lines up with the fenders but it shouldn't be a big deal.
Here it is... Looking like a truck again!!!
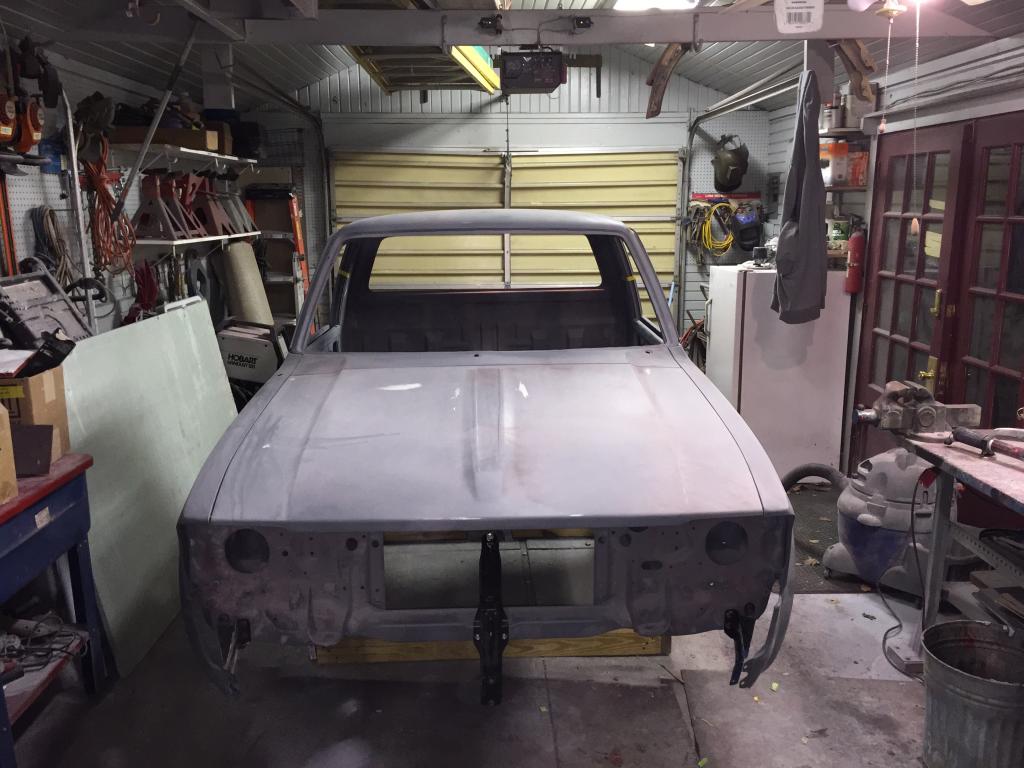
Here it is... Looking like a truck again!!!

 Sep 23, 2014 | 09:37 AM
#887
Thread Starter
Super Moderator
iTrader: (3)
Joined: Jan 2012
Posts: 3,218
Likes: 26
From: Salisbury, MD
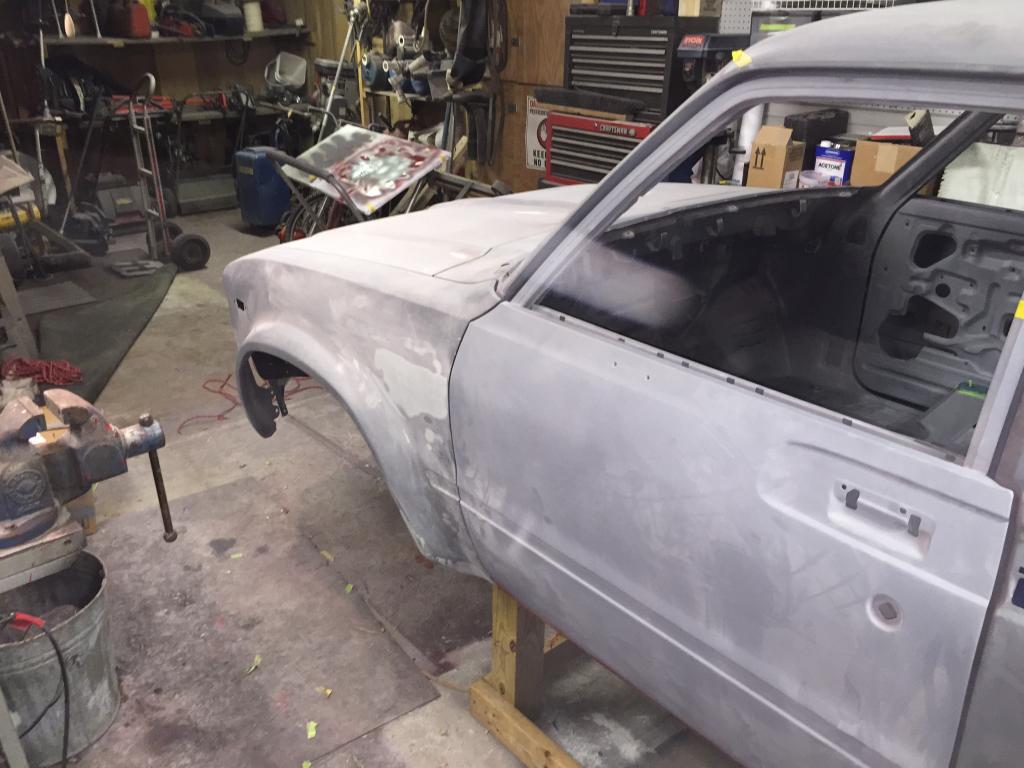
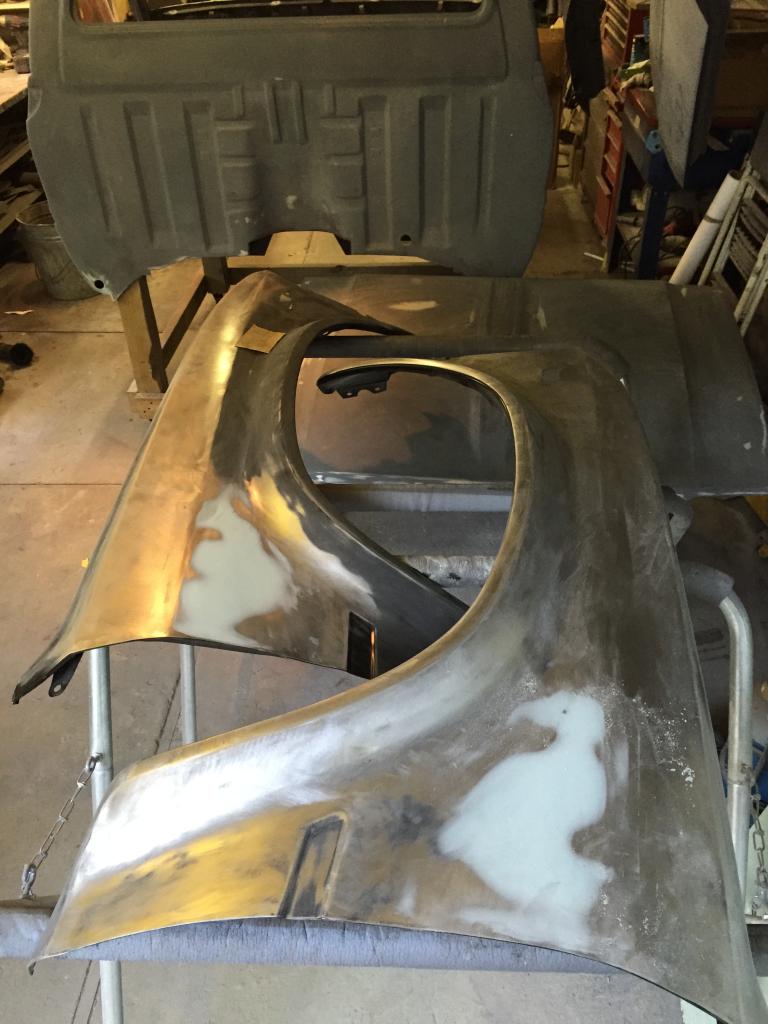
Well, upon further inspection I discovered a couple issues with my fenders that I don't really like. The metal is cracking in some of the corners where the fenders were press - likely cause by metal fatigue coupled with corrosion. I also had some rust issues that I couldn't see near where it mounts to the rocker panel area. I could fix these things, but from my experiences I is not fun or easy welding this thin/cheap Toyota metal. I opted to roll the dice and buy a pair of aftermarket fenders. I've seen some decent fitting fenders on these trucks before and hopefully the ones I bought don't require much tweaking. Worst case scenario, I'll just have to resort to repairing my factory fenders. Luckily for me, the front clip of my cab is straight so that should help reduce any complications. If I had more time, I would have ordered a pair of fiberglass fenders from Corey, but I'm in a tight pinch to get the bodywork and paint complete before the cold weather sets in and a baby #2 deadline in April (God help me if it takes me that long to finish this!!). Fingers crossed for quick shipping on quality fenders!!!
Last edited by kawazx636; Sep 23, 2014 at 09:39 AM.
Sep 23, 2014 | 12:19 PM
#888
Thread Starter
Super Moderator
iTrader: (3)
Joined: Jan 2012
Posts: 3,218
Likes: 26
From: Salisbury, MD
I also add to my little shopping spree today. I scored some chrome bumper bolts, hood latch, fuel cap and hood bumpers - All brand new old stock! Woot Woot! It's the little things that brighten my days...
 Sep 24, 2014 | 03:10 PM
#893
Registered User
Joined: Sep 2014
Posts: 2
Likes: 0
Looks really good. Thanks for posting the detail. I am collecting parts for a rebuild on my 82 SR5, some harder to find than others. A question - any reason you went with Por 15 instead of spraying epoxy primer on your freshly blasted frame & all? I plan to use epoxy under any skim coats of bondo, since from my experience bondo is porous and attracts moisture. Id rather not have it directly applied to bare metal. Keep up the good work!!
Sep 24, 2014 | 07:11 PM
#894
Thread Starter
Super Moderator
iTrader: (3)
Joined: Jan 2012
Posts: 3,218
Likes: 26
From: Salisbury, MD
I used POR15 because it istough as nails, easy to apply and lasts a long time. Many people have had issues with POR15, but they were all caused by improper prep work. POR15 loves sand blasted surfaces and while sand blasting an entire fram can be a real PITA it is by far the best and most effective way to prep for it. Epoxy is great, but what you put over it isn't always rugged enough for the abuse that a frame experiences.
Sep 25, 2014 | 09:38 PM
#895
Thread Starter
Super Moderator
iTrader: (3)
Joined: Jan 2012
Posts: 3,218
Likes: 26
From: Salisbury, MD
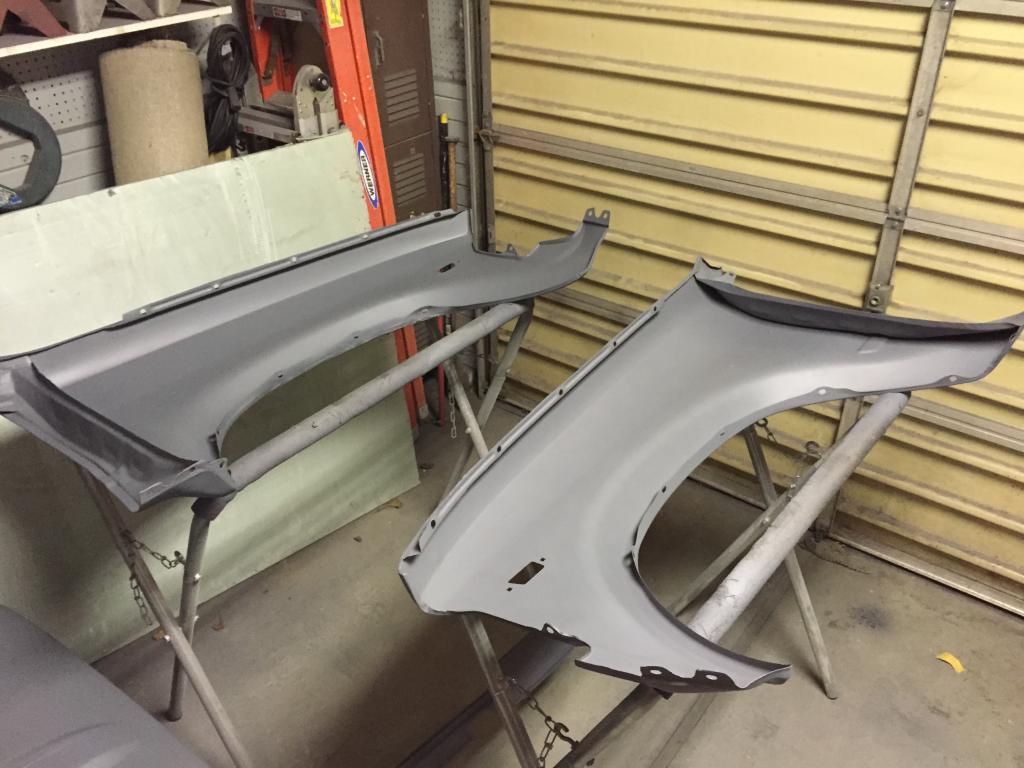
I got the new fenders in today - super quick shipping!
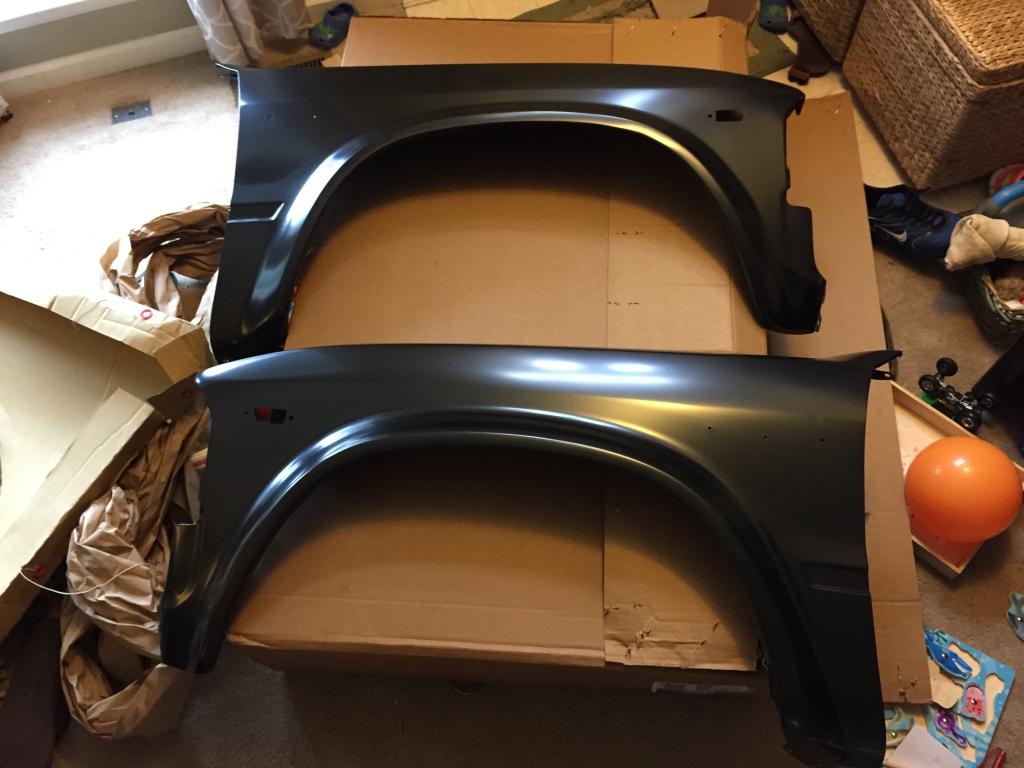
Quality seems to be just as good as the factory fenders, perhaps even a little more thick than the original steel. Overall, no waviness in the stamping and what little there is around the flare can likely be sanded out after a couple coats of surfacer. On the fit... They aren't perfect, but that was expected given the fact that 1) they are aftermarket stampings and 2) the geometry of the cab isn't 100% like it was when it rolled out of the factory 30+ years ago. The body lines definitely line up well - the molding grove down the side, the bends in the rockers and the overall curvature of the fender matches up really well with the doors and hood. The only part that does line up well is the rear upper corner of the fenders where it meets next to the doors and the corner of the windshield. It's not awful, but I'm going to try to get it a little better. The other issue I had was the bolt holes on the top of the fenders were a little off. Not a big deal, I just had to elongate them a little to fit properly. The passenger side fender does not have the hole drilled for the radio antenna, but that is perfectly fine with me because it gave me the notion to just leave it be and use a hidden antenna for my radio - should look pretty sharp with a "shaved" antenna. It did come with the holes for the emblems, but I'm going to weld those up since I won't be putting the emblems back on - if I change my mind I'll just double sided tape them. I also mounted up my old grille and spare headlight doors for mock up. I still have some massaging to do to get the proper fit that I want, but overall I'm pretty satisfied. I'm glad I went this route with the new fenders. I definitely save me some time in bodywork. Here they are with everything aligned about to where I want it:
I'm hoping to get enough time this weekend to get the emblem holes welded up, finish the filler on the smoothie valance and finalize any remaining body work and sanding on the cab. Then it's time for a lot of tedious seam sealing and then PAINT!

Quality seems to be just as good as the factory fenders, perhaps even a little more thick than the original steel. Overall, no waviness in the stamping and what little there is around the flare can likely be sanded out after a couple coats of surfacer. On the fit... They aren't perfect, but that was expected given the fact that 1) they are aftermarket stampings and 2) the geometry of the cab isn't 100% like it was when it rolled out of the factory 30+ years ago. The body lines definitely line up well - the molding grove down the side, the bends in the rockers and the overall curvature of the fender matches up really well with the doors and hood. The only part that does line up well is the rear upper corner of the fenders where it meets next to the doors and the corner of the windshield. It's not awful, but I'm going to try to get it a little better. The other issue I had was the bolt holes on the top of the fenders were a little off. Not a big deal, I just had to elongate them a little to fit properly. The passenger side fender does not have the hole drilled for the radio antenna, but that is perfectly fine with me because it gave me the notion to just leave it be and use a hidden antenna for my radio - should look pretty sharp with a "shaved" antenna. It did come with the holes for the emblems, but I'm going to weld those up since I won't be putting the emblems back on - if I change my mind I'll just double sided tape them. I also mounted up my old grille and spare headlight doors for mock up. I still have some massaging to do to get the proper fit that I want, but overall I'm pretty satisfied. I'm glad I went this route with the new fenders. I definitely save me some time in bodywork. Here they are with everything aligned about to where I want it:


I'm hoping to get enough time this weekend to get the emblem holes welded up, finish the filler on the smoothie valance and finalize any remaining body work and sanding on the cab. Then it's time for a lot of tedious seam sealing and then PAINT!
Sep 29, 2014 | 08:59 PM
#897
Thread Starter
Super Moderator
iTrader: (3)
Joined: Jan 2012
Posts: 3,218
Likes: 26
From: Salisbury, MD
Gizler, I got the fenders from CarParts.com.
I got the emblem holes on the fenders welded up, filled and smoothed yesterday:
Then tonight I scuffed the insides of the fenders really good and shot them with a coat of epoxy. Did the backside of the valance too. Tomorrow night I'll apply some seam sealer to the folder edge and then hit them with a couple coats of red before I flip them over to finish the outsides:
I also sprayed an extra coat of epoxy on the hood since I sanded through to some of the metal when I was making some adjustments. Tomorrow night I'll shoot it with a couple coats of surfacer before I flip it over to seam seal the folded edges and then hit it with some color too:

I'm realizing very quickly that space is truly a premium around here so I want to get a few panels completely done and out of the garage to free up space and prevent potential overspray on finished panels. I'm going to try to get the hood, fenders and valance done by this weekend, then the doors, then the cab. Once I get the cab and panels done, I'll roll it away to storage and bring the bed back so I can finish it. I'm hoping to have all the cab and cab panels done in about two weeks - might be wishful thinking...
I got the emblem holes on the fenders welded up, filled and smoothed yesterday:

Then tonight I scuffed the insides of the fenders really good and shot them with a coat of epoxy. Did the backside of the valance too. Tomorrow night I'll apply some seam sealer to the folder edge and then hit them with a couple coats of red before I flip them over to finish the outsides:

I also sprayed an extra coat of epoxy on the hood since I sanded through to some of the metal when I was making some adjustments. Tomorrow night I'll shoot it with a couple coats of surfacer before I flip it over to seam seal the folded edges and then hit it with some color too:

I'm realizing very quickly that space is truly a premium around here so I want to get a few panels completely done and out of the garage to free up space and prevent potential overspray on finished panels. I'm going to try to get the hood, fenders and valance done by this weekend, then the doors, then the cab. Once I get the cab and panels done, I'll roll it away to storage and bring the bed back so I can finish it. I'm hoping to have all the cab and cab panels done in about two weeks - might be wishful thinking...
Last edited by kawazx636; Sep 29, 2014 at 09:00 PM.

 .. great work there bud !


