
KawaZX636's 1983 Toyota Pickup Restoration
 Jul 16, 2013 | 11:06 PM
#141
Registered User
Joined: Jun 2013
Posts: 69
Likes: 0
From: Fairbanks, AK
Really awesome to see this project come together. I started reading a few days ago, so I'm glad I caught it right as your springs were coming in. It sucks that you had to wait so long, but it looks like the delay has caused you to work extra hard on the smaller details. There has to be a silver lining in that.
Jul 17, 2013 | 05:52 AM
#142
Glad your build is getting back on track to a rolling chassis. I really like the header and exhaust setup, nice and simple, but really will add to the engine bay looks.
Too bad for the delay in getting your springs, but I guess it happens. I bought my rear spring and Front/rear greasable shackles from http://www.4by4connection.com/4runpicallle.html. Got all the parts within 1 1/2 weeks. I think they are a part of ARB in stocking parts
Too bad for the delay in getting your springs, but I guess it happens. I bought my rear spring and Front/rear greasable shackles from http://www.4by4connection.com/4runpicallle.html. Got all the parts within 1 1/2 weeks. I think they are a part of ARB in stocking parts
Jul 17, 2013 | 08:10 PM
#144
Thread Starter
Super Moderator
iTrader: (3)
Joined: Jan 2012
Posts: 3,218
Likes: 26
From: Salisbury, MD
The front shock is part #24-185684 (Collapsed 12.87" / Extended 20.49" / Travel 7.62")
The rear shock is part #33-186542 (Collapsed 15.12" / Extended 24.31" / Travel 9.19")
Not extreme, but it is plenty adequate for what I use my truck for.
The rear shock is part #33-186542 (Collapsed 15.12" / Extended 24.31" / Travel 9.19")
Not extreme, but it is plenty adequate for what I use my truck for.
Jul 17, 2013 | 08:32 PM
#145
Thread Starter
Super Moderator
iTrader: (3)
Joined: Jan 2012
Posts: 3,218
Likes: 26
From: Salisbury, MD
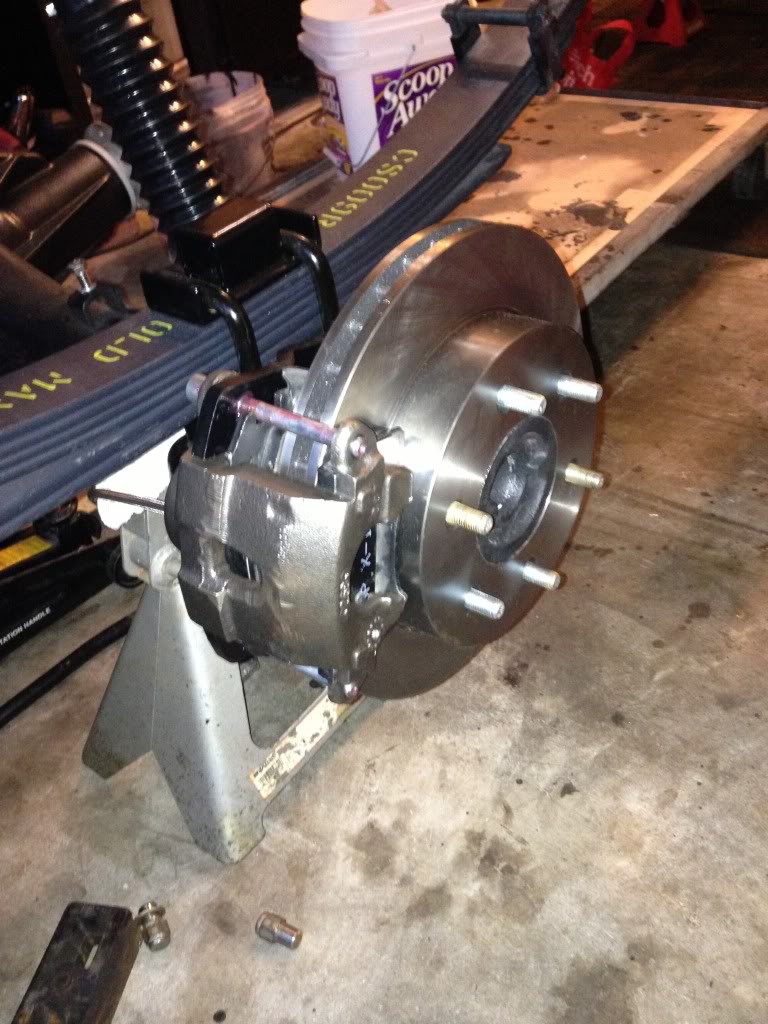
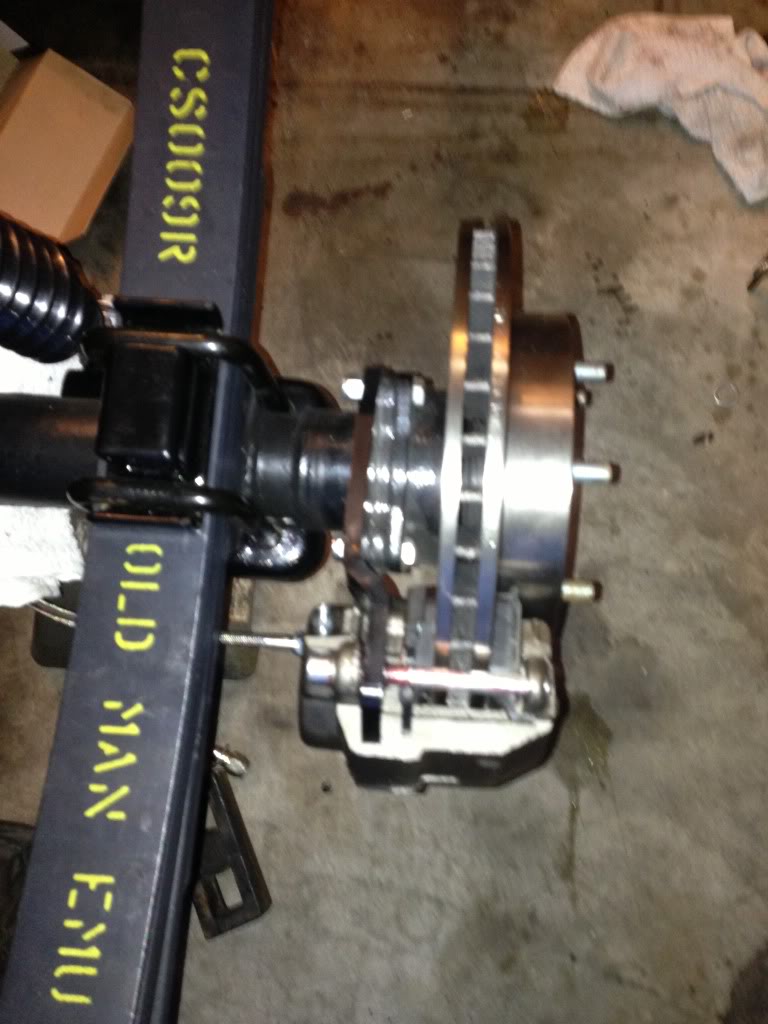
Tonight I was hoping to get my rear disc brake conversion complete, but the brake gods had other plans. I originally had just the calipers mounted up to double check the clearance on the wheels so I had to remove them to install the brake rotors. Then once I had them installed again I realized that I forgot to install the spring clips on the pads. Then once I had them installed AGAIN, I realized that the conversion bracket was in the way of the banjo bolt so I had to take them off to grind down a portion of the calipers near the banjo bolt (also gave me a better route to the center of the axle housing). Then once I had them installed yet AGAIN I realized that my banjo bolts were too short so I have them off AGAIN to take to the parts store to match up the proper banjo bolt length... By now, I'm pretty damn good at installing 1982 Monte Carlo brake calipers!
In other news, I dropped my wheels off to get the tires mounted and balanced during my lunch break today. The shop was jammed up all day so I should be getting them back tomorrow - slightly convenient since I couldn't mount them anyway with the rear brakes acting up.
In other news, I dropped my wheels off to get the tires mounted and balanced during my lunch break today. The shop was jammed up all day so I should be getting them back tomorrow - slightly convenient since I couldn't mount them anyway with the rear brakes acting up.
Jul 18, 2013 | 07:36 PM
#146
Thread Starter
Super Moderator
iTrader: (3)
Joined: Jan 2012
Posts: 3,218
Likes: 26
From: Salisbury, MD
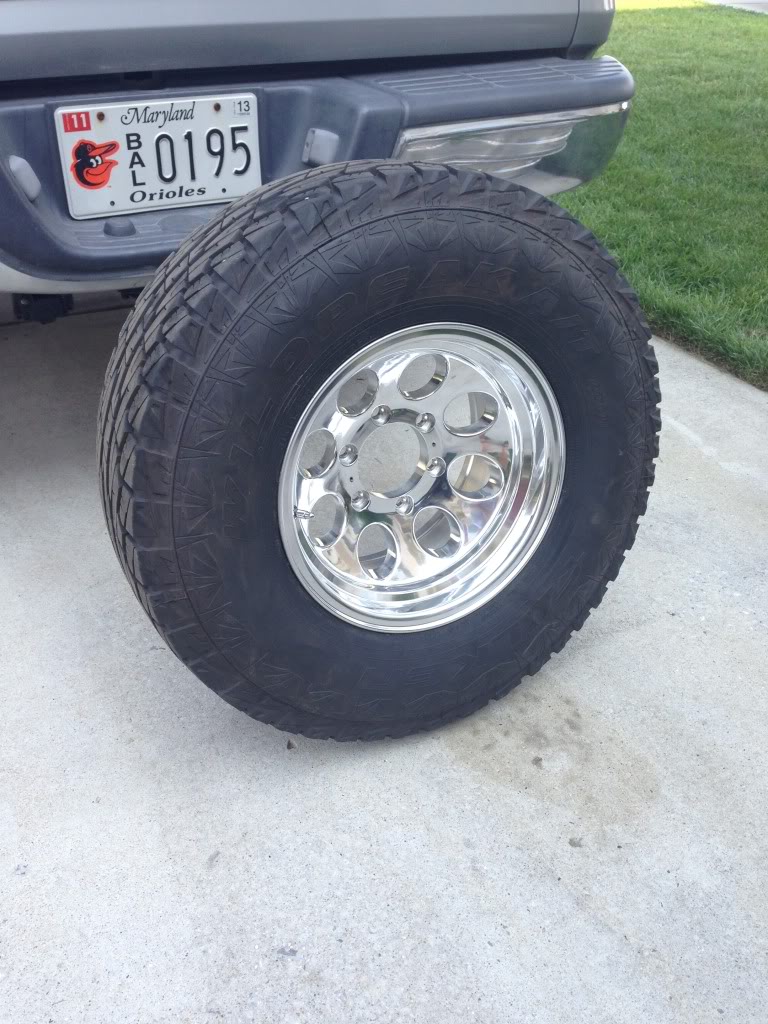
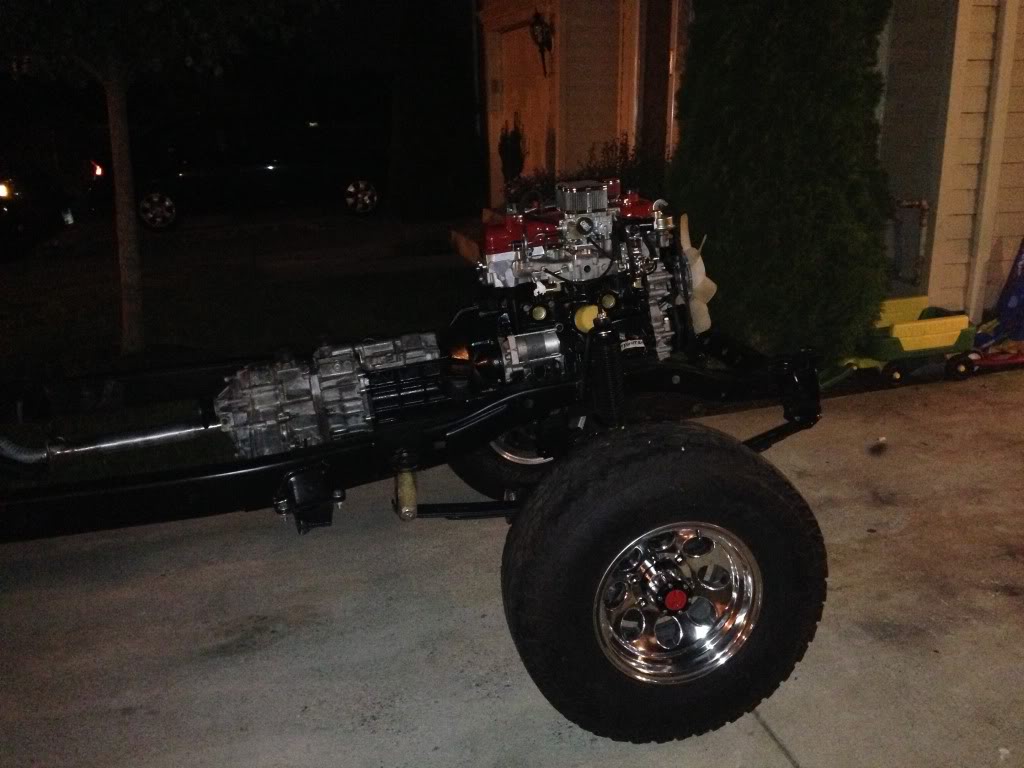
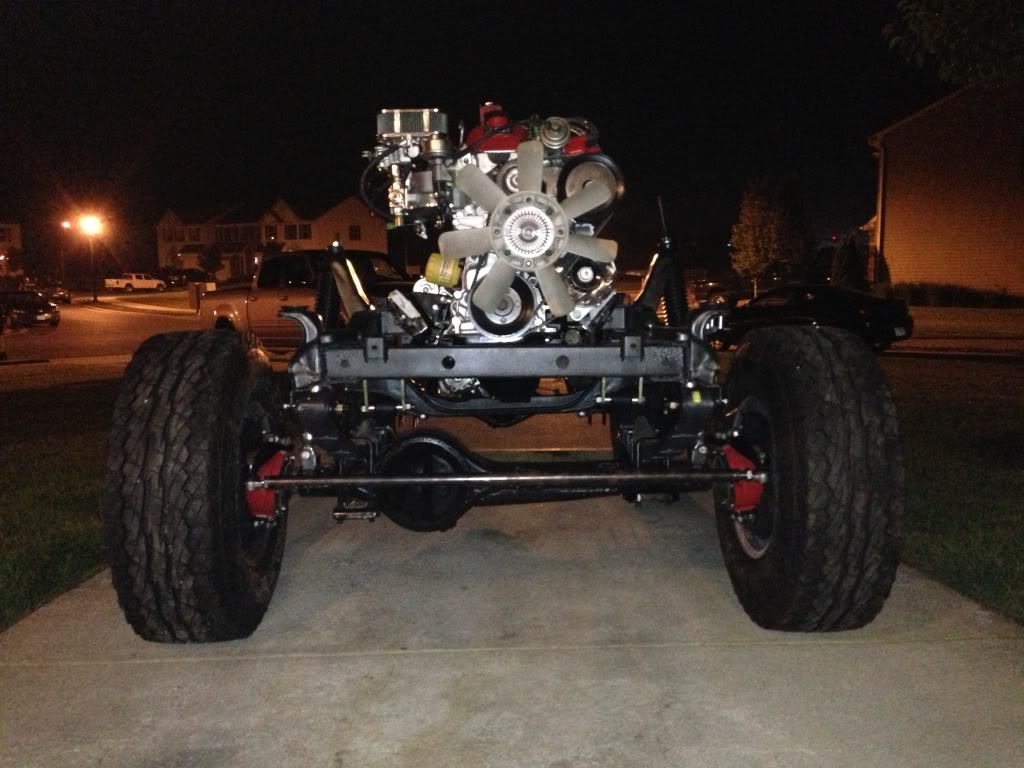
Today was a great day!! Got my tires swapped over to the my new Ion wheels. I'm running Falken Wild Peak 31x10.5 tires. I still maintain that they are the absolute best tires for your buck!! I paid around $600 shipped from Discount Tire direct. I liked them so much that I got a set of 33's for my Tundra. They are quiet on the road, don't cake up in the mud, great in the snow, don't wear too fast and grip the road really well. They have a mildly aggressive look which is what I was going for. I would highly recommend them to anybody who wants an A/T with solid off-road capabilities. Oh... and the wheels look good too! Absolutely perfect clearance around the calipers, tie rod and steering arms.
So I spent my entire lunch break (and then some) searching parts stores for the correct banjo bolts for my rear brake calipers. Went to both Auto Zones, PepBoys, Advanced Auto, Napa, a couple brake shops and even my tire shop... nothing!! Obiviously I could have ordered them, but I wanted them TODAY! I went back to work depressed and expressed my sorrows to my co-worker (who's building a International Scout) and he mentioned this little local mom and pop parts store called RC Holloway. They tend to have some random off the wall parts. Voila, they had it!! For those looking for banjo bolts for this conversion, you will need M10 x 1.5 x 27.8 banjo bolts. Here are the results (eventually, I'll break down the calipers and powdercoat them):
After I got everything buttoned up, I decided to take it for a test spin... My wife caught me driveway pimpin'
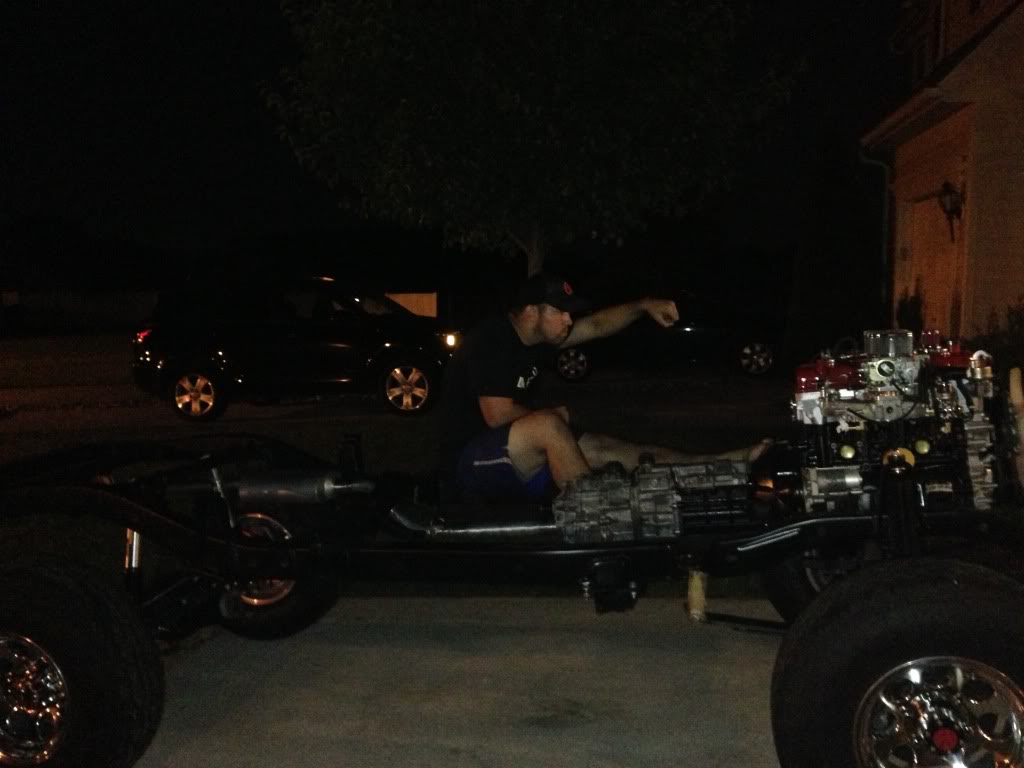
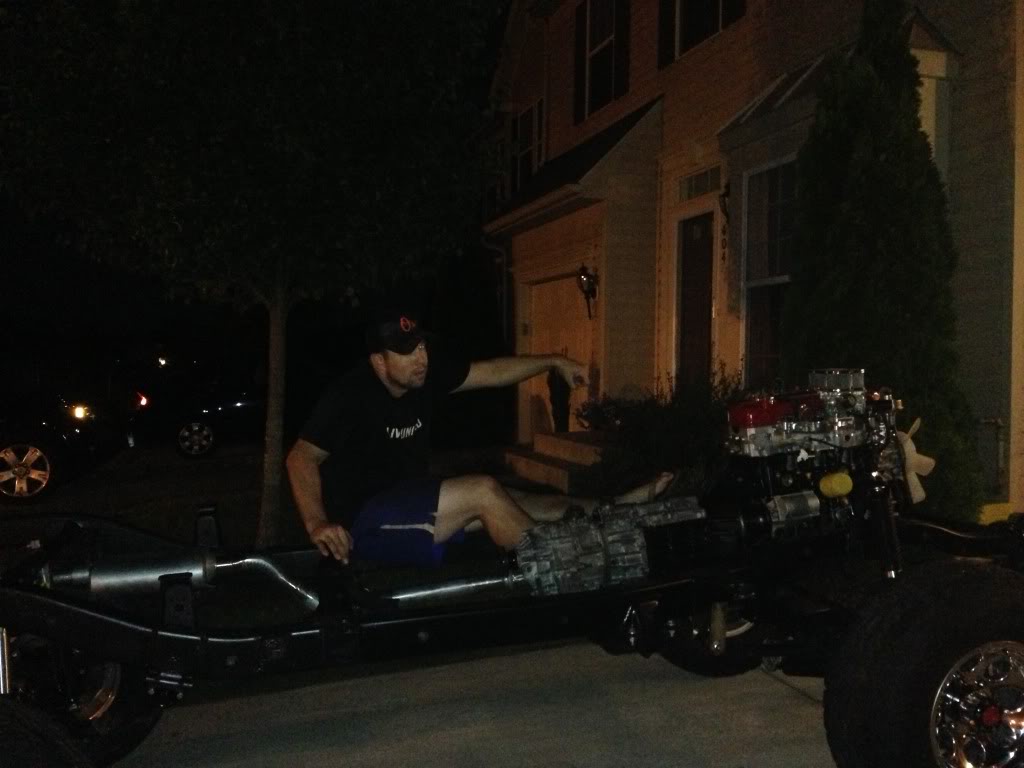
I tried to get some shots while I had it outside, but I ran out of daylight. I'll roll it back out and try to get some shot tomorrow before the sun goes down. It sits a little high so I'm hoping that those springs settle a little bit. My rear shackle angle is a little jacked up, I am praying that the weight of the bed corrects it. If not, I'll address the issue later. The front shackle angle will be perfect once the cab weight is on.
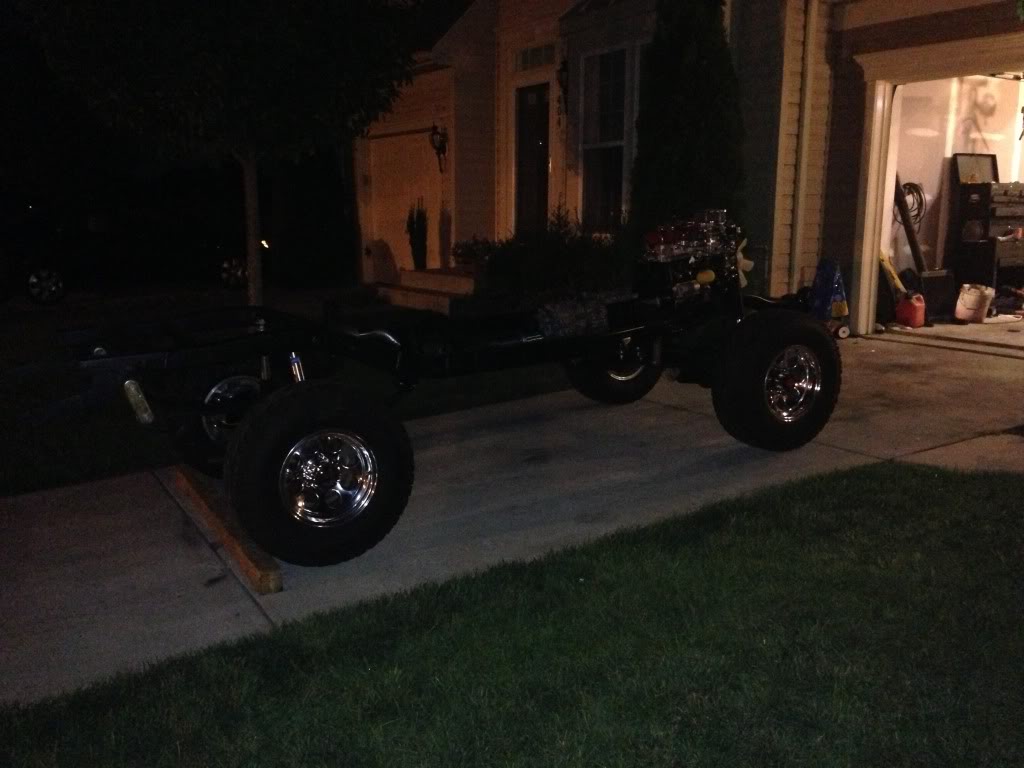
I'm super satisfied with the wheels!
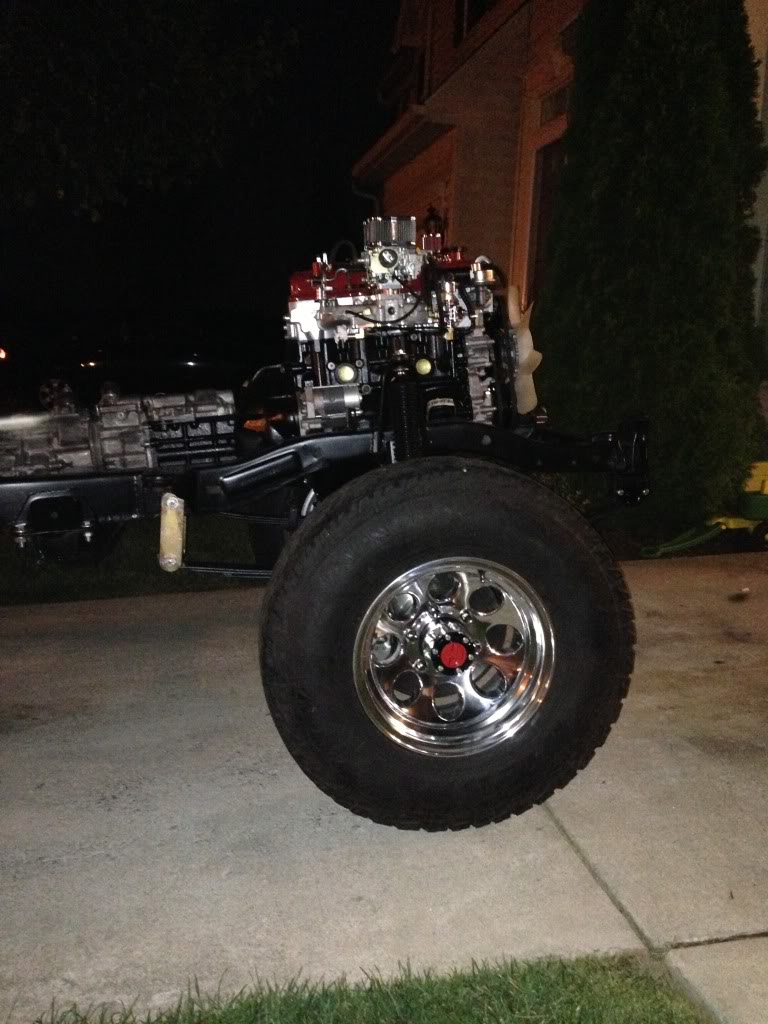
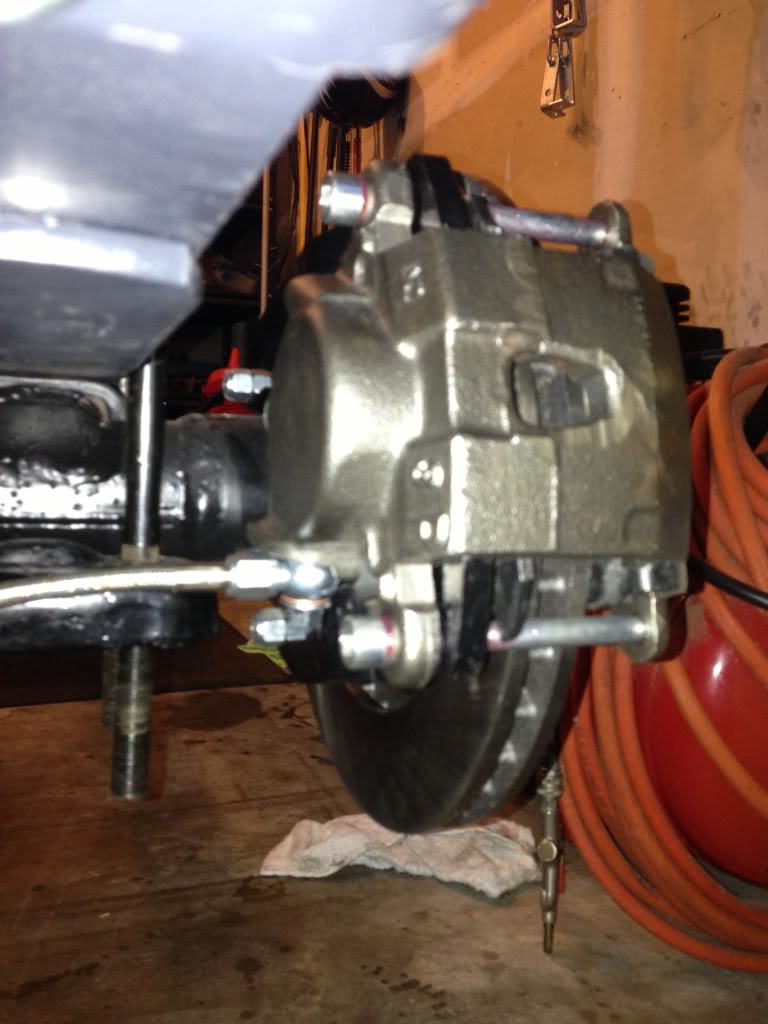
I'm also really glad that I powdercoated the knuckles red. I was a little concerned that they would be a little hidden, but they pop out really nice and provide some good contrast against all the other black chassis components.
I got an overwelming sense of accomplishment today! Even cleaned up the garage tonight while I was getting bombarded by mosquitos!! This weekend I'm going to try to sort through my brake hardware to see what fittings are reuseable and might get to bending some new brake lines.

So I spent my entire lunch break (and then some) searching parts stores for the correct banjo bolts for my rear brake calipers. Went to both Auto Zones, PepBoys, Advanced Auto, Napa, a couple brake shops and even my tire shop... nothing!! Obiviously I could have ordered them, but I wanted them TODAY! I went back to work depressed and expressed my sorrows to my co-worker (who's building a International Scout) and he mentioned this little local mom and pop parts store called RC Holloway. They tend to have some random off the wall parts. Voila, they had it!! For those looking for banjo bolts for this conversion, you will need M10 x 1.5 x 27.8 banjo bolts. Here are the results (eventually, I'll break down the calipers and powdercoat them):


After I got everything buttoned up, I decided to take it for a test spin... My wife caught me driveway pimpin'


I tried to get some shots while I had it outside, but I ran out of daylight. I'll roll it back out and try to get some shot tomorrow before the sun goes down. It sits a little high so I'm hoping that those springs settle a little bit. My rear shackle angle is a little jacked up, I am praying that the weight of the bed corrects it. If not, I'll address the issue later. The front shackle angle will be perfect once the cab weight is on.


I'm super satisfied with the wheels!

I'm also really glad that I powdercoated the knuckles red. I was a little concerned that they would be a little hidden, but they pop out really nice and provide some good contrast against all the other black chassis components.

I got an overwelming sense of accomplishment today! Even cleaned up the garage tonight while I was getting bombarded by mosquitos!! This weekend I'm going to try to sort through my brake hardware to see what fittings are reuseable and might get to bending some new brake lines.
Last edited by kawazx636; Jul 18, 2013 at 07:51 PM.
Jul 18, 2013 | 08:36 PM
#147
Registered User
Joined: Jun 2013
Posts: 69
Likes: 0
From: Fairbanks, AK
Man... That red/black/chrome look is really awesome. Are you think of doing your body in a similar color scheme? Red with grey/black stock looking stripes would be sweet.
I really like those tires, I'm going to have to see if they sell them in Fairbanks. Those fit under a stock lift right?
I really like those tires, I'm going to have to see if they sell them in Fairbanks. Those fit under a stock lift right?
Jul 18, 2013 | 08:48 PM
#148
Thread Starter
Super Moderator
iTrader: (3)
Joined: Jan 2012
Posts: 3,218
Likes: 26
From: Salisbury, MD
I'm going to go with a dark metallic gray like my wife's Camry in the background of some of these pictures or a straight gloss black. Probably chrome mirrors, door handles grille and headlight bezels, but I'll still contemplating all black... we'll see.
The tires should fit really well under a stock lift. They are only 2" bigger than stock tires which only takes 1" of fender clearance away.
The tires should fit really well under a stock lift. They are only 2" bigger than stock tires which only takes 1" of fender clearance away.
Jul 18, 2013 | 08:59 PM
#149
Registered User
Joined: Jun 2013
Posts: 69
Likes: 0
From: Fairbanks, AK
Good to know about clearance. I think if you drive well, a 31 can get you pretty far off the trail.
The dark gray looks really cool, especially for such a clean truck like yours. I have always liked the silver color of the old 4runners too.
The dark gray looks really cool, especially for such a clean truck like yours. I have always liked the silver color of the old 4runners too.
Jul 19, 2013 | 07:09 AM
#151
Thread Starter
Super Moderator
iTrader: (3)
Joined: Jan 2012
Posts: 3,218
Likes: 26
From: Salisbury, MD
yotantn, if you are looking for wheels check out www.rimzoneonline.com
That is where I got my wheels and they sell the Falken Wild Peak tires as well. I just priced it out on their website and the total came up to $1,031.92 for my exact set up mounted, balanced and shipped to your door. $631.96 for the tires, $339.96 for the wheels, $60.00 mount/balance and free shipping and lugs. Mine got shipped to my house within a week, but it may take slightly longer if they have to mount and balance them. A little over $1G is a pretty damn good deal for a set of alloy wheels and tires.
That is where I got my wheels and they sell the Falken Wild Peak tires as well. I just priced it out on their website and the total came up to $1,031.92 for my exact set up mounted, balanced and shipped to your door. $631.96 for the tires, $339.96 for the wheels, $60.00 mount/balance and free shipping and lugs. Mine got shipped to my house within a week, but it may take slightly longer if they have to mount and balance them. A little over $1G is a pretty damn good deal for a set of alloy wheels and tires.
Jul 19, 2013 | 06:53 PM
#152
Thread Starter
Super Moderator
iTrader: (3)
Joined: Jan 2012
Posts: 3,218
Likes: 26
From: Salisbury, MD
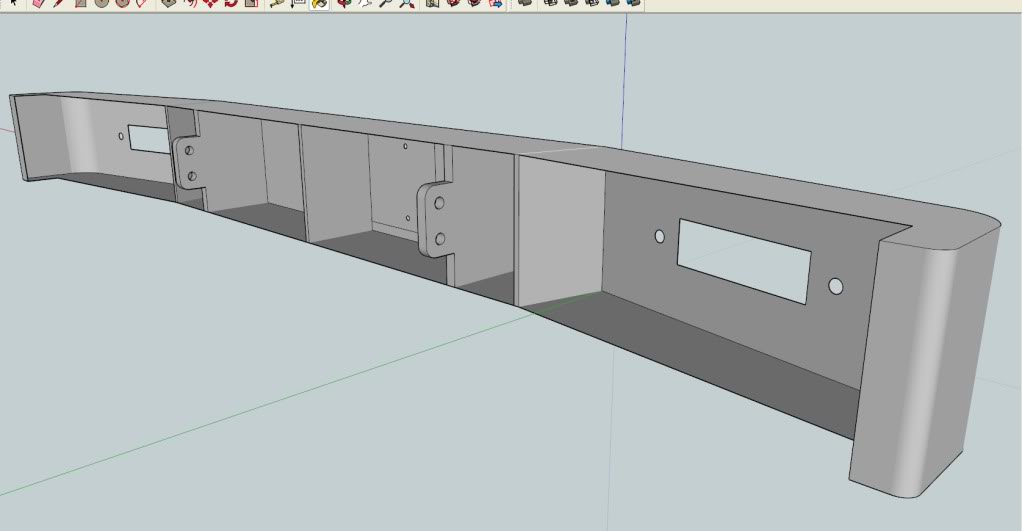
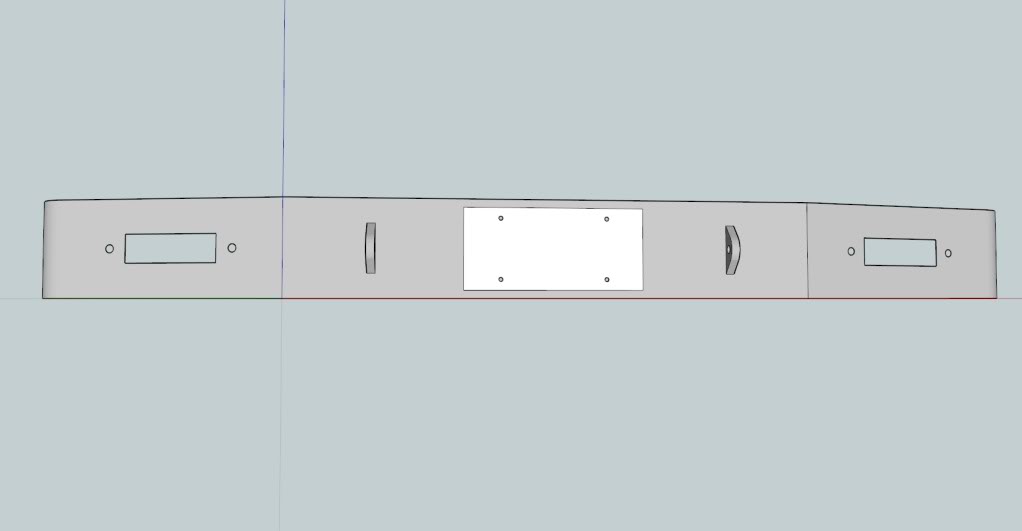
I got this new software at work today called SketchUp - It's a 3D modeling and design software. It's really easy to use and turns out some pretty cool products. So in my need to learn the software for work I decided to design my front bumper. I originally had a different design that had a little more of a off road look, but I'm going to go with something a little more conservative to keep it looking more stock. Obiviously I'm no where near building a bumper in my build, but this is what I'm mostlikely going with.


 Jul 19, 2013 | 09:14 PM
#154
Thread Starter
Super Moderator
iTrader: (3)
Joined: Jan 2012
Posts: 3,218
Likes: 26
From: Salisbury, MD
I doubt that I'll ever mount a winch, but if I do I have allowed my self just enough room behind the bumper to mount a small winch. And I will be using 1/4" plate steel for the front portion (3/32" for the rest) so that my D-rings are properly reinforced and I so that I will have enough strength for a winch but I'll probably never mount one. I don't do a lot of wheeling, just hunting in the woods and some occasional trails and mischief. Besides, chances are that if I ever get stuck I'll more than likely be with my friend who has a H1 Hummer... I'm sure he'll be able to get me out. Here's a pic of us hauling jetskis back to Ocean City with it:
https://m.facebook.com/#!/photo.php?..._user=38001179
https://m.facebook.com/#!/photo.php?..._user=38001179
Jul 19, 2013 | 09:35 PM
#155
Registered User
Joined: Jun 2013
Posts: 69
Likes: 0
From: Fairbanks, AK

 Jul 20, 2013 | 09:25 PM
#157
Thread Starter
Super Moderator
iTrader: (3)
Joined: Jan 2012
Posts: 3,218
Likes: 26
From: Salisbury, MD
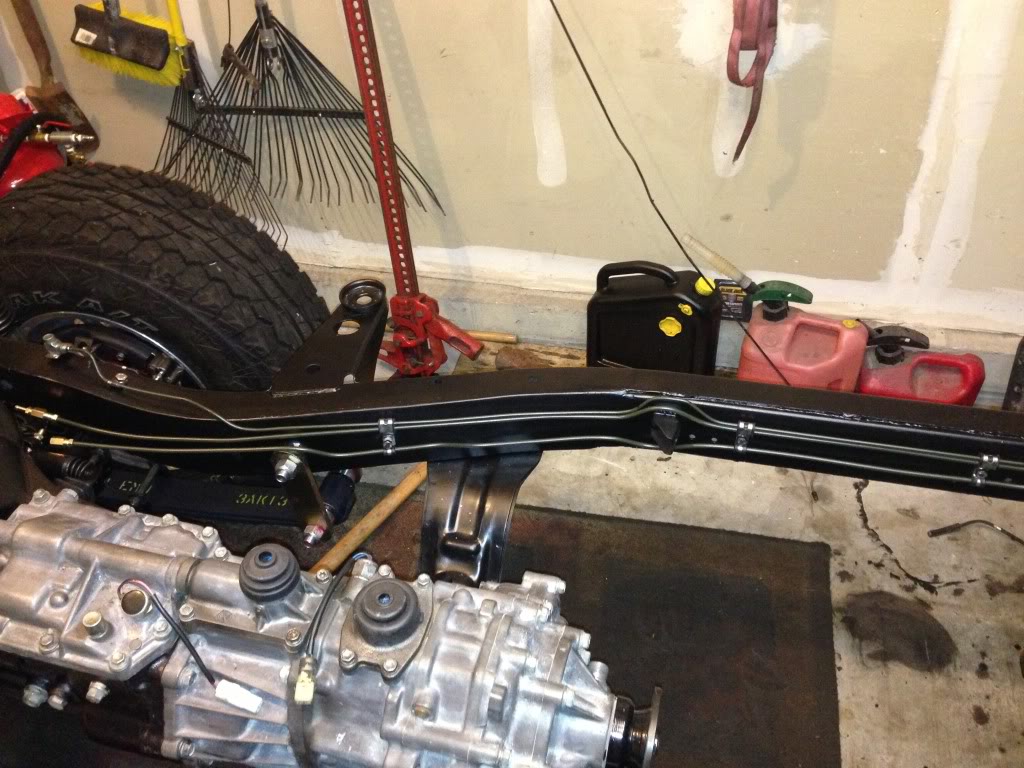
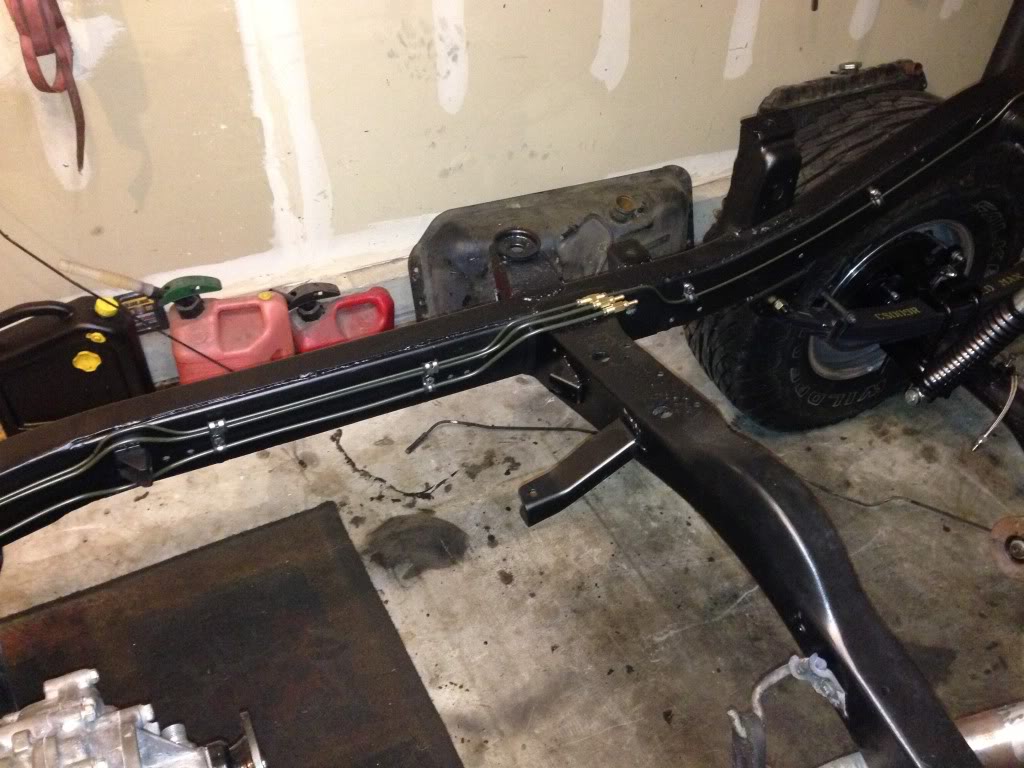
I got my brake and fuel lines bent and mounted tonight. Turned out pretty damn good I must say! I didn't want to mess with the coiled up brake lines so I used a 6 ft and 5 ft pre-flared sections of straight 3/16" brake lines and unioned them in the middle. I only had to cut and make one flare on the rear section where it would fit into the LPV if I had one. Ideally, I could have used two 5 ft sections and not have to cut and flare anything at all (But that would be too easy, right?!). I pretty much routed it the same way that the factory routing went, but still need to drill and tap a new hole for the clip where I patched up the frame - I actually boogered up my first attempt and managed to brake my tap in the frame so I still need to figure out how to get the tap out. I'm also thinking about getting a spark plug retainer or something to secure the three lines on top of the cross member so they don't end up causing rattles. Other than that, it's pretty much done until my extended braided steel line come in from LCE. Now it's a long waiting game and plenty of praying that there are no leaks after all of my brake upgrades!!


 Jul 20, 2013 | 09:30 PM
#158
Thread Starter
Super Moderator
iTrader: (3)
Joined: Jan 2012
Posts: 3,218
Likes: 26
From: Salisbury, MD
Oh, I forgot to mention... I will be mounting the manual load proportioning valve under the hood directly off the 1" Bore master cylinder. If I end up needing a residual valve I'll locate that under the hood as well.
Jul 21, 2013 | 04:22 AM
#159
Registered User
Joined: May 2012
Posts: 396
Likes: 2
From: Jackson, TN
Looking great. It's perfection.
When this thing is done...you're gonna be afraid to get it outta the driveway...afraid somebody will hit it. LOL.
I know I will be very careful of when I get mine out.
When this thing is done...you're gonna be afraid to get it outta the driveway...afraid somebody will hit it. LOL.
I know I will be very careful of when I get mine out.


