
Replacing 1989 22re Headgasket
 Nov 23, 2011 | 08:37 AM
#101

Thread Starter
Registered User
Joined: Jul 2011
Posts: 108
Likes: 0
From: Atlantic Canada
Yeah I know I don't have to remove the plate, just loosening will still be tricky. And about getting the correct o-ring, i have no idea how large the diameter is of the intake manifold that the ring sits in. Pretty sure I'd have to take off the other tube as well, if I were to remove it to test fit a gasket into it.. and removing the other pipe, would involve 4 extra nuts, erg. No, I don't have the other bolt to compare.. thats a good idea though.
I'm also in a small town, so all the hardware and parts stores are a highway-drive away to another city..
And yes, I should take all of the hardware next time I'm there, lol.. I'm thinking I'll brave the storm, and try to venture to the salvage yard.
My fathers out of town at Toyota asking if they have something there, if not I'll head to the salvage yard. Thanks guys
Nov 23, 2011 | 09:00 AM
#102
Thread Starter
Registered User
Joined: Jul 2011
Posts: 108
Likes: 0
From: Atlantic Canada
My dads bringing home some printed off exploded views from the dealership, if i can spot the o-ring ill order it and get it from there.. you mentioned it was 1/16 of an inch roughly, the thickness of the gasket, just not sure the diameter still. I'll keep you guys posted
Nov 23, 2011 | 09:20 AM
#103


 Nov 23, 2011 | 09:33 AM
#104

Registered User
Joined: Nov 2006
Posts: 730
Likes: 2
From: Indiana
There is enough room behind the head to remove the one bolt holding it to the back of the head, it's only held by 1 bolt, go from the drivers side by the firewall valve of the engine, and by looking at my engine pics you should be able to reach the one bolt holding the tube on, I took out engine and still had room to un-installed and re-install the trans mounting bolts, just be nimble and learn to have a feel for wrench's in tight area's it takes, go get a thin Craftsman or another brand 1/4 inch ratchet with thin wall sockets or a ratchet wrench or a wrench with a notch so it can wratcheted without take wrench off to re-position. Take it off and take to hardware store and get an o-ring and slightly enlarge the bolt hole (Rat tail file or drill it bigger) that is giving you trouble so to re-install it easier, the o-ring does the sealing so making hole bigger won't affect anything but making it easier to re-install to intake...
Good Luck!!!!
Good Luck!!!!
Nov 23, 2011 | 09:39 AM
#105
I did the same thing, I have an auto, wasn't pulling it with the motor. The 2 top trans bolts were frustrating both in and out but a helluva lot easier then the alternative. I have plenty of room behind the head to get at those 12mm heads. 1/4" rachet is the way to go!
I agree, you will develop a sense of sight by feel. I almost always have my eyes shut or looking elsewhere when dealing with those pesky hidden fasteners.
Let us know what happens!! I am looking forward to you getting that sucker going!
I agree, you will develop a sense of sight by feel. I almost always have my eyes shut or looking elsewhere when dealing with those pesky hidden fasteners.
Let us know what happens!! I am looking forward to you getting that sucker going!
Nov 23, 2011 | 09:55 AM
#106
Registered User
Joined: Nov 2006
Posts: 730
Likes: 2
From: Indiana
gottadog I do the same thing, close your eyes and just go by feel and make a mental picture in your mind to picture what it looks like by what you feel, I did a clutch in my B2300 and it was so tight for my big hands between engine and firewall I had to thread in a fine thread bolts like an 8th inch at a time and re-position the wrench every tiny turn, it took forever to go do all of then up high during un-installing and re-installing...
I hope he gets it going soon and see how it does.
He is learning alot from this project too :}
I hope he gets it going soon and see how it does.
He is learning alot from this project too :}
Nov 23, 2011 | 12:31 PM
#107
Thread Starter
Registered User
Joined: Jul 2011
Posts: 108
Likes: 0
From: Atlantic Canada
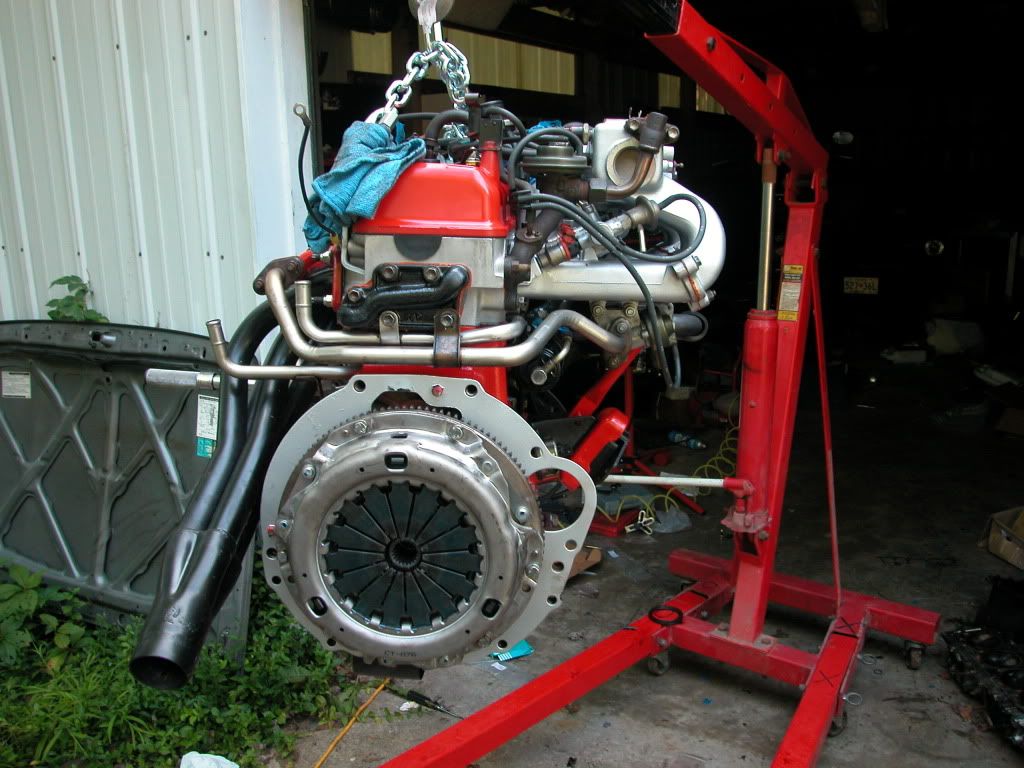
Borrowing this from irab, I think he posted it.. as reference
 So I just got back from the salvage yard finally, barely made it! haha, traffic going about 50km/h on the highway. I've got horrible tires as its supposed to be in storage and drive the truck instead, lol.
John4wd, yeah, there is one bolt holding it on, but doesn't the other tubes bracket cover it? So I was thinking the other had to be removed before that one was. Anyhow, thats a good idea with making the hole bigger, would definitely make it easier to get back into place. and yes I've learned a LOT from this, haha. Definitely quite the learning experience. My parents have no idea what i'm doing.
Gottadog, yeah 1/4 would be handy actually, pretty sure I only have a 3/8 and 1/2 Would like to invest in a bigger socket set someday. I've got ratcheting wrenches for now.
Anyways while I was at the yard I trekked through the snow and got the 2 bolts! and luckily the o-ring gasket was there too, i think it was a 93 or something, seemed better shape than mine, lol. Pretty happy about it, now to line it up with the intake manifold and bolt it all in..
John4wd, yeah, there is one bolt holding it on, but doesn't the other tubes bracket cover it? So I was thinking the other had to be removed before that one was. Anyhow, thats a good idea with making the hole bigger, would definitely make it easier to get back into place. and yes I've learned a LOT from this, haha. Definitely quite the learning experience. My parents have no idea what i'm doing.
Gottadog, yeah 1/4 would be handy actually, pretty sure I only have a 3/8 and 1/2
Would like to invest in a bigger socket set someday. I've got ratcheting wrenches for now. Anyways while I was at the yard I trekked through the snow and got the 2 bolts! and luckily the o-ring gasket was there too, i think it was a 93 or something, seemed better shape than mine, lol. Pretty happy about it, now to line it up with the intake manifold and bolt it all in..

 Nov 23, 2011 | 08:14 PM
#109
Thread Starter
Registered User
Joined: Jul 2011
Posts: 108
Likes: 0
From: Atlantic Canada
hahaah yeah, we're supposed to get up to 30cm.. we did get quite a bit, snowed all day. was brushing snow off the engine while working on it! haha  couldn't even make it into the salvage yard parking lot.. had to park across the street. but its supposed to warm up for the rest of the week, should all melt.
couldn't even make it into the salvage yard parking lot.. had to park across the street. but its supposed to warm up for the rest of the week, should all melt.
Nov 24, 2011 | 07:50 AM
#110
Does your engine have air injection on the exhaust? If it does, then yes then the other tube will be sorta in the way, but not completely, there should or might be enough room with just pulling the bolt out of the tube that attaches under the manifold. Try it with the bolt very loose and still threaded first. If you get it lined up under the manifold then you wont have to worry about trying to get the tab to line up with the hole.
Nov 24, 2011 | 10:57 AM
#111
Registered User
iTrader: (2)
Joined: Dec 2009
Posts: 2,159
Likes: 8
From: Pleasanton, CA - SF Bay Area
welcome!
Searrch for 92 TOY's write up (it's linked in his signature and he's pretty active here). He ha LOTS of photos, and was a self described n00b when he started the job, which is encouraging to us all
Searrch for 92 TOY's write up (it's linked in his signature and he's pretty active here). He ha LOTS of photos, and was a self described n00b when he started the job, which is encouraging to us all
Nov 24, 2011 | 01:50 PM
#112
Thread Starter
Registered User
Joined: Jul 2011
Posts: 108
Likes: 0
From: Atlantic Canada
Does your engine have air injection on the exhaust? If it does, then yes then the other tube will be sorta in the way, but not completely, there should or might be enough room with just pulling the bolt out of the tube that attaches under the manifold. Try it with the bolt very loose and still threaded first. If you get it lined up under the manifold then you wont have to worry about trying to get the tab to line up with the hole.
 I got the pipe attached and everything where it should be.
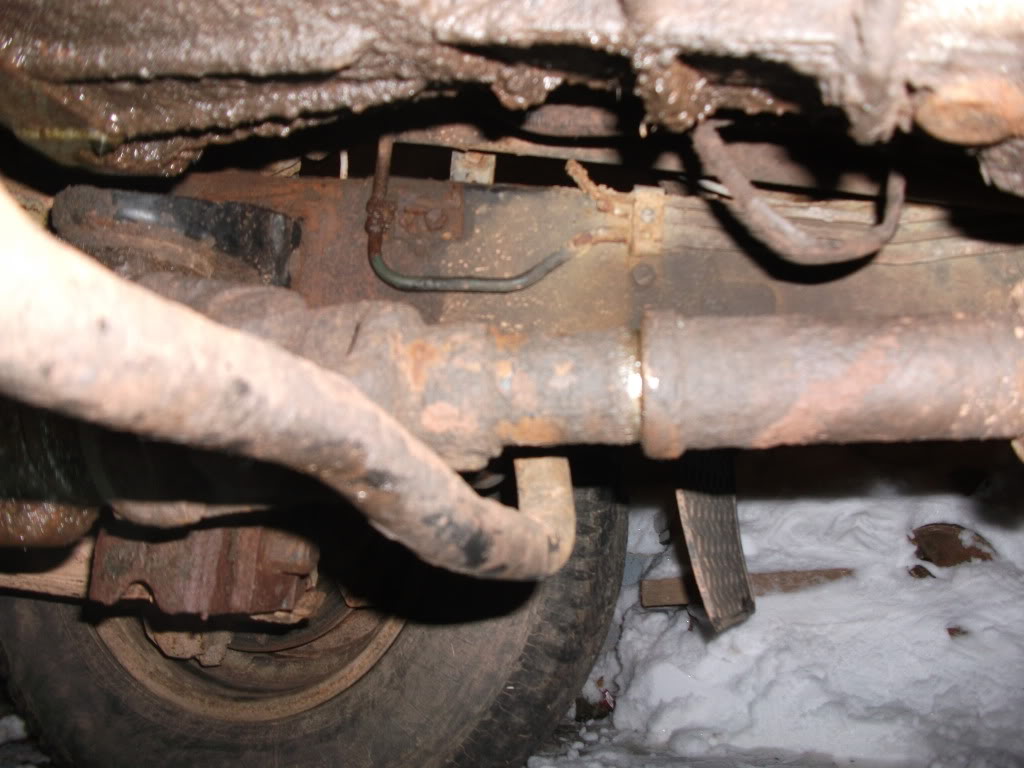
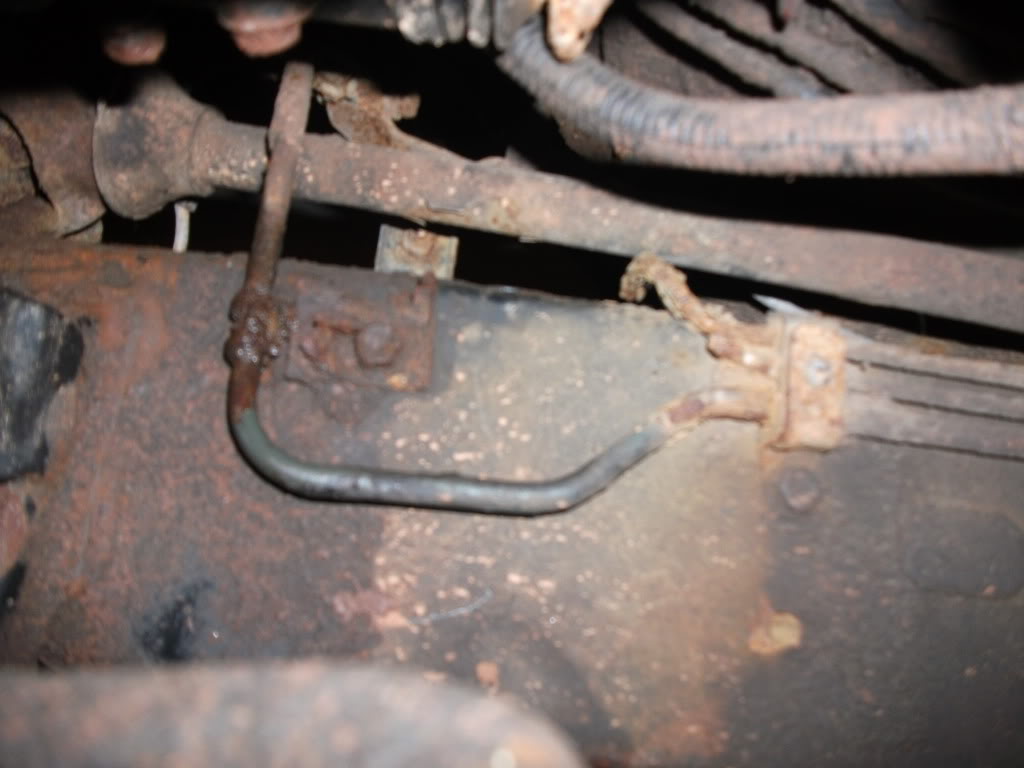
Anyways, I finally got the truck done, turned the key, and fuel sprays out of a fuel line.. turns over, but won't fire. Probably because theres fuel spraying up out of the line, right at a coupling/fitting thing. right after it bends up from the floor, up towards the engine bay. No idea how to fix this.. may have to tow it to a garage i guess. I bought a 24 hour permit to drive it to my mechanic 45 mins away, too. $20 more down the drain.
Nov 24, 2011 | 02:08 PM
#114
Registered User
Joined: Nov 2006
Posts: 730
Likes: 2
From: Indiana
If you use rubber hose for a patch or replacement make sure it's for fuel injection don't use hose for carberators and if you put it between 2 hard lines use a double clamp on each end, it's easy to do :}
 Nov 24, 2011 | 03:07 PM
#116
Thread Starter
Registered User
Joined: Jul 2011
Posts: 108
Likes: 0
From: Atlantic Canada
you guys think patching it is possible like that? I think you can tell where the leak is, its to the left off that bolt,looks like it joins together or something, seems pretty rusty.. i'm assuming it was just its time to go.
Nov 24, 2011 | 03:16 PM
#118
Registered User
Joined: Nov 2006
Posts: 730
Likes: 2
From: Indiana
I would cut it back behind the next clamp back on the frame rail where it's not rusted and get some FI rubber hose and run it all the way to the metal tube further up by the manifold and double clamp both ends and you'll be good to go :}
Make sure both metal ends are clean and rust free so the hose will seal with the double clamps :}
.
Make sure both metal ends are clean and rust free so the hose will seal with the double clamps :}
.
Nov 24, 2011 | 03:32 PM
#119
Thread Starter
Registered User
Joined: Jul 2011
Posts: 108
Likes: 0
From: Atlantic Canada
Tyler - if I were to replace the entire line, would it be smarter to buy a brand new line, rather than a used one which may be getting close to its breaking point too? Or are they quite expensive new.. Never worked with fuel or brake lines before..
John - that sounds pretty easy, makes sense about the rust free part so it will seal. when you say FI rubber hose, what do you mean by FI?
Either way, I've got school tomorrow morning, then heading to Ontario with my father to help him drive back a mustang. Should be back home by Sunday.. can pick up where I left off then. I could try the rubber hose idea tonight, but I don't have a rubber hose and clamps here, just don't have the time before I leave tomorrow. Also haven't been to a lot of classes this week, need to look over stuff for tomorrows test(s)
Thanks for the advice guys much appreciated
Nov 24, 2011 | 03:42 PM
#120
Registered User
Joined: Feb 2010
Posts: 409
Likes: 1
From: Oakridge, Oregon
It would be alot better idea to buy a new one. But i know oem toyota hardlines are stupid pricey. But being in canada you may never find a non rusty used one. A parts store or maybe an auto shop could make one. (a place that make hydrolic fittings.)
FI is Fuel injected. A normal fuel hose is not set for that high of pressure.
FI is Fuel injected. A normal fuel hose is not set for that high of pressure.
Last edited by TylerH; Nov 24, 2011 at 03:43 PM.


