
Head gasket and timing belt replacement....
 Aug 1, 2012 | 07:29 AM
#181
Thread Starter
Registered User

Joined: Jun 2004
Posts: 740
Likes: 2
From: Little Rock, AR
Thanks! I came to a quick forced stop this morning when I found out you can't tighten down the main fuel line to the fuel rails if you have the No. 2 fuel pipe already attached. I followed the FSM, but I don't know how they think you're supposed to be able to do this so I ordered 4 new crush washers and must wait for them to get here.
Yup.... I thought about having to put that timing cover on right after I sealed that part up to the timing belt idler. I usually think things through pretty well and loath having to redo something because I didn't, but you live and you learn.
I like the idea of starting the engine before putting it all back on, but I'm unsure of how to do this. I may not be thinking about it the right way, but it seems like you'd have to put everything on and then take it back off to put the timing belt cover on. If you can give me a little insight into how you did this I'd like to go this route. The timing scares me a little bit, but the guy I'm working on it with has done a couple timing belts before and thinks it shouldn't be too bad. We'll see how it goes.
We've haven't done the timing yet so that crank bolt is still out, but I'd like to get it done by saturday at the latest. I've also looked at the 3/4 torque wrenches and thought I saw one at O'reily's or Autozone for rent. I'll check it out. I think keeping the one you got is fitting considering it sorta marks the end of a project you guys did together.
I'm extremely nervous and very excited. After all the money that's been put into this, I want things to be smooth from here on out with a great running truck.
Aug 2, 2012 | 03:10 AM
#182
YotaTech Milestone-Two Millionth Post
Joined: Jan 2009
Posts: 12,009
Likes: 122
From: Northeast Pennsylvania
Thanks! I came to a quick forced stop this morning when I found out you can't tighten down the main fuel line to the fuel rails if you have the No. 2 fuel pipe already attached. I followed the FSM, but I don't know how they think you're supposed to be able to do this so I ordered 4 new crush washers and must wait for them to get here.
Yup.... I thought about having to put that timing cover on right after I sealed that part up to the timing belt idler. I usually think things through pretty well and loath having to redo something because I didn't, but you live and you learn.
I like the idea of starting the engine before putting it all back on, but I'm unsure of how to do this. I may not be thinking about it the right way, but it seems like you'd have to put everything on and then take it back off to put the timing belt cover on. If you can give me a little insight into how you did this I'd like to go this route. The timing scares me a little bit, but the guy I'm working on it with has done a couple timing belts before and thinks it shouldn't be too bad. We'll see how it goes.
We've haven't done the timing yet so that crank bolt is still out, but I'd like to get it done by saturday at the latest. I've also looked at the 3/4 torque wrenches and thought I saw one at O'reily's or Autozone for rent. I'll check it out. I think keeping the one you got is fitting considering it sorta marks the end of a project you guys did together.
I'm extremely nervous and very excited. After all the money that's been put into this, I want things to be smooth from here on out with a great running truck.
Yup.... I thought about having to put that timing cover on right after I sealed that part up to the timing belt idler. I usually think things through pretty well and loath having to redo something because I didn't, but you live and you learn.
I like the idea of starting the engine before putting it all back on, but I'm unsure of how to do this. I may not be thinking about it the right way, but it seems like you'd have to put everything on and then take it back off to put the timing belt cover on. If you can give me a little insight into how you did this I'd like to go this route. The timing scares me a little bit, but the guy I'm working on it with has done a couple timing belts before and thinks it shouldn't be too bad. We'll see how it goes.
We've haven't done the timing yet so that crank bolt is still out, but I'd like to get it done by saturday at the latest. I've also looked at the 3/4 torque wrenches and thought I saw one at O'reily's or Autozone for rent. I'll check it out. I think keeping the one you got is fitting considering it sorta marks the end of a project you guys did together.
I'm extremely nervous and very excited. After all the money that's been put into this, I want things to be smooth from here on out with a great running truck.
I will go out in the garage and see what I see. my memory of that whole episode is very blurry ,in that, by the time we were at that point Brandon (XXTREME22R) discovered the problem and somehow (and I mean it, I really have no clue or recollection what happened, like a "rebuild blackout") he was able to adjust the belt and then we still had an issue with the timing after that (it was dark...about 1am, exhausted, giddy, hungry etc etc etc) and then he got it all right.
but anyways, I do believe all we did was removed the plastic cover and that top water neck at the top pulley and (not in that order of course) and then put it back on....I CAN remember pulling the distributor, stabbing and re-stabbing it, until we were perfect)
Aug 2, 2012 | 03:36 AM
#183
YotaTech Milestone-Two Millionth Post
Joined: Jan 2009
Posts: 12,009
Likes: 122
From: Northeast Pennsylvania
yep...looks like the green thing is the only thing in the way. but, seriously, I can't give advice on this because I really don't remember how it went. I remember that the timing belt was several steps before we put the motor in and probably weeks before we were attempting to start it up, so my memory was fuzzy at that point and nonexistent at this point. sorry man. you'll get it right.
this is a pic from a few minutes ago. the hose to the left is going to be replaced....so don't get startled if it doesn't look like your hose. i remember cutting it because it was obviously too long because it was kinking but now it's a bit too short (where it connects to the radiator) and has recently been dripping a few drops of red coolant (confirmed as that hose)

ugh..she's not as clean as it used to be. but a year later and about 5k miles later it still runs well.
this is a pic from a few minutes ago. the hose to the left is going to be replaced....so don't get startled if it doesn't look like your hose. i remember cutting it because it was obviously too long because it was kinking but now it's a bit too short (where it connects to the radiator) and has recently been dripping a few drops of red coolant (confirmed as that hose)
ugh..she's not as clean as it used to be. but a year later and about 5k miles later it still runs well.
Last edited by 92 TOY; Aug 2, 2012 at 03:37 AM.
Aug 2, 2012 | 02:22 PM
#184
Thread Starter
Registered User
Joined: Jun 2004
Posts: 740
Likes: 2
From: Little Rock, AR
I guess being that late and giddy would cause anyone to have a little amnesia. We'll try and work it out so the cover is off so we can check the timing belt placement. I've got a couple of diagrams and pics I'm gonna post. I got the upper intake on today, but once I got to the vacuum hoses it got a little confusing even with the diagrams. I'm hoping someone can give me a little input as to what goes where.... The diagrams don't seem to quite match up.... Thanks again!


These first three are of the engine after I got the upper intake on and the egr valve installed.

This image is of the three pipes that exit out right under where the egr mounts to the upper intake. The diagram shows the two, one on either side, but not what the on in the middle is supposed to be connected....

these are the main ones I'm needing help with....


These are the diagrams that I was using, but they don't seem to include everything.... especially a fourth module that sits next to the VSV towards the front of the vehicle. It has hoses on it, but I'm not sure of where it connects.
92-toy - I'm going to check through your thread to see if there is anything I missed that might help me out, but thanks in advance for any help that you might be able to provide....
These first three are of the engine after I got the upper intake on and the egr valve installed.
This image is of the three pipes that exit out right under where the egr mounts to the upper intake. The diagram shows the two, one on either side, but not what the on in the middle is supposed to be connected....
these are the main ones I'm needing help with....
These are the diagrams that I was using, but they don't seem to include everything.... especially a fourth module that sits next to the VSV towards the front of the vehicle. It has hoses on it, but I'm not sure of where it connects.
92-toy - I'm going to check through your thread to see if there is anything I missed that might help me out, but thanks in advance for any help that you might be able to provide....
Last edited by AW1090; Aug 2, 2012 at 02:32 PM.


 Aug 2, 2012 | 03:41 PM
#186
Thread Starter
Registered User
Joined: Jun 2004
Posts: 740
Likes: 2
From: Little Rock, AR
Ha... Thanks for the pics. I think that 2nd one will be a good bit of help. I tried to keep them all straight, but some of the tape came off and now they're just in a big mess.
Aug 2, 2012 | 04:06 PM
#187
Thread Starter
Registered User
Joined: Jun 2004
Posts: 740
Likes: 2
From: Little Rock, AR
A little reference for me later on.... I'd like to give someone credit for this, but I'm unsure of who originally posted it.

1. Reed valve
2. Fuel return hose
3. Brake booster
4. Rear air hose at the AC idle up
5. PS pump valve
6. Front air hose at the AC idle up
7. Vac hose #1 to pass side of rear VSV
8. Vac hose #2 to pass side of center VSV
9. PCV hose
10. Vac hose #5 to driver side of center VSV
11. Vac hose #3 to pass side of front VSV
12. Vac hose #6 to driver side of front VSV
13. PS pump valve
Vac hose #4 goes from driver side of rear VSV to the reed valve
AC idle up vacuum hoses:
- pass side to diaphragm (very short hose)
- driver side tee's into vacuum hose #2 (item 8 in your picture)
Thanks to whoever figured this out.... I'll be using it tomorrow and will hopefully have all the vacuum hoses done.
Aug 3, 2012 | 03:22 PM
#189
Thread Starter
Registered User
Joined: Jun 2004
Posts: 740
Likes: 2
From: Little Rock, AR
So I got to work today on the vacuum hoses and I think I figured the majority of them out, but I have a few questions. I used the diagrams and a picture to figure some out, but am unsure about these.....


Last edited by AW1090; Aug 5, 2012 at 12:32 AM.
Aug 3, 2012 | 04:40 PM
#190
YotaTech Milestone-Two Millionth Post
Joined: Jan 2009
Posts: 12,009
Likes: 122
From: Northeast Pennsylvania
hey...can you circle stuff in some of these pics? not really sure what you are asking in some of the pics.
here's a few pics of the passenger's side. mostly all the same, maybe a bit of a different angle on a few


here's a few pics of the passenger's side. mostly all the same, maybe a bit of a different angle on a few
Aug 3, 2012 | 05:56 PM
#191
Thread Starter
Registered User
Joined: Jun 2004
Posts: 740
Likes: 2
From: Little Rock, AR
Sorry about that... The wife said we had to go so I had to cut the post short

The three with the green tape and the one on the bottom to the right are the ones I'm unsure of at this point. I think I've got the others figured out.


On the first of the three directly above, I have this part that is towards the front of the vehicle next to the vsv... Off of it are these two hoses that I have no clue what they connect to on the plenum.....
Of these two pics, the tubing in the first pic come off the blue part on the right of the 2nd pic and I have no idea where it goes....

These last two pics.... the first is of two hoses and as I show in the 2nd pic that just connect together.... I'm not sure where these should connect...
Thanks again for all the help.... I'm hoping tomorrow we'll have it running......
The three with the green tape and the one on the bottom to the right are the ones I'm unsure of at this point. I think I've got the others figured out.
On the first of the three directly above, I have this part that is towards the front of the vehicle next to the vsv... Off of it are these two hoses that I have no clue what they connect to on the plenum.....
Of these two pics, the tubing in the first pic come off the blue part on the right of the 2nd pic and I have no idea where it goes....
These last two pics.... the first is of two hoses and as I show in the 2nd pic that just connect together.... I'm not sure where these should connect...
Thanks again for all the help.... I'm hoping tomorrow we'll have it running......
Last edited by AW1090; Aug 4, 2012 at 10:41 PM.
 Aug 4, 2012 | 09:14 AM
#193
Thread Starter
Registered User
Joined: Jun 2004
Posts: 740
Likes: 2
From: Little Rock, AR
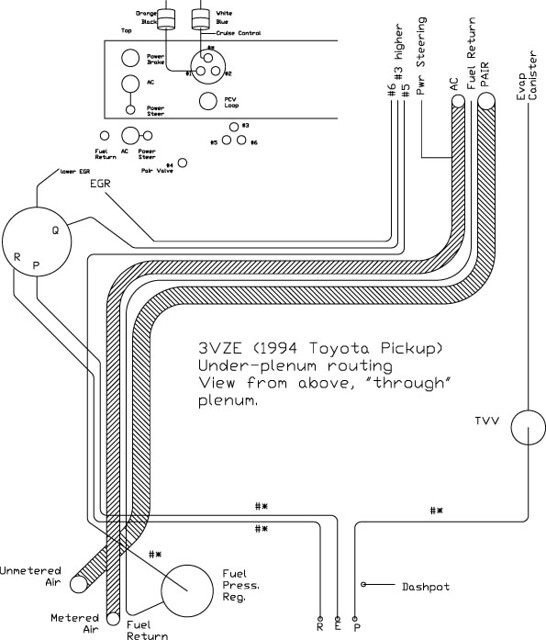
great diagram scope... so just to make sure I'm crystal clear... The disk shape part in the center of the following pic has to do with the AC idle up and the hoses attach to the top and bottom pipes with the green tape in my previous post #191. Correct?
The following hoses were, at some point, part of the power steering, but over time have been disconnected and attached together to make one long hose. These connect the center tube with green tape to the tube that y's off of the bottom tube with green tape. Correct?
Sorry, I would've circled some of the parts to help make things a little clearer, but the editor in photobucket kept giving me an error that it couldn't save the edited photos. Hopefully I've been clear enough that you understand..... Thanks!
92 Toy - I know the deal with your truck must've shaken you guys up a bit, but hopefully nothing else has gone on and things are getting back to normal. Hope you guys are well.
Aug 4, 2012 | 09:32 AM
#194
YotaTech Milestone-Two Millionth Post
Joined: Jan 2009
Posts: 12,009
Likes: 122
From: Northeast Pennsylvania
hey..we're good. hopefully it was random and not specific to me. in my job...sometimes...I don't make friends. just being a bit vigilant here. living out in the country is way different than living in the city we were used to....but the police weren't 10 miles away there.
Aug 4, 2012 | 12:18 PM
#195

Registered User

Joined: Sep 2007
Posts: 8,384
Likes: 875
From: San Francisco East Bay
Sorry, I can't see green tape. The 4th picture shows the area where the idle-ups connect to, but the tubes are covered by stuff in the foreground. (Pictures are great, but are no substitute for a hand-drawn diagram.)
The "disc shaped object" is the AC Vacuum Switching Valve (VSV), and yes, it is switching vacuum. It should have the larger pair of hoses that connects to the larger pair of tubes; one on the side of the plenum, one right below it.
The power steering pump has a valve extending from the back with two hoses (smaller in diameter than the AC idle-ups). They serve the same purpose (when you crank the steering to parallel park, the pressure in the pump ups the idle speed). They connect to the tubes that "Y" off the tubes used by the AC idle-up. You show a picture of two hoses hooked together. If the other end is connected to the power steering pump, that just makes no sense. It would leave a big vacuum leak on the plenum. Usually, you see junk like this where the other ends are on the plenum/tube so prevent a vacuum leak and avoid the power steering pump.
The "polarity" of the tubes doesn't matter; you can reverse them without worrying. The idle-up valves are only valves; they have no direction.
So how could this truck work at all hooked up the way you got it? The prior owner may never have used the AC, and never parallel parked. Or, he may have had the idle set up so high in the first place that it could never stall.
Or, and this is what you need to look into, there may be so much gunk inside the plenum that there is no vacuum at all on those lines. (The gunk comes from lots of places, but the EGR is part of it.) Do you care? Even if you don't want the idle-ups, if you have enough gunk it will block the EGR and your truck will fail smog with high NOx. At a minimum, get a new piece of vacuum hose and see if you can blow EASILY into the plenum vacuum port. If it seems clogged, it is, and you really need to take the plenum apart and clean it.
Last edited by scope103; Aug 4, 2012 at 12:20 PM.
Aug 4, 2012 | 11:37 PM
#196
Thread Starter
Registered User
Joined: Jun 2004
Posts: 740
Likes: 2
From: Little Rock, AR
92 Toy - Glad to hear everything is good. I know what you mean about making enemies at work or at least not making friends based on the fact that you don't agree with them. I've had those relationships many a time at work and tend to not let it bother me, but the individual that I have the interaction with usually has an issue that they hold on to for a while. I'd like to believe that everyone that I work with is an adult and can have opposing views without any problems, but that seems not to be the case. It was probably just some kids committing a random act, but still..... I'm not sure what happened, but I'm sure it crossed a line. Sorry for the rant. Anyways, Glad to hear you guys are doing alright.
Scope - Sorry about the pics. Photobucket has been a pain lately. I'll take a look at the things you posted about, but I don't have anything coming off the PS pump. I'm think the one long hoses, 2 hoses connected together wrapping back towards the plenum, were hooked to the PS pump originally. I'm thinking they were disconnected from the PS pump by the previous owner and butted together with a male to male adapter. I'll check the tubes and make sure they are clogged. Thanks so much.... That diagram was a big help.
On to the big news, We got everything hooked up. We did the time belt three or four times before we got it right. We checked it by spinning the crank two full rotations and making sure everything still lined up. This was done three times before we decided everything was good and started putting everything else back on the front. Once done with everything, we filled all the fluids and tried to start her up with no success. We initially had a small fuel leak at the filter we thought was causing the engine not to start, but fixed it and still no start. We know we're getting fuel at least as far as the filter. We checked the spark and it's good. We checked the distributor at TDC because we read something in the hayne's manual about how it could be on the opposite stroke from the crank, but it looked good. As we tried to start the truck, we adjusted the distributor and screwed with it, but nothing. Man, I was hoping it was going to start up today, but I guess I'll be starting school this week and spending the next weekend on the truck and studying. I've got a video, but it's not very good. The main point of posting the video is so hopefully after hearing what it's doing someone can give me a little insight on what my next approach should be to get it running. In this video, I try to start it six times. The first three times I turned the key to off and tried to start it. You hear it kick over, but stubble and die quickly. The next two times I keep on the key without turning it back to off and it never turns over. The very last time I turn the key back to off before trying and I get nothing. Sorry for the long post, but I'm a little discouraged and wanted to get everything out so I can hear this truck running soon. Thanks again for all the help!..... Here's the video....
http://www.youtube.com/watch?v=qiCMc9QzOwc
Last edited by AW1090; Aug 4, 2012 at 11:55 PM.
Aug 5, 2012 | 01:54 AM
#197
YotaTech Milestone-Two Millionth Post
Joined: Jan 2009
Posts: 12,009
Likes: 122
From: Northeast Pennsylvania
OK...now that's exciting anyway. just think of what you just accomplished.
gonna need someone better than me to help with this one. sorry man. my hunch would be timing, because that sounds like the way we were. make sure the plugs are all in the right spots and the coil wire is on (may sound obvious but it always helps to sleep on it and start simple)
as far as me....I work in the ER, so the people that I potentially agitate are meth heads etc...not coworkers.
Aug 5, 2012 | 04:57 AM
#198

Registered User
Joined: Dec 2011
Posts: 75
Likes: 0
From: Toronto,Ontario
I second timing. I did the same job on my old 3vz and when I went to start her for the first time my dizzy was one tooth off. You could try advancing and restarting one tooth and see if it helps? great job btw. Good luck.
Aug 5, 2012 | 01:08 PM
#199
Thread Starter
Registered User
Joined: Jun 2004
Posts: 740
Likes: 2
From: Little Rock, AR
Thanks for the support guys. I know it's a big accomplishment, but if it doesn't start then the accomplishment is tarnished. It's the way I think.... Not a big fan of failing. I'll check the coil wire. We check the spark wires and they were in the right spot. We'll have to play with the distributor a little more this weekend. I guess we'll pulling it out and advance it or back it up a tooth at a time to see what it does..... I plan on checking the Open Circuit Relay, VAF sensor, and TPS this coming weekend as well. Thanks for the support and suggestions guys...
92 Toy - Sorry, it's funny how I immediately went to the coworkers. We have issues with the family as well, but probably not a bad as with your meth heads. I get along with most of my coworkers, but there are always a couple that have problems. I guess with all that detail oriented work and OCD floating around people are bound to bump heads.....
92 Toy - Sorry, it's funny how I immediately went to the coworkers. We have issues with the family as well, but probably not a bad as with your meth heads. I get along with most of my coworkers, but there are always a couple that have problems. I guess with all that detail oriented work and OCD floating around people are bound to bump heads.....


