
Head gasket and timing belt replacement....
 Jul 20, 2012 | 06:52 PM
#141
Thread Starter
Registered User

Joined: Jun 2004
Posts: 740
Likes: 2
From: Little Rock, AR
Sooo... I've got a couple of questions....
I'm starting to put this engine back together tomorrow and looking ahead I can see a couple of areas I have questions about before I start... I can't find answers after searching over and over again....
1. When I got the block back from the machine shop the oil by-pass hose on top of the block between the heads was removed and the block was painted.... When reattaching the oil by-pass hose should I remove the paint on the surface the hose connects to and apply fipg or not worry about it and apply the fipg to the painted surface?
2. The motor mounts..... I've pulled the mounts off the engine and found what seems to be a part number for the rubber part that connects them, but the dealer says that the motor mounts can't be seperated.... Is this the case or can I replace the rubber part?... If so, what is the torque spec for the center bolt?..... Thanks again
Jul 21, 2012 | 01:57 AM
#142
YotaTech Milestone-Two Millionth Post
Joined: Jan 2009
Posts: 12,009
Likes: 122
From: Northeast Pennsylvania
page 31 about the motor mounts https://www.yotatech.com/forums/f199...0/index31.html
Jul 21, 2012 | 08:12 AM
#143
Thread Starter
Registered User
Joined: Jun 2004
Posts: 740
Likes: 2
From: Little Rock, AR
Thanks!... I can't wait.. I didn't keep the motor mounts seperated because the guy at toyota said they are exactly the same part. I can understand how they would get worn in on one side or the other due to the rubber cushion, but I think I've found a part number for it and if it's replace wouldn't it be like buying a new pair of sneakers.  I'm just thinking I'm probably replacing the part that gets worn in on the motor mounts. You mention the stiffener plates in your pm. Are those the to parts on the bottom back of the engine that are bolted on and get bolted to the trans?.... I read where you guys installed the engine and it seems like it was a great accomplishment for a dad and son project.
I'm just thinking I'm probably replacing the part that gets worn in on the motor mounts. You mention the stiffener plates in your pm. Are those the to parts on the bottom back of the engine that are bolted on and get bolted to the trans?.... I read where you guys installed the engine and it seems like it was a great accomplishment for a dad and son project.
Last edited by AW1090; Jul 21, 2012 at 08:18 AM.
Jul 21, 2012 | 08:19 AM
#144
YotaTech Milestone-Two Millionth Post
Joined: Jan 2009
Posts: 12,009
Likes: 122
From: Northeast Pennsylvania
Thanks!... I can't wait.. I didn't keep the motor mounts seperated because the guy at toyota said they are exactly the same part. I can understand how they would get worn in on one side or the other due to the rubber cushion, but I think I've found a part number for it and if it's replace wouldn't it be like buying a new pair of sneakers. I'm just thinking I'm probably replacing the part that gets worn in on the motor mounts. You mention the stiffener plates in your pm. Are those the to parts on the bottom back of the engine that are bolted on and get bolted to the trans?.... I read where you guys installed the engine and it seems like it was a great accomplishment for a dad and son project.
I'm just thinking I'm probably replacing the part that gets worn in on the motor mounts. You mention the stiffener plates in your pm. Are those the to parts on the bottom back of the engine that are bolted on and get bolted to the trans?.... I read where you guys installed the engine and it seems like it was a great accomplishment for a dad and son project.yep. that's what I'm talking about. could not get everything to match up so make sure you leave yourself some wiggle room and take it easy.
and thanks....yes...indeed it was always a major accomplishment when we were doing stuff for ourselves.
Last edited by 92 TOY; Jul 21, 2012 at 08:21 AM.
Jul 21, 2012 | 08:31 AM
#145
Thread Starter
Registered User
Joined: Jun 2004
Posts: 740
Likes: 2
From: Little Rock, AR
will do... I plan on leaving things a little loose and using a bolt that matches the torque converter bolts to cut the head off of and use as a pin to guide my flywheel into place. I hope it works out....
Last edited by AW1090; Jul 24, 2012 at 11:52 AM.
Jul 22, 2012 | 09:26 AM
#146
Thread Starter
Registered User
Joined: Jun 2004
Posts: 740
Likes: 2
From: Little Rock, AR
No pics, but a short update. This weekend hasn't been as eventful as I would've liked. I was excited and ready to be in the position of getting this engine back in the truck so we started with getting the oil cooler and water pump one, but once we got to the oil by-pass pipe the bolt head snapped off. The remainder of the bolt was flush with the block. It took at least 5 hrs trying to drill it and back it out. We were finally successful and continued with installing parts. We got the drivers side head on and moved to the passengers side when we hit another problem. The front cam cap bolts won't tighten down. They spin and spin so now I'm trying to figure out a solution to this. I'm thinking a longer bolt as the original bolt tightens down without the cap in place leading me to believe the threads are good lower in the hole. I've also thought of helicoils, but I don't have any experience with these. If anyone has any experience with this problem please chime in as I'm not sure what to do. I've also realized after torquing down the head bolts that I should've placed the washers from the orignal bolts on the new bolts I purchased from engnbldr. Does anyone have any opinions on this? Should I back the bolts out and place the washers or should I not worry about it since I've already sealed up the drivers side cam and torqued the passenger's side head down? This engine seems like one problem after another. I hope it runs once I get it back in the truck. Thanks again for any help.
Jul 22, 2012 | 09:51 AM
#147
YotaTech Milestone-Two Millionth Post
Joined: Jan 2009
Posts: 12,009
Likes: 122
From: Northeast Pennsylvania
those head bolts are torque-to-yield / 1-time use / stretched and personally your's after your tighten them down. pretty sure I'm not wrong on that one.....not sure why you are talking about those washers....never heard that one.....shake it off...move on.
here's how it goes.....make a realistic list and expect to get less than half of it done....everything you get done, bid it a fond farewell and good riddance and hope you never meet again.
no experience with helicoil here...sorry.
here's how it goes.....make a realistic list and expect to get less than half of it done....everything you get done, bid it a fond farewell and good riddance and hope you never meet again.
no experience with helicoil here...sorry.
Jul 22, 2012 | 10:07 AM
#148
Looking good man! I would get with engine builder about the use of washers on the head bolts. I would think that the new bolts would come with washers if needed for re-assembly or would be specified from directions or recommended to some extent. You are there now, you don't want to just pass it up then regret it later.
As for the cam cap bolt and or heli-coil; not too hard to perform. I would definitely try threading in a longer bolt first by hand and if it doesn't feel like it's biting then try to repair. To heli-coil you just need to find the thread pitch of the bore and right size die to remove the existing threads. Then you find the next size up tap to cut your new threads. Clean your bore out then place the coil in the bore and start your bolt into into it. The coil will make up the difference in clearance and fastening.
As for the cam cap bolt and or heli-coil; not too hard to perform. I would definitely try threading in a longer bolt first by hand and if it doesn't feel like it's biting then try to repair. To heli-coil you just need to find the thread pitch of the bore and right size die to remove the existing threads. Then you find the next size up tap to cut your new threads. Clean your bore out then place the coil in the bore and start your bolt into into it. The coil will make up the difference in clearance and fastening.
Jul 23, 2012 | 08:52 AM
#149
Thread Starter
Registered User
Joined: Jun 2004
Posts: 740
Likes: 2
From: Little Rock, AR
I got with engnbldr about the washers and he's response was they are intended to be used with the washers from the original bolts. I'm with 92toy on this. I've got it put together and figure that if the bolts are at the proper torque spec then I wouldn't think the washer would matter much.
On to the Cam cap bolts, I found some grade 8 bolts that are slightly longer than the original bolts that tighten down the cam cap. I'm going to try those out and see what kind of progress I can make.
Thanks for the help guys... I've been making what I thought were realistic lists thinking things were going great, but saturday I was so discouraged after snapping that bolt head off. Thanks again for all your help.
Jul 23, 2012 | 08:13 PM
#151
Thread Starter
Registered User
Joined: Jun 2004
Posts: 740
Likes: 2
From: Little Rock, AR
I used the bolts as I got them from engnbldr. I didn't use any washers. I would think though that if the bolts are torqued to the proper spec then there shouldn't be an issue.
Jul 24, 2012 | 05:32 PM
#152
YotaTech Milestone-Two Millionth Post
Joined: Jan 2009
Posts: 12,009
Likes: 122
From: Northeast Pennsylvania
OK...not gonna make you happy but...I can't remember but I do think there are only one washer per bolt..right? Like I said, I am with the understanding that these are 1-time use TORQUE TO YIELD bolts that essentially stretch. so the point of that is my concern is that even if you did take them back out to put the washers on, are the bolts ruined? 2nd concern is that the bolts,if you leave them as-is, have bottomed-out and you are not or will not get a truly tight fit because of the 1/8'' or 1/16'' you have added because the washer is not there.
the optimist in me says you may be OK.
the pessimist / realist says get new bolt for that side, undo it, put the washers on and lean a life-lesson.
sorry man. wish someone with many years and builds experience would chime in....so this is just my opinion based on the minimal knowledge I have.
Last edited by 92 TOY; Jul 24, 2012 at 05:34 PM.
Jul 24, 2012 | 06:11 PM
#153
Contributing Member
Joined: Nov 2010
Posts: 5,125
Likes: 4
From: Columbia River Gorge, Oregon...east side
I'd definately want the washers in place to spread the clamping force properly.
http://www.ncttora.com/fsm/1990-1995...e/cylinder.pdf
Jul 25, 2012 | 02:58 PM
#154
Thread Starter
Registered User
Joined: Jun 2004
Posts: 740
Likes: 2
From: Little Rock, AR
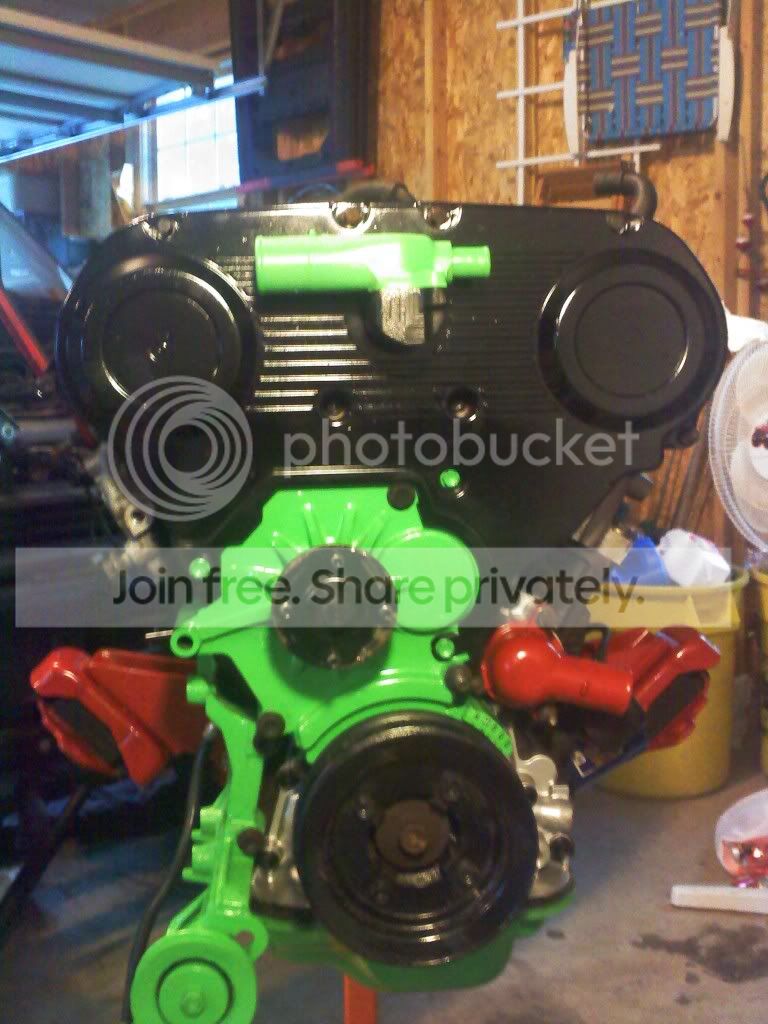
I checked with Ted and his response was that the washers are only a spacer to prevent the bolts from bottoming out. He said his bolts can be reused, but after thinking about it I'm pretty sure the bolts didn't bottom out and I torqued them down to the proper specs. I'm gonna run with it and see how it goes considering I had issues with the cam cap bolts as well. I got everything snugged down and it's looking pretty good. I plan on trying to get the timing belt and fuel rails on by Friday and to get the engine in the truck. I do have one request... Once I decided the block needed to be pulled it happened very quickly so I wouldn't change my mind. I didn't get to take any good pics of both sides of the engine. I am now a little confused about the bracket placement especially on the right side. I've got some pics today so everyone can see the progress. The first one was after the engine decided to flip upside down. Not Cool... I got it back upright and fixed it so no more flips. Sorry for the pic quality.


I've got to change that injector spacer that's cracked. I changed them all out and that one decided not to work for me. I've also got to change out the metal bivalve next to the water by-pass hose in the back of the engine. $47.00 from the local dealership.

I know there is some overlapping with the motor mount and some of the brackets here so I'm hoping to get some help with this.


Is this the way the brackets for the generator are suppose to be on the engine? It looks right, but I wanted to make sure.
Thanks again for everyone's help.... I don't know how I would've gotten this far without you guys. Hopefully we'll be hearing it pretty soon. I'm pushing on it pretty hard to get it done. I've only got a couple of weeks and school starts up then my available time will drop to zero.
I've got to change that injector spacer that's cracked. I changed them all out and that one decided not to work for me. I've also got to change out the metal bivalve next to the water by-pass hose in the back of the engine. $47.00 from the local dealership.
I know there is some overlapping with the motor mount and some of the brackets here so I'm hoping to get some help with this.
Is this the way the brackets for the generator are suppose to be on the engine? It looks right, but I wanted to make sure.
Thanks again for everyone's help.... I don't know how I would've gotten this far without you guys. Hopefully we'll be hearing it pretty soon. I'm pushing on it pretty hard to get it done. I've only got a couple of weeks and school starts up then my available time will drop to zero.
Last edited by AW1090; Jul 25, 2012 at 03:08 PM.


 Jul 25, 2012 | 04:39 PM
#157
Thread Starter
Registered User
Joined: Jun 2004
Posts: 740
Likes: 2
From: Little Rock, AR
Great pics... Thanks so much. I think those are going to help out a ton. Does your right/pass. side motor mount sit under the ac compressor bracket? I think I've got the position of most of the brackets, but I'll be sure to ask if I get stuck. I'm thinking the right motor mount goes under the ac bracket. There's a stay that is placed across the compressor and the ps bracket is directly above that. sound right?
Jul 25, 2012 | 04:40 PM
#158
YotaTech Milestone-Two Millionth Post
Joined: Jan 2009
Posts: 12,009
Likes: 122
From: Northeast Pennsylvania
Great pics... Thanks so much. I think those are going to help out a ton. Does your right/pass. side motor mount sit under the ac compressor bracket? I think I've got the position of most of the brackets, but I'll be sure to ask if I get stuck. I'm thinking the right motor mount goes under the ac bracket. There's a stay that is placed across the compressor and the ps bracket is directly above that. sound right?
bzzzzzzzzzzzzz
BRB
Jul 25, 2012 | 04:54 PM
#159
YotaTech Milestone-Two Millionth Post
Joined: Jan 2009
Posts: 12,009
Likes: 122
From: Northeast Pennsylvania
so.....people might have thought I was silly painting everything the way we did. I ad said we were doing that to be able to differentiate things....and make it all clean and that. so this is one of the times that you can clearly differentiate the RED motor mount from the GREEN A/C compressor bracket. and the main GROUND WIRE is in there too.


