

 Feb 9, 2016, 09:59 AM
Last edit by: IB Advertising
See related guides and technical advice from our community experts:
Browse all: Exterior Guides
- Toyota 4Runner 1984-1995 How to Eliminate Windshield Rust
Step by step instructions for do-it-yourself repairs
Browse all: Exterior Guides

Eliminating the metal windshield trim aka rust maker
 Jan 23, 2012 | 10:43 AM
#103
Registered User
Joined: Apr 2010
Posts: 97
Likes: 1
From: KI, NC
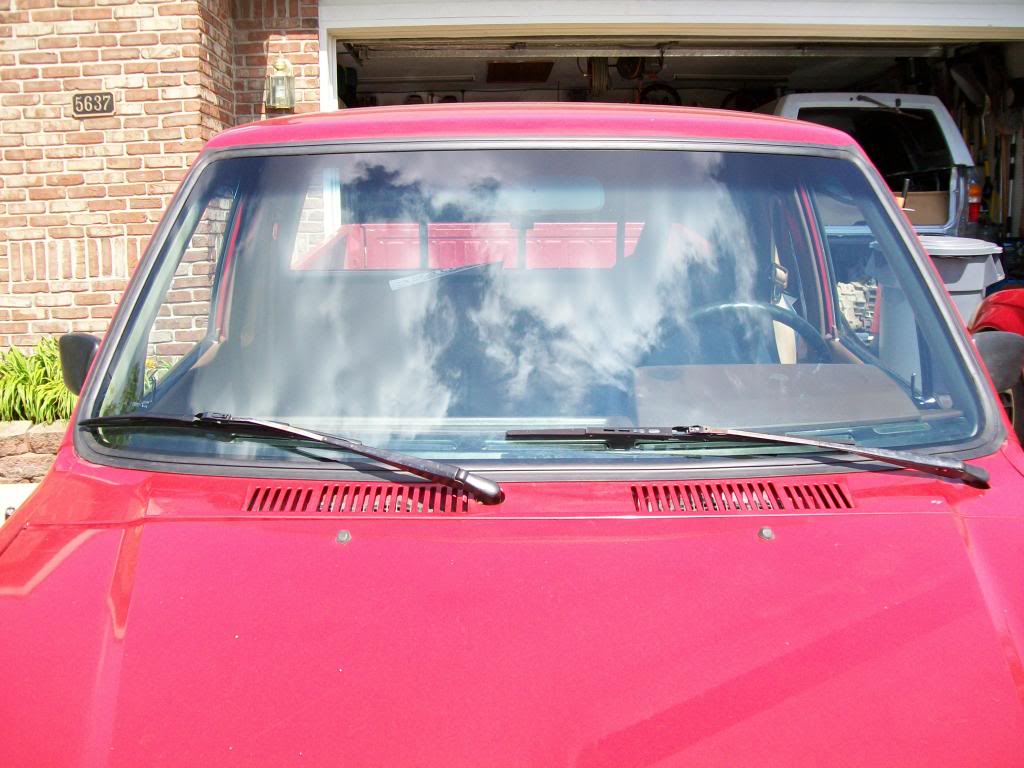
Bringing an old thread back to life. I have a leaky windshield. So after reading this thread I decided to talk to some of the glass people around here. One has stated that he replaced one a while back using a 21mm molding and it turned out nice. I am going to find out, in a few weeks I am taking my 4runner to him. When its done I will post pics of the finished product.
Jan 23, 2012 | 10:58 AM
#104
Registered User
Joined: Aug 2010
Posts: 123
Likes: 1
From: Charleston, SC
Bringing an old thread back to life. I have a leaky windshield. So after reading this thread I decided to talk to some of the glass people around here. One has stated that he replaced one a while back using a 21mm molding and it turned out nice. I am going to find out, in a few weeks I am taking my 4runner to him. When its done I will post pics of the finished product.
I had mine done the same way. a local guy did it for me and replaced all of that nasty metal garbage with a nice spongy 21 or 22 mm( dont remember which one exactly) "universal style" rubber trim. It turned out great!
The only thing I would say to watch is make sure you have him cut the rubber trim nice and straight so the two ends butt together nicely. and that where the two ends meet up is exactly in the center of the truck. My guy was in a rush i guess and kind of did the cut a little crooked so there is like a 1/16th to 1/8th gap between the two ends, and its offset to one side of the glass just a little. but...hey im a perfectionist.
he taped down the corners (especially at the top of the windshield) to make it lay flat. after a couple days i peeled it off and it was perfect!
 [/IMG]e work myself.
Jan 23, 2012 | 11:34 AM
[/IMG]e work myself.
Jan 23, 2012 | 11:34 AM
#106
Registered User
Joined: Apr 2010
Posts: 97
Likes: 1
From: KI, NC
I was going to do the work myself but I need a new windshield from scratches and pits in it. Not cracked yet but don't want to do alot of work just to have it crack a month or so later. The guy that I talked to seems to know what he is doing. I appreciate the heads up on the seam. Would have never really thought about it till after the fact. I'm not exactly a perfectionist, but if I see something like that it will bother the mess out of me.
Jan 23, 2012 | 04:35 PM
#107

Registered User
Joined: Mar 2005
Posts: 56
Likes: 0
From: Huntsville, AL
Mine got installed a week ago by the local safelite. It didn't go so great. I inquired in person about trim options and their comfort working with it, they only supply the 20mm flexitrim, and the techs insisted it would need 26mm but safelite doesn't allow them to supply. So I sourced the 26mm stuff myself, and when the tech arrived we set it into place dry with 20mm. It didn't reach all the way to the cowl:

So it went on with the 26mm. It puckers and pulls away from the body because of the extra width at the upper corners, and the tech didn't back-fill these spots with urethane.

I'm headed back to their shop this week, they can completely set the corners in urethane and use a tool which attaches with a suction cup and holds corners in perfect place while the urethane dries for a couple days. I'm considering also triming some width off of it just at the upper corners so it doesn't pull as hard.
Hindsight, I would have had 26mm along the cowl and 20mm everywhere else. No idea why my spacing appears to be different from others here.
So it went on with the 26mm. It puckers and pulls away from the body because of the extra width at the upper corners, and the tech didn't back-fill these spots with urethane.
I'm headed back to their shop this week, they can completely set the corners in urethane and use a tool which attaches with a suction cup and holds corners in perfect place while the urethane dries for a couple days. I'm considering also triming some width off of it just at the upper corners so it doesn't pull as hard.
Hindsight, I would have had 26mm along the cowl and 20mm everywhere else. No idea why my spacing appears to be different from others here.
Last edited by bkubisht; Jan 23, 2012 at 04:37 PM.
Oct 7, 2012 | 09:42 PM
#108
I found a source for the non-US windshield gasket. Anyone up for ordering one and giving it a try? Mine is sealed up for now so I'm not in the market right now.
http://www.4x4world.com.au/shopping/...roduct_id=5996
http://www.4x4world.com.au/shopping/...roduct_id=5996
Oct 8, 2012 | 05:59 AM
#109
Registered User
Joined: Aug 2010
Posts: 123
Likes: 1
From: Charleston, SC
I had mine done the same way. a local guy did it for me and replaced all of that nasty metal garbage with a nice spongy 21 or 22 mm( dont remember which one exactly) "universal style" rubber trim. It turned out great!
The only thing I would say to watch is make sure you have him cut the rubber trim nice and straight so the two ends butt together nicely. and that where the two ends meet up is exactly in the center of the truck. My guy was in a rush i guess and kind of did the cut a little crooked so there is like a 1/16th to 1/8th gap between the two ends, and its offset to one side of the glass just a little. but...hey im a perfectionist.
he taped down the corners (especially at the top of the windshield) to make it lay flat. after a couple days i peeled it off and it was perfect!
I retract my previous post....this ass hole did a horrible job. one year later and it is leaking... i tried to investigate and found that i could push the entire windshield out of the truck with two fingers.. adhesive failed at the windshield and the trim...peeled off like string cheese. i guess he didnt use any primer???
anyway now he wont warranty his work even though its a only a year old because "its and old truck and they can have rust in there"...
it wasnt rusty when you put it in ass hole!!
f this. i am back to square one again
Oct 13, 2012 | 01:37 PM
#110
Registered User
Joined: Mar 2005
Posts: 56
Likes: 0
From: Huntsville, AL
It has been 10 months since I had mine done. Safelite did keep the truck over a Sunday to get the corners squished down and cured in place. It also had a slight leak which I didn't discover until pulling out of their shop that Monday. Turned around and drove right back in, 10 minutes later it was fixed and I was out of there.
Safelite did use a primer a few minutes before the adhesive/sealant. No rust yet, although I probably wouldn't know it without removing the windshield. It went a few months without having a windshield while I was doing restoration work, and during that time I scraped and sanded absolutely all rust, loose paint, and old adhesive from the truck where the new windshield was to be installed. Then coated it with chassis saver. Bunch of work, but I did find the more I scraped the more rust I found so it was worth it.
Still recommend the way I had it done, even having to source the 26mm flexitrim myself. But pull the old windshield yourself and go to town on surface prep for an entire weekend if you have any possibility of rust being found.
 Jun 23, 2013 | 06:27 PM
#115

Registered User
Joined: Jan 2013
Posts: 57
Likes: 0
Is this molding the metal trim or rubber? I found a place (in the US) that has it:
http://www.4x4world.com.au/shopping/...roduct_id=5996
It's listed for $40
http://www.4x4world.com.au/shopping/...roduct_id=5996
It's listed for $40
Many Thanks
Oct 23, 2013 | 07:49 AM
#116

Registered User
Joined: Jun 2013
Posts: 51
Likes: 0
The windshield in my 84 had been replaced by a previous owner and the glass was separating from the sealant. I had a mobile guy come to reseal it but after the windshield was removed and after removing the sealant from the pinch weld area we noticed some rust, mostly surface but one 3/8" rust through. So now my truck sits without a windshield in the garage until I can properly prep the frame.
I plan on wire brushing and sanding to clean it up a bit and to get the loose stuff off and then using rust converter on it, filling the hole with bondo glass and then priming and painting. What primer would be recommended for this application? Preferably brush on but if I really had to I could mask off and use a rattle can. I thought about por15 but I have never used it and I would have to order it. I would also like to top coat it for added protection and because I don't plan on using any moulding. Since I've owned the truck it's never had moulding and the look hasn't bothered me. I'm unsure what top coat would be ok with the window sealant and how long I would have to wait before the installer could set the windshield.
Any advise on what worked for you or help with choosing products the would work good for my scenario would be very much appreciated. Also if it would be better for me to start a new thread let me know, I'll delete this and do that.
Dec 18, 2013 | 07:57 PM
#117
Registered User
Joined: Jun 2013
Posts: 51
Likes: 0
I finally had my windshield replaced, Im hoping the prep I did will last a few years at least. I wasn't in town during the install so my brother met with the installer, he didn't have many choices for size with the universal moulding, the one he used was 3/4" he said. I guess that would be 19mm. Anyway after pulling the tape I noticed that the moulding doesn't quite cover the upper corners on the body, Im not sure if it is from not raising the windshield enough or the moulding being to small. Even though the moulding is just for looks I might try to fill in the corners with some type of sealant so that it doesn't funnel water in. Other than that my bro said he used ALOT of sealant, it won't be until I wash it or drive in the rain till I know if it leaks.
Ive had the cowl off a couple times and was wondering if there is a way to adjust the cowl up or down at the windshield side to match the fenders or if the fenders have to be adjusted somehow to match the cowl hight?
Ive had the cowl off a couple times and was wondering if there is a way to adjust the cowl up or down at the windshield side to match the fenders or if the fenders have to be adjusted somehow to match the cowl hight?
Feb 10, 2014 | 08:20 AM
#118

Registered User
Joined: Dec 2013
Posts: 2
Likes: 0
I am now in the boat of getting rid of the windshield trim and so fat it seems some here has had good luck with it but I am not having good luck with what exactly was used. If you guys used the PT# 56121-89117 and ordered it form 4X4world.com then I will do so but I have not seen anyone say they did. Also if anyone has had a local shop do it what gasket did they use? I need to get this done ASAP.
Feb 10, 2014 | 10:20 AM
#119
Registered User


Joined: Mar 2012
Posts: 7,125
Likes: 681
my clips are all broken and halfway hanging off. could you just get some of the sealer for the windshield and use it like a caulk and smooth it out or would the sunlight and weather attack it and cause it to peel? i'd rather not put anything in place of those pieces at all, quick and easy; if it lasts.
- The metal trim retains debris and moisture and keeps moisture from evaporating faster. To make it worse it retains saltwater from ocean sports equipment.
- Salt water (electrolyte) + steel and metal trim (dissimilar metals = galvanic corrosion. Rubber seal will not have this.
- Gap is not too wide.
Therefore, I WILL do exactly that:
- Remove all that chrome
- Clean thoroughly
- Seal tiny crevices in the existing Uretheane adhesive. with flowable silicone.
- Finally seal with more viscous (thicker) black. silicone
 Mar 4, 2014 | 05:02 AM
#120
This thread is full of great information but also very flip floppy on what people are actually having done. Rad I'm very interested to see what you come with. I've got a very similar situation to what you have pictured above. However mine looks like it had the windshield replaced recently because the glue looks newer. My problem is that I'm missing the side chrome pieces and I just assume get rid of the chrome all together and get one of these rubber molding setups as well. I just wonder if I have to have the windshield pulled in order for that to happen or if I can simply have one installed with how it sits now.


