
3vze Top End rebuild...W/pics...slowly
 Apr 26, 2005 | 09:34 PM
#161
Thread Starter
Registered User
Joined: Jan 2005
Posts: 571
Likes: 0
From: Moreno Valley, Ca
Nothing major to report...
I'm trying so hard to finish up my interior and I keep running into snags. A special thanks to Bumpin'Yota for his help tonight. Basically my amp seems to be bad as when I connect it to my head units "remote on" line neither turn on. I mickey moused it with a straight line to the battery and this worked. Well it worked off and on and this helps me narrow down the issue to my amp. So much for my "FREEBIE". Well after messing with it I tried again to the HU's "remote line" and now the HU works but still no amp. so I'm in search of an amp so I can finish up.
Thanks Bumpin'yota again
-=Morphine=-
Thanks Bumpin'yota again
-=Morphine=-
Last edited by Morphine; Apr 26, 2005 at 09:57 PM. Reason: Can't type, had to correct my spelling
 May 2, 2005 | 12:19 PM
#163
Contributing Member
Joined: Jan 2005
Posts: 885
Likes: 0
From: Roseville, CA
Morph-
I'm thinking about copying your speaker pods, but was wondering how exactly you attached them. Did you just screw them straight into the inner panels, or put a backing plate on the inside of the panel, or what???
Edit: PS: That carpet looks friggin GREAT!
I'm thinking about copying your speaker pods, but was wondering how exactly you attached them. Did you just screw them straight into the inner panels, or put a backing plate on the inside of the panel, or what???
Edit: PS: That carpet looks friggin GREAT!
Last edited by Bassinfool; May 2, 2005 at 12:20 PM.
May 2, 2005 | 10:04 PM
#164
Thread Starter
Registered User
Joined: Jan 2005
Posts: 571
Likes: 0
From: Moreno Valley, Ca
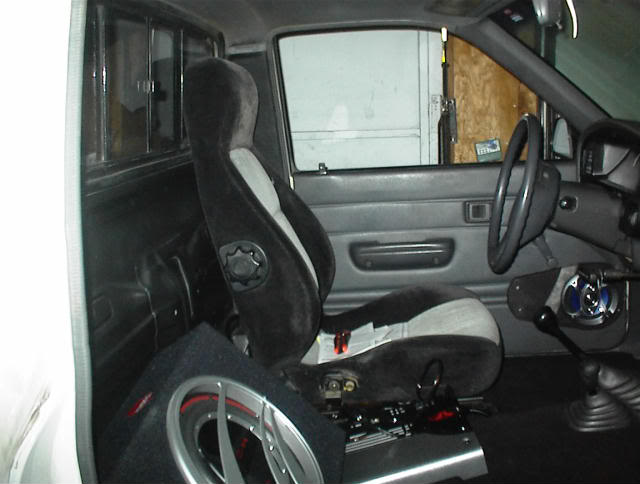
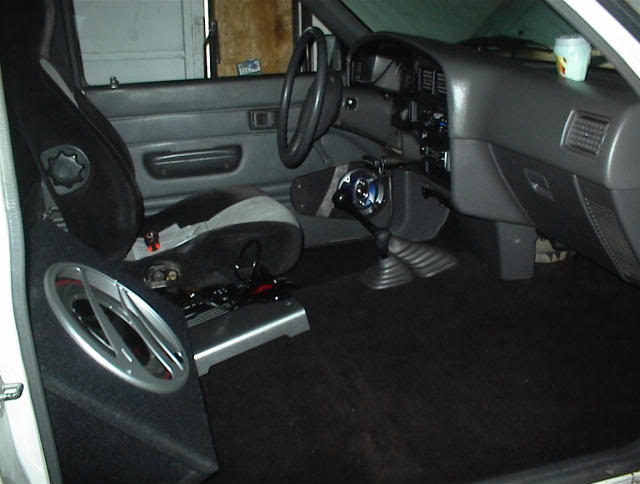
Bassinfool: To mount the pods all I did was screw directly into the panel. I made sure to get a screw that would go through the wood, through the padding and through the door panel backer. The tip of the screw is right at the dynamat/metal. Since i'm not running an amp to the door speakers is sounds awesome. Theres no rattling or vibrations from it. Hope this helps but if you need more direct info let me know.
-=Morphine=-
-=Morphine=-
May 3, 2005 | 07:57 AM
#165
Contributing Member
Joined: Jan 2005
Posts: 885
Likes: 0
From: Roseville, CA
Perfect. I think I'm going to start on them this weekend. The only other thing I was wondering from looking at your pictures is, have you tried rolling up the window with the pods there? It seems like you would hit your hand on it because the pods are fairly close to the crank.-?? Just wondering, because if so, I'd like to make sure & mount mine a little lower.
May 3, 2005 | 10:34 AM
#166
Thread Starter
Registered User
Joined: Jan 2005
Posts: 571
Likes: 0
From: Moreno Valley, Ca
Every so often I clip my hand. I tried to measure it out the best I could. It doesn't interfere but if you're in a hurry "Yes, you will hit your hand". I'd also recommend staying away from the rounded corners as the fabric was a real pain. Granted I had no clue what I was doing, but just a word of caution. My next design would be more along the lines of this:

Sounddomain link HERE
It still has a sweet look to it, offers options for mounting, and looks real clean.
-=Morphine=-
Sounddomain link HERE
It still has a sweet look to it, offers options for mounting, and looks real clean.
-=Morphine=-
May 3, 2005 | 12:30 PM
#167
Contributing Member
Joined: Jan 2005
Posts: 885
Likes: 0
From: Roseville, CA
That looks nice. I'm trying to decide if I want to try & match the vinyl on the door panel, or go with grey carpet. I did a similar thing in the back (ex. cab), where I put speakers in the stock storage bins on the sidewalls. I covered those with gey carpet & they look great, but I'm not sure carpet would work as well on the doors. Just wondering where the heck I can find vinyl that would match well enough?
 May 4, 2005 | 08:34 AM
#170
Contributing Member
Joined: Jan 2005
Posts: 885
Likes: 0
From: Roseville, CA
Originally Posted by Bumpin' Yota
Go to about any fabric store and bring in a panel from your truck to compare the colors. Vinyl can be molded around corners and rounded objects with the help of a heat gun... 
 May 10, 2005 | 04:49 AM
#172
Registered User
Joined: Feb 2003
Posts: 3,689
Likes: 4
From: Sarasota, FL
Originally Posted by Bassinfool
That's good to know. I'll have to get a heat gun. Thanks!
May 11, 2005 | 10:14 PM
#173
Thread Starter
Registered User
Joined: Jan 2005
Posts: 571
Likes: 0
From: Moreno Valley, Ca
ok, slow going
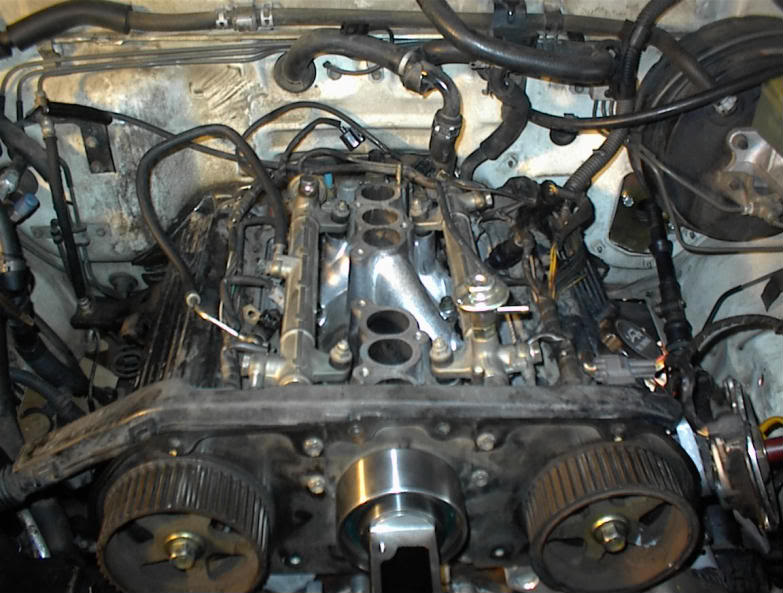
Truth be told I've been scared to finish the engine and start her up. This is the biggest undertaking I've done. My second most was a fuel filter replacement. So I gathered my courage and began again tonight SERIOUSLY trying to finish up soon. Now I have a few questions...
#1.) Should the spacer for the fuel injector be fully seated into the intake manifold or loosely sat into the opening? If the latter, then the tightening of the fuel rail holds it and the injector into place?
#2.) Does anyone have a simple 1,2,3 processes to re-attach all of the timing components? None of the manuals CLEARLY spell it out. They all say to go in reverse order of the removal, but I'm sorry, I'm a little slow with engines.
#3.) If I post pics of some brackets could someone point me in the direction of where they go? This last one blows as it's my own fault for stalling.
Now for progress I have the lower intake manifold on, fuel spacers in place and the fuel injectors and rails lined up just haven't tightened them down, see Question #1. I began to re-attach the lower timing belt (I believe where cover #1 is). I'm hoping to put forth 2 hours a day until it's started, then I'll fine tune and make adjustments as needed. I know it won't be perfect upon my first start, but I DO WANT HER TO START AND RUN without to much headache.
Thanks goes out to EVERYONE here for their continued support. I can't wait to wheel her with some of you.
-=Morphine=-
Charles
May 11, 2005 | 11:39 PM
#174
Registered User
Joined: Mar 2004
Posts: 511
Likes: 0
From: Salem,Oregon
if you PM me your Email address I can send you a boat load of pictures I took during tear down to help you figure out brackets and timing components.
Here is a good link for timing assembly go about half way down for reassembly step by step (Its a 93 FSM)
Here is the entire 93 FSM manual
Here is a good link for timing assembly go about half way down for reassembly step by step (Its a 93 FSM)
Here is the entire 93 FSM manual
May 12, 2005 | 05:38 AM
#175
Registered User
Joined: Feb 2003
Posts: 3,689
Likes: 4
From: Sarasota, FL
Originally Posted by Morphine
Truth be told I've been scared to finish the engine and start her up. This is the biggest undertaking I've done. My second most was a fuel filter replacement. So I gathered my courage and began again tonight SERIOUSLY trying to finish up soon. Now I have a few questions...
#1.) Should the spacer for the fuel injector be fully seated into the intake manifold or loosely sat into the opening? If the latter, then the tightening of the fuel rail holds it and the injector into place?
#2.) Does anyone have a simple 1,2,3 processes to re-attach all of the timing components? None of the manuals CLEARLY spell it out. They all say to go in reverse order of the removal, but I'm sorry, I'm a little slow with engines.
#3.) If I post pics of some brackets could someone point me in the direction of where they go? This last one blows as it's my own fault for stalling.
Now for progress I have the lower intake manifold on, fuel spacers in place and the fuel injectors and rails lined up just haven't tightened them down, see Question #1. I began to re-attach the lower timing belt (I believe where cover #1 is). I'm hoping to put forth 2 hours a day until it's started, then I'll fine tune and make adjustments as needed. I know it won't be perfect upon my first start, but I DO WANT HER TO START AND RUN without to much headache.
Thanks goes out to EVERYONE here for their continued support. I can't wait to wheel her with some of you.
-=Morphine=-
Charles
#1.) Should the spacer for the fuel injector be fully seated into the intake manifold or loosely sat into the opening? If the latter, then the tightening of the fuel rail holds it and the injector into place?
#2.) Does anyone have a simple 1,2,3 processes to re-attach all of the timing components? None of the manuals CLEARLY spell it out. They all say to go in reverse order of the removal, but I'm sorry, I'm a little slow with engines.
#3.) If I post pics of some brackets could someone point me in the direction of where they go? This last one blows as it's my own fault for stalling.
Now for progress I have the lower intake manifold on, fuel spacers in place and the fuel injectors and rails lined up just haven't tightened them down, see Question #1. I began to re-attach the lower timing belt (I believe where cover #1 is). I'm hoping to put forth 2 hours a day until it's started, then I'll fine tune and make adjustments as needed. I know it won't be perfect upon my first start, but I DO WANT HER TO START AND RUN without to much headache.
Thanks goes out to EVERYONE here for their continued support. I can't wait to wheel her with some of you.
-=Morphine=-
Charles
May 12, 2005 | 06:18 AM
#176
Contributing Member
Joined: Feb 2005
Posts: 783
Likes: 3
From: Vancouver BC
Originally Posted by Morphine
Truth be told I've been scared to finish the engine and start her up. This is the biggest undertaking I've done. My second most was a fuel filter replacement. So I gathered my courage and began again tonight SERIOUSLY trying to finish up soon. Now I have a few questions...
-=Morphine=-
Charles
Originally Posted by Morphine
For all new comers and the mechanically challenged...This thread just goes to show what you can do if patient, you have a great support system (Yotatech.com), and can get over your fears of "working on an engine". My previous experience with car repair was changing burnt out bulbs and oil changes.
Thanks yotatech
-=Morphine=-
Someone once gave me wise advise on the board, "Git-R-Dun!!!"

Troy
Last edited by YotaJunky; May 12, 2005 at 06:21 AM.
May 13, 2005 | 01:55 PM
#177
Thread Starter
Registered User
Joined: Jan 2005
Posts: 571
Likes: 0
From: Moreno Valley, Ca
Thank you, Everyone
Ok, thanks everyone for chiming in and helping me over my mental hurdle. Well I've made some progress. Just a quick pic to show, and then some mystery parts for everyone to explain to me where to put them back on at.
First my progress...May not be much but it is progress.
steering stabilzer..
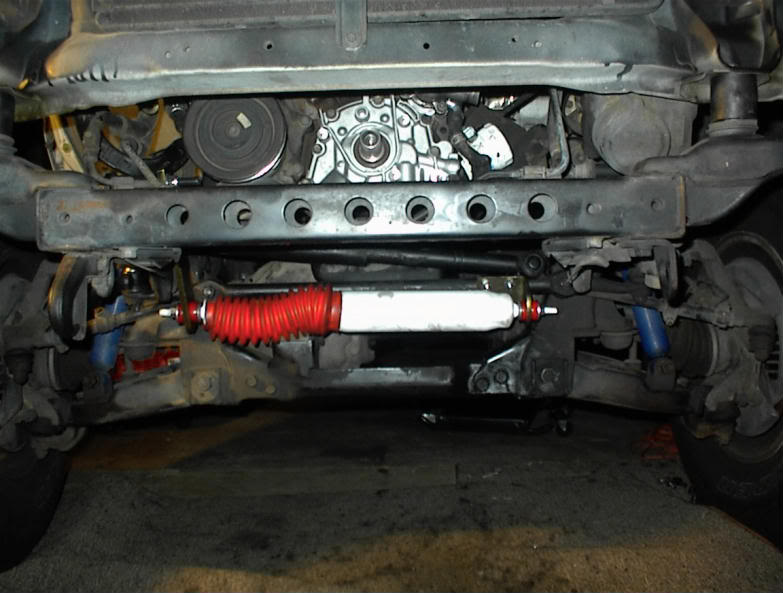
Now the 2 mystery parts, brackets of some kind. The first one...maybe a support bracket on the passanger side (where do you go???)
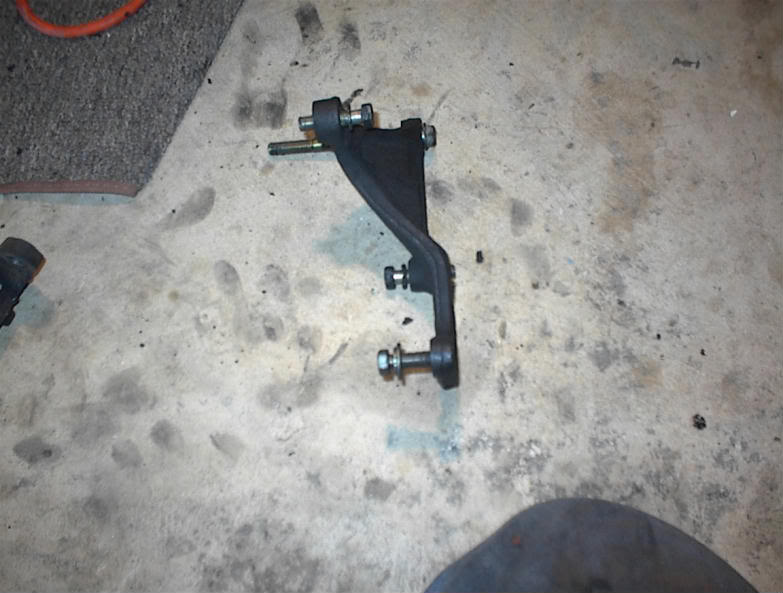
and the second one...
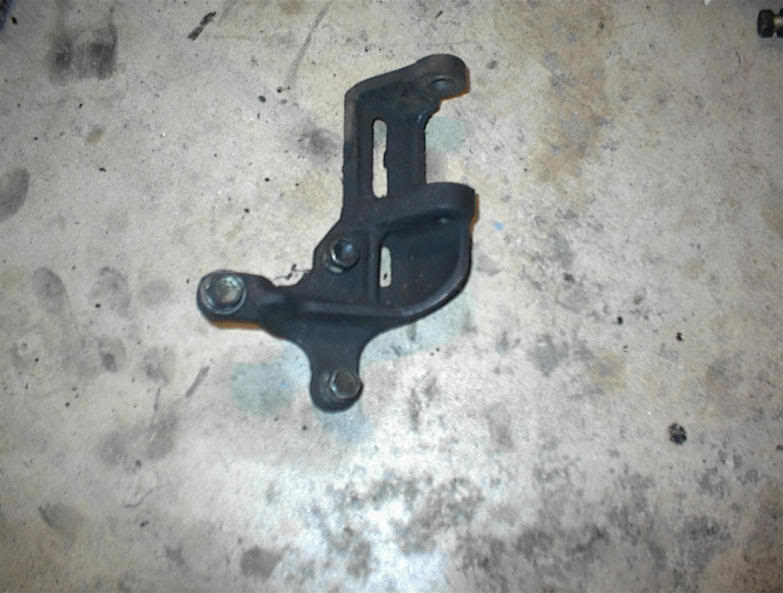
Possibly do one of these help support the altenator? I have the lower support bar but not the upper. Maybe for the power steering resovoir(if this is the correct name). This is my fault for waiting so long. STUPID FEARS. Now I'm working onn my motor on FRIDAY THE 13TH.
Thanks
-=Morphine=-
First my progress...May not be much but it is progress.
steering stabilzer..
Now the 2 mystery parts, brackets of some kind. The first one...maybe a support bracket on the passanger side (where do you go???)
and the second one...
Possibly do one of these help support the altenator? I have the lower support bar but not the upper. Maybe for the power steering resovoir(if this is the correct name). This is my fault for waiting so long. STUPID FEARS. Now I'm working onn my motor on FRIDAY THE 13TH.
Thanks
-=Morphine=-
May 13, 2005 | 02:01 PM
#178
Thread Starter
Registered User
Joined: Jan 2005
Posts: 571
Likes: 0
From: Moreno Valley, Ca
OK, I didn't want to edit my post instead I thought I'd post my own answer...
The 2 mystery parts appear to be these support brackets..

Thank you Ganoid for the help and sending me those pics the other day. I guess looking at them at 1:30AM is a bad Idea. I'm still open to answers on the alternator bracket.
Thanks again
-=Morphine=-
EDIT
ok it looks like part 1 goes on the passanger side to support the power steering and that part 2 is the support I was lokking for for my alternator.
Thanks again Ganoid, I'm taking a second look at your pics and I'm "SEEING THE LIGHT"
-=Morphine=-
The 2 mystery parts appear to be these support brackets..
Thank you Ganoid for the help and sending me those pics the other day. I guess looking at them at 1:30AM is a bad Idea. I'm still open to answers on the alternator bracket.
Thanks again
-=Morphine=-
EDIT
ok it looks like part 1 goes on the passanger side to support the power steering and that part 2 is the support I was lokking for for my alternator.
Thanks again Ganoid, I'm taking a second look at your pics and I'm "SEEING THE LIGHT"
-=Morphine=-
Last edited by Morphine; May 13, 2005 at 02:08 PM. Reason: I'm a moron
May 13, 2005 | 02:34 PM
#179
Registered User
Joined: Feb 2003
Posts: 3,689
Likes: 4
From: Sarasota, FL
Yup the good ole power steering bracket! I took it off and cleaned it when I did my timing belt...when I went to put it back on 3 days later I had absolutely no clue how it went back on. Thank god for the dozens of pictures I took!!
I had the same issue with the fan braket - no idea hwere it bolted up to until i looked at one of the pics I had taken.
I had the same issue with the fan braket - no idea hwere it bolted up to until i looked at one of the pics I had taken.
May 14, 2005 | 01:12 PM
#180
Contributing Member
Joined: Sep 2003
Posts: 138
Likes: 0
From: Lehigh Valley PA
Originally Posted by Morphine
Possibly do one of these help support the altenator?

The lower bracket looks to me like an alternator holder but I've not popped the hood in about three weeks -- ever since I had a coolant leak out of that damn rear hose under the plenum. Your pix showed me what I'm up against and for that I'm grateful.


