
3vze Top End rebuild...W/pics...slowly
 Mar 23, 2005 | 12:40 PM
#121
Registered User
Joined: Mar 2004
Posts: 511
Likes: 0
From: Salem,Oregon
If the header was bolted to the head with more than 2 bolts per cyl I would consider cutting them. The way thay are now you have 2 bolts holding from any movment on x axis but the only thing holding y axis is thier ties to one another and the rigidity of the flange. As for the steel gaskets thay come with all the gasket kits. I got new ones in both the fel-pro kit and the Rock kit. No one I talked to seems to think the head surface needs to have anything done with it.
On another note I did get all the balance numbers back from the engine balancer. Got all the flow numbers for the heads as thay where with 8k miles on the DOA junk and also with the new valves and more port work by Rob @ louthan performance. I should probably post those up on another thread huh?
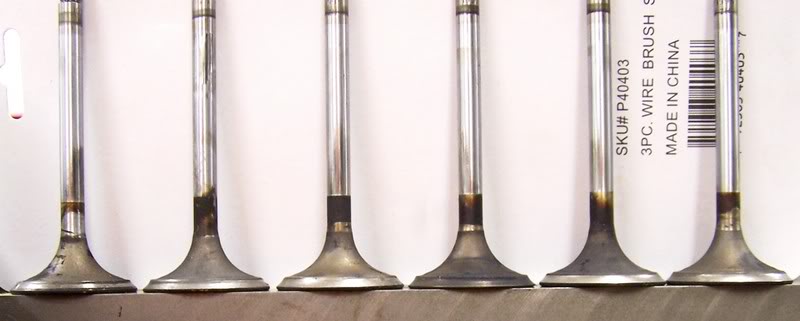
When the heads where worked over the builder said the vaves looked like thay had been run loose for a very long time. When I told him thay had 8k miles on them and how many times I had adjusted them he didnt know what to think....Maybe defective valves? Looking at the valve you could see thay where hammered. I checked and adjusted my valves 2 times in 8k miles after recieving my "Turn Key" junk from Tim over at DOA. The one on the far left looks typical of a 100k motor Rob said the rest where totally gone. Looking at the valve pay attention to the part that contacts the seat it should be a nice flat 45deg angle but looking at mine you can see thay look more like a small trench around the valve head.
Once again another Premium product offered by DOA racing. For the paltry sum of $1000 plus $200 in shipping you too can have a nice quality product and workmanship like this.... Just dont expect any sort of reciept for you money OR customer support OR heck even any sort of acknowledgement that you paid him any money
As you can see Im just a little pissed off about losing my $1000. Maybe I should figure up the "Cost of Ownership" price on these. Lets see $1200 total cost and 8k miles of use. WOW only .15 a mile and that isnt even considering cost of teardown and assembly twice.... what a bargan
On another note I did get all the balance numbers back from the engine balancer. Got all the flow numbers for the heads as thay where with 8k miles on the DOA junk and also with the new valves and more port work by Rob @ louthan performance. I should probably post those up on another thread huh?
When the heads where worked over the builder said the vaves looked like thay had been run loose for a very long time. When I told him thay had 8k miles on them and how many times I had adjusted them he didnt know what to think....Maybe defective valves? Looking at the valve you could see thay where hammered. I checked and adjusted my valves 2 times in 8k miles after recieving my "Turn Key" junk from Tim over at DOA. The one on the far left looks typical of a 100k motor Rob said the rest where totally gone. Looking at the valve pay attention to the part that contacts the seat it should be a nice flat 45deg angle but looking at mine you can see thay look more like a small trench around the valve head.
Once again another Premium product offered by DOA racing. For the paltry sum of $1000 plus $200 in shipping you too can have a nice quality product and workmanship like this.... Just dont expect any sort of reciept for you money OR customer support OR heck even any sort of acknowledgement that you paid him any money
As you can see Im just a little pissed off about losing my $1000. Maybe I should figure up the "Cost of Ownership" price on these. Lets see $1200 total cost and 8k miles of use. WOW only .15 a mile and that isnt even considering cost of teardown and assembly twice.... what a bargan
Last edited by Ganoid; Mar 23, 2005 at 12:46 PM.

 Mar 25, 2005 | 11:06 PM
#123
Thread Starter
Registered User
Joined: Jan 2005
Posts: 571
Likes: 0
From: Moreno Valley, Ca
Progress...She's coming along. Tomorrow the heads go back on and I have a good feeling I'll be able to crank her sometime tomorrow. I figured out my fuel filler issue as I had 2" of hose attached to the fule ce;; neck. I loosed the clamp and pulled up 1". This is giving me 1" on the fuel cell neck and 1/2" on the filler pipe. If someone thinks this isn't enough please advise me. The hose clamps fit nicely and snug the hose evenly across the metal.
Pics will come soon, hopefully outside of my garage and running on her own power.
-=Morphine=-
Pics will come soon, hopefully outside of my garage and running on her own power.
-=Morphine=-
Mar 26, 2005 | 02:18 AM
#124
Registered User
Joined: Mar 2004
Posts: 511
Likes: 0
From: Salem,Oregon
Thats exactly what I did when I made my 1.5" body lift. I also had to heat and bend my shifter to keep it from popping out of gear. Im going to be another week or so before mine is running. Im waiting on my TB being bored out.
Mar 26, 2005 | 06:44 AM
#125
Contributing Member
Joined: Nov 2002
Posts: 10,666
Likes: 5
From: Oklahoma State
Ganoid, who are you having bore your TB? I'm guessing DOA isn't doing it.  I'm thinking about that too.
I put a straight edge on one of my Downey header manifolds and they are not real flat. I haven't measured the gap yet but it looks like 30-40 thou difference across the full length of the manifold. That is just one more reason to cut the manifold into individual sections.
I'm thinking about that too.I put a straight edge on one of my Downey header manifolds and they are not real flat. I haven't measured the gap yet but it looks like 30-40 thou difference across the full length of the manifold. That is just one more reason to cut the manifold into individual sections.
Mar 26, 2005 | 03:45 PM
#126
Thread Starter
Registered User
Joined: Jan 2005
Posts: 571
Likes: 0
From: Moreno Valley, Ca
heads are on, interior carpet is dye'd and drying. I will be continuing tonight and think I might have her running very soon. Man this exciting. I also have copied waskillywabbit on my carpet dye and interior paint --Thanks--. The interior is looking sweet with the "hammered" black going on. I''ll get some pics up later if people want. But dinner calls and then I'll be in the garage some more.
-=Morphine=-
-=Morphine=-
 Mar 26, 2005 | 07:11 PM
#128
Thread Starter
Registered User
Joined: Jan 2005
Posts: 571
Likes: 0
From: Moreno Valley, Ca
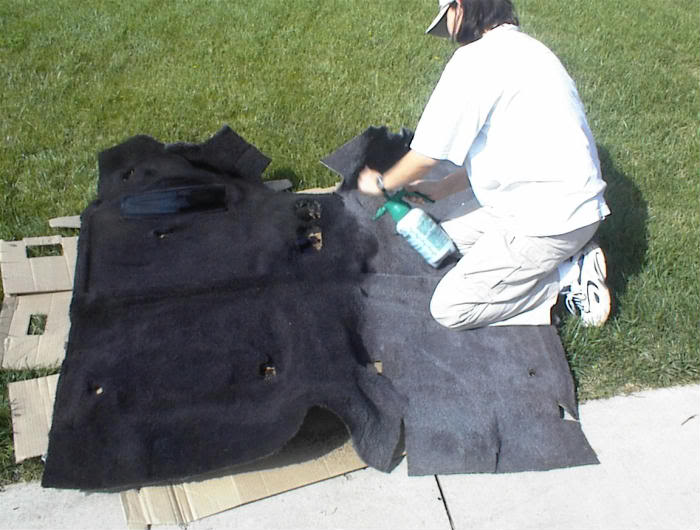
ok some pics
Carpet dye going on...
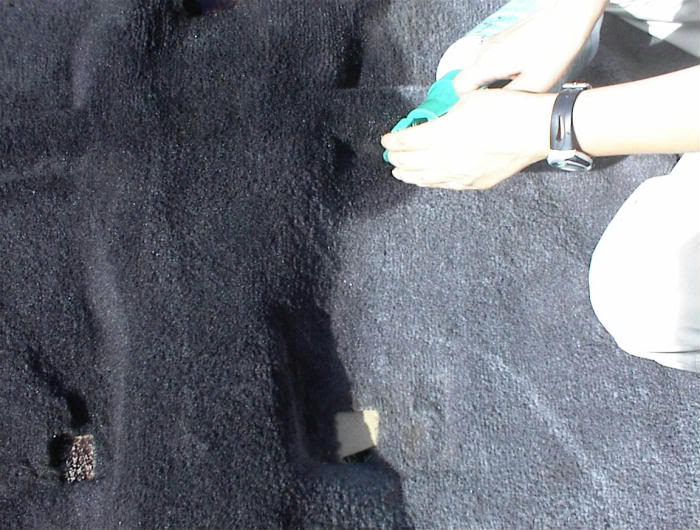
close up of color change...
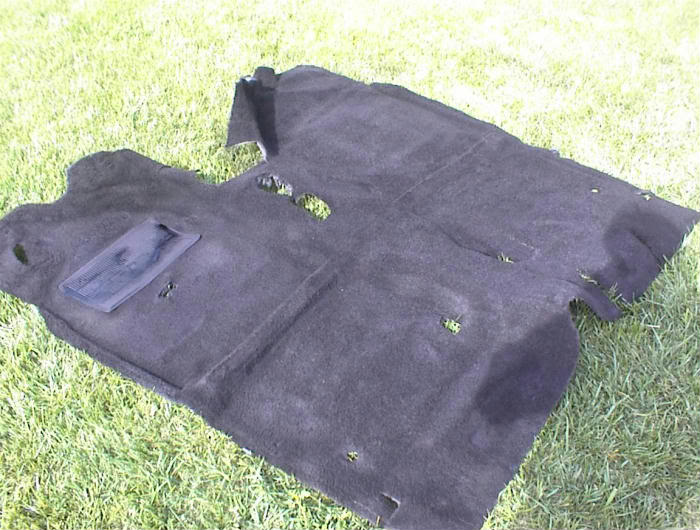
In the sun light drying...
Heads are on...

"hammered paint going on...(thanks waskillywabbit for both ideas ...
...
Just a note, the carpet dye was only a single coat. I used the liquid RIT black dye and very hot water and a pump pressure spray bottle to apply. I'm still going to do a second coat. Now for the "hammered" paint...WHY you may ask. Why not, actually I do have a small hole in my carpet so I'm hoping to "camoflague" this minor problem area.
what do you all think?
-=Morphine=-
close up of color change...
In the sun light drying...
Heads are on...
"hammered paint going on...(thanks waskillywabbit for both ideas
... Just a note, the carpet dye was only a single coat. I used the liquid RIT black dye and very hot water and a pump pressure spray bottle to apply. I'm still going to do a second coat. Now for the "hammered" paint...WHY you may ask. Why not, actually I do have a small hole in my carpet so I'm hoping to "camoflague" this minor problem area.
what do you all think?
-=Morphine=-
Mar 26, 2005 | 09:05 PM
#130
Thread Starter
Registered User
Joined: Jan 2005
Posts: 571
Likes: 0
From: Moreno Valley, Ca
Several holes???? Those are for the shifter area, and then the seat mounting brackets. Look below the drivers side rubber foot rest area. Thats the hole. So hence the "hammered" black paint. All in all for a little time and umder $15 I'm very happy with the results. A lot less expensive than new carpet. Several holes....jeesh, only in my socks.
-=Morphine=-
-=Morphine=-
Mar 28, 2005 | 05:25 PM
#132
Contributing Member
Joined: Nov 2002
Posts: 10,666
Likes: 5
From: Oklahoma State
I finally got around to measuring the flatness of the flanges on my Downey headers and one was off by .035". I started a thread about it: http://www.4x4wire.com/forums/showfl...5&o=14&fpart=1
Last edited by mt_goat; Mar 28, 2005 at 05:27 PM.
Mar 28, 2005 | 08:58 PM
#133
Thread Starter
Registered User
Joined: Jan 2005
Posts: 571
Likes: 0
From: Moreno Valley, Ca
Definitley Contact Downey
mt_goat, after looking at your pics I checked my flanges. I went across the bolt openings top and bottom and mine are flush with the straight edge. I used an 18" metal ruler from back in my print shop days, but all came up flush to the edge. Let us know what happens.
Best of luck
-=Morphine=-
Best of luck
-=Morphine=-
Apr 3, 2005 | 04:27 PM
#136
Thread Starter
Registered User
Joined: Jan 2005
Posts: 571
Likes: 0
From: Moreno Valley, Ca
Updates...Disappointment...And Good News
OK, Slow going here on the rebuild. I went to torque the heads down and realized that the socket I took it off with was a 3/8" and my torque wrench is 1/2". No big deal for most people, break out the 3/8"-to-1/2" adapter, but I DON'T OWN ONE!!!!. No problem, run out and buy the correct socket, 12mm 12 point 1/2". It doesn't fit because I left the camshaft in place. I already sealed up the camshaft bearing caps. I got it off this way but it won't go back on this way. Now I have the correct socket (for next time...Please not for awhile) but I still need to get the adapter so I can finish this.
Next hurdle, running the battery cables, I replaced them since my old ones were corroding pretty badly. I bought everything about 3 months ago to do this and since I had the time and the engine bay space I figured I'd knock it out. PROBLEM: I forgot to include the raise in the body from the body lift and running the cables in the factory position is goining to be awfullyed tight. No big deal just frustrating. 15 minutes and it's corrected.
Third item, painting the cab is awesome. KEY WORD "VENTILLATION". I felt high as a kite for 2 days. Ok so the second day I "knew" what I was doing but still chose to keep the garage closed.
Fourth, getting the fuel rails and injectors ready I realized that the new spacers don't match up to the old ones. The injector doesn't even sit correctly, BAck to the Stealership. My fault I should have checked 1 month ago when I got them instead of waiting till now. LIVE AND LEARN
Good news - with pictures:
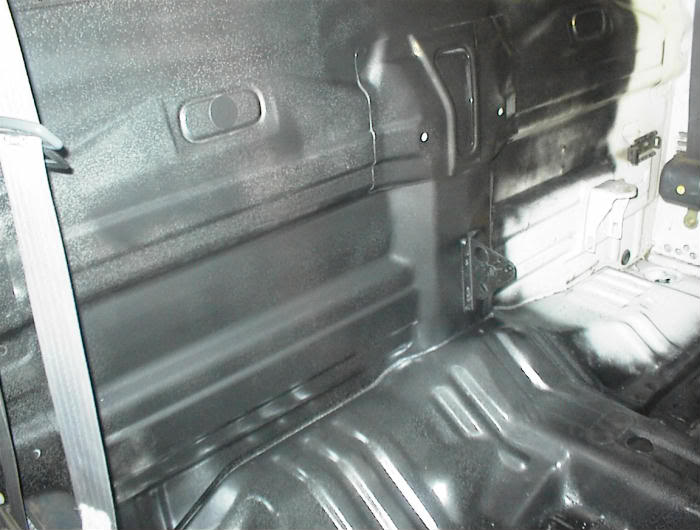
Scavanged some bucket seats out of an Eclipse from the local pick-a-part. Good condition, no rips or tears. Lumbar support still works even. Pretty cheap too (cheaper than the ones I found on Ebay - Shoot I picked both up cheaper than the shipping charges I saw on Ebay). Now need to figure a way to mount them. I got the slide rails from the eclipse but I'll only get 1 bolt hole to line up...
fronts - sorry for the shadow

Drivers seat side - worst area of the 2 seats
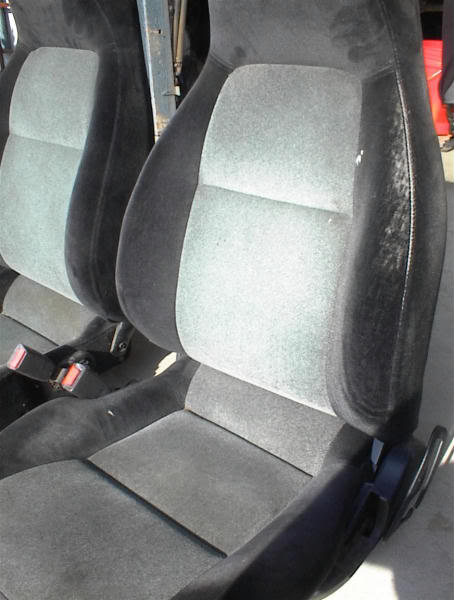
Drivers seat head on

Backs - no tears just a little dirt
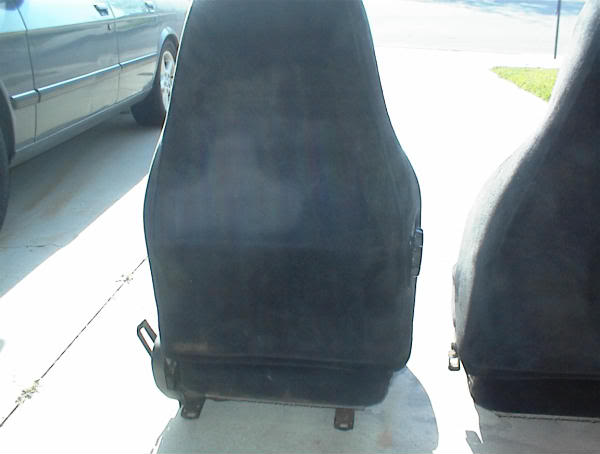
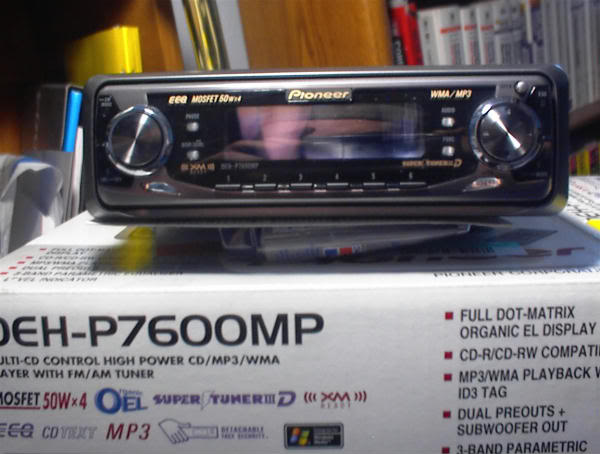
And Finally my new HU - Pioneer DEH-P7600MP. I will be getting new 6 1/2" w/1" tweeters for the doors, a 10" sub - currently looking at the PS1 (I believe, heard it sounds good in a smaller enclosure --Stupid standard cab and me being 6'1"--).
-=Morphine=-
Next hurdle, running the battery cables, I replaced them since my old ones were corroding pretty badly. I bought everything about 3 months ago to do this and since I had the time and the engine bay space I figured I'd knock it out. PROBLEM: I forgot to include the raise in the body from the body lift and running the cables in the factory position is goining to be awfullyed tight. No big deal just frustrating. 15 minutes and it's corrected.
Third item, painting the cab is awesome. KEY WORD "VENTILLATION". I felt high as a kite for 2 days. Ok so the second day I "knew" what I was doing but still chose to keep the garage closed.
Fourth, getting the fuel rails and injectors ready I realized that the new spacers don't match up to the old ones. The injector doesn't even sit correctly, BAck to the Stealership. My fault I should have checked 1 month ago when I got them instead of waiting till now. LIVE AND LEARN
Good news - with pictures:
Scavanged some bucket seats out of an Eclipse from the local pick-a-part. Good condition, no rips or tears. Lumbar support still works even. Pretty cheap too (cheaper than the ones I found on Ebay - Shoot I picked both up cheaper than the shipping charges I saw on Ebay). Now need to figure a way to mount them. I got the slide rails from the eclipse but I'll only get 1 bolt hole to line up...
fronts - sorry for the shadow
Drivers seat side - worst area of the 2 seats
Drivers seat head on
Backs - no tears just a little dirt
And Finally my new HU - Pioneer DEH-P7600MP. I will be getting new 6 1/2" w/1" tweeters for the doors, a 10" sub - currently looking at the PS1 (I believe, heard it sounds good in a smaller enclosure --Stupid standard cab and me being 6'1"--).
-=Morphine=-
Apr 4, 2005 | 08:38 AM
#137
Contributing Member
Joined: Jan 2005
Posts: 885
Likes: 0
From: Roseville, CA
I hate Pioneer. I have a 10" Kicker Comp sub with a Kicker Comp Amp, 6.5" Kenwood speakers where the rear side storage bins used to be. I had an Aiwa sterio for about 3 years. Sound was AWESOME. Well, some of the mechanical parts (Faceplate flipped open & shut) quit working, so I bought a Pioneer deck. My bass sounds like crap. You can't even hear the low bass anymore. Sounds more like an underwater fart or something. I'm going to put that deck in my wife's car & get me something better.
Last edited by Bassinfool; Apr 4, 2005 at 08:40 AM.
Apr 7, 2005 | 02:30 AM
#139
Registered User
Joined: Feb 2005
Posts: 895
Likes: 0
From: thunder bay, ontario
hmm, shoulda got the deh-760mp.. its the premier line, woulda cost about $20 more.. and you get double the warranty, plus a bunch of other nice features.. (what i did anyway)
as for the rebuild... nice.. simply nice, i wish i had the time/funds/patience to do all that work.
as for the rebuild... nice.. simply nice, i wish i had the time/funds/patience to do all that work.
Apr 7, 2005 | 03:52 PM
#140
Thread Starter
Registered User
Joined: Jan 2005
Posts: 571
Likes: 0
From: Moreno Valley, Ca
status report..
The progress is null. I've been catching up on sleep and working on some other items at home besides the Yota. I know "Bad Morphine, Shame on you!". Well I got the tools back (or I bought) I needed to hopefully get finished up. Second coat of dye on the carpet. Began drawing up plans for the buckets. Touch up paint on the interior. Getting the new HU ready.
Progress will go quicker once works levels out or I quit. What ever comes first. Ok time to feed the Huskies and get back in ther garage. Pics and when she runs a sound clip if I can. Thanks for the support and enthiusiasim (SP?) as I have gone way above my head and skills on this project.
-=Morphine=-


