
22R Rebuild
 Feb 12, 2010 | 09:40 AM
#261
Registered User
Joined: Oct 2009
Posts: 134
Likes: 0
From: NW Phoenix
Unfortunately, I have EFI.
BUT, My guess is that the black stuff is basic gooey buildup of unburnt, or, redistributed exhaust mixed in with it (from the EGR) over time. I would assume that as long as the built in sealer of the new gasket seals around the can of the heater, all should be fine. You just don't want an air leak into your intake, around that heater sealing surface.
BUT, My guess is that the black stuff is basic gooey buildup of unburnt, or, redistributed exhaust mixed in with it (from the EGR) over time. I would assume that as long as the built in sealer of the new gasket seals around the can of the heater, all should be fine. You just don't want an air leak into your intake, around that heater sealing surface.
Feb 17, 2010 | 11:56 PM
#262

Thread Starter
Registered User
Joined: May 2009
Posts: 586
Likes: 2
From: Arizona
I'm back.
My multimeter is a cheap Craftsman. The CMH constantly fluctuates between 1.3 and 1.5 ohms, a bit high. Temperature of the CMH at the time was probably in the 60s. Specs are for 68 F, IIRC, so close enough. Maybe it's bad?
I'm reluctant to tear it apart until I have another to use. Might ruin it completely.
The new head bolts arrived yesterday. I put them in and probably went a little overboard working them in. After lightly oiling the threads and bottoms of the bolt heads, I did this, following the manual's tightening and loosening sequences:
tightened in a few stages to 30 ft/lbs
loosened ~ 1/5 turn
back to 30 ft/lbs
loosened ~ 1/5 turn
back to 30 ft/lbs
loosened ~ 1/5 turn
back to 30 ft/lbs
loosened ~ 1/5 turn
back to 30 ft/lbs
tightened to 38 ft/lbs
tightened to 45 ft/lbs
loosened ~ 1/5 turn
back to 45 ft/lbs
tightened to 55 ft/lbs
tightened to 64 ft/lbs
Whew.
One of my timing cover gaskets was almost torn in half (I blame the cats), so I picked up a set at Autzone for $7. I skim coated (very thin) both sides of the gaskets with Ultra Gray RTV and dabbed a tiny bit extra using a toothpick up where the head meets the cover.
The timing cover went on fairly easily under the head. Of course, that's with no oil pan, and I didn't have the oil pump on. I sure hope it has a decent seal.
Note to other dummies like me: Several bolts on the passenger side of the timing cover won't screw in far enough to hold the cover without the thick a/c bracket in place. Put it on as you screw in the bolts. Had I looked at my pictures I would have realized this, but instead I thought at first that the bolt holes were cruddy (a few were slightly rusty) or the bolts had somehow gotten mixed up. I suppose if you're just doing a timing chain that would be pretty obvious, but after parts have sat around for months and memory has faded, it can be overlooked. I was more focused on the alternator side. I remembered that bracket.
The manual calls for 29 ft/lbs on the bigger timing cover bolts, which seems like an awful lot to me. They are presently at about 18 ft/lbs. I don't know if I'll get brave and bump them up a bit later. They thread into the block, so might be ok.
I used some (very little) RTV under the head and washer of the "hidden" bolt under the distributor drive gear. Several people have advised this. Apparently it prevents oil from leaking down the bolt hole to the head/cover junction.
I used Permatex #2 on the threads of the oil pump through bolt. I sprayed High Tack on the water pump gasket. The manual says the grade and size of the water pump bolts are supposed to be tightened to 54 inch pounds. That's 4.5 ft/lbs, so don't go crazy.
I packed Vaseline in my oil pump gears to help it prime.
I wiped some grease in the front main seal. I sanded the crank pulley's seal surface lightly with 400 grit emery paper, then cleaned it well with brake cleaner. For now, I'm using a standard size seal. The pulley's groove doesn't really seem that bad. If it leaks, I'll put in a narrower seal or sleeve it.
I adjusted the valves. Couldn't remember what Engnbldr advises for a 268 cam, so I went .007" and .010".
I bought some Cam-Shield ZDDP additive. It seems to be the most concentrated of the bunch, and is supposed to have short acting and longer acting forms of ZDDP. Also got a package of their moly cam lube for a couple bucks, which I applied before putting the rocker assembly in place.
The pressing issues are what to do about the cold mixture heater and what sealant, if any, to use and where on the intake manifold gasket. Putney's advised leaving it dry except for a little gray RTV around the coolant passages, but I think they are using factory gaskets. I noticed my old factory gasket had sealant in those areas (was bluish colored under the very stubborn to remove original gasket), probably a pre-applied bead of something.
Fel-pro intake gaskets come with some stuff pre-applied. Do modern factory ones?
Last edited by flyingbrass; Feb 18, 2010 at 12:01 AM.
Feb 23, 2010 | 05:29 PM
#263
Thread Starter
Registered User
Joined: May 2009
Posts: 586
Likes: 2
From: Arizona
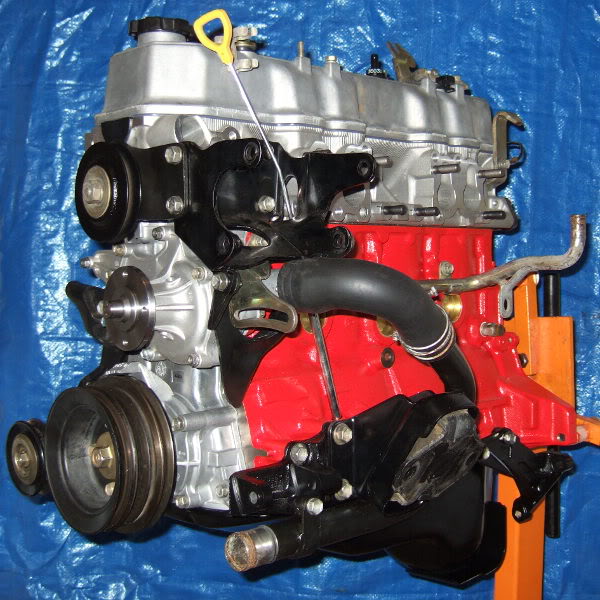
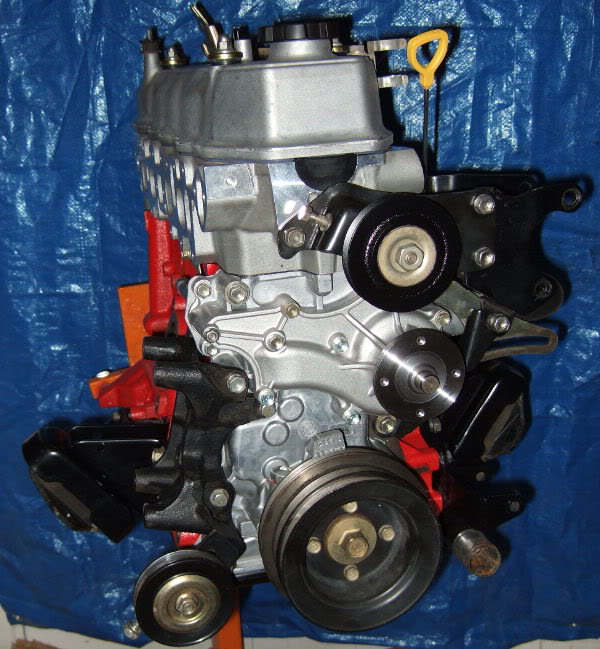
It's starting to look more like an engine. These pics aren't the best, but they'll have to do. I may paint the valve cover later, but probably not.
I haven't decided yet whether to have the alternator rebuilt. It's filthy from a leaky front seal, and I doubt the brushes have much life left. One local shop wants $95, and another said $65 to $130 depending on what it needs.
I need to get a new A/C idler pulley bearing. My original went out years ago and was replaced with a super cheap non-sealed POS. It squeals when wet. Apparently the A/C idler bearing is different from the top one. From what I've read, it needs a SKF 63012ZJ or Timken 301SS. Both are over $20 at Checker. Ouch. Any ideas where to get one cheaper?
I moved the passenger side motor mount rubber part to the driver's side. The old, cracked driver side rubber sits a bit crooked, like it has been squished over to one side. I might have to spring for some new ones. New or old, I'll probably chain them. Gotta figure out how exactly I want to do that in case something needs done before the engine goes in.
Last edited by flyingbrass; Feb 24, 2010 at 08:40 PM.
Feb 24, 2010 | 05:03 AM
#264
Registered User
Joined: Oct 2009
Posts: 134
Likes: 0
From: NW Phoenix
Apparently the A/C idler bearing is different from the top one. From what I've read, it needs a SKF 63012ZJ or Timken 301SS. Both are over $20 at Checker. Ouch. Any ideas where to get one cheaper
Feb 24, 2010 | 07:48 AM
#266
Registered User

Joined: May 2008
Posts: 3,277
Likes: 23
From: way way nor cal
WOW!
Great work man!!
Your thread helped me tremendously with a recent timing chain R & R.
Thanks for all the detailed info and pictures
Great work man!!
Your thread helped me tremendously with a recent timing chain R & R.
Thanks for all the detailed info and pictures
Last edited by toyospearo; Feb 24, 2010 at 07:50 AM.
Feb 24, 2010 | 08:22 PM
#268
Thread Starter
Registered User
Joined: May 2009
Posts: 586
Likes: 2
From: Arizona
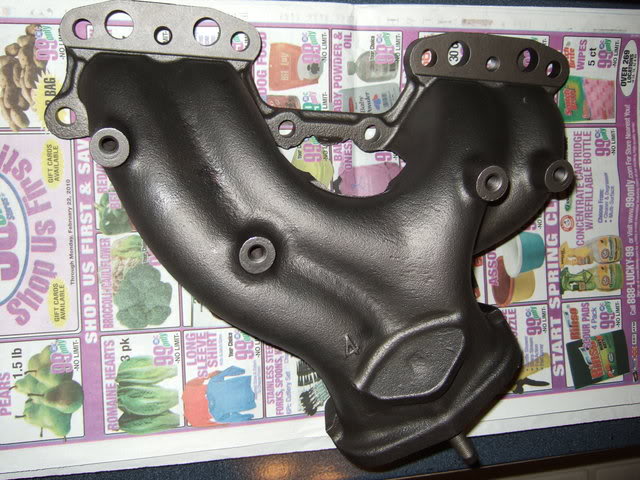
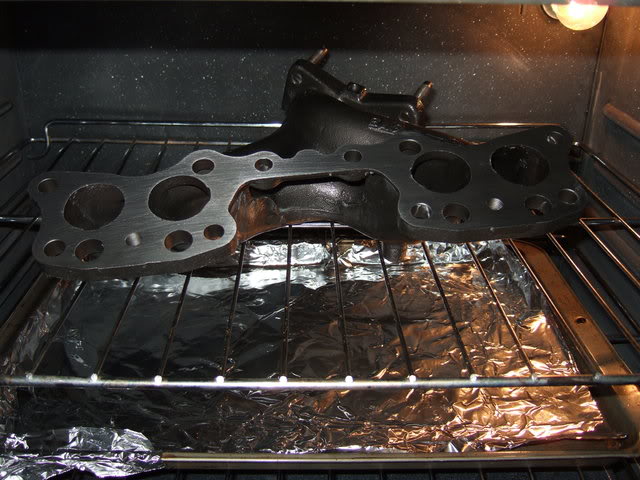
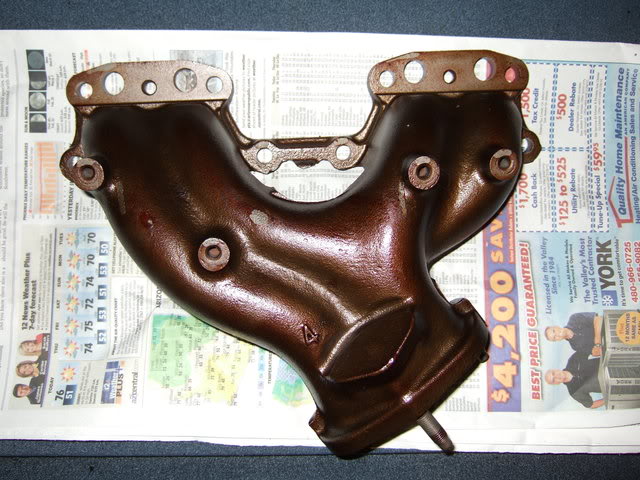
Earlier Stace mentioned that some guys were seasoning exhaust manifolds like cast iron cookware instead of using fancy, expensive high temp paints.
Mine only had light surface rust after 23 years. I presume it didn't come with any coating from the factory. So, I'm not concerned about protecting it. The aluminum cover/shield that routes warm air into the air intake pretty much covers it up, so appearance isn't really an issue to me either.
As an experiment I decided to give this a try. I'm betting the seasoning will burn off when the manifold gets up to operating temp, but we'll see. Maybe it will provide a cheap, long-lasting dark finish. Since this is supposed to be an old school sort of thing, I e-mailed Ted and asked what he knows. He said he had never heard of doing it, though he bakes connecting rods (I'm assuming to make sure they have been properly drawn and aren't overly brittle).
I used a thin coating of Crisco. Baked at 350 for 2 hours, then turned up to 400 for another hour. When cool it had a few drips in places that had coagulated, but they wiped off easily. The coating is still quite soft overall. If this works and appearance is a concern, I'd suggest seasoning several times. Bare cast iron cookware usually requires several sessions to get everything coated and baked in well, at least in my experience. Later, through repeated use, the seasoning turns darker and harder. One time here will have to suffice.
I tried to avoid mating surfaces, but still got a little grease on them. I'll clean them off with a wire brush in the dremel.
Edit to update: A wire brush didn't touch even this relatively soft coating. Sandpaper did.
Smell wasn't any worse than seasoning anything else cast iron. I only had one smoke detector go off. Roasting chiles on a stove burner usually sets off at least two.
Clean as it came back from the shop.
Thin coating of Crisco and positioned like this in the oven. Notice the foil lined cookie sheet underneath to catch drips.
After.
Last edited by flyingbrass; Mar 23, 2010 at 01:16 AM.
Feb 24, 2010 | 08:34 PM
#269
Thread Starter
Registered User
Joined: May 2009
Posts: 586
Likes: 2
From: Arizona
I replaced the original A/C idler bearing so long ago I can't remember the year. It was under $10 at BAP, but was pretty dinky. I'm surprised it lasted this long.
Feb 24, 2010 | 08:58 PM
#270
Thread Starter
Registered User
Joined: May 2009
Posts: 586
Likes: 2
From: Arizona
I was planning to snap a few pictures of installing the oil pan, but that didn't work out with FIPG all over my fingers and not having time to fool around.
Toyota's FIPG is different from usual RTV. Some have claimed these things all the same, just different colors and labels. Nope. Having used both, they aren't the same. Can't say from experience how they compare functionally.
A tube of FIPG was $9.86 from 1sttoyotaparts, and I was ordering other stuff anyway, so shipping charges weren't an issue. If it hadn't been reasonably affordable, I probably would have used The Right Stuff, which costs even more.
I still wonder why the original sealant on this Japanese made truck was gray. The original owner gave me all paperwork and receipts from the dealer -- more than he really should have. I'm 99% sure the oil pan hadn't been off.
Feb 26, 2010 | 02:27 PM
#274
Thread Starter
Registered User
Joined: May 2009
Posts: 586
Likes: 2
From: Arizona
I was planning on putting the engine back in this weekend, but 1) it's going to rain, and 2) I'm waiting for an EGR valve stud from Toyota. Napa didn't have one the right size. The one in my old head wouldn't budge. It stripped.
The exhaust is on. All that needs to be done on the stand is bolting on the intake, and it's ready. Krj sent me a cold mixture heater. My multimeter showed 1.4 ohms for it too (krj got about .4 IIRC), so I guess it's time for a new multimeter. The factory gasket seems to be sealing ok on that inside pre-applied ring. I put some RTV outside the ring, tightened the bolts down, then removed it. No RTV had squished in past the ring. Still seems like a dinky setup, and a vacuum leak there could be easily overlooked.
I'm still debating what to do about the motor mounts, particularly after seeing how crooked the rubber is on the ex-driver's side. Prying it back to center will further stress the crack it has.
Chevron Supreme antifreeze was on sale for $5 a gallon at a business Costco. It seems to be old style green (protects lead solder), though lower silicate. Couldn't pass that up. I'd prefer Toyota Red, but can't bring myself to pay almost $30 a gallon.
 Feb 27, 2010 | 09:00 PM
#277
Thread Starter
Registered User
Joined: May 2009
Posts: 586
Likes: 2
From: Arizona
I picked up that EGR stud from the dealer today. Larry Miller Toyota wants $25 for Toyota Red. The CarQuest nearest me was out of stock when I stopped by some time ago, but IIRC they wanted $27ish. I'll go green for now and change it regularly.
Feb 28, 2010 | 05:16 AM
#278
Registered User
Joined: Jul 2009
Posts: 1,151
Likes: 0
From: hubert nc
i would just use some heavyduty stuff from walmart.. aslong as you read it. and wont turn your head into to aluminum gooie stuff
i know when you start mixing red coolant with the green coolant you get a chemical reaction and bad thing will happen....
i know when you start mixing red coolant with the green coolant you get a chemical reaction and bad thing will happen....
Feb 28, 2010 | 10:10 AM
#279
Registered User
Joined: Sep 2009
Posts: 31
Likes: 0
Lookin good. Glad you got the cmh. My multimeter is a cheapy so you may want to check it with a third one. I'd be interested to see what you come up with, as I've been using that meter to check a bunch of other stuff. By the way, what does IIRC mean?


