
22R Rebuild
 Jan 8, 2010 | 10:48 PM
#221
Registered User
Joined: Jan 2009
Posts: 57
Likes: 0
From: Yuma, Az
Some advocate liberal use of RTV on practically everything, while others warn against doing that. I'm leaning toward the latter camp.
I'm planning on using Permatex High Tack spray on the gaskets for the timing cover, water pump and the not-pre-coated sides of the water bypass plate gaskets on the bottom of the intake manifold. Probably do the same for the rear cover plate on the head.
I'm planning on using Permatex High Tack spray on the gaskets for the timing cover, water pump and the not-pre-coated sides of the water bypass plate gaskets on the bottom of the intake manifold. Probably do the same for the rear cover plate on the head.
I did notice when I rebuilt my '86 that prior to starting the engine I had just the slightest leak around one of the water pump bolts. I torqued it down maybe a quarter turn (2 or 3 ft lbs?) which didnt really stop the leak. After break in the leak was gone, so heating the engine up seems to have ironed it out.
Jan 12, 2010 | 12:12 AM
#223

Thread Starter
Registered User
Joined: May 2009
Posts: 586
Likes: 2
From: Arizona
More delays lately. Things come up. When you can work, what you think will take an hour turns into 4. Or more. And so on. I'm sure I could do this much quicker the next time. Originally, I figured this rebuild would take maybe 6 weeks from pulling the engine to having it running again. We're past double that.
I decided to put that upper timing cover locating dowel in the block. I tried on the timing cover afterward and was pleased that it fit on ok and the top seemed to be even with the deck. However, the cover wouldn't sit flush against the front of the block. It was rocking against something.
Turns out that the metal driver side timing guide, when "adjusted" out to the driver side can hit the inner part of the timing cover at the water passage enough to interfere with the cover seating all the way.
Here is the best picture I could manage to show the contact point. The blue tape was only to reduce brightness from the camera's flash. I had the guide bolts loosened here and the guide more centered and the cover on flush, but look closely and you can see where it touches.
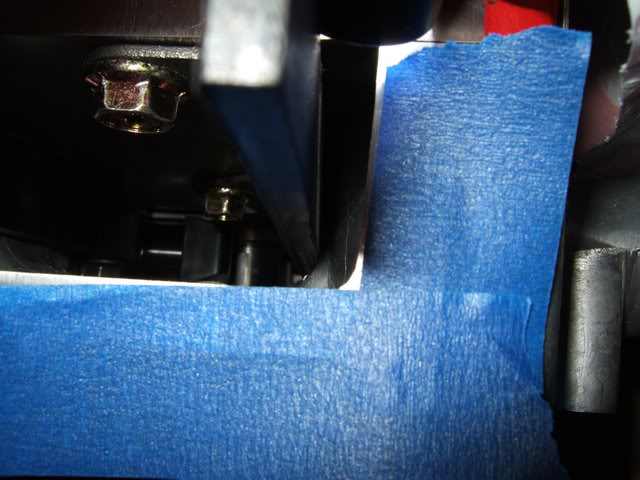
I haven't heard anyone mention this before. The amount the cover can be held out from seating flush with the guide bolted down toward the driver side in my case is close to 1/8" or so at one corner when the other corner is flush. If the average gap is half that, the gasket may make up for it. Or maybe not. Could misadjusted steel-backed timing chain guides be one cause of timing cover leaks? I don't know. I'm just observing and reporting. Tight fit.
After seeing how much adjustment in position is possble with this metal guide on its bolts I'm now thinking putting the head on first is probably the better option. Not for ensuring guide to cover clearance, because now I know to keep the guide in a little, but for making sure the guide is parallel with the chain and isn't canted one way or the other. I wonder how much variation the plastic guides exhibit. I doubt they have any adjustment, but I wonder how much the chain engagement angles differ though the placement of the bolt holes.
I decided to put that upper timing cover locating dowel in the block. I tried on the timing cover afterward and was pleased that it fit on ok and the top seemed to be even with the deck. However, the cover wouldn't sit flush against the front of the block. It was rocking against something.
Turns out that the metal driver side timing guide, when "adjusted" out to the driver side can hit the inner part of the timing cover at the water passage enough to interfere with the cover seating all the way.
Here is the best picture I could manage to show the contact point. The blue tape was only to reduce brightness from the camera's flash. I had the guide bolts loosened here and the guide more centered and the cover on flush, but look closely and you can see where it touches.
I haven't heard anyone mention this before. The amount the cover can be held out from seating flush with the guide bolted down toward the driver side in my case is close to 1/8" or so at one corner when the other corner is flush. If the average gap is half that, the gasket may make up for it. Or maybe not. Could misadjusted steel-backed timing chain guides be one cause of timing cover leaks? I don't know. I'm just observing and reporting. Tight fit.
After seeing how much adjustment in position is possble with this metal guide on its bolts I'm now thinking putting the head on first is probably the better option. Not for ensuring guide to cover clearance, because now I know to keep the guide in a little, but for making sure the guide is parallel with the chain and isn't canted one way or the other. I wonder how much variation the plastic guides exhibit. I doubt they have any adjustment, but I wonder how much the chain engagement angles differ though the placement of the bolt holes.
Last edited by flyingbrass; Jan 12, 2010 at 12:51 AM.
Jan 12, 2010 | 05:03 AM
#224
Registered User
Joined: Oct 2009
Posts: 134
Likes: 0
From: NW Phoenix
2 things,
First, the timing cover. Can you adjust the guide in a little bit to keep it from touching the cover? Should be just fine if you can.
Also, RTV. Do not use "liberal" amounts. I got to change my neighbors head gasket, because his brother replaced the water pump. He used "liberal amounts" of orange RTV on the water pump gasket.
When I pulled the head, there was alot of orange RTV chunks completely blocking water passages in the head gasket. It was ugly.
Just a small thin film is all you need.
Jan 13, 2010 | 04:04 PM
#227
Thread Starter
Registered User
Joined: May 2009
Posts: 586
Likes: 2
From: Arizona
Also, RTV. Do not use "liberal" amounts. I got to change my neighbors head gasket, because his brother replaced the water pump. He used "liberal amounts" of orange RTV on the water pump gasket.
I'm not sure what to use on the gaskets. I was leaning toward only High Tack spray, though it seems many use a skim coat of RTV on the timing cover gaskets. Seems that a even a super thin coating of RTV would help fill voids and irregularities better. I don't know.
I pulled the rear cover plate off my old head and found the EGR passage almost completely clogged with carbon fouling. I scraped out what I could, but couldn't reach much inside. I bought a can of Wal-Mart's cheapest oven cleaner, soaked the plate, making sure the passage was full, and wrapped it in a plastic bag. 20 hours later I hosed it out. Worked pretty well.
The active ingredient in oven cleaner is lye (sodium hydroxide). It doesn't get along well with aluminum. Not with skin either, so be careful.
 Jan 15, 2010 | 09:12 AM
#230

Registered User
Joined: Aug 2008
Posts: 1,758
Likes: 3
From: Northern Colorado :-(
I have a quick question about rebuilds. I'm looking to rebuild mine in the summertime. If I get the .30 over pistons and rings from engnbldr, when I take my block to the shop to have it machined what do I tell them? Simply that I have pistons .3 over and the block needs to be machined accordingly? Or is there a certain size they need to know?
Jan 15, 2010 | 09:35 AM
#231


I have a quick question about rebuilds. I'm looking to rebuild mine in the summertime. If I get the .30 over pistons and rings from engnbldr, when I take my block to the shop to have it machined what do I tell them? Simply that I have pistons .3 over and the block needs to be machined accordingly? Or is there a certain size they need to know?
Jan 15, 2010 | 09:55 AM
#232
Registered User
Joined: Aug 2008
Posts: 1,758
Likes: 3
From: Northern Colorado :-(
-edit-
on the 22re, can you bore and hone the cylinders with the head still on?
Last edited by DupermanDave; Jan 15, 2010 at 11:44 AM.
Jan 15, 2010 | 12:14 PM
#233
Registered User
Joined: Oct 2009
Posts: 134
Likes: 0
From: NW Phoenix
So just take the block in and say "I need this bored over." And they'll judge how much it'll need and let me know which size pistons I should buy?
You only want to bore as much as needed. If you can get away with .010 over, cool. That means in 20 or so years, you can rebuild again (hopefully), boring as little as possible.
Jan 15, 2010 | 06:21 PM
#234
Thread Starter
Registered User
Joined: May 2009
Posts: 586
Likes: 2
From: Arizona
What they said. Take your parts in to see what is needed before ordering anything. .010" over would have been enough for mine, but pistons available start at .020". So, it's either only hone or bore at least .020" over.
>on the 22re, can you bore and hone the cylinders with the head still on?
No.
Today was one of those where nothing went right. Actually, it's just a continuation of my luck this whole week.
I planned to make some progress on the engine this morning. Went to install the exhaust studs in the head. I put two nuts on a brand new upper stud and tightened them together. Not feeling comfortable cranking the stud in to the recommended (at least by LCE) 33 ft/lbs, I took it up a few lbs at a time half expecting the hole to strip. Should they really be screwed in that tight? Seems like an awful lot to me.
At around 26 ft/lbs or so the nut turned, but not the stud. I had stripped the end of the stud, apparently because the outer nut wasn't on far enough. It had only about 2/3 of its thickness on the threads. I have no idea why I left it out that far. I know better, or at least I should.
After unsuccessfully trying to straighten out the mangled threads, I called the local Toyota dealer to see if they had another 90116-10067 in stock. They did, but only one. Wow. I told them to put my name on it. Got a ride to the dealer this afternoon to find the stud they claim is that part number was seemingly tossed in the wrong bin because it's not right. The guy said the difference is probably just a revision of the original. No, it's a wrong part that won't work.
I guess I'll try to remove and reuse a stud from my old head after I get some new 10x1.25 nuts. Stripping the stud also wrecked a nut ($1 each at the hardware store -- oddball metric sizes aren't cheap). If I can't get a stud out or it isn't in acceptable condition I'll have the dealer order one.
Jan 15, 2010 | 07:11 PM
#235
Thread Starter
Registered User
Joined: May 2009
Posts: 586
Likes: 2
From: Arizona
I'm keeping the EGR. The valve itself seems to work ok. If it didn't, I'd probably scrounge up a working used one. We have emission testing here, but that isn't why. I doubt anyone at a test station would notice a block off plate, and my truck passed the IM-240 test with a burned exhaust valve and the EGR vacuum tube (where vacuum is applied to open the valve) completely plugged up. It couldn't have been working.
My reasoning for keeping the EGR is it reduces combustion temperatures when activated. Avoiding excessive heat is a good thing. As long as the EGR system is working as it's supposed to, I don't see how it hurts anything, only helps. I wonder if mine malfunctioning contributed to my valve problem.
Are there any tricks for removing the cover on the EGR modulator? I had mine off once long ago to clean the filter, but now it's being stubborn. I don't remember if it pulls straight off or needs to be in a certain position. It's old, and I don't want to break it.
Last edited by flyingbrass; Jan 16, 2010 at 01:31 AM.
Jan 16, 2010 | 12:23 AM
#236
Registered User
Joined: Jan 2009
Posts: 57
Likes: 0
From: Yuma, Az
The FSM doesn't provide any guidance on the EGR. It just says to replace it if it is faulty, while going into two pages of detail on how to test it. My first instinct would by to apply a little heat and/or penetrant and see if that works. Its interesting that your truck has one. It seems that it was a California only deal if the manual is correct. Aren't you in AZ?
I can't believe that the oven cleaner idea never occurred to me. I soaked those very same brackets in gas over night and still had to scrub to get them clean.
I can't believe that the oven cleaner idea never occurred to me. I soaked those very same brackets in gas over night and still had to scrub to get them clean.
Jan 17, 2010 | 11:35 PM
#238
Thread Starter
Registered User
Joined: May 2009
Posts: 586
Likes: 2
From: Arizona
I finally found out studs aren't supposed to be screwed in very tight. You sure don't want to crank them in to 33 ft/lbs as I heard before. Some (such as ARP) say put them in only finger tight. Others like to snug them in a little past that.
Here's what Engnbldr said about exhaust studs:
-----------------------
I always spin them all the way in, then give them just enough to stay there.
I never measured that but bet it's not over 10 ft lbs. I never use loctite. I do use antisieze on the nuts though, and resnug them after warmup.
Ted
-----------------------
Jan 18, 2010 | 05:38 AM
#239
Registered User
Joined: Jul 2009
Posts: 1,151
Likes: 0
From: hubert nc
when i i put my engine back together i.. i went by all the torque spec in my haynes manual.. didnt have a problem with anything stripping out.. (exhaust manifold intake. fuel rail.. all that stuff flywheel clutch.. )
Jan 18, 2010 | 08:11 PM
#240
Registered User
Joined: Sep 2009
Posts: 31
Likes: 0
The FSM doesn't provide any guidance on the EGR. It just says to replace it if it is faulty, while going into two pages of detail on how to test it. My first instinct would by to apply a little heat and/or penetrant and see if that works. Its interesting that your truck has one. It seems that it was a California only deal if the manual is correct. Aren't you in AZ?
I'm in Montana rebuilding an '83 22r and mine has an EGR valve also. The Chiltons manual I'm using refers to them as if they are used everywhere. I like the heat and penetrant idea to get to the filter, I haven't had any luck getting in there either.
I also have a Reed Valve on my engine which I haven't been able to find any info on. Its not in my Chiltons and I don't have a FSM, the only way I was able to ID it was a search of the part number. Anyone have info on the reed valve? What does it do? Pros and cons of not replacing it.
I can't believe that the oven cleaner idea never occurred to me. I soaked those very same brackets in gas over night and still had to scrub to get them clean.


