
22r teardown / rebuild / clutch replacement
 Oct 20, 2008 | 12:31 AM
#1

Thread Starter
Registered User
Joined: Sep 2008
Posts: 6
Likes: 0
From: Ithaca, NY
So I just recently finished tearing down and rebuilding the engine in my '85 Pickup with a 22R engine. I thought I would create this thread to show some of the pics and to offer some tips and pointers for anyone else that may be interested in doing the same. Keep in mind that I am 25 years old and this is my very first engine re-build so hopefully that will give some people with as little experience as I had some hope.

The re-build was necessary as I had just acquired the truck and soon after had realized that the head gasket was leaking and causing coolant to spill into the #1 cylinder.
Here you can see after removing the head that #1 piston is shiny and clean. This is the result of coolant "steam cleaning" the top of the piston. BTW the coolant sitting in all the cylinders is simply the result of removing the head and allowing the coolant to flow out of the head and into the cylinders:

After turning the engine over by hand, it was apparent that quite a lot of oil was seeping past the piston rings as you can see in the picture below. This is what convinced me to go ahead and replace the piston rings:

Removing one of the pistons:

After pulling all the pistons, I laid them out on some plywood and labeled each piece in the order that it came out (you want to make sure that EVERYTHING and I mean EVERYTHING goes back in exactly the same direction as it came out:

Here is a picture of one of the rod bearings that I had to replace. In my re-build I replaced all the crankshaft as well as rod bearings and I also honed all four cylinders. I found that youtube had some good videos of people honing cylinders and explaining how to do it:

Here you can see that the area between the piston rings is cake with carbon and oil deposits. I used a brass-wire brush to clean up all the carbon and get the pistons nice and shiny. Do not use a steel-wire brush as it is guaranteed to scrape and scratch your pistons:

For the piston grooves I used a broken piston ring to scrape out all the carbon that was lodged in the piston ring grooves:

Here is the rear-main seal. DO NOT FORGET TO REPLACE THIS! I can't stress this enough. If this seal ever starts to leak, say goodbye to your clutch. Might as well replace it while you have a good chance. Or yeah, in the center of the crankshaft in the picture below, there is also a little bearing, I forget what it is called but it also should be replaced. I had to very carefully cut out the bearing with a dremel tool and then pry away at its sides until finally started to break apart and come out:

Here you can see what happens when the timing chain's plastic guides break apart and allow the chain to constantly slap and scrape along the inside of the timing chain cover. If I let this go any longer, the chain would have eaten the two grooves right through the cover which would allow coolant to start spilling into the oil passages:

Here is what else happens when the timing chain guides break apart. As you can see, I reached into the bottom of the oil pan and pulled out a handful of plastic chunks. Many of the plastic pieces were small enough to be picked up by the oil strainer:

Pic of the underside of the engine with the pistons removed:

Now for the valves. Here you can see I am using a valve spring compressor to remove the valves. After compressing the spring, I realize that you just want to sort of rock the compressor back and forth and eventually the spring keepers let go and allow you to pick them up with a telescoping magnet pretty easily:

Here's the main reason why my engine was soooooo sluggish. all four intake valves were caked in oil and carbon. My suspicion is that the PCV valve on the valve cover is responsible for this. After re-assembling the engine I re-routed the PCV valve to vent underneath the car. I know there are other alternatives to solving the PCV valve problem, but I took the cheapest,easiest way out:

Here, I placed each of the valves in my drill press and put the press on FULL SPEED! I then used three different 3M scotchbrite pads going from coarse to fine in order to clean and polish the valves:

Here's an intake valve after a little cleaning. You might be able to see a series a rings on the surface of the valves. It is my understanding that these are also known as "power rings" an they provide an increased amount of surface area for fuel to "bounce" off of which helps it to vaporize better. Getting the rings cleaned and exposed once again will help with both horsepower and fuel economy:

Do not forget to replace the valve stem seals! I think these seals were leaking slightly and also causing the intake valves to become caked with oil. I found that the best method of replacing these was to place the new one on and guide it gently in place with a screwdriver. Next I temporarily removed the spring on top of the seal and then carefully pounded it the rest of the way into place with a rubber hammer:

When re-assebling engine parts, I used a little synthetic oil in an oil bottle cap and a Q-tip in order to dab all the parts with oil. Also, when placing the pistons back in, I simply dunked the entire piston in oil and then used a piston ring compressor to help me guide each one back in the engine. After all was said and done, I then poured oil over everything inside the engine before securing the oil pan back in place. Keep the oil pan loose, however, as you will tighten it down AFTER the timing chain, timing cover,and the head are all back in place:

As for the clutch and flywheel, here is my method of keeping the flywheel secure while loosening all of its bolts. BTW, I was really cheap and I re-used the flywheel bolts, I will probably get flamed for saying that, but in my defense I did use threadlocker blue and so far no problems:

Here you can see the clutch disk alignment tool (in the center of the pressure plate) that came with the clutch-kit:

Before putting the head back on, I cleaned the threads for the head bolts with a tap (size 12mm x 1.25). This was to ensure that I got the torque specs correct for the headbolts without any binding on dirty threads. I would also strongly recommend not re-using the old headbolts. One of my headbolts actually stripped while removing it, however, it came out andonly the threads on the bolt were damaged. If, however, the threads in the block were damaged, then it would be time to buy a "helicoil" kit from autozone in order to actually fix the destroyed threads:


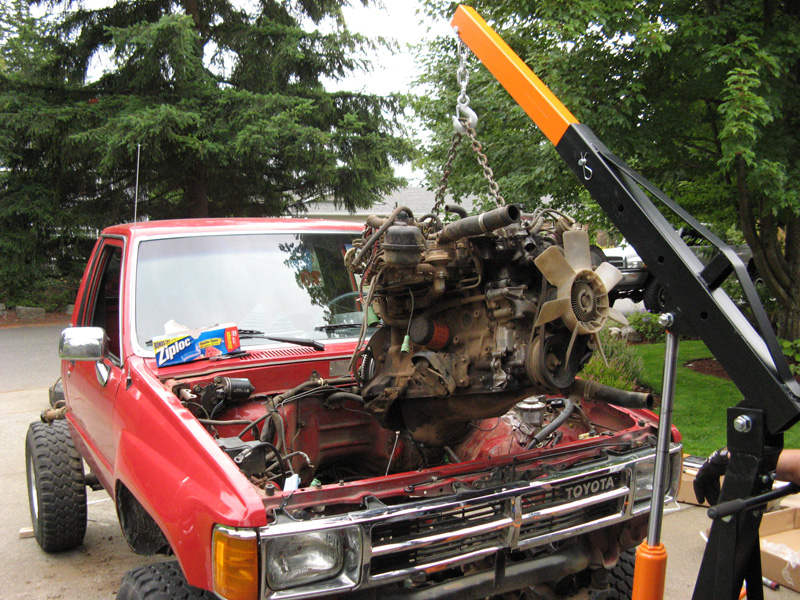
Here I had to use ratcheting-tie downs along with my engine lift to help me guide the engine back in place. I literally fought with the engine for over an hour to get it to finally slide onto the transmission. It took a lot of patient adjusting and readjusting of the lift and the tie-down straps in order to get it in just the right angle to slide into place:

After bolting everything up and connecting the mess of spaghetti like vacuum hoses, I then adjusted the valve clearances in order to make sure that the engine would be nice and quiet. That's the problem with mechanical valve lifters... they are loud!
The truck runs great! I have a HUGE increase in power and the compression across all four cylinders is a nice 175. The clutch now grabs nice and strong as well.
The only new problem that I had encountered after the re-build was that the clutch did not seem to fully disengage, not even when I pushed the pedal right to the floor. I tried adjusting the clutch pedal under the dash as well as bleeding out the master cylinder, both of which did not help at all. I believe that the new throwout bearing that I had put in was a little skinnier than the previous one and thus not allowing enough distance to fully disengage the clutch. I eventually solved the problem by fabricating a new push-rod for the clutch slave-cylinder. I simply took an old bolt that I had lying around and I rounded both ends of it and made it approximately a half-inch longer than the metal push-rod currently in the slave cylinder. After putting in the new push-rod,problem solved! The truck shifts perfectly now! Here's a pic of the new push-rod surrounded with the slave cylinder dust boot:

Let me know what everyone thinks. Also, please throw in any additional advice if you can on order to help people out. One other piece of advice that I can think of right away is that Napa will re-build the head for a little over $100. But don't forget that if the head was warped and they need to shave it down, you will then need to purchase a thicker head-gasket to keep the compression specifications.
I also had to reward myself by putting in a new steering wheel that I actually picked up at a local salvage yard:

had to cut apart the old steering wheel in order to fabricate a bracket to make it work and work correctly:


The re-build was necessary as I had just acquired the truck and soon after had realized that the head gasket was leaking and causing coolant to spill into the #1 cylinder.
Here you can see after removing the head that #1 piston is shiny and clean. This is the result of coolant "steam cleaning" the top of the piston. BTW the coolant sitting in all the cylinders is simply the result of removing the head and allowing the coolant to flow out of the head and into the cylinders:
After turning the engine over by hand, it was apparent that quite a lot of oil was seeping past the piston rings as you can see in the picture below. This is what convinced me to go ahead and replace the piston rings:
Removing one of the pistons:
After pulling all the pistons, I laid them out on some plywood and labeled each piece in the order that it came out (you want to make sure that EVERYTHING and I mean EVERYTHING goes back in exactly the same direction as it came out:
Here is a picture of one of the rod bearings that I had to replace. In my re-build I replaced all the crankshaft as well as rod bearings and I also honed all four cylinders. I found that youtube had some good videos of people honing cylinders and explaining how to do it:
Here you can see that the area between the piston rings is cake with carbon and oil deposits. I used a brass-wire brush to clean up all the carbon and get the pistons nice and shiny. Do not use a steel-wire brush as it is guaranteed to scrape and scratch your pistons:
For the piston grooves I used a broken piston ring to scrape out all the carbon that was lodged in the piston ring grooves:
Here is the rear-main seal. DO NOT FORGET TO REPLACE THIS! I can't stress this enough. If this seal ever starts to leak, say goodbye to your clutch. Might as well replace it while you have a good chance. Or yeah, in the center of the crankshaft in the picture below, there is also a little bearing, I forget what it is called but it also should be replaced. I had to very carefully cut out the bearing with a dremel tool and then pry away at its sides until finally started to break apart and come out:
Here you can see what happens when the timing chain's plastic guides break apart and allow the chain to constantly slap and scrape along the inside of the timing chain cover. If I let this go any longer, the chain would have eaten the two grooves right through the cover which would allow coolant to start spilling into the oil passages:
Here is what else happens when the timing chain guides break apart. As you can see, I reached into the bottom of the oil pan and pulled out a handful of plastic chunks. Many of the plastic pieces were small enough to be picked up by the oil strainer:
Pic of the underside of the engine with the pistons removed:
Now for the valves. Here you can see I am using a valve spring compressor to remove the valves. After compressing the spring, I realize that you just want to sort of rock the compressor back and forth and eventually the spring keepers let go and allow you to pick them up with a telescoping magnet pretty easily:
Here's the main reason why my engine was soooooo sluggish. all four intake valves were caked in oil and carbon. My suspicion is that the PCV valve on the valve cover is responsible for this. After re-assembling the engine I re-routed the PCV valve to vent underneath the car. I know there are other alternatives to solving the PCV valve problem, but I took the cheapest,easiest way out:
Here, I placed each of the valves in my drill press and put the press on FULL SPEED! I then used three different 3M scotchbrite pads going from coarse to fine in order to clean and polish the valves:
Here's an intake valve after a little cleaning. You might be able to see a series a rings on the surface of the valves. It is my understanding that these are also known as "power rings" an they provide an increased amount of surface area for fuel to "bounce" off of which helps it to vaporize better. Getting the rings cleaned and exposed once again will help with both horsepower and fuel economy:
Do not forget to replace the valve stem seals! I think these seals were leaking slightly and also causing the intake valves to become caked with oil. I found that the best method of replacing these was to place the new one on and guide it gently in place with a screwdriver. Next I temporarily removed the spring on top of the seal and then carefully pounded it the rest of the way into place with a rubber hammer:
When re-assebling engine parts, I used a little synthetic oil in an oil bottle cap and a Q-tip in order to dab all the parts with oil. Also, when placing the pistons back in, I simply dunked the entire piston in oil and then used a piston ring compressor to help me guide each one back in the engine. After all was said and done, I then poured oil over everything inside the engine before securing the oil pan back in place. Keep the oil pan loose, however, as you will tighten it down AFTER the timing chain, timing cover,and the head are all back in place:
As for the clutch and flywheel, here is my method of keeping the flywheel secure while loosening all of its bolts. BTW, I was really cheap and I re-used the flywheel bolts, I will probably get flamed for saying that, but in my defense I did use threadlocker blue and so far no problems:
Here you can see the clutch disk alignment tool (in the center of the pressure plate) that came with the clutch-kit:
Before putting the head back on, I cleaned the threads for the head bolts with a tap (size 12mm x 1.25). This was to ensure that I got the torque specs correct for the headbolts without any binding on dirty threads. I would also strongly recommend not re-using the old headbolts. One of my headbolts actually stripped while removing it, however, it came out andonly the threads on the bolt were damaged. If, however, the threads in the block were damaged, then it would be time to buy a "helicoil" kit from autozone in order to actually fix the destroyed threads:
Here I had to use ratcheting-tie downs along with my engine lift to help me guide the engine back in place. I literally fought with the engine for over an hour to get it to finally slide onto the transmission. It took a lot of patient adjusting and readjusting of the lift and the tie-down straps in order to get it in just the right angle to slide into place:
After bolting everything up and connecting the mess of spaghetti like vacuum hoses, I then adjusted the valve clearances in order to make sure that the engine would be nice and quiet. That's the problem with mechanical valve lifters... they are loud!
The truck runs great! I have a HUGE increase in power and the compression across all four cylinders is a nice 175. The clutch now grabs nice and strong as well.
The only new problem that I had encountered after the re-build was that the clutch did not seem to fully disengage, not even when I pushed the pedal right to the floor. I tried adjusting the clutch pedal under the dash as well as bleeding out the master cylinder, both of which did not help at all. I believe that the new throwout bearing that I had put in was a little skinnier than the previous one and thus not allowing enough distance to fully disengage the clutch. I eventually solved the problem by fabricating a new push-rod for the clutch slave-cylinder. I simply took an old bolt that I had lying around and I rounded both ends of it and made it approximately a half-inch longer than the metal push-rod currently in the slave cylinder. After putting in the new push-rod,problem solved! The truck shifts perfectly now! Here's a pic of the new push-rod surrounded with the slave cylinder dust boot:
Let me know what everyone thinks. Also, please throw in any additional advice if you can on order to help people out. One other piece of advice that I can think of right away is that Napa will re-build the head for a little over $100. But don't forget that if the head was warped and they need to shave it down, you will then need to purchase a thicker head-gasket to keep the compression specifications.
I also had to reward myself by putting in a new steering wheel that I actually picked up at a local salvage yard:
had to cut apart the old steering wheel in order to fabricate a bracket to make it work and work correctly:
 Oct 20, 2008 | 07:55 PM
#5
Registered User
Joined: Oct 2007
Posts: 1,521
Likes: 0
From: Hopkins, MN
Here is the rear-main seal. DO NOT FORGET TO REPLACE THIS! I can't stress this enough. If this seal ever starts to leak, say goodbye to your clutch. Might as well replace it while you have a good chance. Or yeah, in the center of the crankshaft in the picture below, there is also a little bearing, I forget what it is called but it also should be replaced. I had to very carefully cut out the bearing with a dremel tool and then pry away at its sides until finally started to break apart and come out:
You can also get an inside bearing puller (easiest) or fill the hole w/ grease and pound a rod (same OD as ID of the bearing) and the pressure will push the bearing out. As the bearing works its way out, add more grease.
Nov 4, 2008 | 12:11 PM
#7
Registered User
Joined: Aug 2004
Posts: 1,209
Likes: 0
From: Pueblo, CO
Nice writeup! The only part I would suggest would be to not run a tap to clean the headbolt holes. To clean the holes, take an old headbolt, cut several vertical slits in the threaded portion and use that to "tap" the holes clean. Using an actual tap can enlarge the holes slightly and make the headbolts more prone to not keeping a torque in the future.
Trending Topics
Nov 7, 2008 | 11:33 AM
#8
Registered User
Joined: Nov 2008
Posts: 131
Likes: 0
From: Eugene Oregon
Thanks for the write up. I'm dong my engine now and your pictures will help much. It is amazing how much a picture help.
BTW did you plastigauge the bearings? If so how do you use the Plastigauge. I bought it but I'm not quite sure what to do with it.
cb
BTW did you plastigauge the bearings? If so how do you use the Plastigauge. I bought it but I'm not quite sure what to do with it.
cb
Nov 7, 2008 | 12:00 PM
#9
Registered User
Joined: Feb 2008
Posts: 2,799
Likes: 3
From: oregon
nice write up.. great pics to!
only thing i seen was that you should not lay the crank down on its side like that its supposed to be stood on end. i didn't under stand either, and i pretty much still don't lol. but my machine shop told me that, and i didn't believe them until i walked in and every crank they had was standing on end/ hanging on end. has anybody else heard of this??
only thing i seen was that you should not lay the crank down on its side like that its supposed to be stood on end. i didn't under stand either, and i pretty much still don't lol. but my machine shop told me that, and i didn't believe them until i walked in and every crank they had was standing on end/ hanging on end. has anybody else heard of this??
Nov 7, 2008 | 12:55 PM
#10
Registered User
Joined: Dec 2006
Posts: 2,880
Likes: 2
From: Olympia, WA
good writeup!
I'd like to make a few suggestions tho.
1)Take the block and crank to a machine shop, have the block jet washed, honed and planed (and you can have em put in new freeze plugs if you care that much)
2)Take the crank in and have it turned/balanced, they'll probably shave it down to .025" then you can get the exact matching bearings you need.
3) Most full engine kits just come with new pistons, wrist pins and connecting rod bushings and rings. You'll have to have the machine shop install the connecting rod bushings, and pistons w/ wrist pins to the rods. The new bushings have to be machined to fit the wrist pin.. and its a pita to put in new bushings take out the old ones without the right tools, i did it, next time id just have the shop do it.
4) Get the head pressure checked, and if you're really goin all out have em install new valves, guides and stem seals, they'll properly grind everything and you'll have a fresh surface to mate with a headgasket.
5) I don't know if you mentioned new headbolts or not, but.. ya for 30 bucks, get new ones. I've mechanic and machine shop (compared to just the internet) has told me get new bolts, something about they're just to damn long. I think this is more crucial from a shops perspective cuz they wont see the truck again. But as a intuitive owner, even with new Headbolts, torque and torque again.. pull that cover off atleast at the 500 mile mark to readjust valves and re-torque those head bolts. They always seem to move with every retorquing.
6) Nothing wrong with reusing the flywheel bolts. Threadlocker is a good idea but not crucial. As long as you torque them properly they're good.
7) Oh and get an engine stand! It's so much easier to install the head, intake, exhaust etc etc... on the stand! .. Nothing is cooler than being able to just rotate the engine into any comfortable position.


It's also a lot easier to install, with engine fully assembled.
8) With the stand you can properly mate the pan to the block or the best seal ever! Another bonus to having the block jet washed is it will come back without oil residue which is a killer for oil pan gaskets.. and the headgasket. Good opportunity to repaint the block as well.
I'd like to make a few suggestions tho.
1)Take the block and crank to a machine shop, have the block jet washed, honed and planed (and you can have em put in new freeze plugs if you care that much)
2)Take the crank in and have it turned/balanced, they'll probably shave it down to .025" then you can get the exact matching bearings you need.
3) Most full engine kits just come with new pistons, wrist pins and connecting rod bushings and rings. You'll have to have the machine shop install the connecting rod bushings, and pistons w/ wrist pins to the rods. The new bushings have to be machined to fit the wrist pin.. and its a pita to put in new bushings take out the old ones without the right tools, i did it, next time id just have the shop do it.
4) Get the head pressure checked, and if you're really goin all out have em install new valves, guides and stem seals, they'll properly grind everything and you'll have a fresh surface to mate with a headgasket.
5) I don't know if you mentioned new headbolts or not, but.. ya for 30 bucks, get new ones. I've mechanic and machine shop (compared to just the internet) has told me get new bolts, something about they're just to damn long. I think this is more crucial from a shops perspective cuz they wont see the truck again. But as a intuitive owner, even with new Headbolts, torque and torque again.. pull that cover off atleast at the 500 mile mark to readjust valves and re-torque those head bolts. They always seem to move with every retorquing.
6) Nothing wrong with reusing the flywheel bolts. Threadlocker is a good idea but not crucial. As long as you torque them properly they're good.
7) Oh and get an engine stand! It's so much easier to install the head, intake, exhaust etc etc... on the stand! .. Nothing is cooler than being able to just rotate the engine into any comfortable position.
It's also a lot easier to install, with engine fully assembled.
8) With the stand you can properly mate the pan to the block or the best seal ever! Another bonus to having the block jet washed is it will come back without oil residue which is a killer for oil pan gaskets.. and the headgasket. Good opportunity to repaint the block as well.
Last edited by drew303; Nov 7, 2008 at 01:06 PM.
Nov 7, 2008 | 12:57 PM
#11
Registered User
Joined: Dec 2006
Posts: 2,880
Likes: 2
From: Olympia, WA
that plastigauge stuff, you lay the bead down in the bearing retainer... Then assemble it, torque it down.. Then remove the bearing, cap etc whatever... then take the guage and measure how smooshed the plastiguage is.
Jan 18, 2009 | 06:04 AM
#12
Thread Starter
Registered User
Joined: Sep 2008
Posts: 6
Likes: 0
From: Ithaca, NY
So its been close to 3,000 miles so far and NO problems with the truck after the re-build. The one and only thing that I wish that I had done while the truck was apart was to use valve lapping compound to help the valves to seal a little better. Here's a pretty good website that explains how to use the stuff:
http://www.v6z24.com/howto/valvelapping
there are also some good videos on youtube that demonstrate the procedure as well.
http://www.v6z24.com/howto/valvelapping
there are also some good videos on youtube that demonstrate the procedure as well.
Jul 24, 2009 | 04:12 AM
#14
Registered User
Joined: Jul 2009
Posts: 69
Likes: 0
From: Castro Valley CA
tiohero, how much experience do you think you need to have with cars to take the leap and do a rebuild? i want t do my 22re but i dunno if im quite capable. i will be doing my clutch soon tho. thanks!
Jul 24, 2009 | 05:50 AM
#16
Registered User
Joined: Nov 2008
Posts: 131
Likes: 0
From: Eugene Oregon
https://www.yotatech.com/forums/f116...r-22re-159781/
You can do it. I know I did.
Jul 29, 2009 | 02:30 PM
#18

Registered User
Joined: Nov 2007
Posts: 99
Likes: 0
I'm impressed you took this on without any prior engine experience... not sure about your particular engine, but if those are TTY (torque to yield) bolts on the flywheel, you'd want to replace those. If that thing comes off... I don't think I need to explain the dangers there. The reason you replace the head bolts is they are TTY bolts and actually stretch when you torque them down. Once you take them out.. they're useless. I'm pretty sure flywheel bolts are usually TTY bolts as well... maybe not on the 22r... I hope you did your homework there. Overall, seems like good work.
The lapping compound is a good idea... also replacing more parts like drew303 mentioned.
The plastigauge.. again like drew said you assemble it with a strip in the bearing-journal clearance. do not use oil at this point, as that is what you are measuring - the clearance between the two surfaces where the oil provides lubrication. torque it down, measure the width on the side of the plastigauge pack to make sure you're within spec.
You guys are talking about standing the crank shaft on end - That is the correct thing to do, laying it down can cause it to bend / flex.
A general tip - cover all your parts when you're not working on them, small amounts of dust can cause problems - for example, bearing failure. This is also important when working on a diesel fuel system.
Again, nice job. The 85 I'm looking at getting next week has a rebuilt engine... so I shouldn't have to worry about this for a while... unless they ed it up!!

Thread
Thread Starter
Forum
Replies
Last Post
MMA_Alex
86-95 Trucks & 4Runners (Build-Up Section)
25
Apr 18, 2017 05:07 AM
Vargntucson
95.5-2004 Tacomas & 96-2002 4Runners
0
Jul 4, 2015 12:15 PM


