
22R Desmog Tutorial
 Aug 17, 2013 | 08:05 AM
#121
Thread Starter
Super Moderator
iTrader: (3)
Joined: Jan 2012
Posts: 3,218
Likes: 26
From: Salisbury, MD
Yep, unless you want coolant in your crank case, you definitely DO NOt want to route your PCV there. Looks like your only option is to mount it to the fitting that goes on the weber air cleaner housing.
Aug 25, 2013 | 05:16 AM
#122

Registered User
Joined: Dec 2011
Posts: 250
Likes: 3
My recently desmogged and Weber 32/36 carbed toyota 22R will not stop dieseling upon shutdown. I have installed an in-line Purolator fuel pressure regulator that I have set to 2.5 psi and I noticed essentially no difference. Still diesels. Any advice?
I have left both charcoal canisters though one of them is not hooked up to the carb. I see the vent port on the carb that could be used with the canister, but it seems blocked off from the inside. How do I use this port?
I have left both charcoal canisters though one of them is not hooked up to the carb. I see the vent port on the carb that could be used with the canister, but it seems blocked off from the inside. How do I use this port?
Sep 2, 2013 | 10:09 AM
#124
Thread Starter
Super Moderator
iTrader: (3)
Joined: Jan 2012
Posts: 3,218
Likes: 26
From: Salisbury, MD
LCE just came out with a complete desmog kit for a pretty good price at $136.
http://www.lceperformance.com/Emissi...-p/1016035.htm
What I love about this company is that they are highly knowledgeable when it comes to Toyotas but aren't too proud to listen to their customers' suggestions and comments. I emailed them a couple months ago suggesting that they sell a complete, no BS desmog kit. They (Wes) called me back saying that it was a great idea and the above link is what they came up with. It should take the guess work out of what people need to do a complete desmog and help keep the cost and headaches to a minimum.
Sep 5, 2013 | 02:13 PM
#125
Registered User
Joined: Dec 2010
Posts: 88
Likes: 0
From: Oregon
What is the water block plates behind the timing cover blocking off? Like what is the original function of that opening? I have an egr delete but do not have those water block off plates and was wondering what the function of it is. Thanks.
Oct 3, 2013 | 02:02 PM
#127
 Oct 24, 2013 | 10:06 AM
#128

Registered User
Joined: May 2013
Posts: 190
Likes: 0
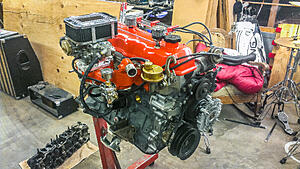
I don't have too many before pics but there are a few.
Here is the mess around the carb before the desmog
http://www.flickr.com/photos/63070365@N06/10452504825/
Here is an interesting aside. On my 1989 model the air pump did not route to the typical ports on the exhaust manifold. I had some discussion with the good guys at lce and they said what I had was rare. The normal spot for the air injection was blocked with a factory block plate, the air injection connected just below the heat shield on the exhaust manifold.
http://www.flickr.com/photos/63070365@N06/10454023665/
I did all this while doing a top end overhaul. Here's the ubiquitous broken timing chain guide that I found.
http://www.flickr.com/photos/63070365@N06/10454345543/
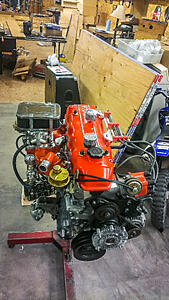
Here is my nice clean engine compartment after the desmog!
http://www.flickr.com/photos/63070365@N06/10460781175/
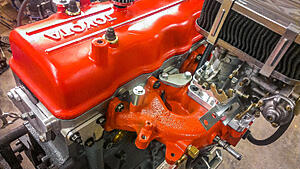
Here is the egr block plate from lce. On the rear of the head I also have the lce crossover water block plate, but it really can't be seen once installed. It's quite nice though.
http://www.flickr.com/photos/63070365@N06/10460954433/"
As part of the egr block plate kit, you get a nice plate for the manifold as well, but after some discussion with Kawaz, I removed it and used this fitting with adaptor that came with the weber carb kit. It is not as elegant, but probably cleaner and better for carb and engine compartment.
http://www.flickr.com/photos/63070365@N06/10460763694/"
You can see from my "before" picture of the exhaust manifold that the air injection went into an unconventional spot. I used lce's O2 sensor block plate to close off this port and it works great.
http://www.flickr.com/photos/63070365@N06/10460792165/
I was going to keep the Aisin carb, but when I tried to rebuild it, I found a lot of messed up stuff inside, so I just went with the weber. I didn't buy the nice fuel pressure regulator like Kawaz did. I used the cheap Mr. Gasket, which gets awful reviews, but it is working great. Note how my fuel lines are routed. I don't recommend doing it that way, it was an expedient as I haven't figured out how to mount this mr. Gasket yet. I have to get more fuel line and figure out how to mount it on the side of the engine compartment in lieu of the zip ties I have it secured with now...
http://www.flickr.com/photos/63070365@N06/10460956693/
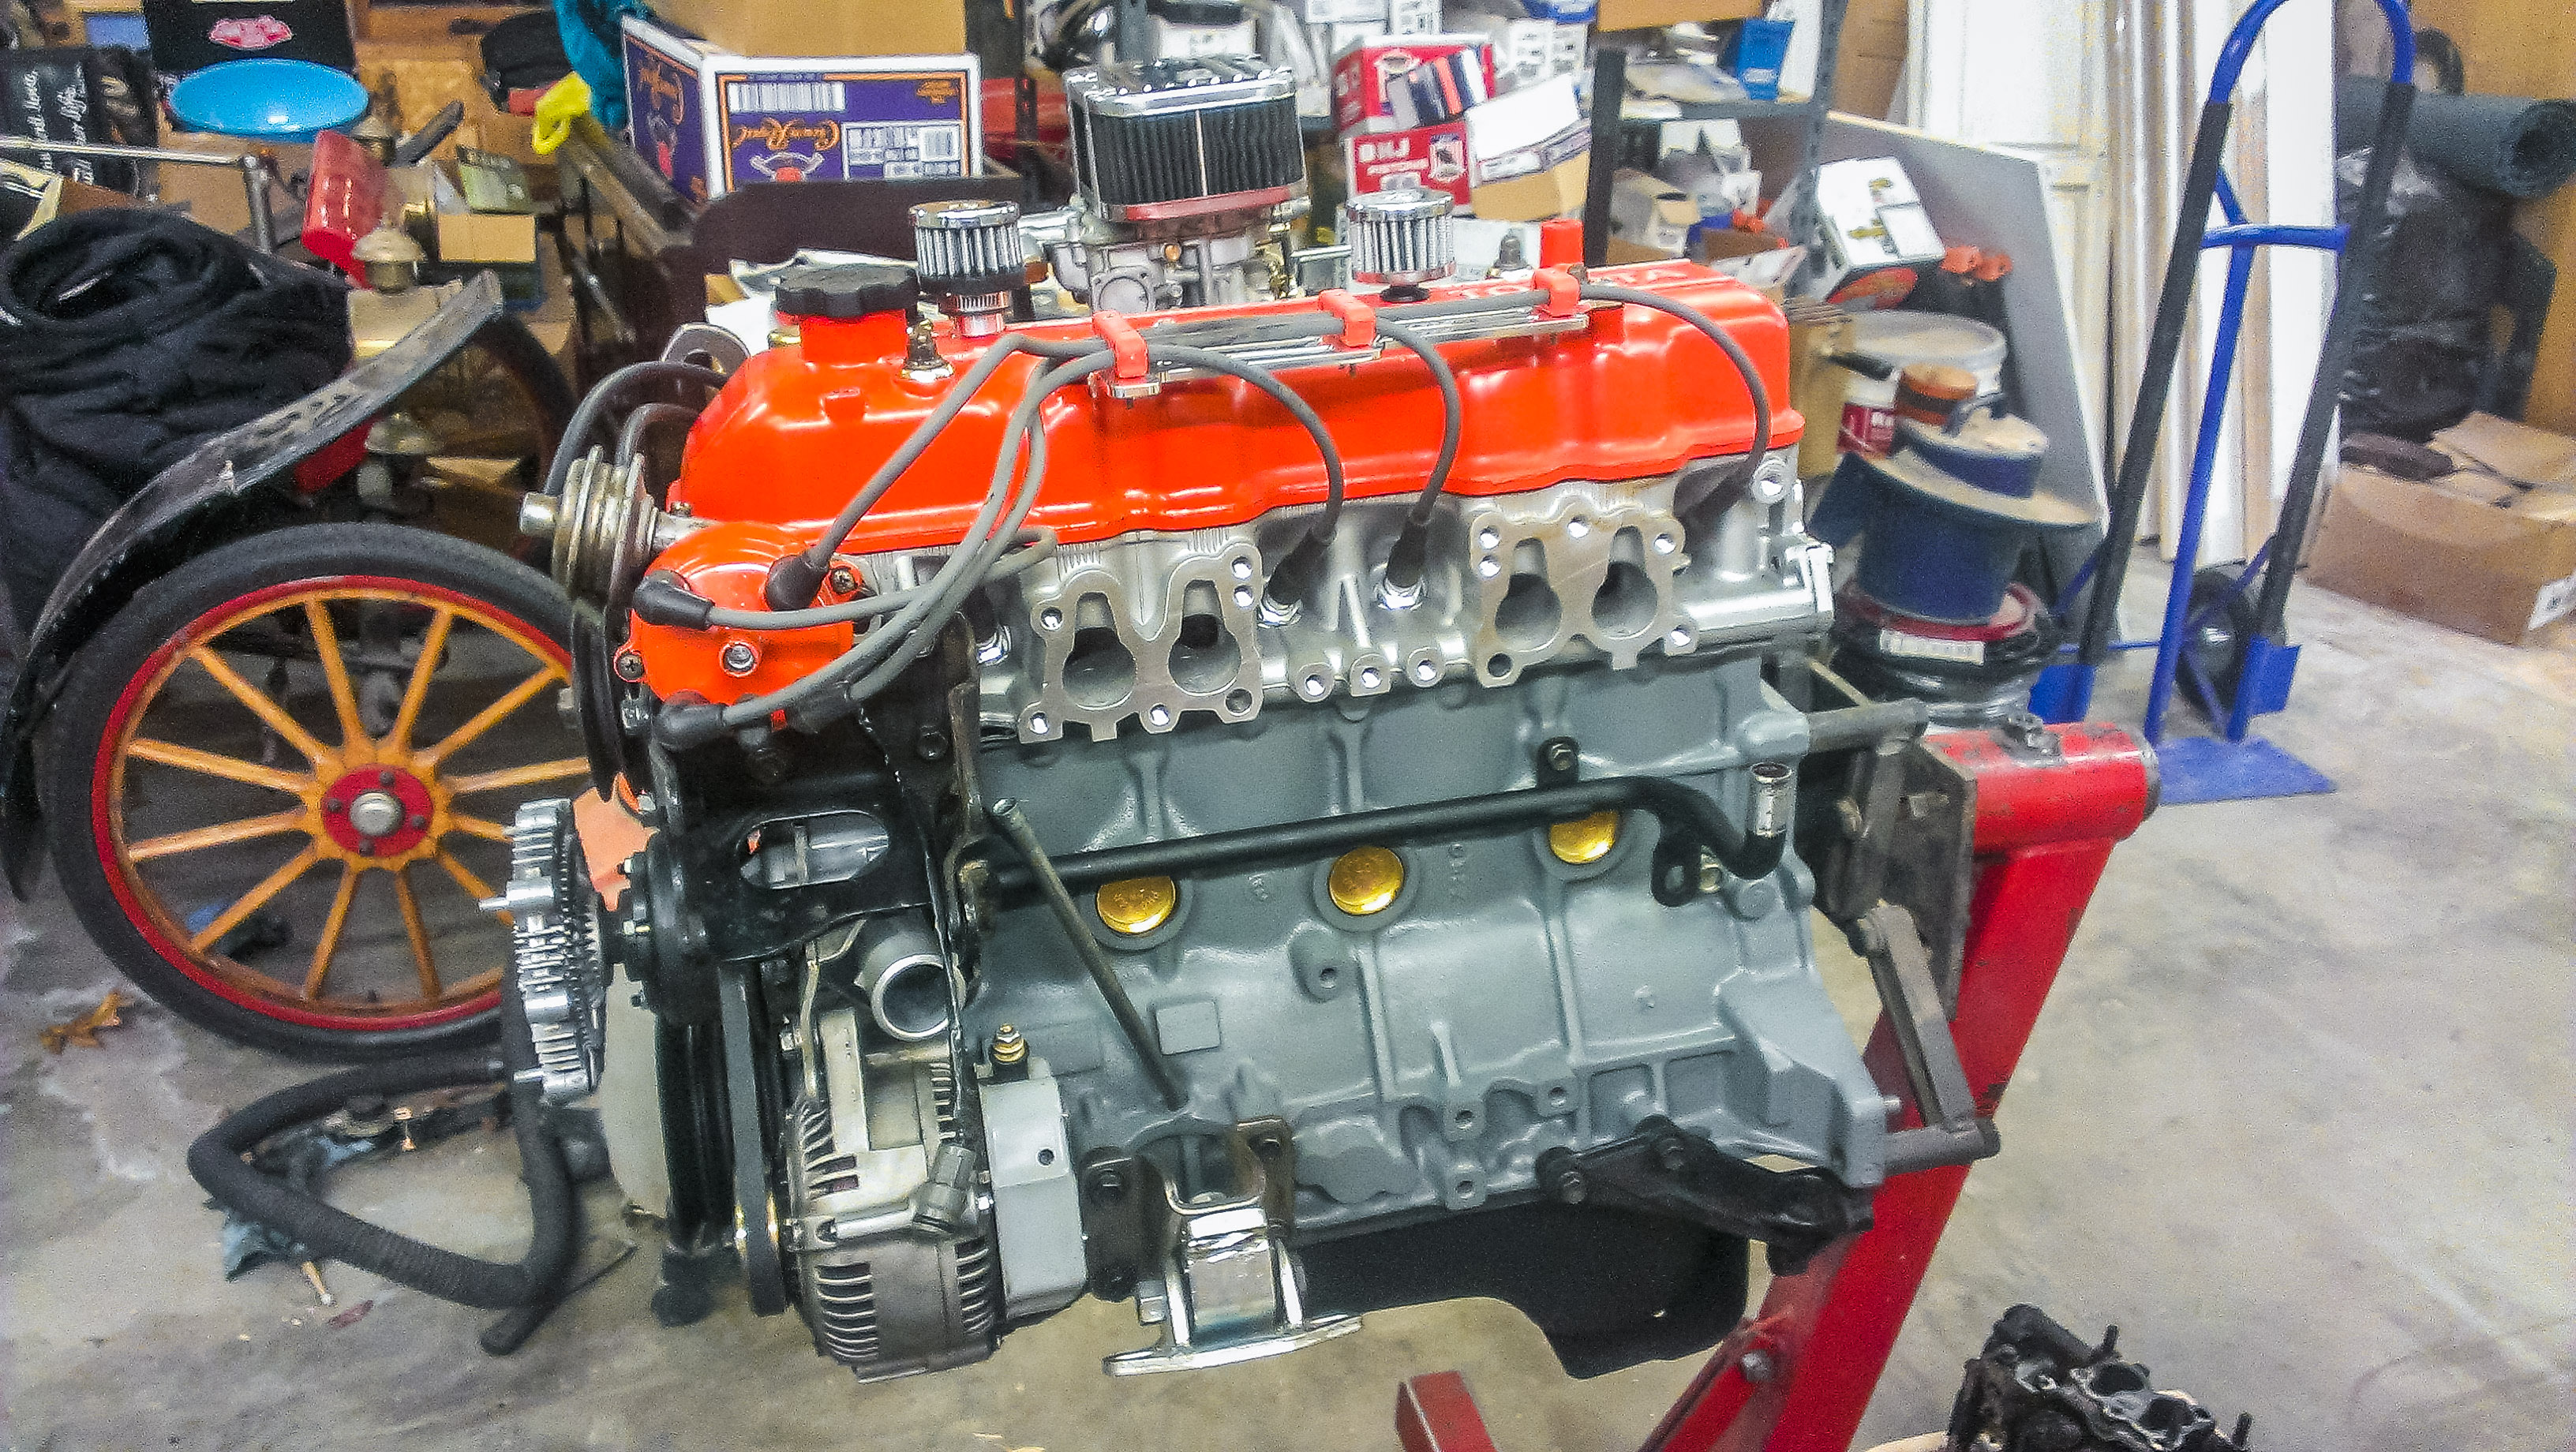
Finally, here is one of my two vacuum hoses. It goes from the forward port on the distributor advance in the first pic to the fitting on the weber in the second picture. The other hose is for the brake booster.
http://www.flickr.com/photos/63070365@N06/10460775306/
http://www.flickr.com/photos/63070365@N06/10460962363/
I wanted to thank everyone on this forum for their help. I would not have been able to do this without Kawaz's great info. and the valuable input from everyone else as well, especially Pumpkinyota. I am not a professional mechanic and it feels good to have done this. It runs so smoothly not, it is like night and day! Thanks for the great thread. Yotatech is great.
Last edited by Bruinpilot; Oct 24, 2013 at 10:17 AM. Reason: Pics not working
Oct 24, 2013 | 06:02 PM
#129
Thread Starter
Super Moderator
iTrader: (3)
Joined: Jan 2012
Posts: 3,218
Likes: 26
From: Salisbury, MD
Good job! Looks nice and tidy under your hood now! I'm glad that I could help you out. I just goes to show that anybody can desmog a 22R. It's not rocket science, you just need a little confidence to jump in a do it - that's what I always preach with mechanics. I'm a firm believer that you can't learn how to wrench on an engine without actually turning the wrench. Thanks for posting the pics.
Did you notice any considerable performance increases?
Did you notice any considerable performance increases?
Oct 24, 2013 | 06:57 PM
#130
Registered User
Joined: May 2013
Posts: 190
Likes: 0
My performance is way better and the engine runs much more smoothly. However, I don't have the best baseline for comparison. When I bought this truck the head was blown and it could barely idle due to all of the vacuum leaks. Desmogging was actually the less intimidating option as compared to tracing that bird's best of tangled rotten hoses looking for a leak. My confidence with wrenching has improved almost as much as the performance though. It was fun and I have my eyes open, if I see another good old yota, I'm going to buy it and the first thing on the to do list will be desmog!
Oct 24, 2013 | 07:24 PM
#131
Thread Starter
Super Moderator
iTrader: (3)
Joined: Jan 2012
Posts: 3,218
Likes: 26
From: Salisbury, MD
Good too hear! I have the same thought process on the birds nest too... I know motors well, but I would hate to have to figure out how to put the emissions system back together! So desmog it is, and always will be!
 Oct 25, 2013 | 06:26 PM
#133
Thread Starter
Super Moderator
iTrader: (3)
Joined: Jan 2012
Posts: 3,218
Likes: 26
From: Salisbury, MD
Easier than rewiring the automatic choke from Aisin to Weber
I ran mine through the spare hole in the dash next to the cigarette lighter and just ran it along the throttle cable housing up to the carb. Bolt it in to the carb, adjust and you're done!
I ran mine through the spare hole in the dash next to the cigarette lighter and just ran it along the throttle cable housing up to the carb. Bolt it in to the carb, adjust and you're done!
Oct 28, 2013 | 08:52 PM
#134

Registered User
Joined: Oct 2013
Posts: 3
Likes: 0
I'm just finishing up a desmog based on this thread and so far it's gone pretty well. The only thing I still am a little confused about is getting the dashboard temperature indicator working. Everyone seems to be saying different things about which sensor sends to the dashboard gauge, so I'll probably just end up tinkering around with it until I find out which one's which.
Anyways yeah, tons of good info on this thread. Thanks guys.


Anyways yeah, tons of good info on this thread. Thanks guys.


 Oct 28, 2013 | 09:28 PM
#135
Thread Starter
Super Moderator
iTrader: (3)
Joined: Jan 2012
Posts: 3,218
Likes: 26
From: Salisbury, MD
Awesome job man, I like your style - If you painted your block black and left the manifold bare it would look identical to mine. Even used my regulator mounting idea, I love it! I truly respect your attention to detail because I know how tough it is to get a engine looking that good.
Just a couple things I noticed:
-You might want to reconsider that rear breather on your PCV valve or monitor it closely. I've seen them spew oil all over the engine compartment before. I wouldn't want to see this sexy thing get all oily. I ran my PCV to where you have the plate in the middle of the manifold. Also provides some vacuum to help vent the crankcase.
-What are you doing with The coolant pipe that runs from the timing cover on the exhaust side of the block (third picture)? The reason I ask is because if you plan on running it to your heater core then you might want to check your hard coolant line down by your driverside motor mount (if you have one). There is a bung on that hardline that is runs to the heater core. Not sure why toyota did it that way because it can get in the way of the steering shaft, but you may have to block that off.
As for your temp sender, You can see the temp sender here just to the right of my fuel gauge going into the side of the manifold (looks red/orange in the picture):

And you can see it here just to the right of the thermostat housing and below and to the right of that vacuum switch (sorry for the dirty pic, it's really clean now!):

I hope this helps. Again, very nice job!
Just a couple things I noticed:
-You might want to reconsider that rear breather on your PCV valve or monitor it closely. I've seen them spew oil all over the engine compartment before. I wouldn't want to see this sexy thing get all oily. I ran my PCV to where you have the plate in the middle of the manifold. Also provides some vacuum to help vent the crankcase.
-What are you doing with The coolant pipe that runs from the timing cover on the exhaust side of the block (third picture)? The reason I ask is because if you plan on running it to your heater core then you might want to check your hard coolant line down by your driverside motor mount (if you have one). There is a bung on that hardline that is runs to the heater core. Not sure why toyota did it that way because it can get in the way of the steering shaft, but you may have to block that off.
As for your temp sender, You can see the temp sender here just to the right of my fuel gauge going into the side of the manifold (looks red/orange in the picture):
And you can see it here just to the right of the thermostat housing and below and to the right of that vacuum switch (sorry for the dirty pic, it's really clean now!):
I hope this helps. Again, very nice job!
Oct 28, 2013 | 09:41 PM
#136
Thread Starter
Super Moderator
iTrader: (3)
Joined: Jan 2012
Posts: 3,218
Likes: 26
From: Salisbury, MD
Oh, another VERY important issue I may have noticed! I see that you have a 1985+ head (pear shaped exhaust ports) on there. 1984 and order heads have round exhaust ports. 1985 and newer cylinder heads will not work on the early blocks as the "raised-ring" pistons will contact the head and smash valves. The 84 and older blocks were taller blocks with different pistons compared to the late model blocks. The 84 and older timing covers are taller and also not interchangeable with 85+ Shorter covers.
I have not clue what block you are using but I figured that I would throw it out there just in case.
I have not clue what block you are using but I figured that I would throw it out there just in case.


 Oct 30, 2013 | 07:57 PM
#138
Thread Starter
Super Moderator
iTrader: (3)
Joined: Jan 2012
Posts: 3,218
Likes: 26
From: Salisbury, MD
Great job Plowzilla! It's extremely satisfying that I was able to help you out - helping others is very motivating and inspirational for me as well. I also love that you used my fuel pressure regulator mounting idea as well; it's one of my more clever ideas and it was so simple!
My only suggestion with what you have done would be relocating your fuel filter. When ever I change my fuel filter (which I hopefully won't have to do as much anymore after thoroughly cleaning the tank) I get the residual fuel that's left in the lines all over the place - I wouldn't want it to run all down onto my intake manifold and block, but that's just me. Also, I had a bunch of rust scale in my tank so I wanted my fuel filter before my fuel pump so my fuel pump doesn't get messed up with the crud - from what I can tell in the pictures, it looks like you have it after the pump. Just a couple suggestions to think about.
Again, excellent job!!
Nov 12, 2013 | 11:46 AM
#139

Registered User
Joined: Nov 2013
Posts: 2
Likes: 0
I got a quick question.
I'm fixing to do this on an old '80 20R motor. most of this seems to line up, except LCE doesn't have any block-off plates for the air injection on a 20R. do you know if the later 22R/RE block off plates will work?
I'm fixing to do this on an old '80 20R motor. most of this seems to line up, except LCE doesn't have any block-off plates for the air injection on a 20R. do you know if the later 22R/RE block off plates will work?
Nov 12, 2013 | 12:29 PM
#140
Thread Starter
Super Moderator
iTrader: (3)
Joined: Jan 2012
Posts: 3,218
Likes: 26
From: Salisbury, MD
I think they will but I'm not 100% sure. If you call LCE I am certain that they will be able to provide your with the correct advice. They are super friendly over there and they are highly knowledgeable. When you find out, be sure to post the answer here so others will know.
Last edited by kawazx636; Nov 12, 2013 at 12:30 PM.


