
22R Desmog Tutorial

 Mar 3, 2015 | 05:50 PM
#282

Registered User
Joined: Mar 2015
Posts: 1
Likes: 0
Parts List, sources and costs (Click on the links to go to the product website):
FROM YOUR LOCAL PARTS STORE:
6ft - 1/4” Fuel hose – about $10.00
6ft - 5/32” Vacuum hose – about $10.00
12 - 1/4” Stainless fuel hose clamps – about $10.00
1 - 1/4” male NPT to 3/8” Barb 90* elbow fitting (brake booster) – about $5.00
1 – 1/4” male NPT to 3/16” Barb (Manifold vacuum advance) – about $3.00
1 – 3/8” male NPT to 1/4” female reducer fitting (Fuel pressure gauge) - about $3.00
2 – 3/8” male NPT to 1/4” Barb 90* elbow fitting (Fuel lines to fuel pressure regulator) – about $8.00
(EDIT: I may have some of the fitting sizes wrong - your best bet is to take your manifold and FPR to the hardware store to match up your fittings properly)
TOTAL: about $49.00
edit: I'm learning a lot more as I keep reading, about the BSPP threads and the vacuum advance stuff..
I'm going Weber/Holley FPR/fuel gauge on this '82 Hilux truck. I've been searching today for the fittings to adapt to the FPR and barb for manifold vacuum advance to the distributor. Should I try that without first, then hookup that 2nd vacuum advance if I feel I need it?
At Lowes I only found the fitting between the fuel gauge and the FPR. That was mislabeled on your first post, it is actually an adapter 3/8" NPT male to 1/8" NPT female (not 1/4")
How about that Holley FPR? Are the 3/8" fittings BSPP? And that's why the male NPT fitting I bought at lowes screwed into the top ok for the pressure gauge? (Will seal fine with thread sealant)
http://morewinemaking.com/public/pdf/wthreads.pdf
Any specifics on the 90* fittings to use for this? Are they really 1/4" barb for that fuel hose stock size?
Last edited by TajMan; Mar 3, 2015 at 06:15 PM.
Mar 10, 2015 | 10:22 AM
#283
Registered User
Joined: Feb 2011
Posts: 374
Likes: 1
From: Las Vegas
Inspired
I had my motor out to do timing chain, etc. I was wondering what to do with the beast. Came across this thread, now I am on board the desmogging path. Ordered lots of stuff from LCE, I talked up this thread with the sales people and told them they need to hire the creator of this thread. It's the only reason I bought 2K$ in parts!
Hopefully I can figure out how to upload some photos and share my new project.
Great thread and thanks for all the information. BRAVO
Hopefully I can figure out how to upload some photos and share my new project.
Great thread and thanks for all the information. BRAVO
Mar 10, 2015 | 09:52 PM
#284
Thread Starter
Super Moderator
iTrader: (3)
Joined: Jan 2012
Posts: 3,218
Likes: 26
From: Salisbury, MD
Just got finished up with all the wiring on my truck so I figured I'd share with you all here; this is what a desmogged engine looks like:
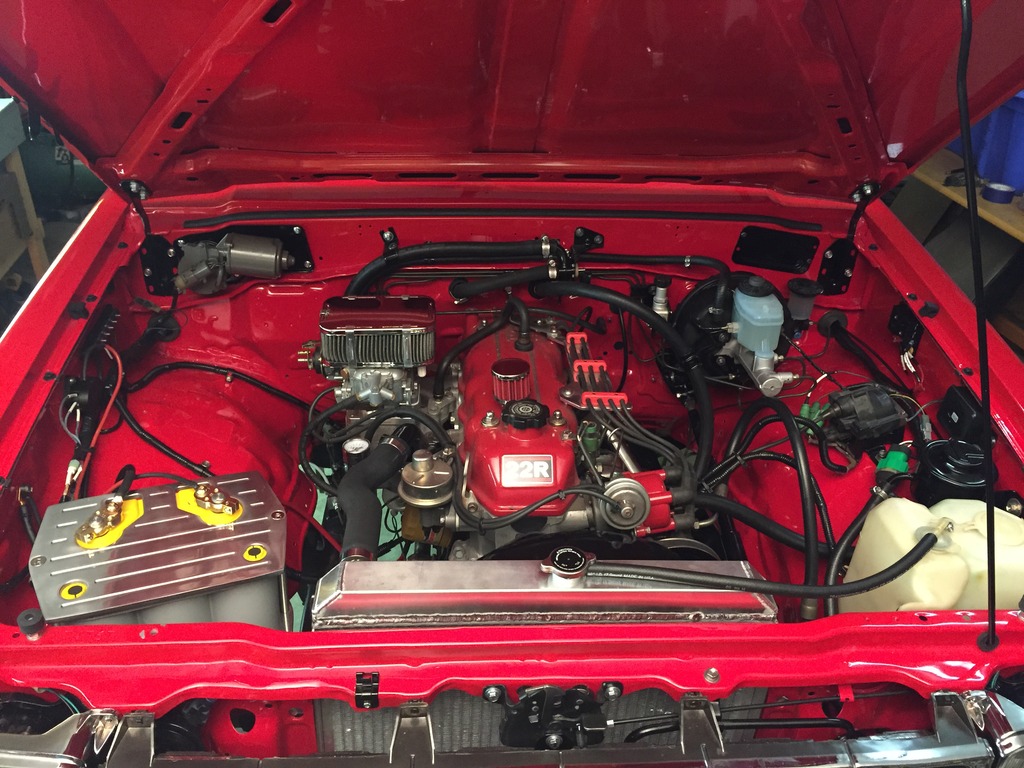
Nice and clean with no emissions BS!

Nice and clean with no emissions BS!
May 5, 2015 | 03:03 PM
#287
Registered User
Joined: Aug 2014
Posts: 103
Likes: 0
From: CO
So, I just got the head off my '87 2x and I took off the ridiculous air system from the exhaust and that reed valve under the intake. I would like to get rid of the hard water line that goes around the back of the head. I suppose I could buy the intake block off plate and then block off the outlet behind the timing cover, and the one in the center of the head intake side, then run a hose from the block off plate under the intake round behind the head and to the heater water inlet.
But what will missing that temperature wire from under the intake do to the system?
But what will missing that temperature wire from under the intake do to the system?
Last edited by ditypup; May 5, 2015 at 03:30 PM.
May 5, 2015 | 03:31 PM
#289
Registered User
Joined: Aug 2014
Posts: 103
Likes: 0
From: CO
Ha Ha was a typo... (nobody's perfect) So what do you think of the question? Also wondering if the heat at the back of the head may not be good for rubber hose in the long run, but would certainly be a lot easier to replace. And also didn't someone say that the coolant would have better flow?
Last edited by ditypup; May 5, 2015 at 03:33 PM.
May 6, 2015 | 09:25 AM
#290
Registered User
Joined: Feb 2011
Posts: 374
Likes: 1
From: Las Vegas
That hose is a heater hose. If you block that off on a later model 22r, you will have no heat in the cab. These trucks are old now and these hoses last a long time, I would not be worried about the heat effect on the rubber. I did this de-smog on my 87'. The only block off plate you will need for a later 22r is the EGR block plate.
May 6, 2015 | 09:39 AM
#291
Registered User
Joined: Aug 2014
Posts: 103
Likes: 0
From: CO
reply
Hi Mr Utah, I know its a heater hose outlet. If you were to block off the bottom of the intake manifold there would then be a coolant connector under there. http://www.lceperformance.com/Water-...-p/1032010.htm
Now you can block off the PS water outlet behind the TC and then take your heater hose from under the intake man to the heater input.
The OP talked about this in this thread.
My question was about the wire coming off the part underneath the stock
intake man.
OP I also know the USA 22R series ended in 95. Was a typo.
May 6, 2015 | 01:38 PM
#292
Registered User
Joined: Feb 2011
Posts: 374
Likes: 1
From: Las Vegas
Wire
That wire connects to a disk heater, to warm the intake and assist in the automatic choke operation. You can leave it in, it does not interfere with any thing if it is disconnected or not working. I believe the LCE plate does not allow for the heater disk to remain.
May 11, 2015 | 06:56 AM
#293
Registered User
Joined: Aug 2014
Posts: 103
Likes: 0
From: CO
OP that is the NICEST looking 22R in one of the nicest looking RED pickups I have ever seen. Super nice job well done. Congratulations!
What would be a good gasket sealer compound for the bottom plate on the intake manifold. Grey permatex? Toyota seal packing?
The stuff that was on there is now hard as a rock. Real bugger getting it off the aluminum.
What would be a good gasket sealer compound for the bottom plate on the intake manifold. Grey permatex? Toyota seal packing?
The stuff that was on there is now hard as a rock. Real bugger getting it off the aluminum.
Last edited by ditypup; May 11, 2015 at 06:59 AM.
May 11, 2015 | 08:16 AM
#294
Thread Starter
Super Moderator
iTrader: (3)
Joined: Jan 2012
Posts: 3,218
Likes: 26
From: Salisbury, MD
OP that is the NICEST looking 22R in one of the nicest looking RED pickups I have ever seen. Super nice job well done. Congratulations!
What would be a good gasket sealer compound for the bottom plate on the intake manifold. Grey permatex? Toyota seal packing?
The stuff that was on there is now hard as a rock. Real bugger getting it off the aluminum.
What would be a good gasket sealer compound for the bottom plate on the intake manifold. Grey permatex? Toyota seal packing?
The stuff that was on there is now hard as a rock. Real bugger getting it off the aluminum.
May 29, 2015 | 05:25 AM
#297
Thread Starter
Super Moderator
iTrader: (3)
Joined: Jan 2012
Posts: 3,218
Likes: 26
From: Salisbury, MD
Here's another modification for you desmoggers out there. When you fully desmog your engine you will eliminate the charcoal canisters to vent the pressure out of the gas tank. The gas cap will release the vacuum build up caused by the fuel pump pulling fuel but there is no mechanism to release the pressure build up cause by heat and vaporized fuel. Everytime I would remove the fuel cap I would get a long large hiss of pressure coming out of the tank - it was really bad and quite frankly scary! I had a boat gas tank vent lying around so I decided to use that for my vent. Here's what it looks like if you've never seen one:
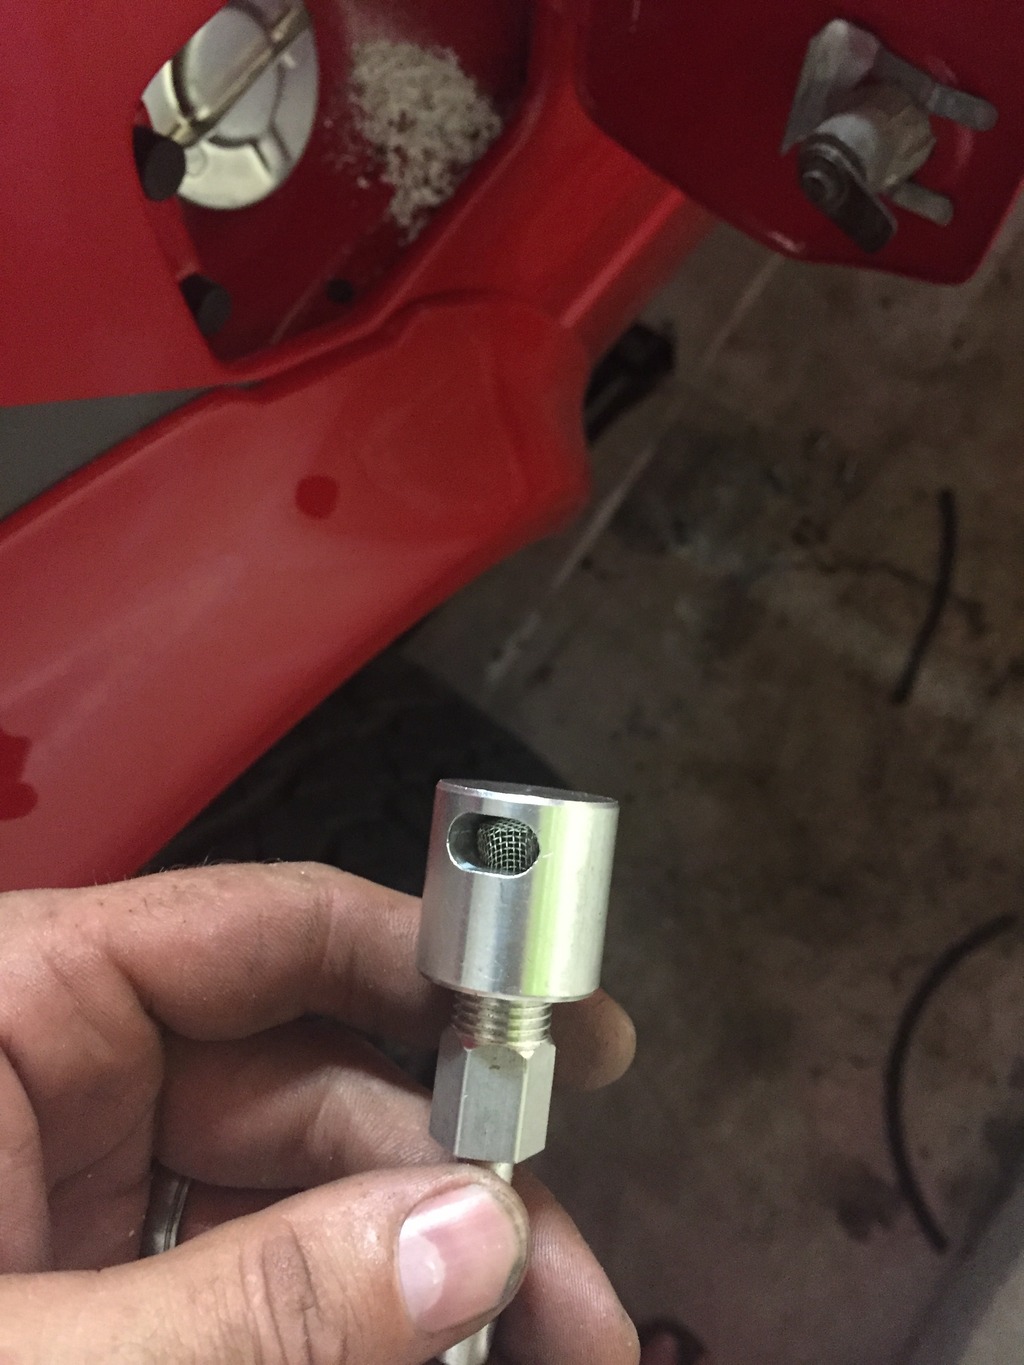
Obviously I wanted it hidden and it you typically want it mounting as high or higher than the fuel filler so I drilled a 1/2" hole in the fuel pocket to mount it.
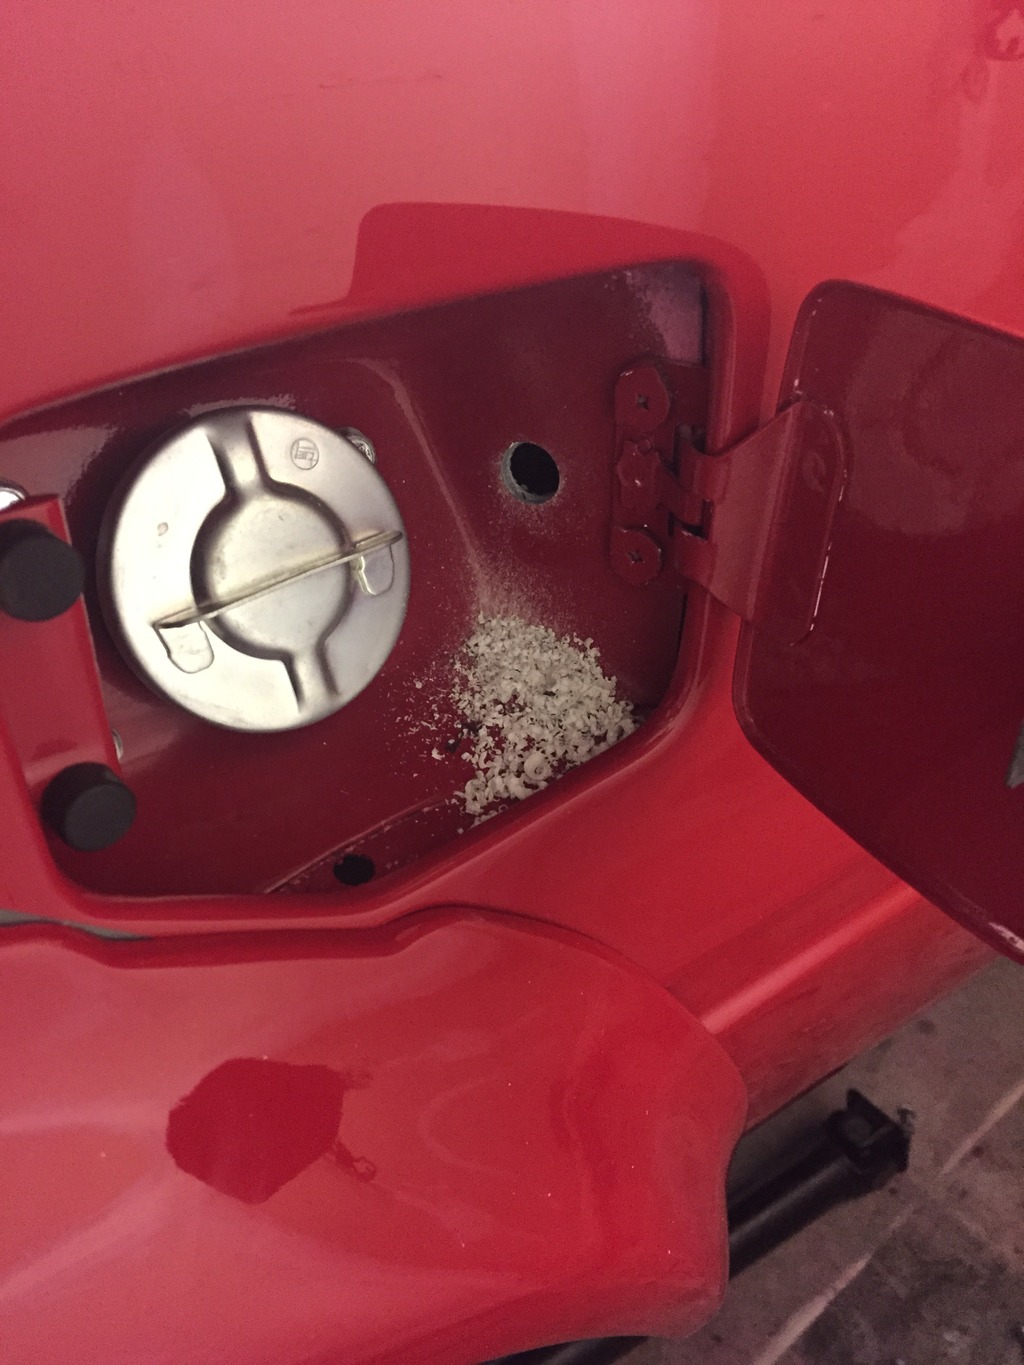
I installed it with the vent opening facing downward to prevent the possibility of water or debris getting into the fuel tank and ran a section of 1/4" fuel hose from the barb fitting on the back side of the vent to the factory vent line on the tank that would normally go to the charcoal canister. I had to bend the vent line on the tank so that it pointed towards the filler neck to make installation easier and cleaner. Turned out just as expected with plenty of clearance around the filler cap so it isn't in the way when refueling.
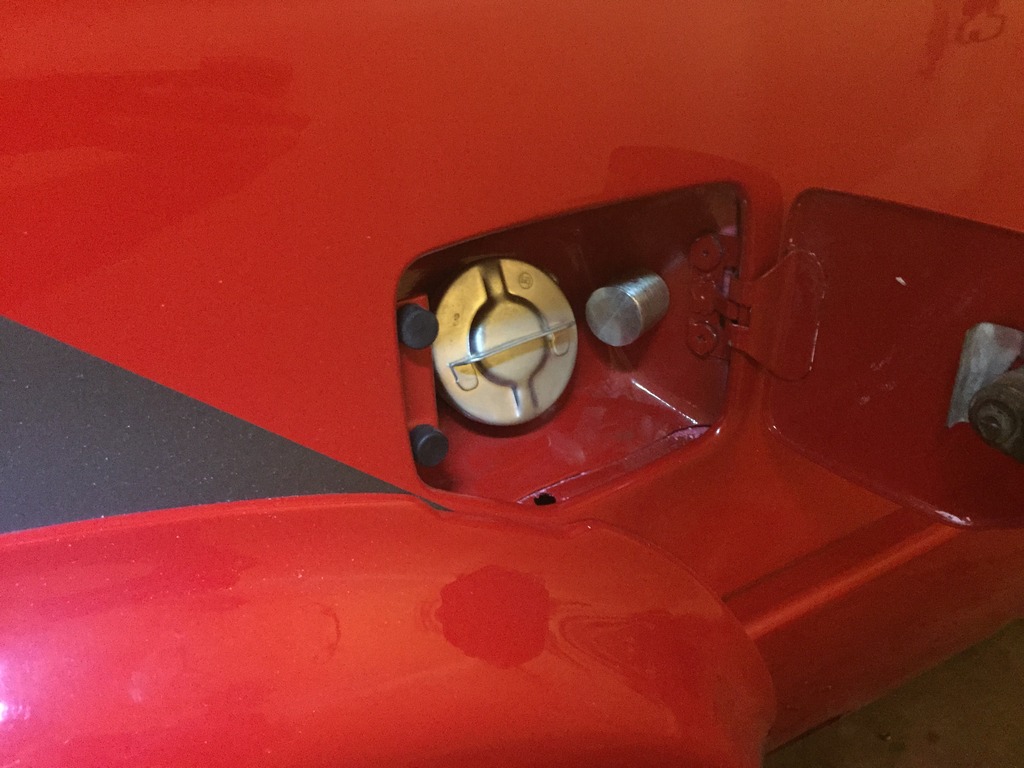
Now no more hissy fuel cap!!! Quick, easy and cheap mod to do. It took me about 20 minutes to do and if I didn't already have all the parts it would have cost around $20-30 for the parts.
May 29, 2015 | 11:00 AM
#298

Registered User
Joined: Mar 2011
Posts: 228
Likes: 0
From: Falls City, OR
Cool idea. Could you also have put it in the engine compartment where the charcoal canister was? I know you like a clean motor compartment though!
Do you have a fiberglass bed? Because those drillings don't look like steel in the picture.
Do you have a fiberglass bed? Because those drillings don't look like steel in the picture.
May 30, 2015 | 05:04 AM
#299
Registered User
Joined: Feb 2011
Posts: 374
Likes: 1
From: Las Vegas
Nice idea. However, I chose to keep the charcoal canisters to vent the tank. I vented them to the side of the Weber, then it gets sucked in the intake for combustion. When I get back home I'll have to post some photos.
May 30, 2015 | 05:30 AM
#300
Registered User
Joined: May 2008
Posts: 4,591
Likes: 126
From: Montana
Nice looking engine bay. I've been driving a lot of work trucks lately, and bought my old Subaru back for the summer. After getting a little used to them, then opening the hood on my 78 20R, desmogged truck...wow. It's just so nice and simple in there, with everything clearly visible.


