
Offroad/camping/utility-all in one trailer build
 May 15, 2013 | 06:16 PM
#41

Registered User
Joined: May 2013
Posts: 78
Likes: 0
From: Vancouver, Wa
Just out of curiosity, what kind of welder are you using?
Project looks good! I'm planning on doing some fab work on my newly acquired '91 pickup but that will have to wait till after the house stuff is fixed.
Project looks good! I'm planning on doing some fab work on my newly acquired '91 pickup but that will have to wait till after the house stuff is fixed.
Jun 16, 2013 | 12:28 PM
#42
Thread Starter
Registered User
iTrader: (2)
Joined: Sep 2010
Posts: 2,716
Likes: 7
From: Tri-Cities, Wa
Tomorrow I will be getting some 14 gage sheet metal to "skin" the body frame work that I built. I will be getting one 4x8' sheet to do the bedsides, and I'll have to order the 5x10' sheet. That should be enough material to do the floor, tailgate and the front header panel. So hopefully I'll have some updates with pics in the near future!
Jul 22, 2013 | 07:38 PM
#43
Thread Starter
Registered User
iTrader: (2)
Joined: Sep 2010
Posts: 2,716
Likes: 7
From: Tri-Cities, Wa
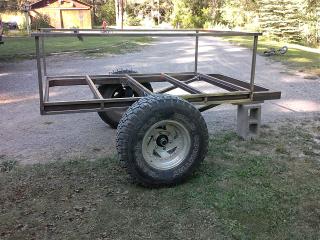
Finally got some work done on the trailer project. I finished building all my links, and got the main part of the trailer tongue built. I also got the air helper spring brackets all welded up and gusseted, I ran out of wire again, so I need to finish up some welds, then I can mount the firestone air helper springs and run the air lines.
I also bought the 4x8' and 5x10' sheets of 14 gage sheet metal for the floor and bedsides, just need to cut them into the correct sizes. I can't believe how fast the 1" square tube frame I built a few months back has rusted! I had it in the carport, but must have gotten enough moisture to rust, so now I have a lot of prep work to do before priming!... Here's a few pics...
I also bought the 4x8' and 5x10' sheets of 14 gage sheet metal for the floor and bedsides, just need to cut them into the correct sizes. I can't believe how fast the 1" square tube frame I built a few months back has rusted! I had it in the carport, but must have gotten enough moisture to rust, so now I have a lot of prep work to do before priming!... Here's a few pics...


Last edited by rustED; Jul 22, 2013 at 08:19 PM.
Jul 23, 2013 | 07:04 PM
#46
Thread Starter
Registered User
iTrader: (2)
Joined: Sep 2010
Posts: 2,716
Likes: 7
From: Tri-Cities, Wa
Thanks guys, I appreciate the compliments! Hopefully I can get some more work done on it this week. Here's a short list of things that need to be done:
1.) Build mounts on the 1" frame work and also on the trailer frame (I don't wont to drill into the trailer frame if I don't have to so I'll probably build some tabs to mount the bed/box to.
2.) cut out the 14 gage sheetmetal into the size panels I need and tack them in place.
3.) build the tail gate frame work out of 1" square tube, I have just enough left over to do this
4.) get some more welding wire and attach the trailer tongue, add gussets and reinforce the area where it attaches to the main trailer frame.
5.) finish up all the final welding on the trailer frame, then prime and paint... I would like to use POR15, but not sure if it's in the budget at this time.
6.) mount the Firestone air bags
7.) decide on whether to build trailer fenders or just buy some
8.) build a lockable hard top cover for it
9.) paint the body red to match my 4runner (fenders and hard top black)
I'm sure I'm forgetting stuff like wiring and lighting, but that will be a ways away. I was originally planning on having shocks on it, but since I switch from running coil springs to air helper springs, I don't think I will need shocks, what do you guys think?
Jul 23, 2013 | 11:31 PM
#48
Thread Starter
Registered User
iTrader: (2)
Joined: Sep 2010
Posts: 2,716
Likes: 7
From: Tri-Cities, Wa
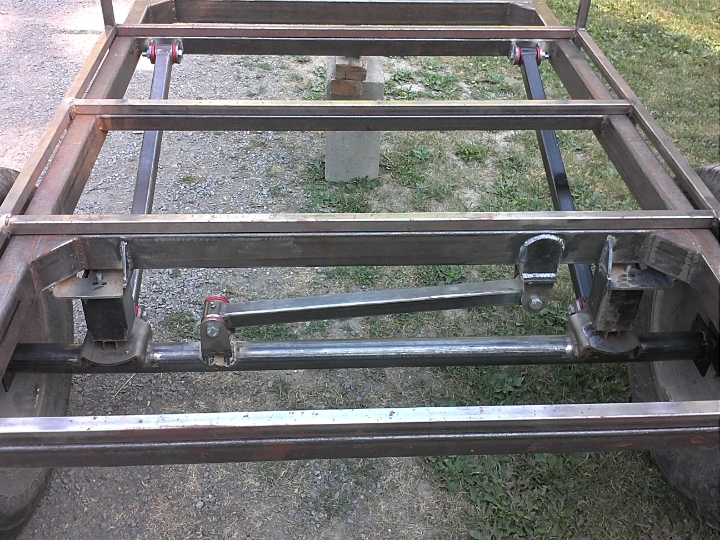
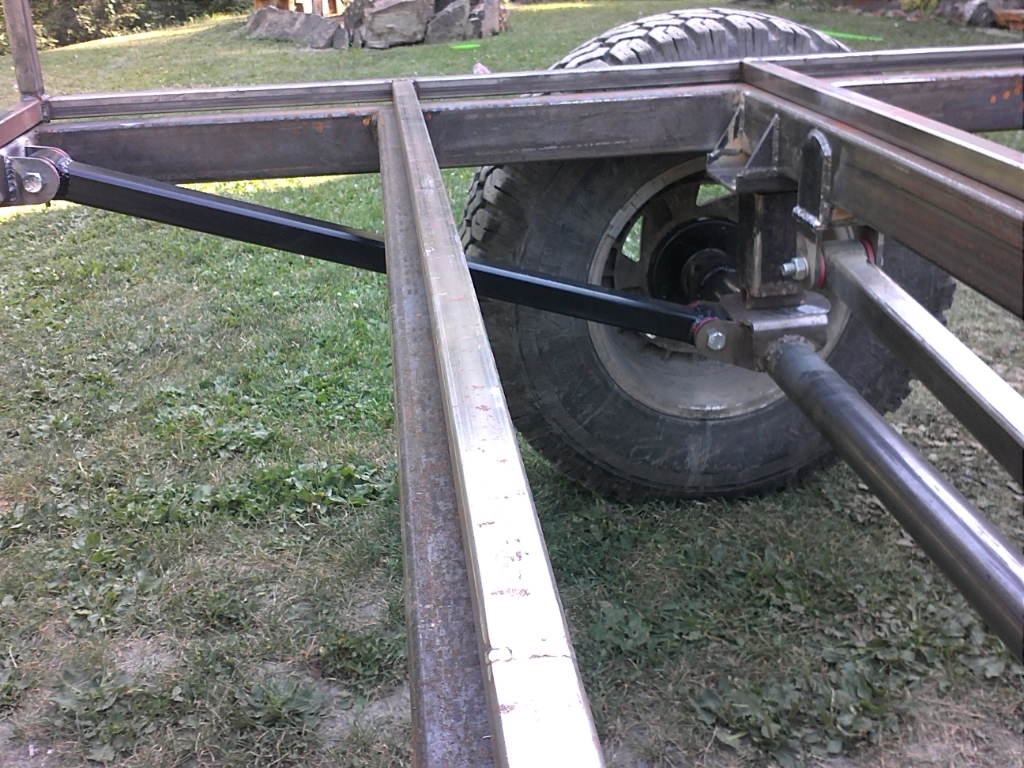
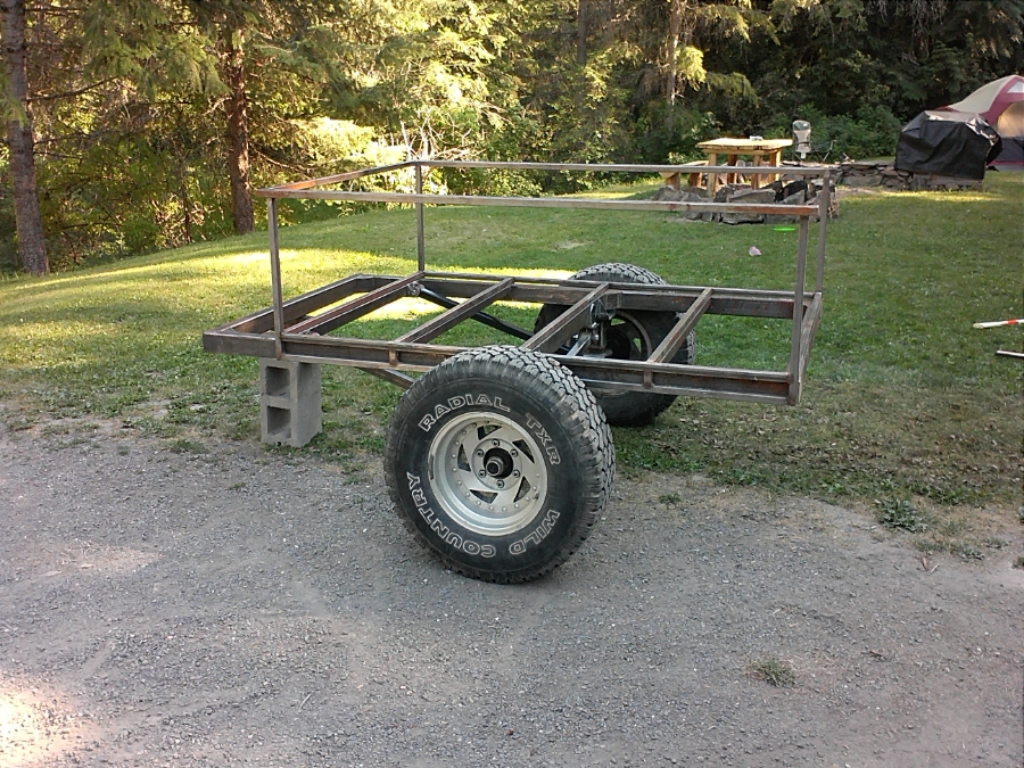
I'm hoping the track bar does the job, it feels pretty solid, the axel isn't twisting back and forth, I plan on adding more gussets, especially to the area where the track bar attaches to the axel, my main goal yesterday was to get it on wheels so I could move it around easier, lol. Like I mentioned in the beginning of this build, I've never built a 3link before, so I'm open to suggestions.
Jul 24, 2013 | 09:56 AM
#50
Thread Starter
Registered User
iTrader: (2)
Joined: Sep 2010
Posts: 2,716
Likes: 7
From: Tri-Cities, Wa
I think I get what your saying, and i'd run this link parallel to the existing link, this would prevent the axel from twisting, correct? I was wondering if this would be necessary since the trailer is just basically being drug behind my 4 runner, I could see if it was under a vehicle with power to the wheels were you would probably get more axel wrap... then again I'd rather over build the trailer to be on the safe side than to under build it, lol..... Thanks Inu for your input, this gives me something to think about, it's always nice to get constructive input from someone else's perspective! The good thing is where I live I can do plenty of offroad testing without going far from my house, so I can always add or change things later!
Aug 9, 2013 | 05:22 PM
#51
Thread Starter
Registered User
iTrader: (2)
Joined: Sep 2010
Posts: 2,716
Likes: 7
From: Tri-Cities, Wa


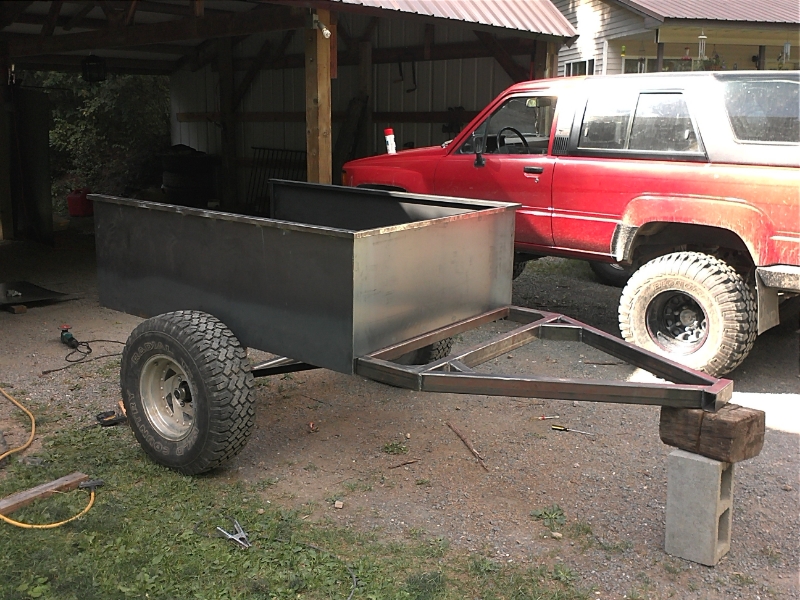
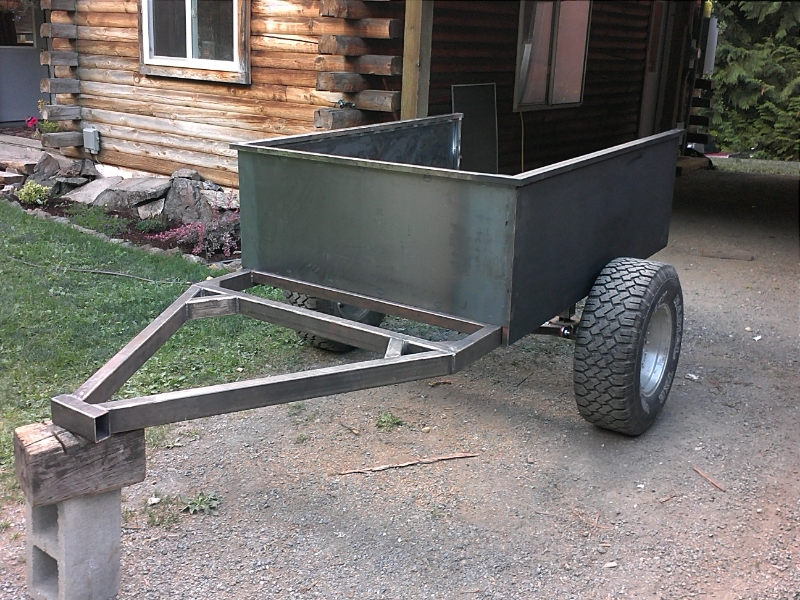
^^^Today I got the trailer tongue welded into place, I added this brace for strength, I have some 1/4" thick plate steel, I'm thinking about cutting out a triangle shape and fill in the center area


^^^my new toy, it's only a 8" drill press, 5speeds, 2.5 amp motor, got it brand new in the box for $30, will see how it holds up!
Last edited by rustED; Aug 9, 2013 at 09:12 PM.
Aug 19, 2013 | 06:25 PM
#54
Thread Starter
Registered User
iTrader: (2)
Joined: Sep 2010
Posts: 2,716
Likes: 7
From: Tri-Cities, Wa
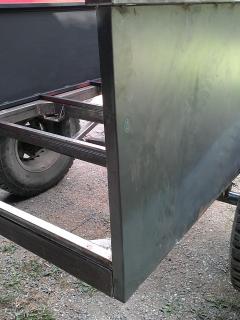
I got some work done on the trailer today, I got both sides and the front of the box sheet metal in place. The drivers side is fully welded all the way around. The passenger side and front are stitch welded in place, but need to finish up welding up the seams all the way around.
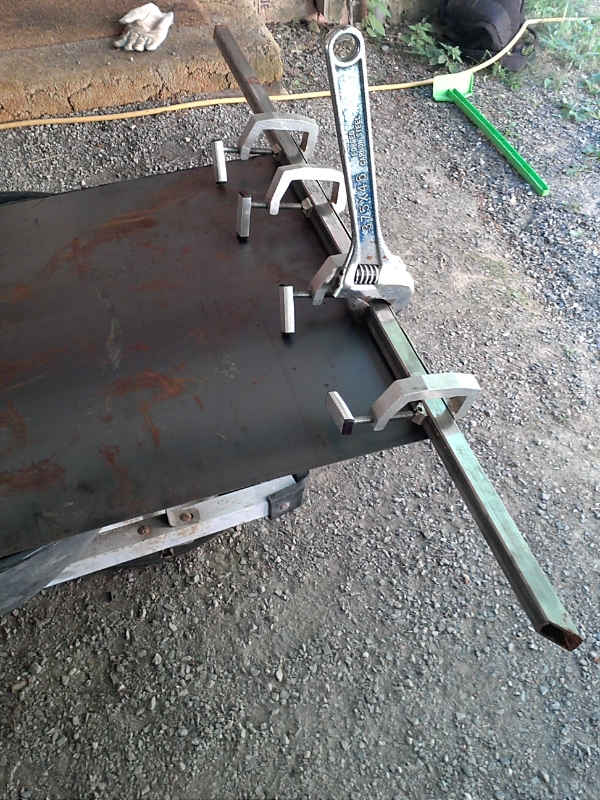
^^^Here is my make-shift bending brake, I clamp a piece of 1" square tubing to the sheet metal and used a grinder to cut a scribe line to make it easier to bend, then just took my big cresent wrench and used it to bend it over, worked good!
^^^ Here is the end that I bent, so it would wrap around, that way the tailgate sheetmetal will flush up to it, if that makes sense, lol

I have all the parts cut out to build the tailgate, I'll try to get them welded up tomorrow,I still need build mounts so I can bolt the box down to the frame, then I can cut out the sheet metal for the floor and weld that in.
With the changes that I made to the width of the trailer I'm pretty sure that I'll have to run wheel spacers, I'm going to, eventually get some black steel rims with the same offset as my 4runner, then I'll figure out how wide of a wheel spacer I need.

^^^Here is my make-shift bending brake, I clamp a piece of 1" square tubing to the sheet metal and used a grinder to cut a scribe line to make it easier to bend, then just took my big cresent wrench and used it to bend it over, worked good!

^^^ Here is the end that I bent, so it would wrap around, that way the tailgate sheetmetal will flush up to it, if that makes sense, lol


I have all the parts cut out to build the tailgate, I'll try to get them welded up tomorrow,I still need build mounts so I can bolt the box down to the frame, then I can cut out the sheet metal for the floor and weld that in.
With the changes that I made to the width of the trailer I'm pretty sure that I'll have to run wheel spacers, I'm going to, eventually get some black steel rims with the same offset as my 4runner, then I'll figure out how wide of a wheel spacer I need.
Last edited by rustED; Aug 19, 2013 at 07:08 PM.
Aug 20, 2013 | 05:59 PM
#56
Thread Starter
Registered User
iTrader: (2)
Joined: Sep 2010
Posts: 2,716
Likes: 7
From: Tri-Cities, Wa
Today I got the tailgate pretty much built, need to finish up some welding on it and get some hinges, I got a plan for the latching mechanism, I'll go into more detail on that later, also I have the tailgate holder upper thingy (that keeps the tailgate from falling all the way down, don't know what you call it, lol) off of my old 83' pickup that I'm going to use on this...


Last edited by rustED; Aug 20, 2013 at 06:26 PM.
Aug 20, 2013 | 06:39 PM
#58
Thread Starter
Registered User
iTrader: (2)
Joined: Sep 2010
Posts: 2,716
Likes: 7
From: Tri-Cities, Wa

*EDIT* ^^^This is what I was talking about, lol
Last edited by rustED; Aug 20, 2013 at 07:42 PM.
Aug 24, 2013 | 12:18 PM
#60
Thread Starter
Registered User
iTrader: (2)
Joined: Sep 2010
Posts: 2,716
Likes: 7
From: Tri-Cities, Wa
Yeah I thought about just using cable, but I already have the "limit straps" (thanks by the way, lol) and think they will work pretty good for this.
I made some hinges for the tailgate, just need to do some grinding and minor trimming to make the tailgate open properly. The outer 14ga sheet metal skin that I welded to the tailgate is rubbing not allowing the tailgate to open, so I'll fix that.
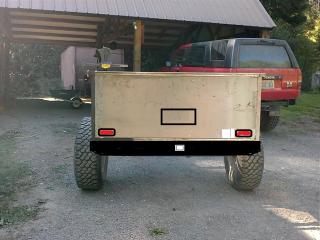
I originally planned on building a rear bumper and mounting the tail lights in the bumper, but now I'm thinking of mounting the taillights in the tailgate, and also the sinking the license plate into the tailgate as well, something like this:
I made some hinges for the tailgate, just need to do some grinding and minor trimming to make the tailgate open properly. The outer 14ga sheet metal skin that I welded to the tailgate is rubbing not allowing the tailgate to open, so I'll fix that.
I originally planned on building a rear bumper and mounting the tail lights in the bumper, but now I'm thinking of mounting the taillights in the tailgate, and also the sinking the license plate into the tailgate as well, something like this:

Last edited by rustED; Aug 24, 2013 at 12:28 PM.


