When you click on links to various merchants on this site and make a purchase, this can result in this site earning a commission. Affiliate programs and affiliations include, but are not limited to, the eBay Partner Network.
The garden's pretty good this year, tomatoes everywhere and way behind- they're still all green! I've made zucchini bread, pancakes, red beans and rice with, eggs, frittata and am trying to figure out what else I can hide zucchini in. Corn, cucumbers, peppers too. That's all so far. Oh, and blackberries!
I'm going to take pics as I put the parking brake cable back in, got the part yesterday and haven't even got it out of the package yet. In getting it out the hardest part for me was getting the rod out of the brake lever. That just took a little patience. I'll try to get it done this morning and post up when it's disgusting humid later.
Got another passenger for the 4Runner...
He's 3 month old Humane Society waif. Somebody remind me how cute he is when he starts teething, ok?
No problem- anything that helps others (as long as they remember I'm figuring this stuff out too) is a good thing.
1) It was a 1 coffee job to get it in, I may even have enough left over to have gotten it out on the same cup too.
2) SAVE all your old hardware and the old cable too for a part off it. I needed to reuse one of the old brackets (easy to do), and all the bolts, the two keepers and their corresponding pins and the two nuts. Make note of where the bolts came from, they aren't all the same length. Easy to figure out, just make sure to keep the shortest one for the bracket on the diff.
I'd say the trade-off for not raising a garden this year is well worth it and I know you feel the same way too.
Pics this afternoon when the heat index hits 100 and I'll be inside. It's 9:54 am, a balmy 86 degrees with 60% humidity. High of 93 in the forecast.
hrt4me- I've got your part. PM me or whatever you want and let me know what you want to do. Don't worry about the when, I'll hang onto it for as long as you need me to.
Replacing the parking brake cable:
FIRST THINGS FIRST. You're removing the parking brake cable. This equals no parking brake. I know you've got it in gear but chock the wheels already, you're going to be crawling around under it and I like having each and every one of you around.
Coffee! Stupid cup holder...
I'm replacing the cable with one from Advance Auto Parts. Made by Dorman, who I've had decent luck with.
Remove center console. There are 2 10mm bolts inside storage area and a 10mm bolt on either side at the front of the console by the shifters. You may have to set the brake to get the console off.
One on this side and one on the opposite side:
Also push out from behind and unplug any switches in the console:
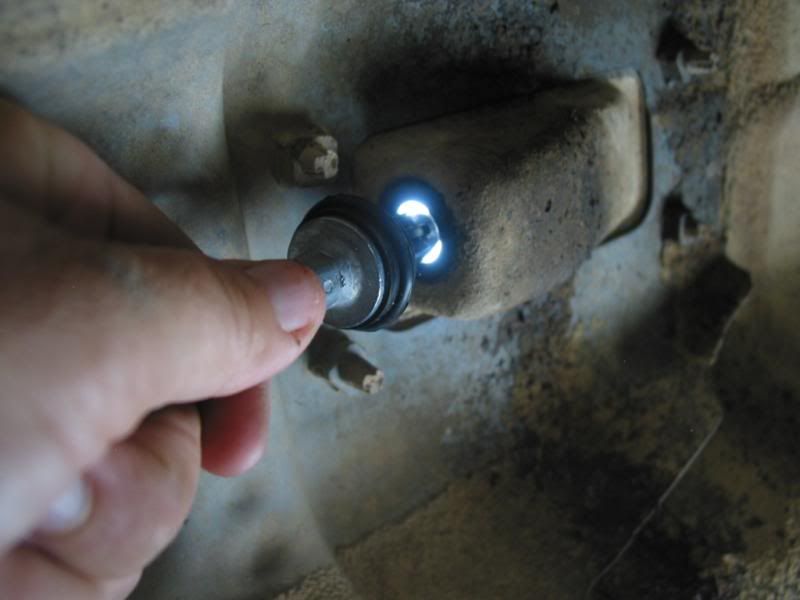
This bit was the most annoying part for me:
This rod has to go backwards...
through this tube
Fiddle with it enough and it will come out. I used pliers and pushed from the top with a screw driver. I also used a lot of patience. The cable comes out of its track on the passenger side of the brake lever.
The third is connected to the rear axle.
Another 12mm. My truck has an aftermarket bracket. Stock will be connected directly to the bracket welded onto the axle. You'll find it.
The 4th bracket is close by. 12mm unbolts from the bottom. Keep track of how this one comes apart. You will need the weird plastic washer, hang onto it along with any hardware you take off.
Undo the parking brake cable at the wheel:
pull out the retainer:
Take out the pin:
Remove the cable bracket:
Do the same at the other wheel.
Two more brackets to go. Both 12mm socket
One on the diff. Note that this is the shortest of the bolts. You'll want to remember that when you put it all back together:
and one on the right side axle, unbolts from the bottom:
Now you need to get that bracket off the old cable. I pried it open with a screw driver. It bends very easily. Bend it back over the metal fitting on the new cable. It will be right by the rear gas tank strap. The cable actually runs behind that bracket and to the left (driver) side of the rear brake line.
There's a little keeper tab. You will see the hole it fits into when you put the bracket on. There's pretty much only one way it'll go on.
So you're basically doing the same thing you did to get the cable off, except putting on where you took off.
When you get done with all that get in the truck, tighten up your nuts (up) and it's time to get the center console back on.
Find any switch connectors you had to undo. When putting the console back in be careful to run the wiring on either side of the front junk tray so they won't get pinched between it and the carpet. Pull the connectors through the holes in the center console, plug into their corresponding switches and push the switches into the console from the front side.
Bolt the console back to the truck and there you go.
If I've forgotten anything please chime in. Any questions please holler. I have never done a parking brake cable before and found it pretty simple, just remembering how the brackets were and which bolt went where (not hard). The cable was $35 bucks with coupon code and ebates. It was the only one I found beyond dealer ($140 something) that didn't exclude 265/70r16 wheels or 4x. Hopefully it works better than some of the other junk I end up with! As it arrived it looked pretty good at least.
Nice to see that the cup holder in the 3rd Gens still sucks and is in a crap spot. I hate coffee getting spilt over the electronics....
Maybe one day I'll make a clever centre console.
That would be so cool! Some people replace the older consoles with new out of the 99 and up 3rd gens because the cup holders are in that rather than the dash. The problem with those beyond the expense is there are no places for switches. I need those switch spots because all the ones in the dash are holding things and all but one of the center console spots are taken too. (The bottom left switch is waiting for a job.) I apparently have a switch addiction?
Last edited by habanero; Jul 17, 2013 at 10:33 AM.

 Jul 13, 2013 | 06:30 AM
 hehe. ... You as well, you spicy/sweet lil pepper you! Haha