
tutorials on valve cover gasket?
 Oct 25, 2012 | 01:01 PM
#1

Thread Starter
Registered User
Joined: Mar 2010
Posts: 210
Likes: 0
tutorials on valve cover gasket?
I looked around and did a search and didnt see anything...
just wondering if anyone has done one on here with lots of pics?
anything I should look out for?
do I leave the throttle body connected to the intake manifold, or separate them?
Is a felpro manifold gasket from advanced auto good enough or should I go with dealer oem?
I was thinking of installing the valve cover gaskets dry with no permatex....thoughts?
thx
Oct 25, 2012 | 01:43 PM
#2
Thread Starter
Registered User
Joined: Mar 2010
Posts: 210
Likes: 0
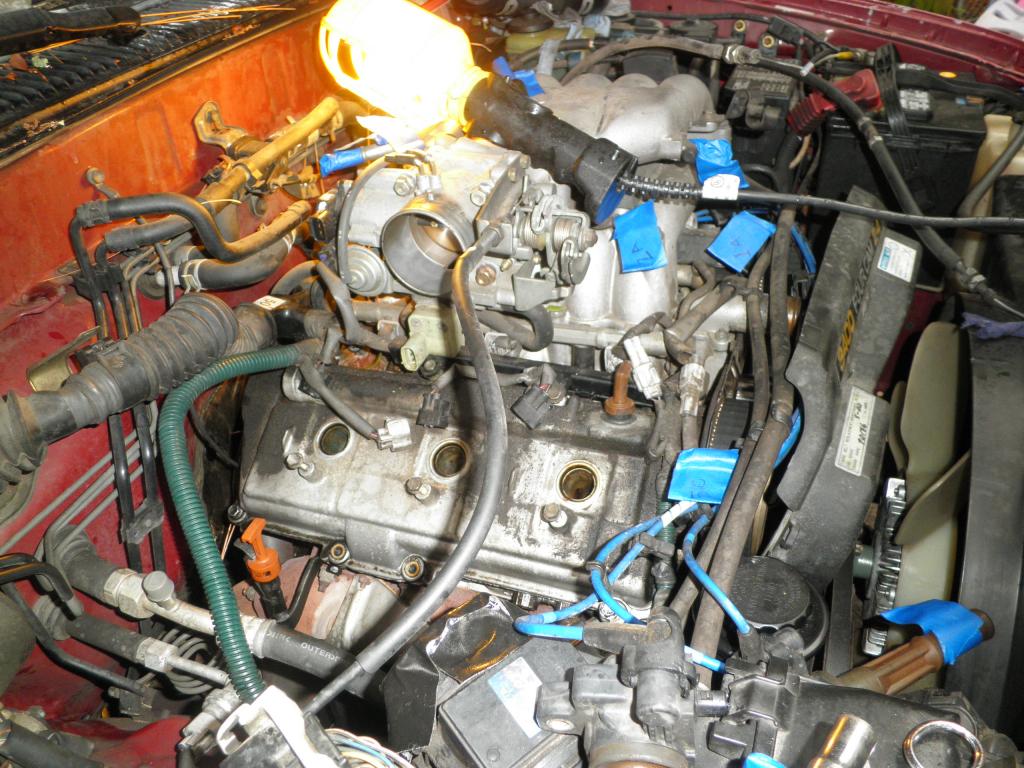
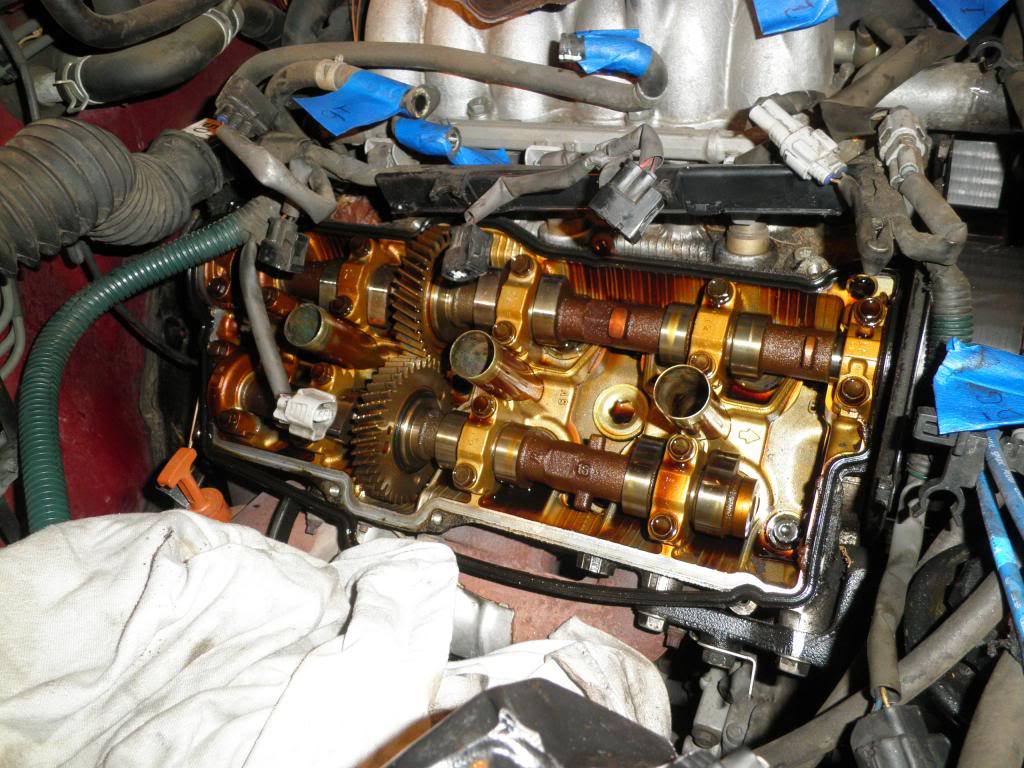
here is what i have so far
yes that is 230k miles worth of leakage
moved the upper timing cover to make room, and tagged all the vacuum lines to help with reassembly
Last edited by mattbatson; Oct 25, 2012 at 01:45 PM.
Oct 25, 2012 | 01:51 PM
#3
Thread Starter
Registered User
Joined: Mar 2010
Posts: 210
Likes: 0
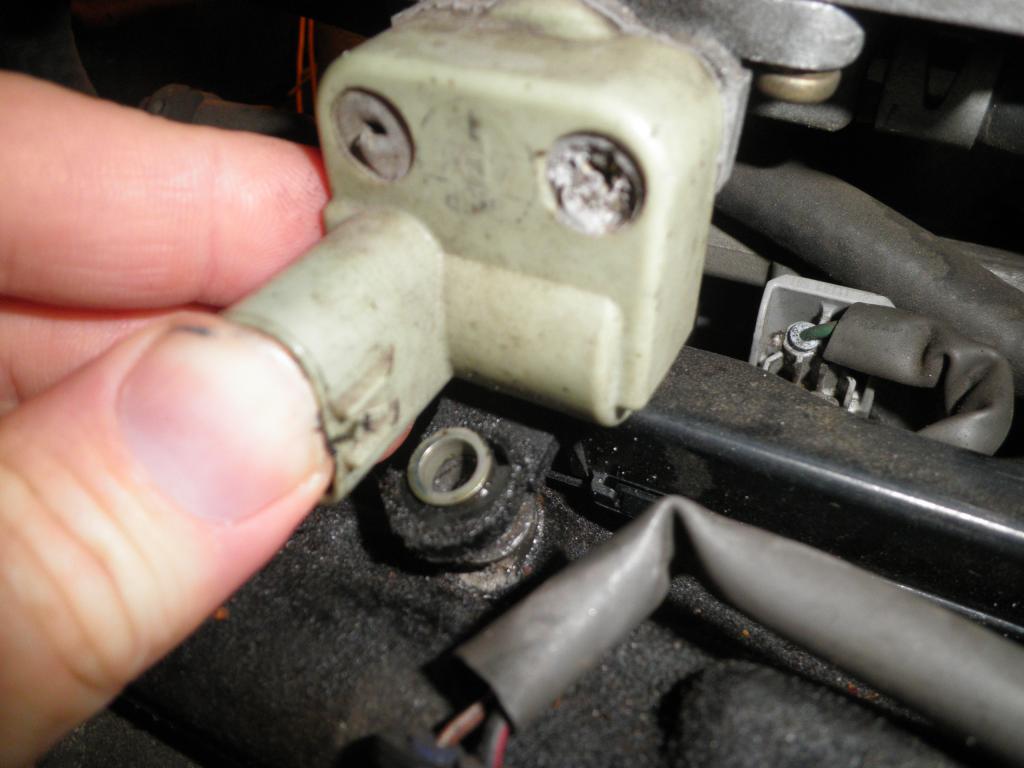
the black plastic wire loom holder thingamajig that connects at the top of the passenger side cover was found to be broken at both of its tabs
not sure if this is an issue....doesnt seem like it moves around much
 Oct 25, 2012 | 03:20 PM
#5
I just did mine, this thread helped me out. Not many pics though.
https://www.yotatech.com/forums/f2/r...37/index2.html
It looks like you labeled all the hoses with their corresponding spot. That's definitely smart. No, you do not need to remove the throttle body from the upper plentum, you do need to remove all hoses going into the throttle body, and that cruise control cable so the throttle body can be completely removed along with the upper plentum. I would get the factory gaskets, I've heard people have had problems with others.
As far as trying to re-install the new gasket, you are going to seed some adhesive on several areas, check the thread that I linked for you. Otherwise it will leak and you'll be doing the job all over again.
The broken plastic wire loom is not a big deal at all, I've never heard of anyone who this has not happened to. I completely broke mine off, removed it completely and used a good amount of gorilla tape on the wires to protect them.
You will want all new crush washers on all 16 valve cover bolts. If not it will leak. Make sure you really wipe down the edges of the valve cover well with brake cleaner along with the area of the block that they sit on. Any oily residue could cause the new gasket not to sit right and make a tight seal, and shocker, more leaks! I even went as far as putting Permatex along the seam of the valve covers after it was all bolted down, just to be extra sure nothing would leak.
It's really not too complicated, just lots of little tedious steps. Good luck!
Oct 25, 2012 | 03:33 PM
#6
Registered User
Joined: Oct 2005
Posts: 736
Likes: 1
From: Auburn/Sacramento, CA
You can leave the throttle body connected to the upper plenum or disconnect, no real advantage/disadvantage either way. Yes, replace those crush washers.
Make sure you label where every hose and plug goes and take pictures with your labels; that'll make things a lot easier during re-assembly.
For parts, this is the list of Toyota parts I used:
Per the FSM, you will need to put permatex on the corners of all the 1/2 moon plugs, and at the corners of the cam retainers; that description probably isn't too clear, but the FSM has a diagram that's pretty easy to see.
All in all, its not a tough job (easier with the engine on a stand, like I did) just take your time and don't try to rush it.
EDIT: You probably should replace the PCV valve and grommet while everything's taken apart; moderately easier now than later.
Make sure you label where every hose and plug goes and take pictures with your labels; that'll make things a lot easier during re-assembly.
For parts, this is the list of Toyota parts I used:
- 22271-62040 - Throttle Body Gasket, $7
- 17176-62040 - Plenum Gasket, $9 (you'll need 2).
- 11213-62020 - Valve Cover Gasket, $20 (you'll need 2)
- 90210-05007 - Crush Washers, $0.75 (you'll need 16)
- 11193-70010 - Spark Tube Gasket, $2.50 (you'll need 6)
Per the FSM, you will need to put permatex on the corners of all the 1/2 moon plugs, and at the corners of the cam retainers; that description probably isn't too clear, but the FSM has a diagram that's pretty easy to see.
All in all, its not a tough job (easier with the engine on a stand, like I did) just take your time and don't try to rush it.
EDIT: You probably should replace the PCV valve and grommet while everything's taken apart; moderately easier now than later.
Last edited by SacRunner; Oct 25, 2012 at 03:36 PM.
Oct 25, 2012 | 05:20 PM
#7
Registered User
Joined: Feb 2010
Posts: 570
Likes: 0
From: Outer Banks, NC
Trending Topics
Oct 25, 2012 | 07:50 PM
#8
Thread Starter
Registered User
Joined: Mar 2010
Posts: 210
Likes: 0
You can leave the throttle body connected to the upper plenum or disconnect, no real advantage/disadvantage either way. Yes, replace those crush washers.
Make sure you label where every hose and plug goes and take pictures with your labels; that'll make things a lot easier during re-assembly.
For parts, this is the list of Toyota parts I used:
Per the FSM, you will need to put permatex on the corners of all the 1/2 moon plugs, and at the corners of the cam retainers; that description probably isn't too clear, but the FSM has a diagram that's pretty easy to see.
All in all, its not a tough job (easier with the engine on a stand, like I did) just take your time and don't try to rush it.
EDIT: You probably should replace the PCV valve and grommet while everything's taken apart; moderately easier now than later.
Make sure you label where every hose and plug goes and take pictures with your labels; that'll make things a lot easier during re-assembly.
For parts, this is the list of Toyota parts I used:
- 22271-62040 - Throttle Body Gasket, $7
- 17176-62040 - Plenum Gasket, $9 (you'll need 2).
- 11213-62020 - Valve Cover Gasket, $20 (you'll need 2)
- 90210-05007 - Crush Washers, $0.75 (you'll need 16)
- 11193-70010 - Spark Tube Gasket, $2.50 (you'll need 6)
Per the FSM, you will need to put permatex on the corners of all the 1/2 moon plugs, and at the corners of the cam retainers; that description probably isn't too clear, but the FSM has a diagram that's pretty easy to see.
All in all, its not a tough job (easier with the engine on a stand, like I did) just take your time and don't try to rush it.
EDIT: You probably should replace the PCV valve and grommet while everything's taken apart; moderately easier now than later.
I'll look up the FSM to see where the permatex goes
I got spark plug tube gaskets with my valve cover gaskets....I bought felpro from advanced auto.
I've used felpro valve cover gaskets on my honda's with great success, and figured they would be fine.
If anyone knows different, let me know and I'll go to the stealership
Oct 25, 2012 | 08:00 PM
#9
Thread Starter
Registered User
Joined: Mar 2010
Posts: 210
Likes: 0
I just did mine, this thread helped me out. Not many pics though.
https://www.yotatech.com/forums/f2/r...37/index2.html
It looks like you labeled all the hoses with their corresponding spot. That's definitely smart. No, you do not need to remove the throttle body from the upper plentum, you do need to remove all hoses going into the throttle body, and that cruise control cable so the throttle body can be completely removed along with the upper plentum. I would get the factory gaskets, I've heard people have had problems with others.
As far as trying to re-install the new gasket, you are going to seed some adhesive on several areas, check the thread that I linked for you. Otherwise it will leak and you'll be doing the job all over again.
The broken plastic wire loom is not a big deal at all, I've never heard of anyone who this has not happened to. I completely broke mine off, removed it completely and used a good amount of gorilla tape on the wires to protect them.
You will want all new crush washers on all 16 valve cover bolts. If not it will leak. Make sure you really wipe down the edges of the valve cover well with brake cleaner along with the area of the block that they sit on. Any oily residue could cause the new gasket not to sit right and make a tight seal, and shocker, more leaks! I even went as far as putting Permatex along the seam of the valve covers after it was all bolted down, just to be extra sure nothing would leak.
It's really not too complicated, just lots of little tedious steps. Good luck!
https://www.yotatech.com/forums/f2/r...37/index2.html
It looks like you labeled all the hoses with their corresponding spot. That's definitely smart. No, you do not need to remove the throttle body from the upper plentum, you do need to remove all hoses going into the throttle body, and that cruise control cable so the throttle body can be completely removed along with the upper plentum. I would get the factory gaskets, I've heard people have had problems with others.
As far as trying to re-install the new gasket, you are going to seed some adhesive on several areas, check the thread that I linked for you. Otherwise it will leak and you'll be doing the job all over again.
The broken plastic wire loom is not a big deal at all, I've never heard of anyone who this has not happened to. I completely broke mine off, removed it completely and used a good amount of gorilla tape on the wires to protect them.
You will want all new crush washers on all 16 valve cover bolts. If not it will leak. Make sure you really wipe down the edges of the valve cover well with brake cleaner along with the area of the block that they sit on. Any oily residue could cause the new gasket not to sit right and make a tight seal, and shocker, more leaks! I even went as far as putting Permatex along the seam of the valve covers after it was all bolted down, just to be extra sure nothing would leak.
It's really not too complicated, just lots of little tedious steps. Good luck!
thx for the tips
I'll plan on doing the bolt grommets then.
and thanks for the thread link
 Oct 25, 2012 | 09:01 PM
#10
Thread Starter
Registered User
Joined: Mar 2010
Posts: 210
Likes: 0
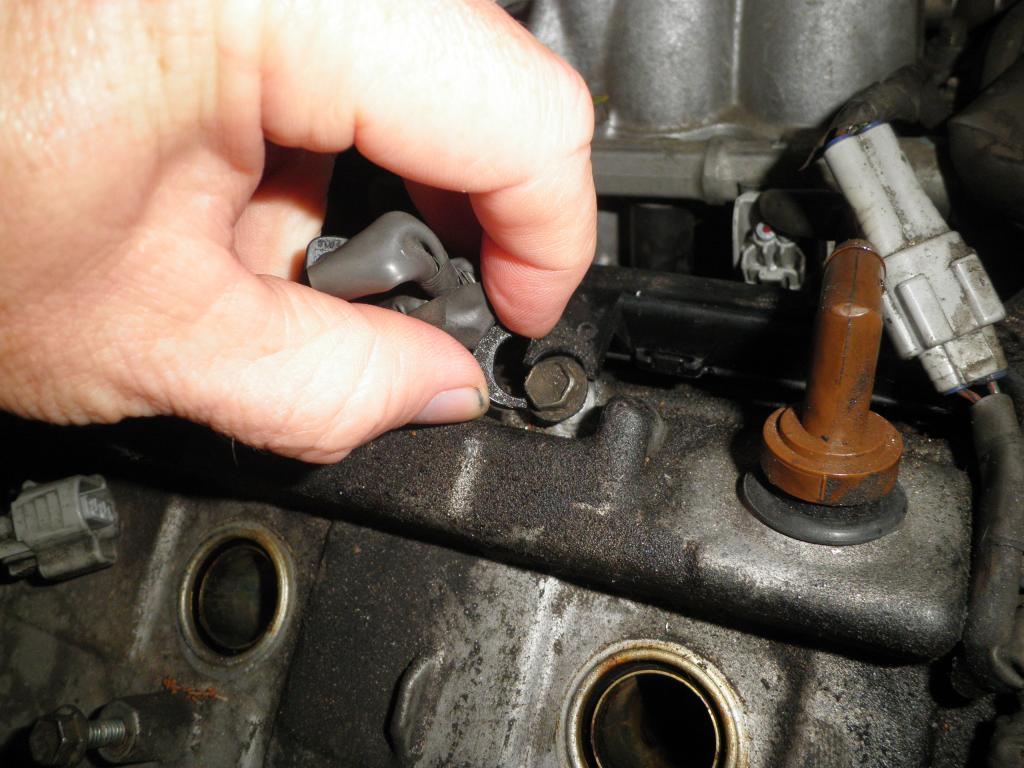
so here is what a 230K mile engine looks like

looks good for another 230K in my opinion
One note, do I need to get toyota FIPG or will just some off the shelf permatex work fine? For the nineties on the half moons and such?
thx
oh yeah, and i'm thinking of replacing those two coolant lines/hoses coming off the throttle body while it is all easy to get to.
Figure with the mileage/age of my truck, it is a good idea
Last edited by mattbatson; Oct 25, 2012 at 09:03 PM.
Oct 29, 2012 | 01:36 PM
#12
Thread Starter
Registered User
Joined: Mar 2010
Posts: 210
Likes: 0
Oct 29, 2012 | 03:07 PM
#13
Contributing Member
Joined: Nov 2010
Posts: 5,125
Likes: 4
From: Columbia River Gorge, Oregon...east side
I've never had an issue using Ultra Black RTV before starting to use the black FIPG. Be sure that all the oil is off the head and valve cover surface before applying the RTV/FIPG.
Last edited by rworegon; Oct 29, 2012 at 03:09 PM.
Oct 30, 2012 | 07:35 AM
#14
Thread Starter
Registered User
Joined: Mar 2010
Posts: 210
Likes: 0
ok, thx
i already bought some permatex gasket maker, which I figured was the same as FIPG.
I suspect it will work fine.
peace
Nov 4, 2012 | 06:14 AM
#15
Thread Starter
Registered User
Joined: Mar 2010
Posts: 210
Likes: 0
Ok, ran into a problem, and I'm betting that anyone else doing this job would experience the same issue.
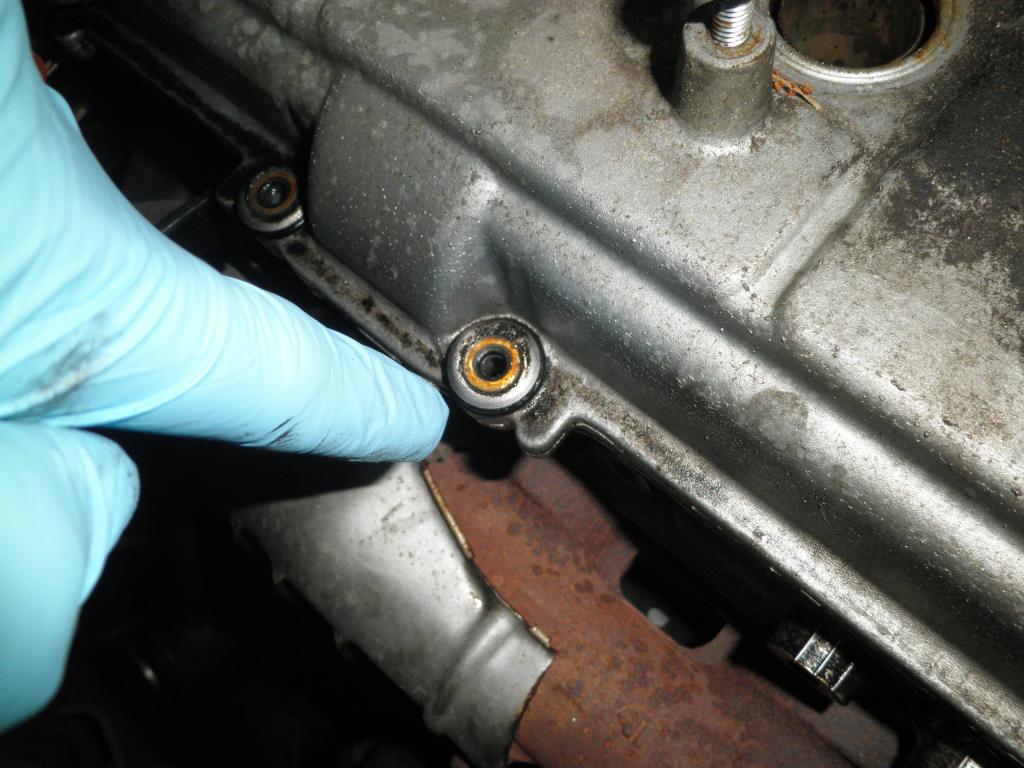
the spark plug hole rubber o ring gaskets are very difficult to install.
I actually damaged two of them trying to get them in.
There are little metal tabs that hold the seals in place.
I ended up bending these out of the way in order to use a 36mm socket and hammer to pound the seal in.
Even with the socket and hammer I still couldnt get the seals seated as far down as they were at the factory.
here is a pic with the seal out and the metal tab bent up
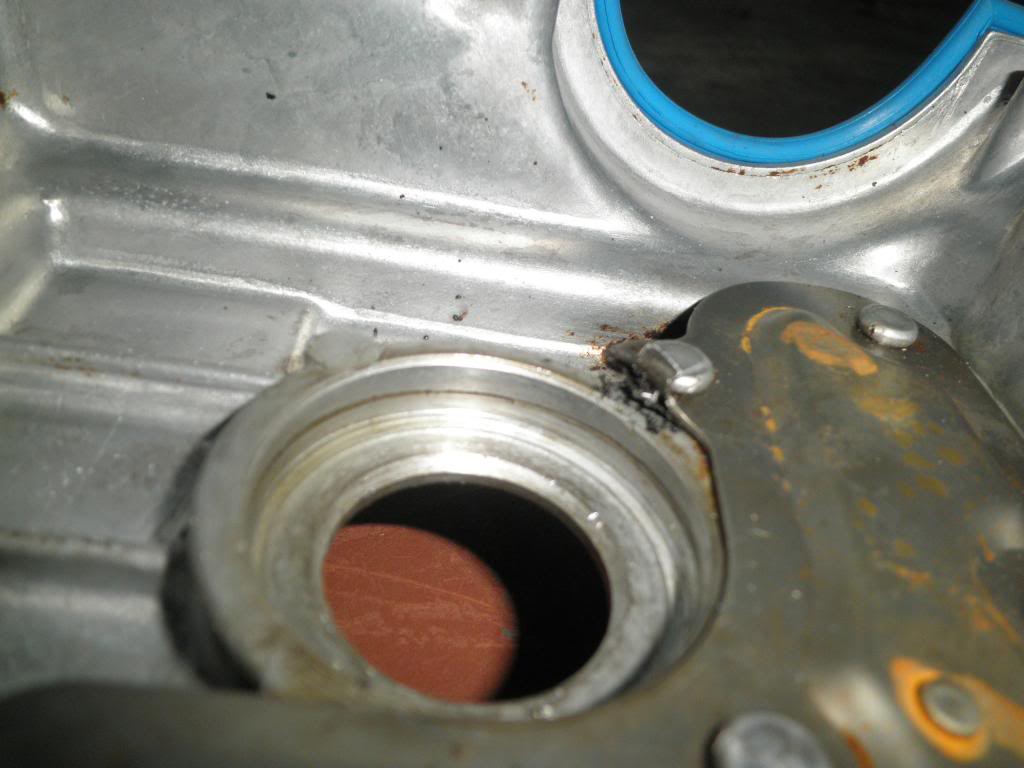
here is the seal installed, but as you can see not flush
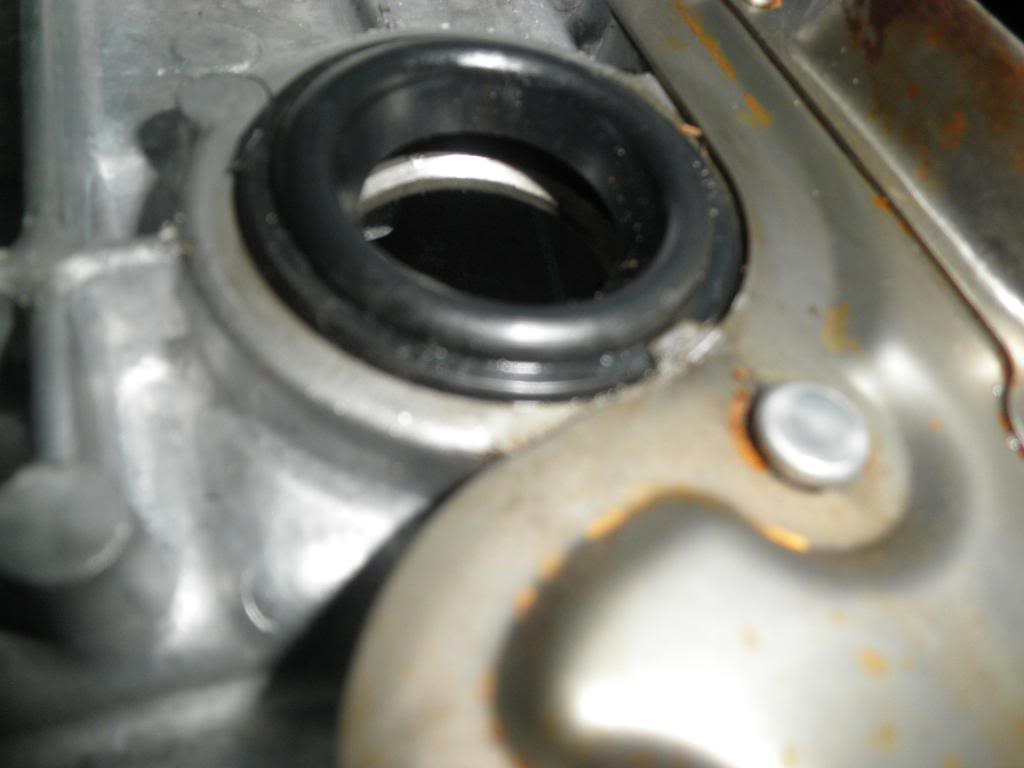
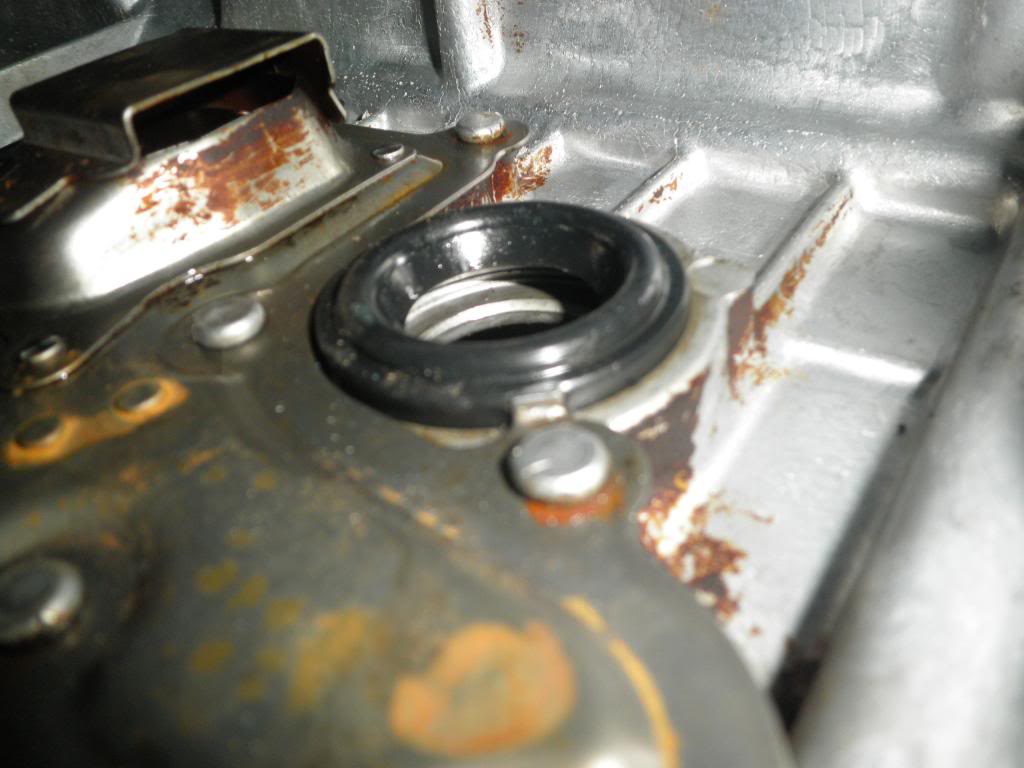
these are the kinds of things that I imagine weekend warriors like myself would like to be aware of ahead of time rather than running into them unexpectedly in the middle of the job and then having to try and figure it out.
So, after I'm done, I think I will do a tutorial, as it seems I can fill some gaps that other threads on the subject didnt mention.
the spark plug hole rubber o ring gaskets are very difficult to install.
I actually damaged two of them trying to get them in.
There are little metal tabs that hold the seals in place.
I ended up bending these out of the way in order to use a 36mm socket and hammer to pound the seal in.
Even with the socket and hammer I still couldnt get the seals seated as far down as they were at the factory.
here is a pic with the seal out and the metal tab bent up
here is the seal installed, but as you can see not flush
these are the kinds of things that I imagine weekend warriors like myself would like to be aware of ahead of time rather than running into them unexpectedly in the middle of the job and then having to try and figure it out.
So, after I'm done, I think I will do a tutorial, as it seems I can fill some gaps that other threads on the subject didnt mention.
Nov 4, 2012 | 06:44 AM
#16
Contributing Member
Joined: Nov 2010
Posts: 5,125
Likes: 4
From: Columbia River Gorge, Oregon...east side
I did not bend the tab up and had no problem tapping them down as shown in post 84 below. Maybe put a little oil on the edge on the seal to help it slip into place?
http://www.ultimateyota.com/index.ph...&topic=2241.75
http://www.ultimateyota.com/index.ph...&topic=2241.75
Nov 4, 2012 | 07:57 AM
#17
Thread Starter
Registered User
Joined: Mar 2010
Posts: 210
Likes: 0
I did not bend the tab up and had no problem tapping them down as shown in post 84 below. Maybe put a little oil on the edge on the seal to help it slip into place?
http://www.ultimateyota.com/index.ph...&topic=2241.75
http://www.ultimateyota.com/index.ph...&topic=2241.75
i used wd-40 on the seals, as this is an old trick I had done in the past...eventually the wd-40 dissolves and the seal will be firmly in place.
If I didnt bend the tabs back, then that meant I had to start the seals in at a severe angle...in other words not square.
I tried this, which is how I damaged two seals, but the part of the seal opposite the metal tabs, sticking way up out of the hole, were impossible to get seated.
it just seems like a really tight fit.
Now, disclaimer...
I bought these from advanced auto, they are not factory oem.
I wonder if this will be a problem.
 Nov 4, 2012 | 11:33 AM
#19
Thread Starter
Registered User
Joined: Mar 2010
Posts: 210
Likes: 0
maybe that is it then
I damaged two of the advanced auto ones, so I will go to the dealer and pick up three for the other side and see if that is what makes the difference.
I'll keep ya posted


