
Terrys87 88 4Runner Restoration/Build thread
 Sep 1, 2011 | 04:19 PM
#461
Here you go, Terry.... hope this helps... I can take pics of whatever else you want, but my puter is CRAWLING again, all the sudden... so I'm not even gonna deal with Youtube, sorry, lol. >>>>>>>>>

Sep 1, 2011 | 05:12 PM
#462
Thread Starter
Super Moderator
iTrader: (1)
Joined: Aug 2008
Posts: 11,787
Likes: 28
From: Anderson Missouri
Thanks Chef.. I am posting it again next to your post to make it easier to compare. I just got home from flag football practice for the kiddos and it is dark, but will get a better pic here in the morning. Thats a great pic and I can get alot of detail from that one. I really appreciate it.
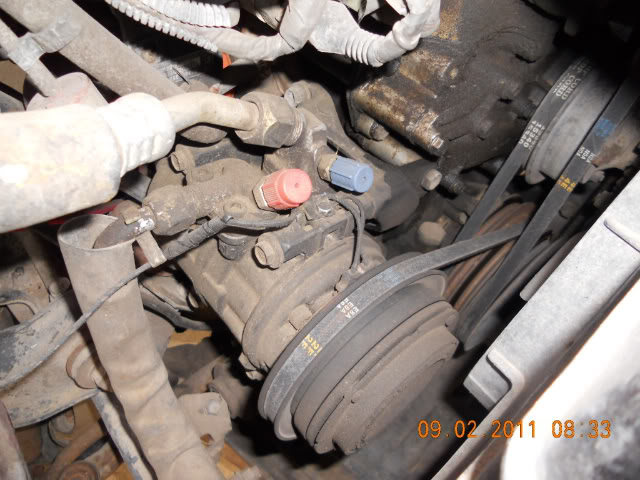
My metal hose comes straight off the front with the port to the rear, as yours is off to the side. My left port looks about same as yours but not the right one.
My metal hose comes straight off the front with the port to the rear, as yours is off to the side. My left port looks about same as yours but not the right one.
Last edited by Terrys87; Sep 1, 2011 at 05:16 PM.
Sep 2, 2011 | 06:03 AM
#463
Registered User
Joined: Mar 2011
Posts: 28
Likes: 0
From: East Texas
Good Morning Terry,
Been keeping up with your build thread and you're doing a great job, lots of inspiration to be had.
I saw your request for pics and mine look like Chef's. Hope these help.
A little ways back:
Up close:
CoreyC has a point, in August '88 they switched to a different compressor. These pics may not do any good for you...
Last edited by 86TonkaToy4X4; Sep 2, 2011 at 07:05 AM.
Sep 2, 2011 | 06:14 AM
#464
Registered User


Joined: May 2005
Posts: 1,979
Likes: 233
From: S. FL
Terry - Not the best pic, but only one handy. This is my '88, you can kindof see that I had to put a right angle adapter on the low side port to be able to get to it. My brother has an 88 4Runner and his is exactly the same as mine. I'm wondering if 87 & 88 were different as far as that low side compressor port.

Sep 2, 2011 | 11:02 AM
#465
I agree with the late 87-88 compressor change.... But what I don't get, nor see, in the pics or 88's that I've seen .... is the Low Pressure Side facing THE REAR? I'ma wait for more clear pics from Terry....... TERRY????? hahaha!
Best wishes, man.... I will gladly walk you through where every O-ring is, etc., if you wanna/need2 end up restoring the system a lil bit(sealing it up, more so).
Best wishes, man.... I will gladly walk you through where every O-ring is, etc., if you wanna/need2 end up restoring the system a lil bit(sealing it up, more so).
Sep 2, 2011 | 11:04 AM
#466
Is it possible that the PO took that valve off another compressor, cuz the seals failed(VERY COMMON, ...mine had!).... Something like a transversely mounted motor where the valve actually WOULD be mounted the opposite direction(maybe cuz he stripped the low side valve and didn't wanna replace the compressor??????).... and mounted it on your rigs compressor..... just so he could have it cleared, filled?
Sep 2, 2011 | 05:01 PM
#467
Thread Starter
Super Moderator
iTrader: (1)
Joined: Aug 2008
Posts: 11,787
Likes: 28
From: Anderson Missouri
Hey guys, I really appreciate you putting pics up. That sure helps when you get into a pickle. Sometimes a picture really is worth a 1000 words. I was starting to think I had one that may have been rigged, but seeing coryc85 has given me a little hope.
I am also going to use your pics to make sure mine is mounted in the proper location. I picked up the right angle adapter, but it still looks like it is going to be a tight fit.
Chef..I think I did pick the more difficult year to work on. I have seen on your post to Dutchbelly and other post about the injectors and now this. I will be getting with you on the o-rings. I am going to do most of the work to help keep the cost down. Dont really think it is that difficult.
86TonkaToy4x4..Thanks for the words of inspiration. I am trying to make my build to help others that are just getting into this and show that it can be done really reasonable. I remeber when I was new to this and Im still learning, that someone can look at this thread and say "I can do that".
coryc85..Thanks for your pic. Looks like it is still going to be difficult about getting that charged with the righ angle on it. Never would thought of a right angle adapter and had a tough time finding one but I finally did. Like Chef said, wonder if some one took a different model and put these on our trucks. It would be practically impossible to charge these.
I really appreciate you guys stepping up and helping me out. I was having visions of having to go and get anthor compressor. I traded a good one for some parts awhile back, just knowing I woul probably need it. I have one on my 86 parts truck but it is in snake haven and I want to make it my next project and would be one more problem to deal with later. Thanks
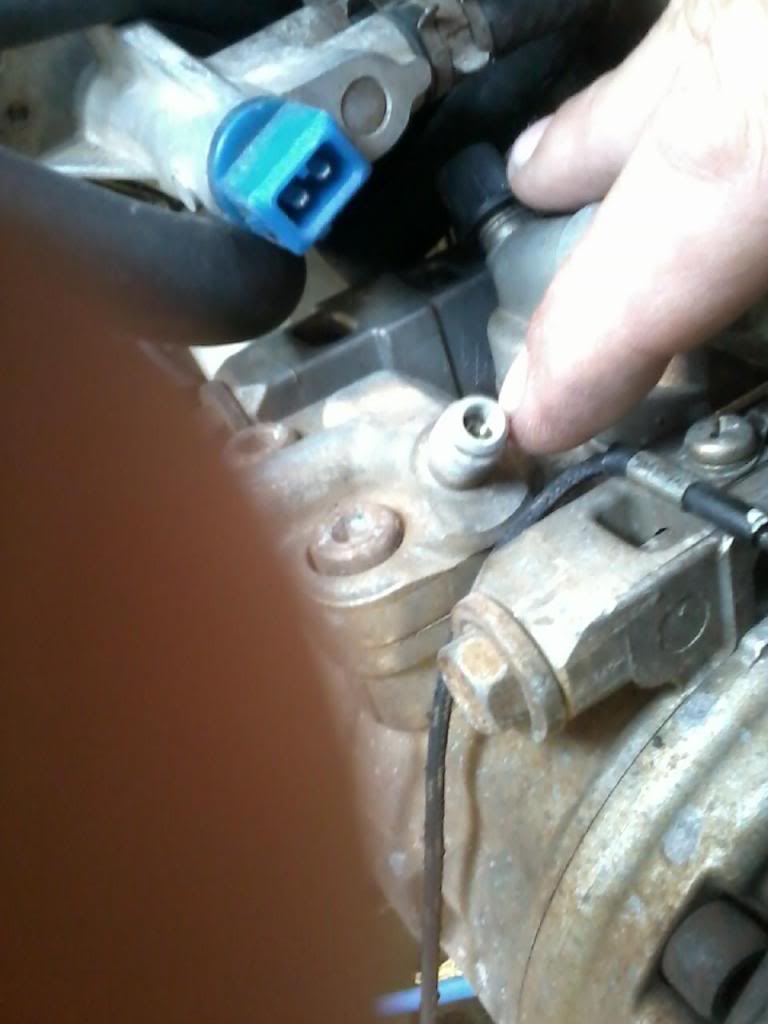
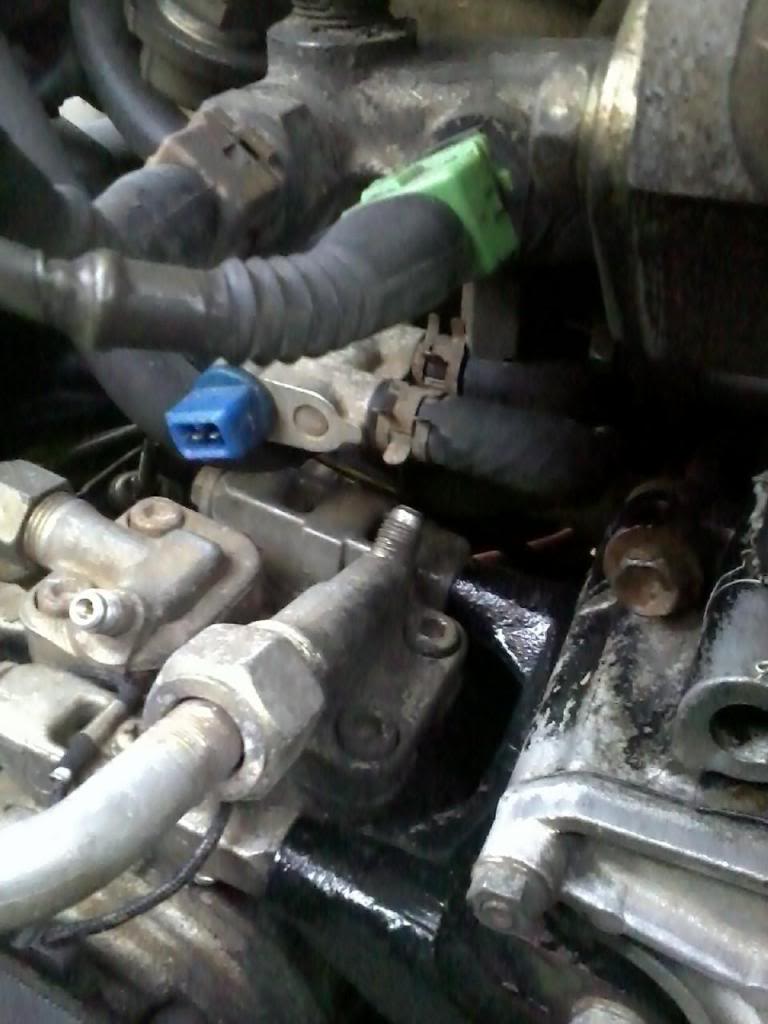
Here is a better shot. I dont know what goes on that blue plug. I dont have any connectors disconnected. I have looked several times.
I am also going to use your pics to make sure mine is mounted in the proper location. I picked up the right angle adapter, but it still looks like it is going to be a tight fit.
Chef..I think I did pick the more difficult year to work on. I have seen on your post to Dutchbelly and other post about the injectors and now this. I will be getting with you on the o-rings. I am going to do most of the work to help keep the cost down. Dont really think it is that difficult.
86TonkaToy4x4..Thanks for the words of inspiration. I am trying to make my build to help others that are just getting into this and show that it can be done really reasonable. I remeber when I was new to this and Im still learning, that someone can look at this thread and say "I can do that".
coryc85..Thanks for your pic. Looks like it is still going to be difficult about getting that charged with the righ angle on it. Never would thought of a right angle adapter and had a tough time finding one but I finally did. Like Chef said, wonder if some one took a different model and put these on our trucks. It would be practically impossible to charge these.
I really appreciate you guys stepping up and helping me out. I was having visions of having to go and get anthor compressor. I traded a good one for some parts awhile back, just knowing I woul probably need it. I have one on my 86 parts truck but it is in snake haven and I want to make it my next project and would be one more problem to deal with later. Thanks
Here is a better shot. I dont know what goes on that blue plug. I dont have any connectors disconnected. I have looked several times.
Sep 2, 2011 | 09:07 PM
#468
That blue thing is where my IACV is, ....but my plug is on the OPPOSITE SIDE, as well! lol. The IACV has 2 coolant lines like that, lil diff on mine... and so I'm not sure since I can't see what is on the other side of that.
Sep 3, 2011 | 02:29 AM
#469
Thread Starter
Super Moderator
iTrader: (1)
Joined: Aug 2008
Posts: 11,787
Likes: 28
From: Anderson Missouri
I got my carpet on order, should be here next Friday or Monday due to the holiday. I ordered it from http://www.stockinteriors.com/reques...20110903061141 got the 825 maroon plush cut pile. Should go well with my interior.
I still need to pick up a roll of Peel and Seal to get under the front seats when I install the carpet. Didnt get the trunk area carpet yet but will at a later date. Had to work with the misses to get the front half. We just get to tighten the belt for the next couple of weeks.
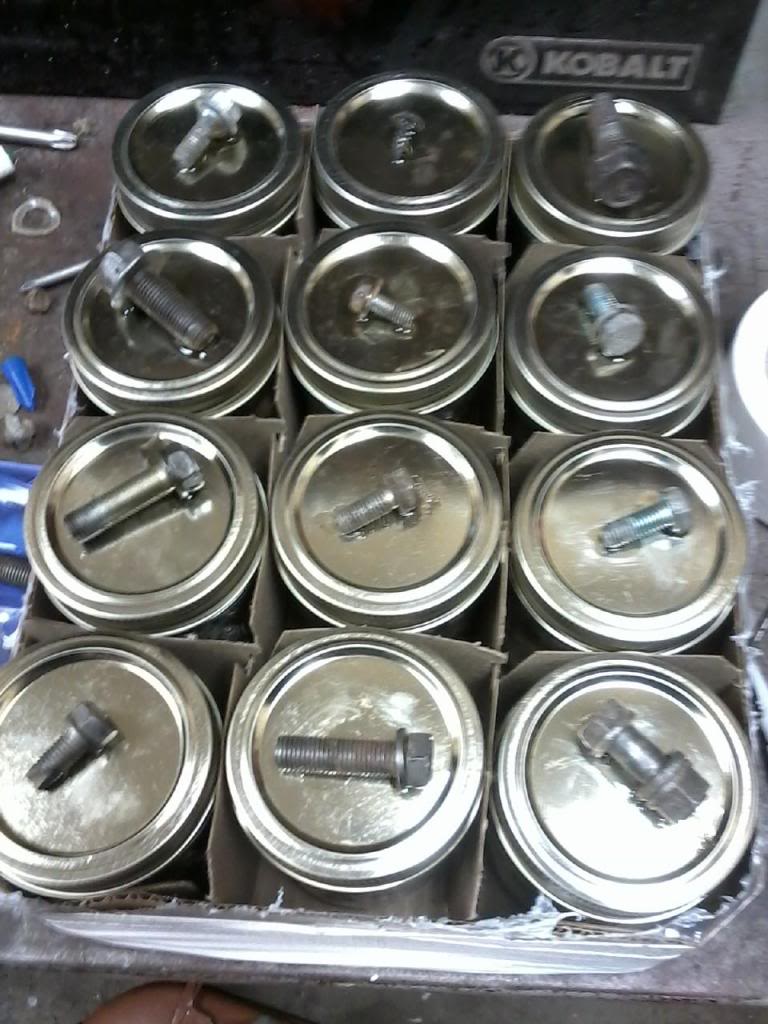
Also today, I got tired of digging through my 2 gallon bucket whenever I needed a bolt or screw. We were in Dollar General and I found a case of pint jars for less then 8 bucks. Got all of the nuts and bolts seperated. Anytime I am in a junk yard or come across some nuts and bolts, I get them. Salvage guys are use to seeing me with several handfuls all of the time. Has saved me lots of head aches. I still have a Preston Antifreeze jug full that I need to seperate. I glued a sample bolt on top. Should make life a little easier.
I still need to pick up a roll of Peel and Seal to get under the front seats when I install the carpet. Didnt get the trunk area carpet yet but will at a later date. Had to work with the misses to get the front half. We just get to tighten the belt for the next couple of weeks.
Also today, I got tired of digging through my 2 gallon bucket whenever I needed a bolt or screw. We were in Dollar General and I found a case of pint jars for less then 8 bucks. Got all of the nuts and bolts seperated. Anytime I am in a junk yard or come across some nuts and bolts, I get them. Salvage guys are use to seeing me with several handfuls all of the time. Has saved me lots of head aches. I still have a Preston Antifreeze jug full that I need to seperate. I glued a sample bolt on top. Should make life a little easier.
Sep 3, 2011 | 02:40 AM
#470
Thread Starter
Super Moderator
iTrader: (1)
Joined: Aug 2008
Posts: 11,787
Likes: 28
From: Anderson Missouri
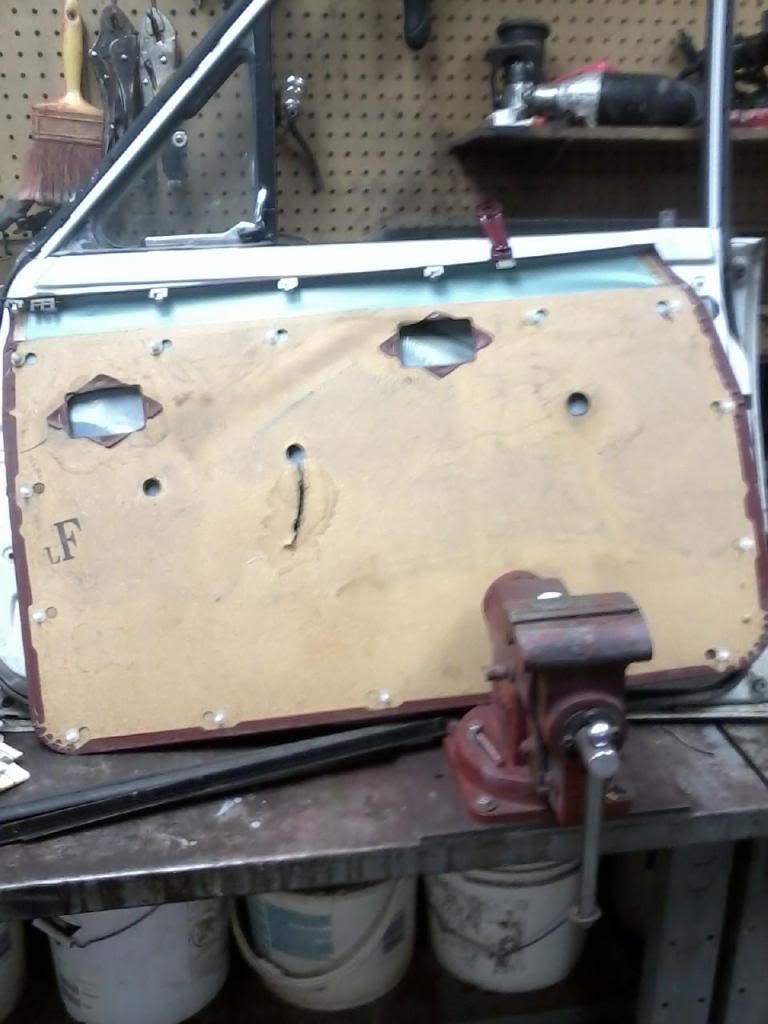
The wife has been mentioning that the passenger door had a big rip in it. I tried looking in the boneyard Thursday and Friday for a red door panel with no luck. So I took a gray door panel I had in the shed and painted it red.
I really wanted to keep my pair of gray panels and didntwant to paint one. I went ahead and did it though. I kept my old panel just incase I ever needed it for some reason, but also used it to practice on and help keep my spare door sealed up. I just followed the Haynes manual for getting it apart and it did a great job of explaining.
Still waiting for things to dry but will get a pic of it on the door soon. Here is what I started with. If I can get a red door panel later, I will but for now this will work.
Parts Door

Back side of old panel. If you remove your panel, watch out for the far right clip. I have my window crank maring the clip. It likes to pop out.
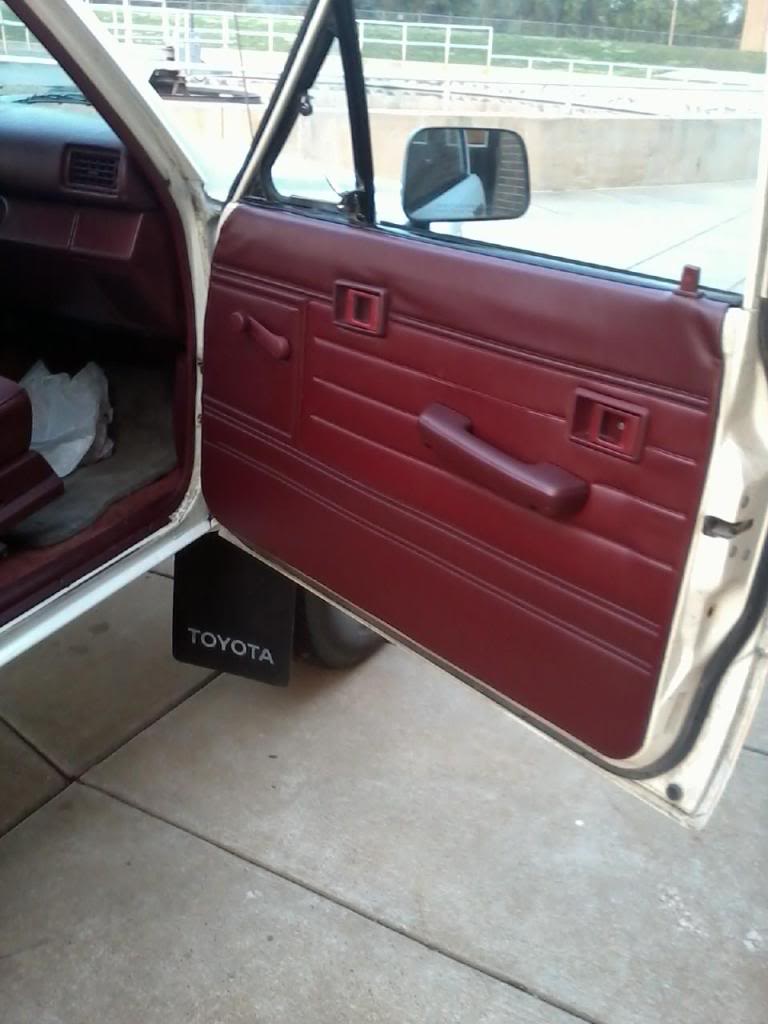
Old Panel on door and new panel painted. Seems like the color is a shade off but still looks better then it did.
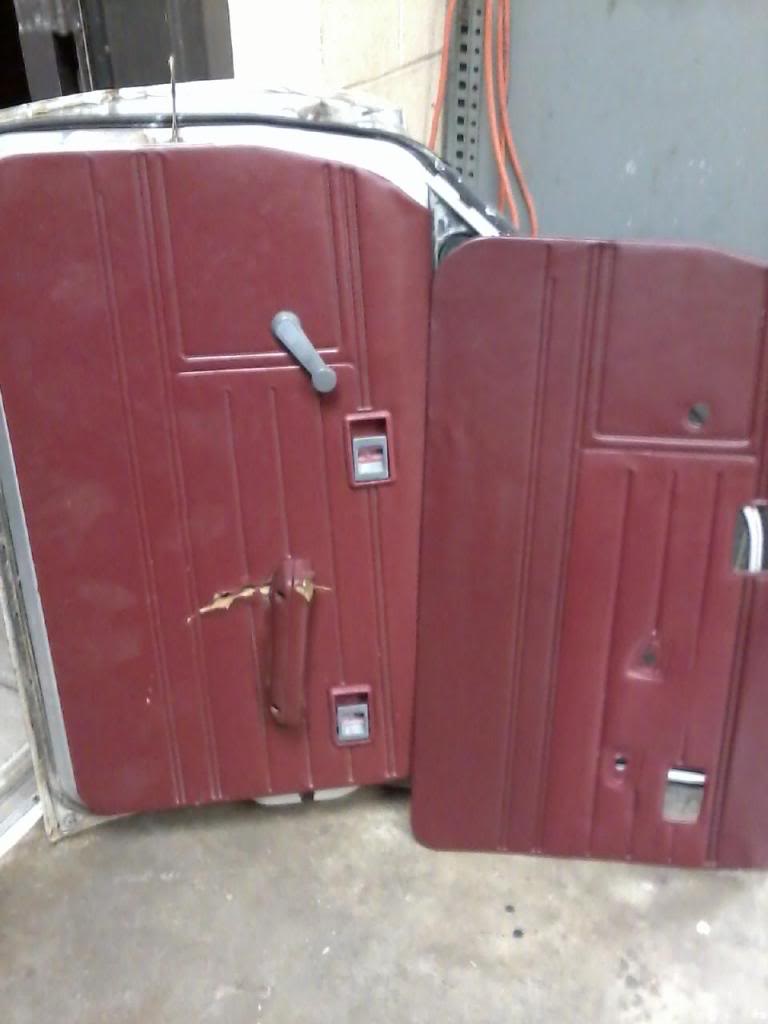
Here is the door finished. I need to work the wrinkle out by the lock.
I really wanted to keep my pair of gray panels and didntwant to paint one. I went ahead and did it though. I kept my old panel just incase I ever needed it for some reason, but also used it to practice on and help keep my spare door sealed up. I just followed the Haynes manual for getting it apart and it did a great job of explaining.
Still waiting for things to dry but will get a pic of it on the door soon. Here is what I started with. If I can get a red door panel later, I will but for now this will work.
Parts Door
Back side of old panel. If you remove your panel, watch out for the far right clip. I have my window crank maring the clip. It likes to pop out.
Old Panel on door and new panel painted. Seems like the color is a shade off but still looks better then it did.
Here is the door finished. I need to work the wrinkle out by the lock.
Last edited by Terrys87; Sep 3, 2011 at 06:09 AM.
Sep 3, 2011 | 02:46 AM
#471
Thread Starter
Super Moderator
iTrader: (1)
Joined: Aug 2008
Posts: 11,787
Likes: 28
From: Anderson Missouri
Once I get my carpet, I am down to getting
AC- am working on it
Seats
Shocks
Transfer Case
Left Front Mud Flap
Back Panels in the trunk area that cover jack and other side
Stereo
I got 292,000 miles on the truck and am wanting to have it in new condition by 300,000. I drive about 1500 miles a month.
AC- am working on it
Seats
Shocks
Transfer Case
Left Front Mud Flap
Back Panels in the trunk area that cover jack and other side
Stereo
I got 292,000 miles on the truck and am wanting to have it in new condition by 300,000. I drive about 1500 miles a month.
Sep 3, 2011 | 07:54 AM
#472
Registered User
Joined: May 2005
Posts: 1,979
Likes: 233
From: S. FL
Terry - thanks for the response in my thread. I do like the TG header, it's definitely got a little more grunt than stock. I also bought the air injection block off plates. The other thing I like is that it eliminates that exhaust joint right there where the downpipe meets the stock manifold.
Anyway, about the AC, my low side port faces the rear, and my brother's also faces the rear. His truck is from Lousiana, mine from Florida, so I'm pretty sure they are both original. I'm guessing that it wasn't an issue with R12, but once you put that big R134 adapter on there it gets real tight. The other issue I found is that the little hose that comes on most of those r134 recharge cans is way too short to reach it while the engine is running. I have the AC gauge set from Harbor Freight and it reaches no problem. My AC worked great last summer when I recharged it, it eventually stopped and now I'm trying to get it back working again, so I'll be watching your thread Terry for tips.
Anyway, about the AC, my low side port faces the rear, and my brother's also faces the rear. His truck is from Lousiana, mine from Florida, so I'm pretty sure they are both original. I'm guessing that it wasn't an issue with R12, but once you put that big R134 adapter on there it gets real tight. The other issue I found is that the little hose that comes on most of those r134 recharge cans is way too short to reach it while the engine is running. I have the AC gauge set from Harbor Freight and it reaches no problem. My AC worked great last summer when I recharged it, it eventually stopped and now I'm trying to get it back working again, so I'll be watching your thread Terry for tips.
Sep 5, 2011 | 12:05 AM
#473
Thread Starter
Super Moderator
iTrader: (1)
Joined: Aug 2008
Posts: 11,787
Likes: 28
From: Anderson Missouri
I copied alot of this post that I put on Chefs thread, but am starting to look into this problem.
Today as I was driving, sometimes mine is real quiet and other times I get a air noise. Today I started checking into the air leak and noticed it was coming from the top, rear corners and with a little pull, I could seal the noise off.
I got to thinking maybe I just need to readjust the doors, but further inspection showed that my door hinges have a sleeve the covers the pin that holds the to hinges together. It looks like it might be that the hinges may have cut into the sleeve, causing alot of slop.
I was wondering if this may be some cause of your noise. You can tell quick by picking up on the end of your door and see how much movement you may have. I havent looked into the fix for this just yet, but am hoping that maybe I can just replace the sleeve and not the whole door hinge.
Found this thread and will see where to get the parts. https://www.yotatech.com/forums/f116...shings-181522/
Bushing http://cgi.ebay.com/ebaymotors/25-Qt...item19c80f9f18 moxiemarket on ebay
Another possibility. http://cgi.ebay.com/ebaymotors/TOYOT...item27ab4e52af
Last edited by Terrys87; Sep 5, 2011 at 12:25 AM.
Sep 5, 2011 | 12:09 PM
#475
Registered User
Joined: Apr 2011
Posts: 428
Likes: 0
From: Southern Ontario
I like the glued bolt on top of the jar idea. I have a bucket of spare bolts from my parts truck, but they're all mixed together, and it's next to impossible to find the one I need. Do you have any good before pics of the whole interior before you started all this restoration progress? Every time I stop in you've tweaked and smoothed out something new, would be interesting to see a few comparison pics side by side from before you started to now.
Sep 5, 2011 | 01:12 PM
#476
Registered User
Joined: Aug 2009
Posts: 2,173
Likes: 0
From: hohenwald tn.
just trying to catch up on your thread terry, as always great work on the interior parts that thing is gonna be sweet, cant help ya on the a/c Im no where near that far along yet, Im sure youll get it.
Sep 5, 2011 | 07:44 PM
#477
Thread Starter
Super Moderator
iTrader: (1)
Joined: Aug 2008
Posts: 11,787
Likes: 28
From: Anderson Missouri
Hello Chef.. I tried checking Toyota and parts was closed today, but may have found a substitute and will check them tomorrow when I get off of work and a couple of parts stores.
Hello Dutchbelly. I went through my Photobucket Album and didnt find any pics. I thought I had took some but apparently I didnt. I wish I would have now as it was in bad shape and it looks 10 times better then it did. It would of made a good Before and After.
Hello Jason.. Good to hear from you, know you probably been out for awhile. 2 days ago we were triple digit heat and last nite I had to run the heater as it was cold. Breaking out the jackets now.
I am waiting on my carpet to get in. Just getting small detail things done so whenit gets here, I will be able to remove everything and put down the last of the Peel and Seal ( need to get some more of it) and doing the small things that help put the finishing touch on it.
That is one thing that is nice is when waiting on parts there is always some free stuff that just takes a little elbow grease which I have lots of.
Sep 6, 2011 | 01:35 AM
#478
Thread Starter
Super Moderator
iTrader: (1)
Joined: Aug 2008
Posts: 11,787
Likes: 28
From: Anderson Missouri
I had a burnt bulb in my SR5 Cluster guage, so decided to pull it and fix the bulb, and while at it I wanted to adjust the potintiometer as mine is from a V6. I was looking at the SR5 guage swap thread and it say you can adjust the V6 guage to a 22re by adding about 20k ohms to the potoentiometer.
I dont have a hand held tach and have my volt meter on loan so thought I would do something to get it a little closer. It was running about a 1000 rpm off. I am guessing an 88 cluster is different from the rest as I had to pull the tach needle off and remove the 2 screws to get to the potientiometer.
I put the tach needle back on and turned on the key and it went to 4000 rpm without motor running. I then pulled the needle and put it at zero. I started it up and it is still off a little bit, by 200-300 rpms. But is alot closer then it was. This may not have been the correct way of doing it and when I pull the guage again sometime down the road and I hava a hand held tach and volt meter I will fine tune it.
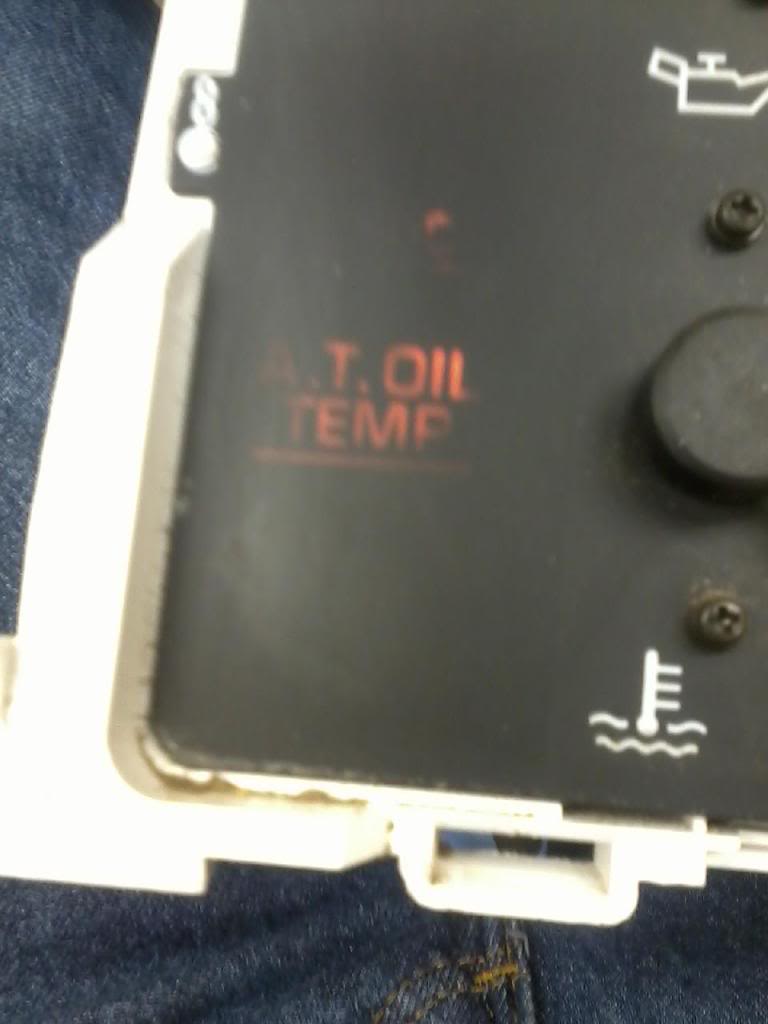
I was reading Zelephants post and he was asking about the AT Oil temp light. It is in the guage and a V6 guage will work, just have to do some adjustments. I have done several swaps and it is so much easier having the same guage as your truck, but if that isnt an option, there are other ways.
This wasnt the correct way of me doing it, but it is ALOT closer. probably could of went and 1/8th turn less and got it closer, but dont like messing with the needle any more then I have to.
I did a test drive and at 3000 rpm, I was doing 60mph and at 2400 rpm I was doing 50 mph.
2 screws and used 2 flatblade screwdrivers to pry up evenly.

AT Oil light lit with flashlight behind it.
Tach at 71 mph. Not to bad for a SWAG. ( Scientific Wild Arse Guess)
Tach and Speeds I found on 92 Toys thread. I will adjust better later on.
55MPH in 5th, holding steady, straight away, 4.30 Gear Ratio, 2300 RPM
65MPH in 5th,.............................................. ................,..2800 RPM
75MPH in 5th,.............................................. ................,..3300 RPM

I dont have a hand held tach and have my volt meter on loan so thought I would do something to get it a little closer. It was running about a 1000 rpm off. I am guessing an 88 cluster is different from the rest as I had to pull the tach needle off and remove the 2 screws to get to the potientiometer.
I put the tach needle back on and turned on the key and it went to 4000 rpm without motor running. I then pulled the needle and put it at zero. I started it up and it is still off a little bit, by 200-300 rpms. But is alot closer then it was. This may not have been the correct way of doing it and when I pull the guage again sometime down the road and I hava a hand held tach and volt meter I will fine tune it.
I was reading Zelephants post and he was asking about the AT Oil temp light. It is in the guage and a V6 guage will work, just have to do some adjustments. I have done several swaps and it is so much easier having the same guage as your truck, but if that isnt an option, there are other ways.
This wasnt the correct way of me doing it, but it is ALOT closer. probably could of went and 1/8th turn less and got it closer, but dont like messing with the needle any more then I have to.
I did a test drive and at 3000 rpm, I was doing 60mph and at 2400 rpm I was doing 50 mph.
2 screws and used 2 flatblade screwdrivers to pry up evenly.
AT Oil light lit with flashlight behind it.
Tach at 71 mph. Not to bad for a SWAG. ( Scientific Wild Arse Guess)
Tach and Speeds I found on 92 Toys thread. I will adjust better later on.
55MPH in 5th, holding steady, straight away, 4.30 Gear Ratio, 2300 RPM
65MPH in 5th,.............................................. ................,..2800 RPM
75MPH in 5th,.............................................. ................,..3300 RPM
Last edited by Terrys87; Sep 6, 2011 at 06:25 AM.
Sep 6, 2011 | 09:12 AM
#479
I run 4.30 gears on 31's and I run 3200rpm at 70mph. I posted it in Jerry's thread, not long ago(maybe a couple pages), my exact results. I figure since you have an Auto(wait, do you? lol).... you would then have 4.30's stock.... So if you got 31's and you read 3600rpm with 4.30's... I'd say you're off a lil bit(Unless the Auto effects Rpm range?
Ok, forget it, I'm confused! lol.
Ok, forget it, I'm confused! lol.
Sep 6, 2011 | 12:28 PM
#480
Thread Starter
Super Moderator
iTrader: (1)
Joined: Aug 2008
Posts: 11,787
Likes: 28
From: Anderson Missouri
Thanks Chef.. I am going to compare it to my 91. It is setup about the same and would be close. Soon as I can get a tach, I will do it right. It is ALOT closer then it was. It was driving me up the wall not being close. Before it would only run between 1 and 2 thousand rpm. I have manual trannys in my 22res. I do alot of towing and not sure I want to put that much abuse on an auto tranny.


