
Terrys87 86 4Runner with a 2nd Chance
 Jun 3, 2013 | 11:44 PM
#1221
Registered User
Joined: Jul 2012
Posts: 2,365
Likes: 4
From: Idaho
i replaced all those factory band clamps with stainless worm drive types mine were all failing or flat rusted solid id replace it just for peace of mind mark
terry heres a link to the door lock clips of flea bay theres right an left sides the lock rod itself can be adjusted at the bend i had to do it on my 79 due to age it dont take much of a bend to tighten it up and with new clips should fix the issue
http://www.ebay.com/sch/Car-Truck-Pa...p2045653.m1774
Jun 3, 2013 | 11:56 PM
#1222
Thread Starter
Super Moderator
iTrader: (1)
Joined: Aug 2008
Posts: 11,787
Likes: 28
From: Anderson Missouri
Thanks cyberhorn...I added that link to the previous post I have and will be getting those on order here in a few moments. I suspect that they just arent pulling the rod far enough. I had thought of trying to bend the rod to help take up the slack in it. I want to see what is actually causing the problem. Just cant believe as much of a problem that this is, that there isnt more info out there on it. I have seen it several times.
Hello Mark..Those are some more poor designed clamps. Seems like once I loosen them they can tend to leak. I too replace them with the worm gear clamps.
Hello Mark..Those are some more poor designed clamps. Seems like once I loosen them they can tend to leak. I too replace them with the worm gear clamps.
Jun 9, 2013 | 07:33 AM
#1223
Thread Starter
Super Moderator
iTrader: (1)
Joined: Aug 2008
Posts: 11,787
Likes: 28
From: Anderson Missouri
Had a family member in the hospital for awhile and she finally passed away so have been tied up with that for a while. After I get done with the funeral I have to start my 2 weeks of summer camp for the guards and should be back around the 27th to make up for the days I am missing. I will try to catch up on some threads later on. After camp I should get things back to normal and get alot done. The things I want to accomplish is growing.
Jameser84 is picking up his truck today from a friend of mine who has put in his new motor for him. I should be seeing him a little later on today. I have talked to him several times, just never met him. He has the BTTF truck here and it is a nice little truck.
I had a slave cylinder to leak so I replaced it with a parts store just to get it running again. After hitting the brakes sevral times, I felt the pedal give alot. I had to go further down the road and my brake light came on and could tell my brakes were getting bad.
I pulled over and checked all of the brakes and the driver rear brake had fluid everywhere. The one that I had changed the slave cylinder on. Rear brakes are not my strongest area, so I figured I had done something wrong. After several times I had a friend that knows rear brakes to help me and when we compared an old factory cylinder to the parts store slave cylinder, we noticed that the parts store cylinder was correct for bolting up to the hub, but the pistons were not long enough to stay in the cylinder. I normally check when using parts stores parts, but this time I figured it was right as it bolted up and everything. Parts stores quality is going down hill.
Parts Stores Cylinder. The piston would not stay in.
The one on the right is what I should of had all along. The one on the left is the parts store piston.
Jameser84 is picking up his truck today from a friend of mine who has put in his new motor for him. I should be seeing him a little later on today. I have talked to him several times, just never met him. He has the BTTF truck here and it is a nice little truck.
I had a slave cylinder to leak so I replaced it with a parts store just to get it running again. After hitting the brakes sevral times, I felt the pedal give alot. I had to go further down the road and my brake light came on and could tell my brakes were getting bad.
I pulled over and checked all of the brakes and the driver rear brake had fluid everywhere. The one that I had changed the slave cylinder on. Rear brakes are not my strongest area, so I figured I had done something wrong. After several times I had a friend that knows rear brakes to help me and when we compared an old factory cylinder to the parts store slave cylinder, we noticed that the parts store cylinder was correct for bolting up to the hub, but the pistons were not long enough to stay in the cylinder. I normally check when using parts stores parts, but this time I figured it was right as it bolted up and everything. Parts stores quality is going down hill.
Parts Stores Cylinder. The piston would not stay in.

The one on the right is what I should of had all along. The one on the left is the parts store piston.

Last edited by Terrys87; Aug 28, 2015 at 04:12 PM.
Jun 9, 2013 | 12:14 PM
#1225
Hey bubba, .... just wanted to share that I am so sorry for your loss! You and yours, especially all whom will be most deeply hit by this, will all be in my prayers, buddy!
Keep goin at the rest whenever u can... Always great to watch.
Keep goin at the rest whenever u can... Always great to watch.
Jun 10, 2013 | 07:30 AM
#1226
Registered User
Joined: Aug 2009
Posts: 2,173
Likes: 0
From: hohenwald tn.
Jun 10, 2013 | 06:34 PM
#1227
Thread Starter
Super Moderator
iTrader: (1)
Joined: Aug 2008
Posts: 11,787
Likes: 28
From: Anderson Missouri
Hello cyberhorn.. Luckily I was aware of something going wrong and caught it before anything could of gone bad.
Thanks Mark... Tomorrow is t he funeral then I leave for St. Louis and after that I will take a small vacation and thigs should take off when I get back.
Thanks Jason... I got it working right an that is a relief in itself.
Thanks Mark... Tomorrow is t he funeral then I leave for St. Louis and after that I will take a small vacation and thigs should take off when I get back.
Thanks Jason... I got it working right an that is a relief in itself.
Jun 10, 2013 | 06:52 PM
#1228
Thread Starter
Super Moderator
iTrader: (1)
Joined: Aug 2008
Posts: 11,787
Likes: 28
From: Anderson Missouri
I got several texts and messages that I will try and get caught up on here soon. Things just been a little busy. I went back to work for the past few days and the weather has been nice at nite and on my lunch break I have been tinkering witht the 86 runner a little bit.
Yesterday Jamesr84 was out getting parts for his BTTF truck that a friend of mine is working on had I got to visit with him a little bit. He is a great guy and has a sweet little truck.
I have some orange peel in my clear coat I have not finished since I painted the truck. I want to get the tailgate finished so as I can get all of my trom pieces on and get it wrapped up. When I shot the clear coat on it was 10 degress cooler then when I painted. I should of used a hardner for the clear that was for the cooler temps. I didnt realize temperture had dropped that much so wont be making that mistake again,
Shooting clear coat is the coat I will have the most problems on and luckily it is the easiest to fix. Just takes a lot of elbow grease. Doesnt show in picture, but the right side is glass smooth, the white is the clear coat that I have wet sanded using 2000 grit paper with a little dish detergent.

For detailing, these are my favorite tools. I have had orbital polishers and just about anything else and I always fall back to this. A cheap set up and quick once you figure out a pattern. Using sandpaper may sound scary, but this paper is so fine, really not need to worry. Start in a hidden spot and you can feel when the paper slides easily that the surface is starting to get smooth. Then follow it with Meguiars products. Use a foam rubber block and wrap the sandpaper around it. I like to soak my sandpaper a few minutes befroe sanding. Not using a block can cause you fingers to have highs and lows in the finished surface.
Here is a buffer that I have. It works great, but using the tools above is alot safer then using this. This pad is wool and with the Meguiars that I have posted above, this can ruin a paint job. It is a great little tool, but I only use it for a few moments before using the other tools. I would NOT recommend this for a first time use without any experince. The sandpaper, drill, foam pad, and Meguiars will get you the same results, but it will take a little longer but far less chance of causing any damage over using a buffer.

Yesterday Jamesr84 was out getting parts for his BTTF truck that a friend of mine is working on had I got to visit with him a little bit. He is a great guy and has a sweet little truck.
I have some orange peel in my clear coat I have not finished since I painted the truck. I want to get the tailgate finished so as I can get all of my trom pieces on and get it wrapped up. When I shot the clear coat on it was 10 degress cooler then when I painted. I should of used a hardner for the clear that was for the cooler temps. I didnt realize temperture had dropped that much so wont be making that mistake again,
Shooting clear coat is the coat I will have the most problems on and luckily it is the easiest to fix. Just takes a lot of elbow grease. Doesnt show in picture, but the right side is glass smooth, the white is the clear coat that I have wet sanded using 2000 grit paper with a little dish detergent.

For detailing, these are my favorite tools. I have had orbital polishers and just about anything else and I always fall back to this. A cheap set up and quick once you figure out a pattern. Using sandpaper may sound scary, but this paper is so fine, really not need to worry. Start in a hidden spot and you can feel when the paper slides easily that the surface is starting to get smooth. Then follow it with Meguiars products. Use a foam rubber block and wrap the sandpaper around it. I like to soak my sandpaper a few minutes befroe sanding. Not using a block can cause you fingers to have highs and lows in the finished surface.

Here is a buffer that I have. It works great, but using the tools above is alot safer then using this. This pad is wool and with the Meguiars that I have posted above, this can ruin a paint job. It is a great little tool, but I only use it for a few moments before using the other tools. I would NOT recommend this for a first time use without any experince. The sandpaper, drill, foam pad, and Meguiars will get you the same results, but it will take a little longer but far less chance of causing any damage over using a buffer.
 Jun 10, 2013 | 10:31 PM
#1229
Registered User
Joined: Jul 2012
Posts: 2,365
Likes: 4
From: Idaho
hey terry i was watching american restorations the other day he showed how to remove any polishing swirl marks you might get after buffing clear coat (especially bad on darker colors) you can use corn starch on the buffer after moistening the area takes the swirls right out looks like glass
Jun 12, 2013 | 07:43 PM
#1230
Registered User
Joined: Dec 2008
Posts: 2,391
Likes: 1
From: tecumseh nebraska
Its the weird clamp where the tiny leak is, below the plastic line tap/flush kit piece in the pic. Its like a round clamp with a perpendicular rod that tightens the strip?

.......It's factory.... And its just a hose that goes TO the heater core inlet, not the clamp style inside. BUT I WILL DEFINITELY hit you up when "THE CORE" miniseries begins! Lol.
.......It's factory.... And its just a hose that goes TO the heater core inlet, not the clamp style inside. BUT I WILL DEFINITELY hit you up when "THE CORE" miniseries begins! Lol.
Jun 12, 2013 | 08:17 PM
#1231
Registered User
Joined: Apr 2012
Posts: 2,817
Likes: 2
From: Los Angeles CA
hey terry i was watching american restorations the other day he showed how to remove any polishing swirl marks you might get after buffing clear coat (especially bad on darker colors) you can use corn starch on the buffer after moistening the area takes the swirls right out looks like glass
Jun 26, 2013 | 01:18 PM
#1232
Registered User
Joined: May 2013
Posts: 21
Likes: 0
From: Albuquerque, New Mexico
 Trucks are looking great terry! Sorry for your loss mate...
 I was wondering, what did ya'll's stock speaker set up look like for 4runns 85-89? Are the stock speakers sony? Also how does your guys' back window work? Does it roll down when you turn the key in the lock in the back bumper. Or can you only roll it down from the front?
Thanks guys
(semi new engine) AM intake coming !

 Jun 26, 2013 | 02:18 PM
#1233
Registered User
Joined: Jul 2012
Posts: 2,365
Likes: 4
From: Idaho
@second handstoke the rear windows roll down/up via the key in the gate OR by the switch in the center console with the ignition on, if things are unmodifyed (also has a safety lock switch next to it)
some put in jumpers so the switch is live all the time in the console
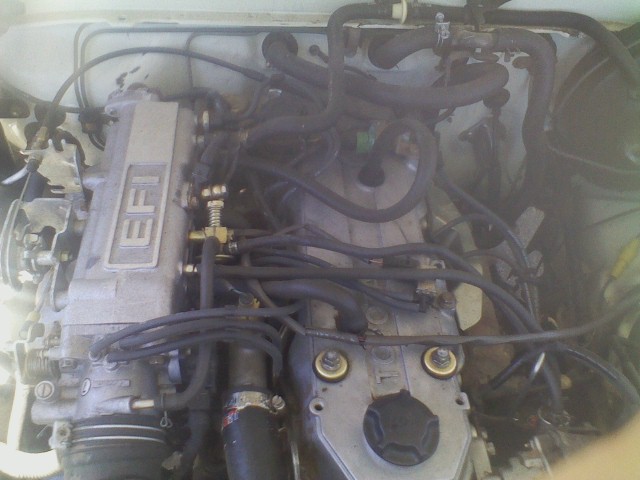
nice engine some new fittings on the upper plenum (sparkilys)
some put in jumpers so the switch is live all the time in the console
nice engine some new fittings on the upper plenum (sparkilys)
Jun 26, 2013 | 03:01 PM
#1234
Registered User


Joined: Mar 2012
Posts: 7,125
Likes: 681
Best to do rear window mod cleanly. Pls see my mod for rear window control from inside rear deck, for schematic.
Jun 26, 2013 | 03:55 PM
#1235
Registered User
Joined: Jul 2012
Posts: 2,365
Likes: 4
From: Idaho
i was really surprised how well it worked too he showed the swirled polished panel in black spritzed it with water dusted with a little cornstarch rubbed the buffer over it to mix (foam pad) an buffed the panel wiping it clean looked like glass an no swirls in it
Jun 26, 2013 | 06:06 PM
#1236
Been using cornstarch for years.... It helps to remove wax more quickly and cleanly. No swirls on my girl! Lol
TR8 is another Godsend IMHO.... And Mothers Cleaner & then Carnuba paste wax.
TR8 is another Godsend IMHO.... And Mothers Cleaner & then Carnuba paste wax.
Last edited by ChefYota4x4; Jun 26, 2013 at 06:09 PM.
Jun 28, 2013 | 04:15 AM
#1237
Thread Starter
Super Moderator
iTrader: (1)
Joined: Aug 2008
Posts: 11,787
Likes: 28
From: Anderson Missouri
Hello Cyberhorn.. I seen that show as well and was suprised to see the cornstarch trick. I dont watch much TV but I do record alot of car and restoration shows and am always looking for tips and tricks. Ricks Resotration is one of my favorites as all of the different things he restores.
Hello kornhuskerwizard... I have been trying to get my engine bays to look as well as Marks, but somehow the wiring looks like a bowl of Spaghetti when I done with mine. One of these days I will get it figured out.
Hello Richard.. American Restoration does have alot of tips and some of the things he does like toys and refrigerators is interesting and it all applies.
Thanks secondhandstoke..We knew it was coming and it was a long time coming and she was tired of suffering so it is in some way a relief. The speakers I dont recall the brand that are factory but I am thinking they are 4 inch?? speakers and I replaced Mistys with some after markets. I do recall I just bent the aftermarket speakers tabs a little and used a drill and they look like they belong in there.
My keys are so worn out that they wont operate the key lock in the tail gate. It is something that I have on the list to get to someday but seems like that day just doesnt seem to get here. Your key should lower the window for you when the tailgate is operating correctly. I see several members on Yotatech and all have several different talents but RAD4Runner has the ability to break down a electrical schematic and make it easily understandable by far over any other member I have found on here. I will be doing his mod when I get to that stage. I would recommend his mod.
Thanks RAD4Runner.. I am going to give the cornstarch a try here hopefully some time later this week and will post my results as well and see if I cant add some more info on it.
Hello Cyberhorn.. The foam pad is something I have used for years and for someone without any experince on using a buffer is alot more safer then the buffer. The buffer is a great tool to have, but will ruin a paint job if not used correctly. The foam pad my take a little longer but will get the same great results and far less chance of damaging paint. Using fine grit sand paper (2000 grit of finer) is safer then the buffer as well and I know that may seem inimidating using sandpaper over a buffer, but I have had more damage with buffers then anything else.
Hello Mark.. What is TR8?? I must be drawing a blank in my mind right now or havent heard of it. Mothers Products are great and do a great job. Probably my favorite brand.
Jun 28, 2013 | 05:27 AM
#1238
Thread Starter
Super Moderator
iTrader: (1)
Joined: Aug 2008
Posts: 11,787
Likes: 28
From: Anderson Missouri
I got done with the funeral and then had to turn around and go do my 2 week summer camp for the guards. I am so glad that is over with. They are going overboard with phyiscal fitness. My legs still ach from them trying to get me back in to shape. Then the remote area they had as in was a mosquito haven and I did my part to feed them while out there. I took my laptop with me but I just wasnt able to get much of a signal so it wasnt much use while having it there with me.
Got to see some guys that I went to Iraq and Afghanistan with that I had seen in along time and it was nice seeing some of those, but this is going to be my last summer camp I will be doing. I got my time in and I am still able to keep up with alot of the younger guys, but it is getting harder to do each time. Getting older is for the birds.
Got home and Misty said her truck had a bad vibraton in it. It does, I am hoping it is just a U-Joint but will need to look into it later on today and see what is going on with it. She said I was going to the lake when I got home, that sounds great but then I noticed in her tone of voice that she had plans for her and the kids of going too, lol. I took the boat to the lake last nite and it is running great and the camper seems like it is good to go as well. Now I just need to put in for some vacation time and hoping to get to the lake sometime in the next week or so.
I should be wrapping up the bodywork on the 86 Extra Cab hopefully this week if all goes as planned. I just have some areas on the top of the cab, behind the window and finish the tailgate area and it should be ready for paint fairly soon.
I am planning on moving my console switches to the dash in preparation for getting it done so when I get some carpet ordered that I can just install it and come up with a more useful center console and keep the switches more protected from dust and such as well. I need shocks badly but on smooth roads it rides well enough that they will wait.
I also want to get started on the motor for the 85 and get it put together by the end of next month and want to atleast get the 85 running in the next couple of months. Now that the cold weather is out of here and I think everything else that I had to do is out of the way, my projects should take off quickly if all goes as planned.
Misty wants a Grant Steering wheel for her runner and now that I have some descent looking seats in mine, I think getting her seats reupholstered is starting to make it on to her list of things that she wants to get done now. I leave upgrading her runner to her as it comes out of her funds and not mine. I think she will be starting to do some things on hers here fairly soon as well.
Jun 28, 2013 | 05:43 AM
#1239
Thread Starter
Super Moderator
iTrader: (1)
Joined: Aug 2008
Posts: 11,787
Likes: 28
From: Anderson Missouri
When I am at the boneyard, there are 2 types of windshield nozzles that came on these trucks, dont know if they are different years but they are interchangeable. They look the same and you will never notice the difference, but the thing is the way that they mount.
The nozzle on the left has a squeeze tab and is in my opinion a whole lot better to use when replacing the nozzles. When I paint a hood, I remove the nozzles for less masking and a better paint covering.
The nozzle on the right has skirts that hold it in place and once you remove these nozzles, I have never got them to fit right and in general are just one big pain in the butt to mess with. I havent paid much attention to which years they come out with the the squeeze tab is so much more easier to take out and put back in and is something I grab when I find them in the yards.
The left one is the better one to use and a direct fit. Just squeeze the tab and tilt forward to remove from hood. You can tell by the triagular hole. The right one has skirts which isnt showing in the picture to well.
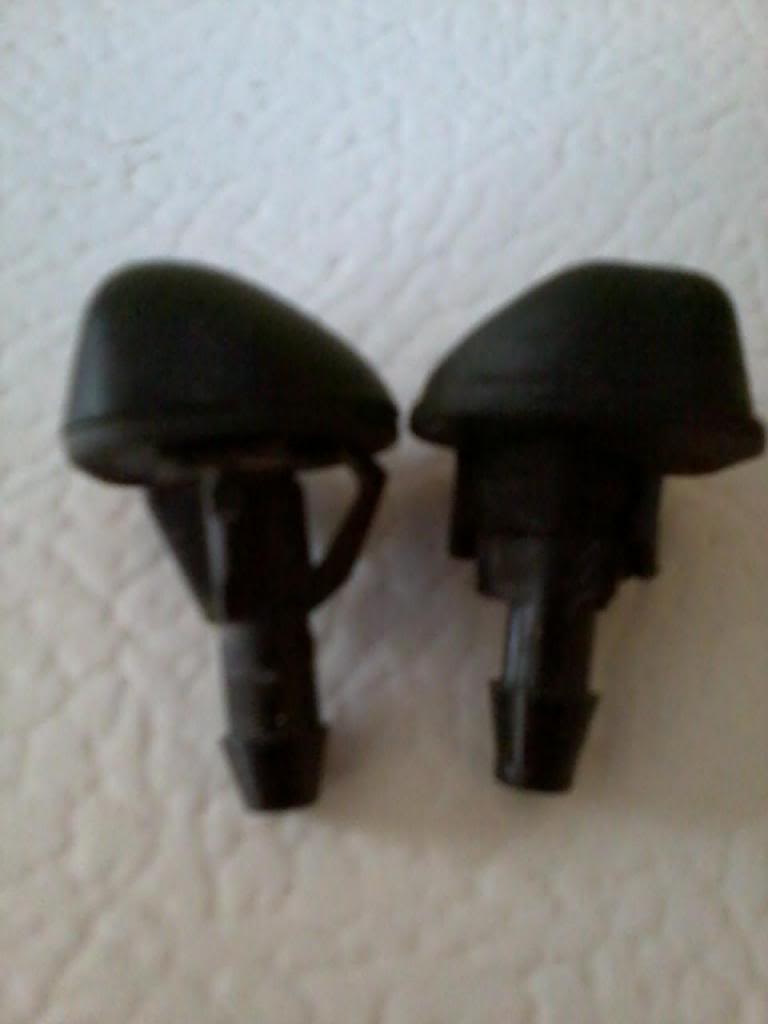
 Jun 28, 2013 | 10:23 AM
#1240
Mine spray like a jet stream on top and bottom of wipers if they're centered. They're wacky! Lol. ... But they work. If I wanted more of a "spray" pattern, not mist, just more spread out,..... whatcha think? Should I soak mine or something? Probably lots of calcification! Grrr! Lol. ... No kidding, they really are like a squirt gun. The thing is I know that they're supposed to be to some degree because they squirt into 2 directions ... And both of them do the same thing. I cleaned them one time with a sewing needle, and it seems like they don't spray as well anymore. I don't need them to be like a pressure sprayer because they're only shooting on one spot on the windshield anyway hahaha. Little things like this always perk my interest.
Last edited by ChefYota4x4; Jun 28, 2013 at 10:24 AM.


