
Terrys87 86 4Runner with a 2nd Chance
 Nov 12, 2012 | 11:58 AM
#821
Thread Starter
Super Moderator
iTrader: (1)
Joined: Aug 2008
Posts: 11,787
Likes: 28
From: Anderson Missouri
The runner is getting emptier of its parts. I installed my seats and carpet. They are worn but will have to do til I can order new carpet and have my seats done. For something to do later this winter, I have thought of trying to remove the seat covers and use them as a pattern to make my own. That will be later down the road. I will put new gray carpet in when I do it. This just makes it feel more like a truck and gets things out of the way and a little more quieter and warmer.
I have about 125 miles on it since gettin it running and so far my rear axle seal seems to be holding up and not leaking.
Here is what I started with.

Rear carpet and seats in and a hand full of parts that still need to be put in. I have the side panels in the side of the shop and will repaint all of the interior to a glossier gray. I used an off the shelf interior paint but will need to finish panels at a later time. Still need to get other things done to it.

Back seats are ratty but it is something that can be reupholstered. Alot more then when I started with when I first got the runner.

Front seat area and still need to Peel and Seal the doors and get the panels done before I put them on.

Got my nozzles on and working. Also got the timing set while under the hood.

Post I found...https://www.yotatech.com/forums/f116...inally-218848/
I have about 125 miles on it since gettin it running and so far my rear axle seal seems to be holding up and not leaking.
Here is what I started with.
Rear carpet and seats in and a hand full of parts that still need to be put in. I have the side panels in the side of the shop and will repaint all of the interior to a glossier gray. I used an off the shelf interior paint but will need to finish panels at a later time. Still need to get other things done to it.
Back seats are ratty but it is something that can be reupholstered. Alot more then when I started with when I first got the runner.
Front seat area and still need to Peel and Seal the doors and get the panels done before I put them on.
Got my nozzles on and working. Also got the timing set while under the hood.
Post I found...https://www.yotatech.com/forums/f116...inally-218848/
Last edited by Terrys87; Nov 13, 2012 at 03:14 AM.
Nov 12, 2012 | 12:15 PM
#822
Wow, amazing transformation, Terry!  .... I hear ya on the "I'll get that stuff as I can afford it/fit it in the budget."... SO MANY things I would LOVE to do... Just have to be patient
 haha.
haha.
REALLY enjoy watching your thread/watching you work
.... I hear ya on the "I'll get that stuff as I can afford it/fit it in the budget."... SO MANY things I would LOVE to do... Just have to be patient haha. REALLY enjoy watching your thread/watching you work
Nov 12, 2012 | 01:56 PM
#824
Registered User
Joined: Aug 2009
Posts: 2,173
Likes: 0
From: hohenwald tn.
hopeing to catch up with ya soon buddy but it would sure help if you would take a MONTH or two off, JK man. I didnt remember your rear seats being in that bad a shape but maybe I was thinking of another set you had heck I dont remember. Anyway great work I will say it again that thing looks friggen sweat.
Nov 14, 2012 | 02:38 AM
#826
Thread Starter
Super Moderator
iTrader: (1)
Joined: Aug 2008
Posts: 11,787
Likes: 28
From: Anderson Missouri
Hello Mark..That money thing does tend to hold things up. I will win that lottery I never play someday I hope. It would help, but that is a good time to get all of the other things that dont cost done which I wouldnt do if it werent for the budget thing. It kind of works out.
Thanks HighLux..It has come along ways when I first got it. I sure some may have seen when I first started the build thread that it would never see the road again. I learned alot on it and hoping in the next 2 or 3 years it looks as new as I can make it and alot nicer then what it would of been new.
Hello Jason..My seats are trashed but they are the only ones I have seen in a boneyard since I have been into runners. After I get them repaired, I am sure I will find 50 sets of seats. I do like the idea of having some ratty seats. Eventually it will bug me enough to get off of my butt and learn how to sew. I have a sewing machine in the shop, so it is working its way up the list. Just glad I have managed to be patient in the past few years.
Hello Cyberhorn... I think I will try and cut them down and see what happens. If I ever came across a smoking deal on 4.88s and some 33s, I would get them. That is a long range plan and it will need a lift of some kind. Right now the shifter hits the body and I dont want to cut it up.
Last edited by Terrys87; Nov 14, 2012 at 03:48 AM.
Nov 14, 2012 | 02:55 AM
#827
Thread Starter
Super Moderator
iTrader: (1)
Joined: Aug 2008
Posts: 11,787
Likes: 28
From: Anderson Missouri
Got the next few days off so am looking forward to seeing what I can get done. I need to change plugs in Mistys runner and I ordered a cupholder that Cyberhorn showed on his thread and will post pics of it installed. Misty is a coffeeaholic and likes being able to have a place for her coffee cups.
I also will be working on the 88 pickup as the heater core is circulating hot water thru the hoses but not transfering heat. Think it is just coated with gunk and I have flushed it with water and air and still not heat. The circulating valve is good. Talking to Jason and he suggested to use CLR, never thought of that and would rather do that then change a heater core. I will post results on that later.
I did move alot of things that I have discovered or learned while working on this runner to my 88 Runner builds first page. Trying to keep all of the little tricks and tips for it to be an easy reference to. Still have more I want to add to it. Link>>> https://www.yotatech.com/forums/f199...thread-227399/
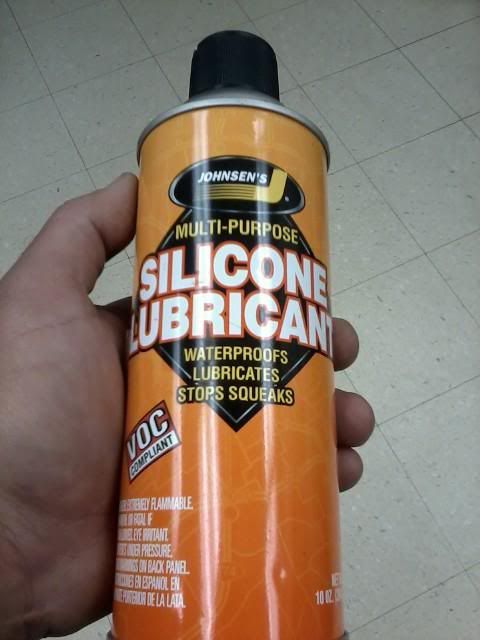
I had to get a new Haynes as my old manual just finally was worn out. One day I will own as FSM and glad I downloaded one when I had the chance. Got my wiper arms cleaned and painted and some new to me window channel tracks/guides. If you are having a difficult time rolling your windows up and down, this Silicon Spray can make a world of difference.
Silicone Spray in the tracks. Have mentioned it before but incase someone missed it on my last build.
New tracks, will be glad to get them in. Should cut down on some noise and wind.

I also will be working on the 88 pickup as the heater core is circulating hot water thru the hoses but not transfering heat. Think it is just coated with gunk and I have flushed it with water and air and still not heat. The circulating valve is good. Talking to Jason and he suggested to use CLR, never thought of that and would rather do that then change a heater core. I will post results on that later.
I did move alot of things that I have discovered or learned while working on this runner to my 88 Runner builds first page. Trying to keep all of the little tricks and tips for it to be an easy reference to. Still have more I want to add to it. Link>>> https://www.yotatech.com/forums/f199...thread-227399/
I had to get a new Haynes as my old manual just finally was worn out. One day I will own as FSM and glad I downloaded one when I had the chance. Got my wiper arms cleaned and painted and some new to me window channel tracks/guides. If you are having a difficult time rolling your windows up and down, this Silicon Spray can make a world of difference.
Silicone Spray in the tracks. Have mentioned it before but incase someone missed it on my last build.
New tracks, will be glad to get them in. Should cut down on some noise and wind.
Last edited by Terrys87; Nov 14, 2012 at 09:04 AM.
Nov 14, 2012 | 03:09 AM
#828
Thread Starter
Super Moderator
iTrader: (1)
Joined: Aug 2008
Posts: 11,787
Likes: 28
From: Anderson Missouri
I have fixed temp guages by cleaning the sensors and connectors. I found a thread that says to check the ground behind the fuse panel and to tighten the screws on the back of the instrument cluster. I will be doing that as well as some of the other things I want to get done.
Hoping to readjust my valves, install my windshield cowl and wipers, cut my lift down to an inch, install my window tracks, start on my rear brakes, instrument cluster screws, check for loose nuts and bolts from one end to the next end and anything in between,paint L trims, do some wet sanding on body and polishing, get the wheels looking cleaner, add some sealant to my half moon seals as one is leaking, adjust my hood and fenders, work on my 4WD indicator plug, shine my bumper up, work on my dome light where windshield place disconnected it, little detail items,fix passenger front seat..will add more as I think of them.
Mostly a list for me but if I dont write it down and when I get out in the shop, I wont think of 2 things and it is to be a descent day and want to get the most out of it.
Ground screw...................................... done.
Window tracks .....................................done.
Cowl and wiper ....................................done.
Paint L trims ........................................done.
Instument Cluster .................................done.
Half Moons...........................................do ne
Clean inside of Frame.............................done.
Adjust Valves
Domelight......................................... ....Working on.
Paint Hubs ...........................................done.
4WD Indicator
Reverse Switch .....................................done.
Shine Bumper
Shine Wheels.........................................don e.
Solder Water/Seal Bottle ........................done.
Fix Pass Seat
Remove Lift
Dash Dimmer ........................................done.
Clean/Install Rear Panels
Detail Bottles .......................................done.
Flush Radiator.......................................don e.
Install Driver Visor
Inspect/paint rear hubs
Tank Float
Tighten bolts
Wet Sand
Shifter Boots
Clean Under Carriage
Work on Exhust Leak
Solder Water Sensor................................done.
Bleed Rear Brakes
Last edited by Terrys87; Nov 20, 2012 at 02:23 PM.
Nov 14, 2012 | 09:45 AM
#829
I have that Johnsons... Worked well on my door windows!
Didn't seem to do much on the rear window seal, as that seems to have a felt type fiber thingy going on, lol. Actually, I think it's lack of doing anything is due to the fact that my motor is slowing down around half way up in rolling up process. It's done so for a while... guess it's tired.
Didn't seem to do much on the rear window seal, as that seems to have a felt type fiber thingy going on, lol. Actually, I think it's lack of doing anything is due to the fact that my motor is slowing down around half way up in rolling up process. It's done so for a while... guess it's tired.
Nov 14, 2012 | 11:41 AM
#831
Thread Starter
Super Moderator
iTrader: (1)
Joined: Aug 2008
Posts: 11,787
Likes: 28
From: Anderson Missouri
Havent gotten much doe. Been trying to get the heater core to work on the pickup. That has gotten a little better but not where it should be. I will say more about I later as I still havent given up on it just yet.
Here is the ground screw that I mentioned earlier. Seemed to make a little difference as mine did have some bad corrosion. I will pull the instrument cluster tomorrow and tighten the screws. I think my brake light bulb is burnt out so will fix it then as well.

Greased the lower track and WD-40 the other moving mechanisims. It helped.

Put some 3M glue on the inside of the door track and door seal. Got half of it on me.

I then started with the back edge and slipped it in and would roll the window up and then when I rolled it down, I would use the window to help pull the seal down to where it needed to be. I started with the rear of the door.

Seal is in. One less rattle.

Here is the ground screw that I mentioned earlier. Seemed to make a little difference as mine did have some bad corrosion. I will pull the instrument cluster tomorrow and tighten the screws. I think my brake light bulb is burnt out so will fix it then as well.
Greased the lower track and WD-40 the other moving mechanisims. It helped.
Put some 3M glue on the inside of the door track and door seal. Got half of it on me.
I then started with the back edge and slipped it in and would roll the window up and then when I rolled it down, I would use the window to help pull the seal down to where it needed to be. I started with the rear of the door.
Seal is in. One less rattle.
Last edited by Terrys87; Nov 14, 2012 at 11:46 AM.
Nov 14, 2012 | 11:46 AM
#832
I seriously can't say... (pertaining to which may be the root of the symptoms)....
Basically, when it's running, it goes down really fast, up not AS fast(but not slow as hell, lol).... When it's NOT running, it still goes down pretty fast... But going up, at times, it's VERY slow. Like... an inch per second or less? As it get's near the top/sealing(with the motor off)... about the last 8 inches... it really slows down. BUT, it always goes all the way up.
I'm pretty sure the intermittent "Wont go down/up" drama is unrelated. That seems to be the window relay module or something beforehand or thereafter. I cleaned up the module contacts and realized that that clip was going back in VERYYYYYYYYY much like a stubborn mule. It was VERY tough to get it to 'clip' at the end of insertion. Seems a LIL easier now... And I've not had an incident since.(I used a soldering iron/board cleaner brush, with bronze on one side and stainless on the other.) Cleaned up all the pins and inside the female spades with that.. Then blew it out with electrical cleaner... Let it dry and then dielectric grease as I always do... then slapped it back in. NOT having opened it up and made sure the inside had no corrosion... I have no clue as to whether or not it'll do the trick for a while... BUT, it's not given me trouble in around 100 more tries since. Pretty good ratio, ya know?
I'm guessing, much like the power antenna on these... That motor inside has grease that turns to playdough... etc. I would imagine I could fairly easily remove the cap and take a look..... BUT, I'm done 'GUESSING' on that crap... so I'll just assume it's A TOTAL PITA and the whole apparatus has to come out. ????? lol. Waiting until it burns out(the rear window motor) seems illogical to me... Sure, "when it's broke, then fix it" is often the best route if it's something that wont leave ya stranded... This isn't likely to leave me anywhere... BUT, I've had this happen and had to climb through when it's 150*F or so inside in the High Desert... (hot springs trips or Death Valley Wheeling)... and HOLY INFERNO'S, RESTO-MAN! lol... I would rather nip this in the proverbial bud, if you KWIMean?
Also worth mentioning... my rear door latch was funky for A LONGGGGGGGGGG time. So, the window likely had to work harder once it hit half way up, etc.(once the glass hit what was supposed to be the groove... but rather, instead, was the edge of the groove.... make sense?.. The door wasn't shut all the way on that side)... I'd MOST OFTEN push in the door while I rolled it up... just for logic's sake. But not always. Often rolled it up from the front. Or down.
It almost seems like a "Low Battery" type thing... which is NOT the case. My Wanna-be-a-Yellow Top "Duralast GOLD" is and has been a PHENOMENAL battery.... 5 years now, NOTHING wrong with it. Holds 12.47 Volts all day long. NEVER pitches down on me when starting, etc. Holds a steady 12.25V even when cranking/before the Alternator has taken over. thereafter, I have 14.58V the last check I did, at Idle.
Nov 14, 2012 | 06:39 PM
#833
Registered User
Joined: Jul 2012
Posts: 2,365
Likes: 4
From: Idaho
I seriously can't say... (pertaining to which may be the root of the symptoms)....
Basically, when it's running, it goes down really fast, up not AS fast(but not slow as hell, lol).... When it's NOT running, it still goes down pretty fast... But going up, at times, it's VERY slow. Like... an inch per second or less? As it get's near the top/sealing(with the motor off)... about the last 8 inches... it really slows down. BUT, it always goes all the way up.
I'm pretty sure the intermittent "Wont go down/up" drama is unrelated. That seems to be the window relay module or something beforehand or thereafter. I cleaned up the module contacts and realized that that clip was going back in VERYYYYYYYYY much like a stubborn mule. It was VERY tough to get it to 'clip' at the end of insertion. Seems a LIL easier now... And I've not had an incident since.(I used a soldering iron/board cleaner brush, with bronze on one side and stainless on the other.) Cleaned up all the pins and inside the female spades with that.. Then blew it out with electrical cleaner... Let it dry and then dielectric grease as I always do... then slapped it back in. NOT having opened it up and made sure the inside had no corrosion... I have no clue as to whether or not it'll do the trick for a while... BUT, it's not given me trouble in around 100 more tries since. Pretty good ratio, ya know?
I'm guessing, much like the power antenna on these... That motor inside has grease that turns to playdough... etc. I would imagine I could fairly easily remove the cap and take a look..... BUT, I'm done 'GUESSING' on that crap... so I'll just assume it's A TOTAL PITA and the whole apparatus has to come out. ????? lol. Waiting until it burns out(the rear window motor) seems illogical to me... Sure, "when it's broke, then fix it" is often the best route if it's something that wont leave ya stranded... This isn't likely to leave me anywhere... BUT, I've had this happen and had to climb through when it's 150*F or so inside in the High Desert... (hot springs trips or Death Valley Wheeling)... and HOLY INFERNO'S, RESTO-MAN! lol... I would rather nip this in the proverbial bud, if you KWIMean?
Also worth mentioning... my rear door latch was funky for A LONGGGGGGGGGG time. So, the window likely had to work harder once it hit half way up, etc.(once the glass hit what was supposed to be the groove... but rather, instead, was the edge of the groove.... make sense?.. The door wasn't shut all the way on that side)... I'd MOST OFTEN push in the door while I rolled it up... just for logic's sake. But not always. Often rolled it up from the front. Or down.
It almost seems like a "Low Battery" type thing... which is NOT the case. My Wanna-be-a-Yellow Top "Duralast GOLD" is and has been a PHENOMENAL battery.... 5 years now, NOTHING wrong with it. Holds 12.47 Volts all day long. NEVER pitches down on me when starting, etc. Holds a steady 12.25V even when cranking/before the Alternator has taken over. thereafter, I have 14.58V the last check I did, at Idle.
Basically, when it's running, it goes down really fast, up not AS fast(but not slow as hell, lol).... When it's NOT running, it still goes down pretty fast... But going up, at times, it's VERY slow. Like... an inch per second or less? As it get's near the top/sealing(with the motor off)... about the last 8 inches... it really slows down. BUT, it always goes all the way up.
I'm pretty sure the intermittent "Wont go down/up" drama is unrelated. That seems to be the window relay module or something beforehand or thereafter. I cleaned up the module contacts and realized that that clip was going back in VERYYYYYYYYY much like a stubborn mule. It was VERY tough to get it to 'clip' at the end of insertion. Seems a LIL easier now... And I've not had an incident since.(I used a soldering iron/board cleaner brush, with bronze on one side and stainless on the other.) Cleaned up all the pins and inside the female spades with that.. Then blew it out with electrical cleaner... Let it dry and then dielectric grease as I always do... then slapped it back in. NOT having opened it up and made sure the inside had no corrosion... I have no clue as to whether or not it'll do the trick for a while... BUT, it's not given me trouble in around 100 more tries since. Pretty good ratio, ya know?
I'm guessing, much like the power antenna on these... That motor inside has grease that turns to playdough... etc. I would imagine I could fairly easily remove the cap and take a look..... BUT, I'm done 'GUESSING' on that crap... so I'll just assume it's A TOTAL PITA and the whole apparatus has to come out. ????? lol. Waiting until it burns out(the rear window motor) seems illogical to me... Sure, "when it's broke, then fix it" is often the best route if it's something that wont leave ya stranded... This isn't likely to leave me anywhere... BUT, I've had this happen and had to climb through when it's 150*F or so inside in the High Desert... (hot springs trips or Death Valley Wheeling)... and HOLY INFERNO'S, RESTO-MAN! lol... I would rather nip this in the proverbial bud, if you KWIMean?
Also worth mentioning... my rear door latch was funky for A LONGGGGGGGGGG time. So, the window likely had to work harder once it hit half way up, etc.(once the glass hit what was supposed to be the groove... but rather, instead, was the edge of the groove.... make sense?.. The door wasn't shut all the way on that side)... I'd MOST OFTEN push in the door while I rolled it up... just for logic's sake. But not always. Often rolled it up from the front. Or down.
It almost seems like a "Low Battery" type thing... which is NOT the case. My Wanna-be-a-Yellow Top "Duralast GOLD" is and has been a PHENOMENAL battery.... 5 years now, NOTHING wrong with it. Holds 12.47 Volts all day long. NEVER pitches down on me when starting, etc. Holds a steady 12.25V even when cranking/before the Alternator has taken over. thereafter, I have 14.58V the last check I did, at Idle.
mark sounds like the last bit of travel the widow has to go up needs more lubrication, the track (the slide points under the glass) the slide points on the regulator an the gears use a lithium grease (white) is waterproof an dosent get hard over time the red bearing grease is a good second
also again check the grounds make sure at least one of the 4 regulator mounting points is clean steel then bolt it on paint it to seal
the antenna motor is easy to take out remove the pastic fender liner on the passenger side undoo the nuts on top an bring it down the cover unscrews you can then see the toothed plastic tape that pulls it down an pushes it out
Last edited by Cyberhorn The Dragon; Nov 14, 2012 at 06:42 PM.
Nov 15, 2012 | 01:24 AM
#834
Thread Starter
Super Moderator
iTrader: (1)
Joined: Aug 2008
Posts: 11,787
Likes: 28
From: Anderson Missouri
Hello Mark and Cyberhorn...To eleminate the motor, I would run some jumper wires right to the motor itself with a battery. Switching polarity controls the direction. If it goes great both ways, I would suspect your relay box is going bad. I seen a break down of the relay box and there is a relay for each direction.
Never messed with an electric antenna. So not much help on that. I do have one but not sure if it works. It will be awhile before I ever install it. I am just trying to get to a bare bones basic 4Runner.lol I now have windows that I can roll up AND down. I got heat too. I am hoping today to have windshield wipers. We are talking just the basics. Still a looong way to go.
Never messed with an electric antenna. So not much help on that. I do have one but not sure if it works. It will be awhile before I ever install it. I am just trying to get to a bare bones basic 4Runner.lol I now have windows that I can roll up AND down. I got heat too. I am hoping today to have windshield wipers. We are talking just the basics. Still a looong way to go.
Nov 15, 2012 | 10:15 AM
#835
Registered User


Joined: Mar 2012
Posts: 7,125
Likes: 681
Terry and all,
Do you think the silicone spray is best for lubricating and reconditioning rubber seals, etc? I've used silicone leather conditioner on my mountain boots that caused glue on sole to delaminate. Manufacturer said it's because of the solvent used and not the silicone itself, so I'd like to know your first-hand experiences.

I think direct contact between ring terminal and sheet metal is most reliable, so each time I touch a ground point. I sand down contact surface to bare metal, clean ring terminal and use conductive grease on surfaces.
 Nov 15, 2012 | 03:25 PM
#836
Thread Starter
Super Moderator
iTrader: (1)
Joined: Aug 2008
Posts: 11,787
Likes: 28
From: Anderson Missouri
Thanks RAD..I have been using the Silicon spray now for 2 years and so far it hasnt messed up my seals at all. I can say it really makes a big difference on manual windows. Literally worried about breaking the handle and spray the seals and operate the window several times and when done, I have been able to operate it with just my thumb and forefinger.
I cleaned mine down to primer and probably should of took it to metal, but I did wire brush the bolt and contacts.
Hey Guys..I have been trying to help this guy with his problem. You have any suggestions I could give him? Thanks Link>>>https://www.yotatech.com/forums/f131...-light-261223/
I cleaned mine down to primer and probably should of took it to metal, but I did wire brush the bolt and contacts.
Hey Guys..I have been trying to help this guy with his problem. You have any suggestions I could give him? Thanks Link>>>https://www.yotatech.com/forums/f131...-light-261223/
Last edited by Terrys87; Nov 15, 2012 at 04:32 PM.
Nov 15, 2012 | 03:36 PM
#837
Thread Starter
Super Moderator
iTrader: (1)
Joined: Aug 2008
Posts: 11,787
Likes: 28
From: Anderson Missouri
I got a few thing done. It is deer season around here and spent a big part of the day messing with deer. Finding them and cleaning them. Hoping tomorrow I get a little more done.
Cyberhorn posted this on his thread and installed it in Mistys Runner. Works great for her coffee cup that she always has with her.

Got my cowl,rubber seal, and wiper on. Gave it one quick cleaning as I did have the cowl off but it has been in the shop. Wanted to make sure there was nothing left in here. Lots of junk gets in here.

Primed and painted the "L Trims and the B pillar". I used trim paint on both. I think I will do the L trims in regular paint at a later time. Still looks better then it was.

Finished painting.

A side view. I also got my Cluster guage screws tightened. Each one went a quarter turn easily.
Mark.. I was just talking to Jason and he reminded me that your heat guage drops to zero/cold. I found a post last week and someone asked today about the same issue. From what I gathered, clean the ground screw and tighten all screws on the back on the Combo guage.
A better view.

Cyberhorn posted this on his thread and installed it in Mistys Runner. Works great for her coffee cup that she always has with her.
Got my cowl,rubber seal, and wiper on. Gave it one quick cleaning as I did have the cowl off but it has been in the shop. Wanted to make sure there was nothing left in here. Lots of junk gets in here.
Primed and painted the "L Trims and the B pillar". I used trim paint on both. I think I will do the L trims in regular paint at a later time. Still looks better then it was.
Finished painting.
A side view. I also got my Cluster guage screws tightened. Each one went a quarter turn easily.
Mark.. I was just talking to Jason and he reminded me that your heat guage drops to zero/cold. I found a post last week and someone asked today about the same issue. From what I gathered, clean the ground screw and tighten all screws on the back on the Combo guage.
A better view.
Nov 15, 2012 | 04:00 PM
#838
Hi Terry, I like the cupholder mod on your wife's 4runner...I may have to look into that one, that has a nice fatory look to it! Your runner is looking very good! The repainted window moldings really turned out nice, all of the black accents really sets off your new paint job, nice work!!!
Nov 16, 2012 | 12:45 AM
#839
Looking good, man!
Thanks on the tips.... I'll try that at some point. I was going to go LED in the dash... but I really am so happy with the stock green all around after putting in the perfect working dimmer... that I wont bother. BUT, it bothers me to NOT KNOW, for certain, that my temp gauge is dead on or at least close.
The temp doesn't drop off anymore... it USED to do that...before I swapped in the temp gauge from another cluster(Jason has it now, that SR5 Cluster.... I think he does anyhow haha... My brain is a lil funky). BUT, when I start it cold... it seems to be already at around 1/3rd... Always sits there. I have a high end Radiator, new, Better than OEM quality, new OEM Stat, new hoses for the most part.. New water pump... I think I'm fine... I don't sweat it, lol... BUT, I still don't think that's safe. ESPECIALLY when wheeling and pushing it, ya know? I will clean that stuff up and then tighten it, asap... letcha know.
Thanks on the tips.... I'll try that at some point. I was going to go LED in the dash... but I really am so happy with the stock green all around after putting in the perfect working dimmer... that I wont bother. BUT, it bothers me to NOT KNOW, for certain, that my temp gauge is dead on or at least close.
The temp doesn't drop off anymore... it USED to do that...before I swapped in the temp gauge from another cluster(Jason has it now, that SR5 Cluster.... I think he does anyhow
haha... My brain is a lil funky). BUT, when I start it cold... it seems to be already at around 1/3rd... Always sits there. I have a high end Radiator, new, Better than OEM quality, new OEM Stat, new hoses for the most part.. New water pump... I think I'm fine... I don't sweat it, lol... BUT, I still don't think that's safe. ESPECIALLY when wheeling and pushing it, ya know? I will clean that stuff up and then tighten it, asap... letcha know.
Nov 16, 2012 | 04:29 AM
#840
Thread Starter
Super Moderator
iTrader: (1)
Joined: Aug 2008
Posts: 11,787
Likes: 28
From: Anderson Missouri
Thanks Ed... I will eventually get the front window tinted to match the back and think that will make a nice difference. It will be a ways off yet. Now that I should be able to get more time to work on it things should start to make a difference. Still got alot of little things to take care of, but each one is a step closer.
Hello Mark... I think cleaning the ground screw and tightening the back of the guages has got to help. Also the sensors get a lot of hard water build up and that can only help. But I hear you, I like to have the confidence in my guages.
Hello Mark... I think cleaning the ground screw and tightening the back of the guages has got to help. Also the sensors get a lot of hard water build up and that can only help. But I hear you, I like to have the confidence in my guages.


