
Morph
 Meh.....you get away from things for a while and you tend to forget the details. That happens.
 Jul 6, 2010 | 08:43 AM
#162
Thread Starter
Contributing Member
Joined: Apr 2004
Posts: 5,464
Likes: 6
From: Arvada, Colorado
Yup. A little bit of AxleHeimers! LOL!
Nah, I just don't have the time to post as much really, as I've gotten more and more active on local stuff.
Anyway, stay tuned for barbeque'd metal!
Nah, I just don't have the time to post as much really, as I've gotten more and more active on local stuff.
Anyway, stay tuned for barbeque'd metal!
Jul 6, 2010 | 07:47 PM
#164
Thread Starter
Contributing Member
Joined: Apr 2004
Posts: 5,464
Likes: 6
From: Arvada, Colorado
Got some gussets made this evening, and started mocking up the center link. Also primed the frame yesterday, and painted today
Here is the mocked up idler, and a shot showing how I cut off the bracing:


And, I added some new bracing in:

Primed the frame yesterday:

Next it was on to mock up:
First I lined up a stock arm for reference:


Then it was on to the new arm:
Parts I'm using:


Mocked up, extended 1/2" to account for the extra steel on the frame now:


I spent the rest of the evening making gussets. I still have a few more to go:


I'll be using a piece of tube as shown to tie gussets into on the front side of the arm. Still have to make those though.

Also still have to drill holes in the main tube so I can rossette weld along the length of the tube.
Here is the mocked up idler, and a shot showing how I cut off the bracing:
And, I added some new bracing in:
Primed the frame yesterday:
Next it was on to mock up:
First I lined up a stock arm for reference:
Then it was on to the new arm:
Parts I'm using:
Mocked up, extended 1/2" to account for the extra steel on the frame now:
I spent the rest of the evening making gussets. I still have a few more to go:
I'll be using a piece of tube as shown to tie gussets into on the front side of the arm. Still have to make those though.
Also still have to drill holes in the main tube so I can rossette weld along the length of the tube.
Jul 6, 2010 | 08:23 PM
#167
Registered User
Joined: Feb 2007
Posts: 2,203
Likes: 0
From: Sierra Nevada's or the Deserts of Las Vegas
Damn dude, that's badass...but with all this work, why not just swap out the front end and eliminate all the problems and make the whole front end that much stronger?
Jul 7, 2010 | 07:28 AM
#170
Thread Starter
Contributing Member
Joined: Apr 2004
Posts: 5,464
Likes: 6
From: Arvada, Colorado
This was 370 for the idler and 150 for the tie rod end parts, and the steel was stuff I had laying around, so I don't remember what all that was, but it wasn't too much because its short stuff.
SAS would be
900 for a new locker
700 for longs
500 for link material, brackets, and hardware
6-700 for coilovers
200 for gears
120 for new bearings
100 for a driveshaft mod
???? for tires and wheels
5-700 for high steer
and then add 900 if I want to go with a diamond instead of a normal LC front.
Plus, the body is still rough and crappy looking, and I still don't have cup holders!

It needs a lot of work before it can get SAS'd.
Jul 7, 2010 | 07:59 AM
#171
Thread Starter
Contributing Member
Joined: Apr 2004
Posts: 5,464
Likes: 6
From: Arvada, Colorado
eh, not really. With the plasma its so quick and easy that I didn't really think about it. I knew I'd have to put more on, but this way it is all lined back up with the original hole in the bottom of the frame.
Jul 7, 2010 | 08:40 AM
#172
Registered User
Joined: Sep 2005
Posts: 8,656
Likes: 16
From: NW Ark on wooded ten acres...Ozarks at large!
Well, it is a bit of work, but cost wise, much much cheaper.
This was 370 for the idler and 150 for the tie rod end parts, and the steel was stuff I had laying around, so I don't remember what all that was, but it wasn't too much because its short stuff.
SAS would be
900 for a new locker
700 for longs
500 for link material, brackets, and hardware
6-700 for coilovers
200 for gears
120 for new bearings
100 for a driveshaft mod
???? for tires and wheels
5-700 for high steer
and then add 900 if I want to go with a diamond instead of a normal LC front.
Plus, the body is still rough and crappy looking, and I still don't have cup holders!
It needs a lot of work before it can get SAS'd.
Jul 7, 2010 | 08:51 AM
#173
Thread Starter
Contributing Member
Joined: Apr 2004
Posts: 5,464
Likes: 6
From: Arvada, Colorado
SAS doesn't need to be that extensive, but I don't want a cookie cutter, every kid on the block has one, SAS. I also don't want to put leafs back on, even in the front, as I just went to all this trouble to get rid of them, because they annoy me.
And, yes, all my prices are new. Probably won't buy used stuff.
As for wheels and tires, I don't see too much of a point in SASing to run tires that I can run IFS. And also, beadlocks would be nice.
Jul 7, 2010 | 09:00 AM
#174
Registered User
Joined: Sep 2005
Posts: 8,656
Likes: 16
From: NW Ark on wooded ten acres...Ozarks at large!
No. Coils in the rear. Thats a good point though, as my rear needs a 4 link now, as the 3 link I designed has a few flaws. Nothing major, but stuff that annoys me on the road.
SAS doesn't need to be that extensive, but I don't want a cookie cutter, every kid on the block has one, SAS. I also don't want to put leafs back on, even in the front, as I just went to all this trouble to get rid of them, because they annoy me.
And, yes, all my prices are new. Probably won't buy used stuff.
As for wheels and tires, I don't see too much of a point in SASing to run tires that I can run IFS. And also, beadlocks would be nice.
Jul 7, 2010 | 09:13 AM
#175
Thread Starter
Contributing Member
Joined: Apr 2004
Posts: 5,464
Likes: 6
From: Arvada, Colorado
Jul 7, 2010 | 09:21 AM
#177
Registered User
Joined: Mar 2008
Posts: 546
Likes: 0
From: CO
He used to have leafs up front, then he did an IFS conversion to be different...

He's IFS and doesn't want to go to leafs if he does a SAS.

Edit: I'm slow.
 Jul 12, 2010 | 07:16 AM
#180
Thread Starter
Contributing Member
Joined: Apr 2004
Posts: 5,464
Likes: 6
From: Arvada, Colorado
Got some more done. I now only have one tie rod left to make and I should be good to go!
Anyway, some progress:
First off, I "bologna cut" the center link sleeve and drilled it full of holes for rossette welds:


The bologna cut was at the suggestion of my buddy Kevin in RS, so as not to create a shear plane in the center link. Made sense and took all of 2 minutes to do, I'm liking it.
Then, after checking everything lined up, it was BARBEQUE TIME!!!!

The thermometer on the top of the grill read about 600F, but I'd imagine its only accurate to 50 deg at best. However, it was hot. I let the parts heat in there for 45 minutes, then pulled them out part by part and welded them up, with one 10 minute re-heat of the main piece in the middle of it.
Welded great, so I'm pretty sure my "tests" of the metal were accurate enough, by which I mean, it was a forged piece.
After welding, I put the whole thing back under the grill for another 30 minutes, and then shut the grill off, and kept the lid closed and let it cool. I think it was pretty slow cooling.
Anyway, I did not have a chance to shoot pictures while welding things up, as it was too rushed.
However, this is the finished product, checking for fitment on the truck:


I think some of those braces are a bit large, so I may trim them down a bit.
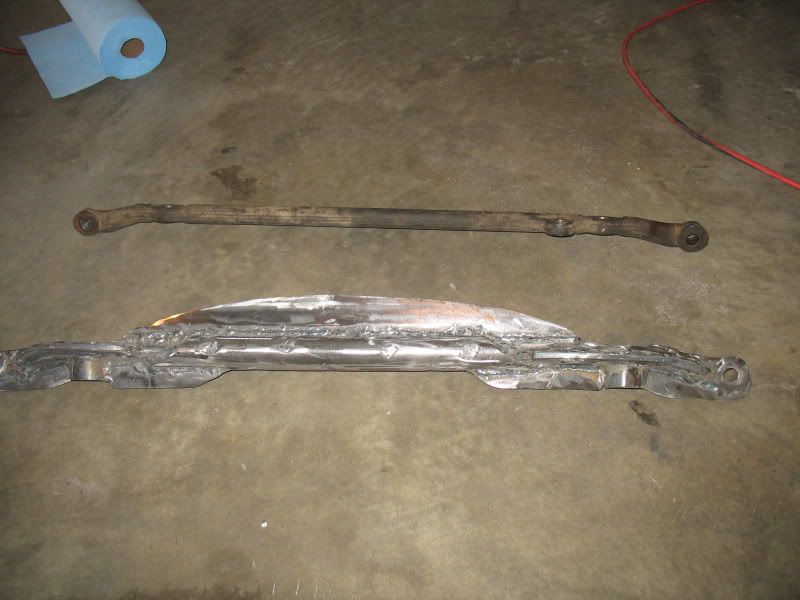
Here are a couple shots after doing a little clean up grinding, next to a stock unit:


I'm hoping this will result in a steering system that won't bend. I seem to have this knack, however, of not getting things to do what I want them to do.
Anyway, I also got one tie rod welded up, but don't have a picture yet. Not too impressive though, just a straight piece of DOM with two threaded inserts welded it, also with rossette welds.
Anyway, some progress:
First off, I "bologna cut" the center link sleeve and drilled it full of holes for rossette welds:
The bologna cut was at the suggestion of my buddy Kevin in RS, so as not to create a shear plane in the center link. Made sense and took all of 2 minutes to do, I'm liking it.
Then, after checking everything lined up, it was BARBEQUE TIME!!!!
The thermometer on the top of the grill read about 600F, but I'd imagine its only accurate to 50 deg at best. However, it was hot. I let the parts heat in there for 45 minutes, then pulled them out part by part and welded them up, with one 10 minute re-heat of the main piece in the middle of it.
Welded great, so I'm pretty sure my "tests" of the metal were accurate enough, by which I mean, it was a forged piece.
After welding, I put the whole thing back under the grill for another 30 minutes, and then shut the grill off, and kept the lid closed and let it cool. I think it was pretty slow cooling.
Anyway, I did not have a chance to shoot pictures while welding things up, as it was too rushed.
However, this is the finished product, checking for fitment on the truck:
I think some of those braces are a bit large, so I may trim them down a bit.
Here are a couple shots after doing a little clean up grinding, next to a stock unit:
I'm hoping this will result in a steering system that won't bend. I seem to have this knack, however, of not getting things to do what I want them to do.
Anyway, I also got one tie rod welded up, but don't have a picture yet. Not too impressive though, just a straight piece of DOM with two threaded inserts welded it, also with rossette welds.


