
Kelly00127 build 1988 toyota pickup 22re 5 speed 4x4
 Dec 11, 2012 | 06:23 PM
#21

Thread Starter
Registered User
Joined: Jun 2011
Posts: 54
Likes: 0
From: Aberdeen, SD
The only thing I have done to the body is I replaced the old rubber bushing with poly bushing and put on a 1" body lift from 4Crawler Offroad. It was an easy install since I was replacing the bushings. It came with all new bolts and such. With a 1" bodylift I did not have to extend brake lines, drop the radiator, extend the steering linkage, or extended the shifters. 1" is not much but it gives it a different look without raising the body off the frame too much. I also found additional rust which I removed and reinforced by welding new metal.
Dec 12, 2012 | 11:44 AM
#22
It does make working on these so much easier with the motor out. You have done alot to it since getting it. Truck is coming along nicely. I tore my motor down and have it nearly back together and am getting ready to install the distributor and I like the video below. It is nearly set when done. You might like it.
Video>>> http://www.youtube.com/watch?v=9qEQM...ature=youtu.be
Video>>> http://www.youtube.com/watch?v=9qEQM...ature=youtu.be
Dec 12, 2012 | 12:13 PM
#23
Thread Starter
Registered User
Joined: Jun 2011
Posts: 54
Likes: 0
From: Aberdeen, SD
It does make working on these so much easier with the motor out. You have done alot to it since getting it. Truck is coming along nicely. I tore my motor down and have it nearly back together and am getting ready to install the distributor and I like the video below. It is nearly set when done. You might like it.
Video>>> http://www.youtube.com/watch?v=9qEQM...ature=youtu.be
Video>>> http://www.youtube.com/watch?v=9qEQM...ature=youtu.be
Thank you!


 Dec 12, 2012 | 05:31 PM
#25
Thread Starter
Registered User
Joined: Jun 2011
Posts: 54
Likes: 0
From: Aberdeen, SD
I sent the injector's off to have them refurbished and cleaned. I ordered auto meter electric gauges and installed the sensors. Oil sensor was no problem. I put it where the dummy light sensor went. I attempted to put the new temp gauge in the current temp gauge sensor location near the injectors but it was a little too large and would not fit. I placed it were the drain cock is for the engine block. I guessing it will still work. Any thoughts? Any thoughts on the use of teflon tape? I read a few posts where people had ground issues when using teflon tape.
(current stock temp gauge)

(oil pressure sending unit)
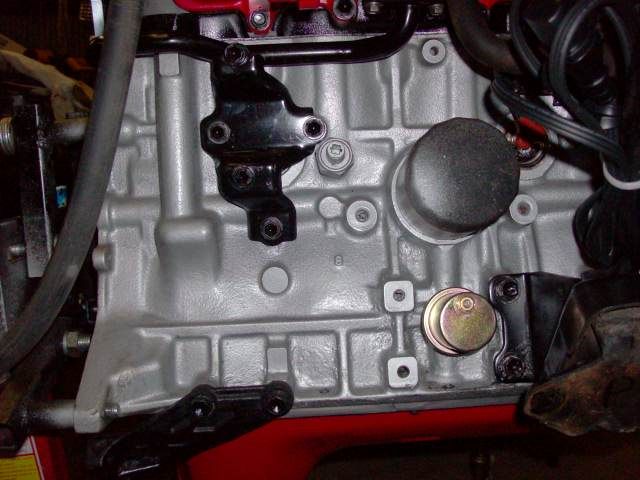
(oil pressure sending unit)

(location of the new temp gauge)

I'm ready to take it off the engine stand. All I need to do is put in the new pilot bearing, new fly wheel, new clutch, new pressure plate, and put in a new throw out bearing and I will be ready to slide the engine back in.
(current stock temp gauge)
(oil pressure sending unit)
(oil pressure sending unit)
(location of the new temp gauge)
I'm ready to take it off the engine stand. All I need to do is put in the new pilot bearing, new fly wheel, new clutch, new pressure plate, and put in a new throw out bearing and I will be ready to slide the engine back in.
Dec 12, 2012 | 10:33 PM
#27
Wow, GREAT work, great transformation ..... and GREAT READ! LOVE seeing the son in there! WOOT! haha... X2 on the 'GREAT body work!' commentary... Motor isn't looking shabby either
Dec 13, 2012 | 09:24 AM
#28
Thread Starter
Registered User
Joined: Jun 2011
Posts: 54
Likes: 0
From: Aberdeen, SD
Thank you. I'm giving my son the option of having this truck or a 1989 4runner 5 speed 4x4 with the 22re which I will fix after this one. I guessing he will opt for the 4runner. I love the 4 cylinders.
Dec 16, 2012 | 08:06 PM
#29
Thread Starter
Registered User
Joined: Jun 2011
Posts: 54
Likes: 0
From: Aberdeen, SD
I finished putting the motor back together. I also added a block heater. I put in a new fly wheel, clutch, pilot bearing and throw out bearing. It went in fairly easy. Now comes the task of connecting all the hoses and wires. My plan is to finish installing my aftermarket gauges and start it next weekend. Now is the time where I start to second guess myself. Did I tighten that? Did I forget something? Am I sure if applied the right torque? What have I forgot? I'm very happy I've have gotten this far. I'm looking forward to firing it up! I need to clean up my shop.


Dec 17, 2012 | 01:28 AM
#30
HOLY CRAPOLI! NICE WORK!!!
Know whatcha mean on the 'what did I forget'... But really, it's trial and error. Get the HG and Intake and such right... the semantics can be re-done pretty easily.
Did you sealant up the underside and top corners of the half moons?
Did you do the dab of sealant on the end of the top/center oil pump bolt?
Did you do the 3 Different Torque ratings on the Oil pump?
Did you install the chassis ground wire to the block plate bolt on the back of the head? (PITA to get to after you install the motor)
Knock sensor, Oil Pressure sending unit, CTSensor, CSI Time Switch, all have Teflon or Thread Sealer on them?(Not manditory but helpful insurance)...
Can be a bit of a witch to run some of the wiring through with the plenum already on... Especially if you've not cut that center support away on the lower intake. NOT saying you screwed up, lol... people do them like that. Just found it a BIT tough to get some of them brittle injector wire connectors on when I did it that way one time... And then the wiring has to run THOUGH that center portion, OVER the lower intake hump, under the plenum center hole.... through to the;
A. Oil Pressure Sending Unit
B. Coolant Temp Sending unit
C. Knock Sensor
D. Reverse and 4WD Wiring that Heads back to the Trans
E. IACV Connector
F. Coolant Temp Sensor
G. CSI Time Switch
H. TPS
I. Thermo Temp Time Switch (on top of Thermostat housing on many models)
J. Starter Signal Wire
K. FPR and AC VSV Wiring
L. Injector Wiring, including Cold Start
.......... Personally... I found it MUCH easier to finish assembly by doing everything EXCEPT the Plenum/Throttle Body... Ran the wiring through... Ran the IACV/other vacuum and all the various Coolant lines through... THEN slap the plenum on. NOT trying to say "NOOOOOOOOO!" hahaha... I'm just sharing my experience in case you have a lil trouble or snap off an Injector connector retainer clip housing, etc.
Last edited by ChefYota4x4; Dec 17, 2012 at 01:29 AM.
Dec 17, 2012 | 06:13 AM
#31
Thread Starter
Registered User
Joined: Jun 2011
Posts: 54
Likes: 0
From: Aberdeen, SD
HOLY CRAPOLI! NICE WORK!!!
Know whatcha mean on the 'what did I forget'... But really, it's trial and error. Get the HG and Intake and such right... the semantics can be re-done pretty easily.
Did you sealant up the underside and top corners of the half moons?
Did you do the dab of sealant on the end of the top/center oil pump bolt?
Did you do the 3 Different Torque ratings on the Oil pump?
Did you install the chassis ground wire to the block plate bolt on the back of the head? (PITA to get to after you install the motor)
Knock sensor, Oil Pressure sending unit, CTSensor, CSI Time Switch, all have Teflon or Thread Sealer on them?(Not manditory but helpful insurance)...
Can be a bit of a witch to run some of the wiring through with the plenum already on... Especially if you've not cut that center support away on the lower intake. NOT saying you screwed up, lol... people do them like that. Just found it a BIT tough to get some of them brittle injector wire connectors on when I did it that way one time... And then the wiring has to run THOUGH that center portion, OVER the lower intake hump, under the plenum center hole.... through to the;
A. Oil Pressure Sending Unit
B. Coolant Temp Sending unit
C. Knock Sensor
D. Reverse and 4WD Wiring that Heads back to the Trans
E. IACV Connector
F. Coolant Temp Sensor
G. CSI Time Switch
H. TPS
I. Thermo Temp Time Switch (on top of Thermostat housing on many models)
J. Starter Signal Wire
K. FPR and AC VSV Wiring
L. Injector Wiring, including Cold Start
.......... Personally... I found it MUCH easier to finish assembly by doing everything EXCEPT the Plenum/Throttle Body... Ran the wiring through... Ran the IACV/other vacuum and all the various Coolant lines through... THEN slap the plenum on. NOT trying to say "NOOOOOOOOO!" hahaha... I'm just sharing my experience in case you have a lil trouble or snap off an Injector connector retainer clip housing, etc.
Know whatcha mean on the 'what did I forget'... But really, it's trial and error. Get the HG and Intake and such right... the semantics can be re-done pretty easily.
Did you sealant up the underside and top corners of the half moons?
Did you do the dab of sealant on the end of the top/center oil pump bolt?
Did you do the 3 Different Torque ratings on the Oil pump?
Did you install the chassis ground wire to the block plate bolt on the back of the head? (PITA to get to after you install the motor)
Knock sensor, Oil Pressure sending unit, CTSensor, CSI Time Switch, all have Teflon or Thread Sealer on them?(Not manditory but helpful insurance)...
Can be a bit of a witch to run some of the wiring through with the plenum already on... Especially if you've not cut that center support away on the lower intake. NOT saying you screwed up, lol... people do them like that. Just found it a BIT tough to get some of them brittle injector wire connectors on when I did it that way one time... And then the wiring has to run THOUGH that center portion, OVER the lower intake hump, under the plenum center hole.... through to the;
A. Oil Pressure Sending Unit
B. Coolant Temp Sending unit
C. Knock Sensor
D. Reverse and 4WD Wiring that Heads back to the Trans
E. IACV Connector
F. Coolant Temp Sensor
G. CSI Time Switch
H. TPS
I. Thermo Temp Time Switch (on top of Thermostat housing on many models)
J. Starter Signal Wire
K. FPR and AC VSV Wiring
L. Injector Wiring, including Cold Start
.......... Personally... I found it MUCH easier to finish assembly by doing everything EXCEPT the Plenum/Throttle Body... Ran the wiring through... Ran the IACV/other vacuum and all the various Coolant lines through... THEN slap the plenum on. NOT trying to say "NOOOOOOOOO!" hahaha... I'm just sharing my experience in case you have a lil trouble or snap off an Injector connector retainer clip housing, etc.
Thanks for all the reminders. Not sure if I did the sealant for the center bolt on the water pump but I put sealant on both sides of the gasket? Hope that does the trick. This is the first 22re I have rebuilt. I have just about hooked everything back up. I have a few more wires to connect (grounds) etc., torque the main pulley bolt, put on the radiator, fill, put on the fan and belts, and fill with oil. Connect the aftermarket temp, volt, and oil pressure gauges. Crank with the coil wire pulled and plugs out, to prime the oil pump, reconnect then start. Anything else I forgot?
Dec 25, 2012 | 08:33 AM
#32
Mark left some really good tips above. Sond like you got about mos of it wrapped up. If all is setup right, you will be suprised at how fast it will fire up I still occasionally get the dizzy a tooth off and it will still start, so if you cant get the timing set correct, that is probably what happened.
Here is a pic I refer to for the grounds.
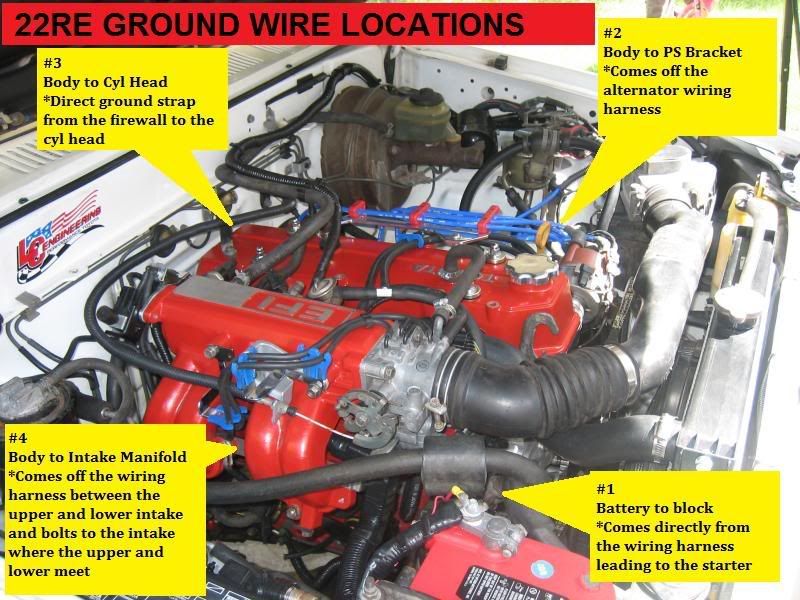
Here is a pic I refer to for the grounds.
Dec 25, 2012 | 06:35 PM
#33
Thread Starter
Registered User
Joined: Jun 2011
Posts: 54
Likes: 0
From: Aberdeen, SD
Terry Thanks for the additional reminders. I got everything hooked up and ran it for about 40 miles then changed the oil. No leaks of any kind. I did not get my aftermarket gauges installed yet. Might look for an SR5 gauge. I will be putting the factory steel rims back on with the standard size tires with an aggressive tread. The RV cam does not seem like it does much as far as power. I have to paint the rims and get the tires put on them. I have a rollbar which came with truck which I have to paint and install.


Dec 26, 2012 | 01:05 PM
#34
I like your TRD stickers on the rear of the truck. Is this the same truck as what is on the first page?? Just kidding, you did a great job and should be proud of what you did. You will get alot of satisftion out of it. Your truck just looks great on the inside and outside.
Dec 26, 2012 | 01:13 PM
#35
Thread Starter
Registered User
Joined: Jun 2011
Posts: 54
Likes: 0
From: Aberdeen, SD
I like your TRD stickers on the rear of the truck. Is this the same truck as what is on the first page?? Just kidding, you did a great job and should be proud of what you did. You will get alot of satisftion out of it. Your truck just looks great on the inside and outside.
Thank you Terry! Keep your eye open for an SR5 gauge set.
Dec 26, 2012 | 01:34 PM
#36
Chef (Mark) has one for $100.. that is what they usually run about on ebay. I have dealt with him several times and has always done me well. Here is his link.. I just looked and it appears he still has it.>> https://www.yotatech.com/forums/f109.../#post52015309
Dec 26, 2012 | 01:35 PM
#37
Thread Starter
Registered User
Joined: Jun 2011
Posts: 54
Likes: 0
From: Aberdeen, SD
Chef (Mark) has one for $100.. that is what they usually run about on ebay. I have dealt with him several times and has always done me well. Here is his link.. I just looked and it appears he still has it.>> https://www.yotatech.com/forums/f109.../#post52015309
Dec 27, 2012 | 07:02 AM
#39
Here is the new oil sending unit you will need. I suggest removing the grounding tab like in the picture below. The one you have now is a little larger then a nickel and the one you will need is a little larger then a quarter.
Here is the one I removed on mine and suggest removing. It will ruin the oil guage if it is connected to it. Also make sure that when removing the old sensor that it is actually turning and not twisitng off. I experinced that before as well. Luckily a guy I knew was able to weld a nut to it and spin the broken shaft out of it.

Here is the one I removed on mine and suggest removing. It will ruin the oil guage if it is connected to it. Also make sure that when removing the old sensor that it is actually turning and not twisitng off. I experinced that before as well. Luckily a guy I knew was able to weld a nut to it and spin the broken shaft out of it.
Last edited by Terrys87; Dec 27, 2012 at 07:04 AM.

Thread
Thread Starter
Forum
Replies
Last Post
6th Gear
84-85 Trucks & 4Runners (Build-Up Section)
19
Dec 10, 2019 07:31 AM
Peteyg39@hotmail.com
Newbie Tech Section
1
Jun 26, 2015 08:15 AM


