
Kelly00127 build 1988 toyota pickup 22re 5 speed 4x4
 Dec 2, 2012 | 02:43 PM
#1

Thread Starter
Registered User
Joined: Jun 2011
Posts: 54
Likes: 0
From: Aberdeen, SD
Kelly00127 build 1988 toyota pickup 22re 5 speed 4x4
Hello,
I purchased this truck a few years ago. It was not running and 1 rear wheel was locked up. I initially started fixing it up for my son. Who with a limited license and driver's ed can drive at the age of 14. The more I work on this truck the more I like it, which may mean he might get another vehicle. I have rebuilt a few V-8, never done welding or body work, but plan on attempting. I enjoy the simplicity of this engine and design. I will try to post pictures when I can.
Kelly


Look it's smiling!

I purchased this truck a few years ago. It was not running and 1 rear wheel was locked up. I initially started fixing it up for my son. Who with a limited license and driver's ed can drive at the age of 14. The more I work on this truck the more I like it, which may mean he might get another vehicle. I have rebuilt a few V-8, never done welding or body work, but plan on attempting. I enjoy the simplicity of this engine and design. I will try to post pictures when I can.
Kelly
Look it's smiling!
Last edited by Kelly00127; May 19, 2013 at 08:10 AM.
Dec 2, 2012 | 03:14 PM
#2
Just got done reading about your wrecked 3rd Gen and then seen you had this build. Alot of these 2nd gen trucks, the bed may be bad but the rest of he truck can be really solid. Just depends. Check the rear of the frame especially.
Seen you were going to Missouri for a funeral when you wrecked. I currently know where two great beds are at, just dont know what part of Missouri you go to. They are out there, just have to look.
These trucks really are set up nice and easy to work on, and the when done right are just a great fun dependable ride. Looking forward to your build.
 Dec 3, 2012 | 06:22 AM
#5
Thread Starter
Registered User
Joined: Jun 2011
Posts: 54
Likes: 0
From: Aberdeen, SD
Frame had surface rust. I took the bed off, cleaned it up and used POR-15 on it. All the brake lines were rusted and were replaced. I had to replace the fuel sending unit, fuel pump, fuel lines, new cap rotor and wires, and it fired up.
Dec 3, 2012 | 03:27 PM
#6
Body work takes time and patience. I am not a pro, but I do my own and actually enjoy it. Best thing I could say is to jump in and do it. Any information you might want to know I will give it my best shot. Not much bodywork threads on here, but when they do I subscribe.
Dec 3, 2012 | 04:20 PM
#7
Thread Starter
Registered User
Joined: Jun 2011
Posts: 54
Likes: 0
From: Aberdeen, SD
Body work takes time and patience. I am not a pro, but I do my own and actually enjoy it. Best thing I could say is to jump in and do it. Any information you might want to know I will give it my best shot. Not much bodywork threads on here, but when they do I subscribe.
Thank you! Looking at your builds, you definitely have a skill for the restore. I've put the cart before the horse. I've done a lot of the work but have not posted the pictures yet. I thought I would get around to doing a few per evening.
Trending Topics
Dec 3, 2012 | 05:09 PM
#8
Thread Starter
Registered User
Joined: Jun 2011
Posts: 54
Likes: 0
From: Aberdeen, SD
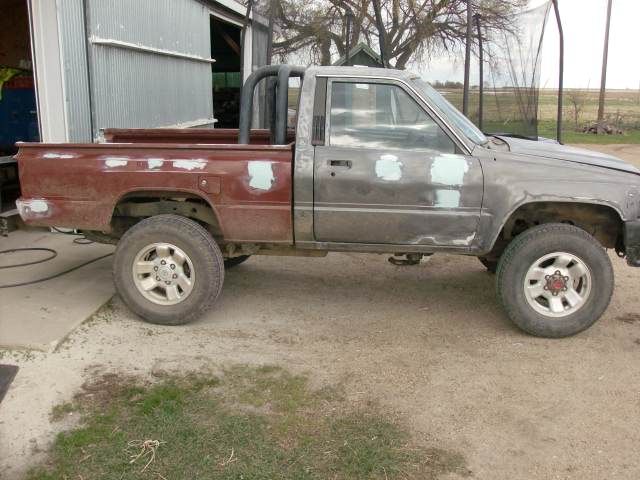
I started the body work. I have had no training in body work. Only what I have read and found on the internet. I figured how bad could it turn out?


I used a wire feed welder to seal up these holes. I learned real quick how thin the metal was by burning a bigger hole. Turned down the welder to the lowest level and used a wet rag to cool the metal and took my time.


Took the bed off to make it easier to work on. I coated the bottom of the bed with black undercoating

I used a wire feed welder to seal up these holes. I learned real quick how thin the metal was by burning a bigger hole. Turned down the welder to the lowest level and used a wet rag to cool the metal and took my time.
Took the bed off to make it easier to work on. I coated the bottom of the bed with black undercoating


 Dec 5, 2012 | 06:33 PM
#10
Thread Starter
Registered User
Joined: Jun 2011
Posts: 54
Likes: 0
From: Aberdeen, SD
Homemade paint booth
I painted this the truck this past summer, never thinking to start a build thread so I'm just now putting on here. I'm trying to get caught up to my current engine build. Ok this is my first time painting a vehicle. I created this temp paint booth in my shop using 10' 1 1/4" pvc pipe with T's and 90's duc tape and mono-filament tape (Tape that needs to be cut). Using, I believe 4 mill plastic with a width of 12'. I placed furnace filters on the far end and used a squirrel cage type fan (donated by friend) at the opening to draw air through the booth. I am not sure it helped and I'm not sure this temp booth was worth the effort. It did cut down on dust in the paint. What's great about this booth, you do not need to use PVC cement. All you have to do is use a rubber mallet or jam them together. After your done, you can reuse the PVC pipe using the rubber mallet to disassemble. Total cost for the materials was about $140, probably cheaper where you live. It worked ok. However when I kicked on the fan, it drew in the plastic to some degree so you want the plastic as tight as you can get it. I put heavy weights at the bottom to keep it from bowing in. I also hung about 10 sticky fly strips which are not pictured.


 Dec 10, 2012 | 06:48 PM
#13
Thread Starter
Registered User
Joined: Jun 2011
Posts: 54
Likes: 0
From: Aberdeen, SD
Paint
Ok I started painting using a base coat/clear coat. Reattached the doors and put the bed on saw horses so I could get to the back of the cab.


Clear coat


Sorry for the quality this was taken with a cell phone. The bed is just resting on the frame. It is not leveled with the spacers.

Clear coat
Sorry for the quality this was taken with a cell phone. The bed is just resting on the frame. It is not leveled with the spacers.
Dec 11, 2012 | 12:52 PM
#15
Thread Starter
Registered User
Joined: Jun 2011
Posts: 54
Likes: 0
From: Aberdeen, SD
Terry,
I'm guessing I'm like you. I like making something new again. I remember when these trucks came out. I always wanted one but could not afford it. I can afford them now, they just need work. I had to buy it when I saw the Beastie Boy's sticker on the rear window. I've always been a mechanic, not a body guy. I found body work fun to do, but I can see all my mistakes that I won't make on the next one! You just have to jump in, what the worst that can happen? You have to redo it. Thanks for all your advice to date.
Kelly
Dec 11, 2012 | 05:20 PM
#16
Thread Starter
Registered User
Joined: Jun 2011
Posts: 54
Likes: 0
From: Aberdeen, SD
Bedliner
I bought this in a kit. It came with a spraygun, 4 canisters of liner, and a hardner. It was easy to use and I would do it again. You need to make sure you rough up the bed well and clean it. I sprayed it in the open. I had a few spots which pealed due to poor prep. The canisters were mixed with the hardner then screwed onto the gun and sprayed. I went over the bedrail. Great stuff but you need to purchase additional canisters to make it thicker.


Dec 11, 2012 | 05:39 PM
#18
Thread Starter
Registered User
Joined: Jun 2011
Posts: 54
Likes: 0
From: Aberdeen, SD
Engine Rebuild
It's Winter time here so we pulled it into the shop. The shop is not heated but we use a forced air heater. Initially My son and I were just going to fix the broken timing guides, put in an RV cam, with new cover, oil pump, and water pump to include timing sprocket and chain. We were going to do it with the engine in the truck. Eventually we just decided to pull the motor. It was much easier than I thought and I would suggest it if you have the equipment pull the engine. This engine was working fine with only 126,000 on it, but I decided to just redo it so I would know it was done.


You can see all the plastic timing guide on the right is gone. I found all the chunks in the oil pan.

You can see all the plastic timing guide on the right is gone. I found all the chunks in the oil pan.


 Dec 11, 2012 | 06:05 PM
#20
Thread Starter
Registered User
Joined: Jun 2011
Posts: 54
Likes: 0
From: Aberdeen, SD
I sent the head off to have it cleaned, checked and resurfaced.


I did not have the block bored out, I honed the cylinders, leaving the crankshaft in place. I looked at the rod bearing and they look good, so I left all the bearing alone. Here are pictures of the honing. I liberally applied oil and kept the hone moving at all times but could not get a cross hatch pattern, but it did look a lot better.

The one on the left is not honed, one on the right is honed. It was tough for me to hone it with the crank in. You have to rotate the crank out of the way as far as you can, to hone it. I broke one honing stone hitting the crank's beefy side (lesson learned). I also attempted to keep the grit off the crank with towels. When completed I sprayed everything off with brake cleaner and re-oil.

Here are the new pistons and rings in place.


I did not have the block bored out, I honed the cylinders, leaving the crankshaft in place. I looked at the rod bearing and they look good, so I left all the bearing alone. Here are pictures of the honing. I liberally applied oil and kept the hone moving at all times but could not get a cross hatch pattern, but it did look a lot better.
The one on the left is not honed, one on the right is honed. It was tough for me to hone it with the crank in. You have to rotate the crank out of the way as far as you can, to hone it. I broke one honing stone hitting the crank's beefy side (lesson learned). I also attempted to keep the grit off the crank with towels. When completed I sprayed everything off with brake cleaner and re-oil.
Here are the new pistons and rings in place.


