
irab88's 1993 PickUp Build-Up Thread
 May 14, 2013 | 09:48 AM
#2281
Ian, you do really nice set ups! Sick!.... like usual. ... and the doors DO look great. Keep it up, learning each time! Lol
Last edited by ChefYota4x4; May 14, 2013 at 11:32 AM.
May 14, 2013 | 11:19 AM
#2283

instead of 2 dpdt relays, i used 4 spdt (standard automotive 5-pin) relays. cheap and easy replacements. to make a dpdt relay, wire the coils from 2 spdt relays in parallel. the switch is any spdt switch, and the led indicators are just 12v led's. all of this stuff can be had from ebay, radioshack, or advance-auto-zone.
the wire i got off of ebay here (relays to locker):
http://www.ebay.com/itm/Trailer-wire-Heavy-Duty-Flat-3-conductor-14-ga-per-10ft-/270384235718?pt=Boat_Parts_Accessories_Gear&hash=item3ef42804c6&vxp=mtr(or search for 3 flat trailer wire. my local rv shop had plenty of it. you'll need 2 runs/6 conductors)
and the servo wire (relays to switches/led's):
http://www.ebay.com/itm/NEW-Hitec-Servo-Wire-50-3-Color-57417-NIB-/330867391013?pt=US_Radio_Control_Control_Line&hash=item4d093bba25(hitec servo wire, comes in 50-foot bundles. again, 2 runs/6 conductors)
not this weekend, but some other weekend, i can swing by and show you my setup (maybe you want some help with your front axle, too?)
May 14, 2013 | 11:30 AM
#2285
yeah, this is the circuit i used:

and the post on wiring:
https://www.yotatech.com/forums/f199...l#post51925020
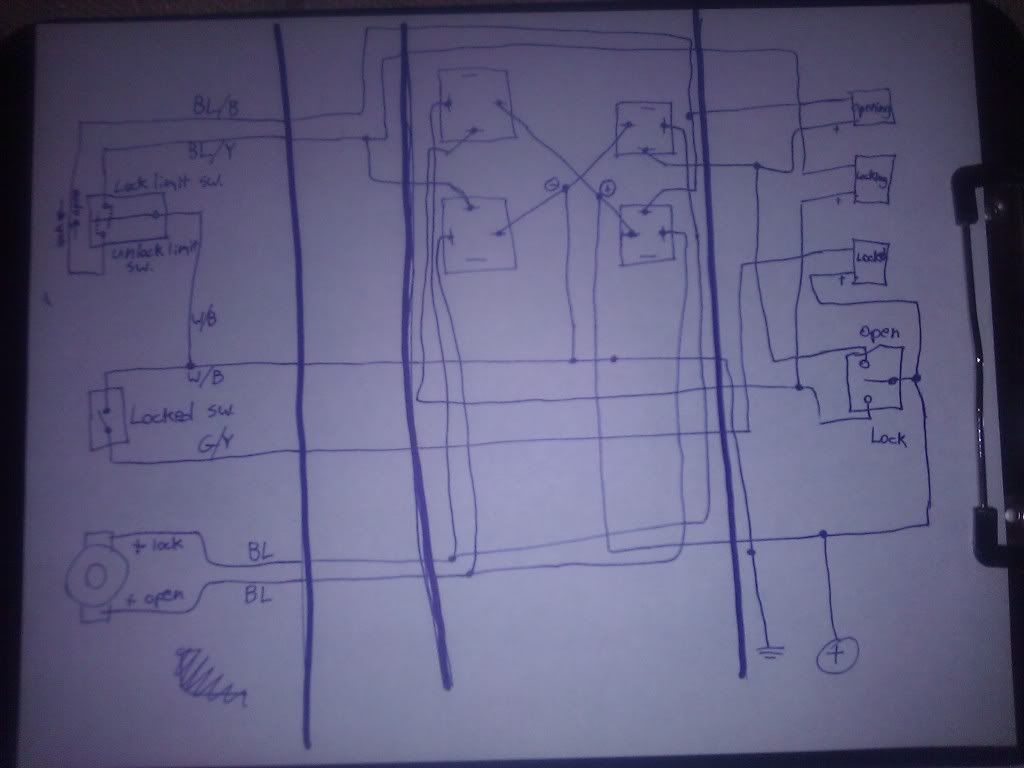
left-to-right: locker | connections to cable run | under hood | in cab
the terminals of the relay that aren't connected go to ground
wires aren't connected unless there's a -•-
and the post on wiring:
https://www.yotatech.com/forums/f199...l#post51925020
left-to-right: locker | connections to cable run | under hood | in cab
the terminals of the relay that aren't connected go to ground
wires aren't connected unless there's a -•-
Last edited by irab88; May 14, 2013 at 11:32 AM.
May 14, 2013 | 12:20 PM
#2286
Registered User
Joined: Apr 2012
Posts: 2,817
Likes: 2
From: Los Angeles CA
 May 14, 2013 | 03:34 PM
#2287
instead of 2 dpdt relays, i used 4 spdt (standard automotive 5-pin) relays. cheap and easy replacements. to make a dpdt relay, wire the coils from 2 spdt relays in parallel. the switch is any spdt switch, and the led indicators are just 12v led's. all of this stuff can be had from ebay, radioshack, or advance-auto-zone.
the wire i got off of ebay here (relays to locker):
Video Link: http://www.ebay.com/itm/Trailer-wire-Heavy-Duty-Flat-3-conductor-14-ga-per-10ft-/270384235718?pt=Boat_Parts_Accessories_Gear&hash=i tem3ef42804c6&vxp=mtr
(or search for 3 flat trailer wire. my local rv shop had plenty of it. you'll need 2 runs/6 conductors)
and the servo wire (relays to switches/led's):
Video Link: http://www.ebay.com/itm/NEW-Hitec-Servo-Wire-50-3-Color-57417-NIB-/330867391013?pt=US_Radio_Control_Control_Line&hash =item4d093bba25
(hitec servo wire, comes in 50-foot bundles. again, 2 runs/6 conductors)
not this weekend, but some other weekend, i can swing by and show you my setup (maybe you want some help with your front axle, too?)
May 16, 2013 | 05:17 PM
#2289
this is the adapter i'm talking about:

(you'll need to remove the center "pin" and drill it out a bit for better airflow)


thank you
May 22, 2013 | 09:24 AM
#2290
Registered User

Joined: Jan 2010
Posts: 3,795
Likes: 33
From: Bloodymore
Ian, did you have to modify the housing for the elocker where the yellow circle is on the back of the housing. Looks like a dimple to clear a bolt on the locker.

Last edited by RBX; May 22, 2013 at 09:31 AM.
May 22, 2013 | 12:19 PM
#2291
When installing mmy elocker we heated tht area up and hit it a few times with a hammer to make room for thr elocker bolt
May 22, 2013 | 06:27 PM
#2292
nope. fit right in. but i guess it depends on what gears you have, too. i have the stock 4.10's, so it's the same as the original gear. bigger gears might rub. once you get a few short studs in, put the locker in and turn the pinion. if it rubs, then you know you'll need to clearance it.
this is what's under my rig right now (plus a bit more taken out of the red areas- i didn't measure the first time, d'oh!), plus studs and a locker
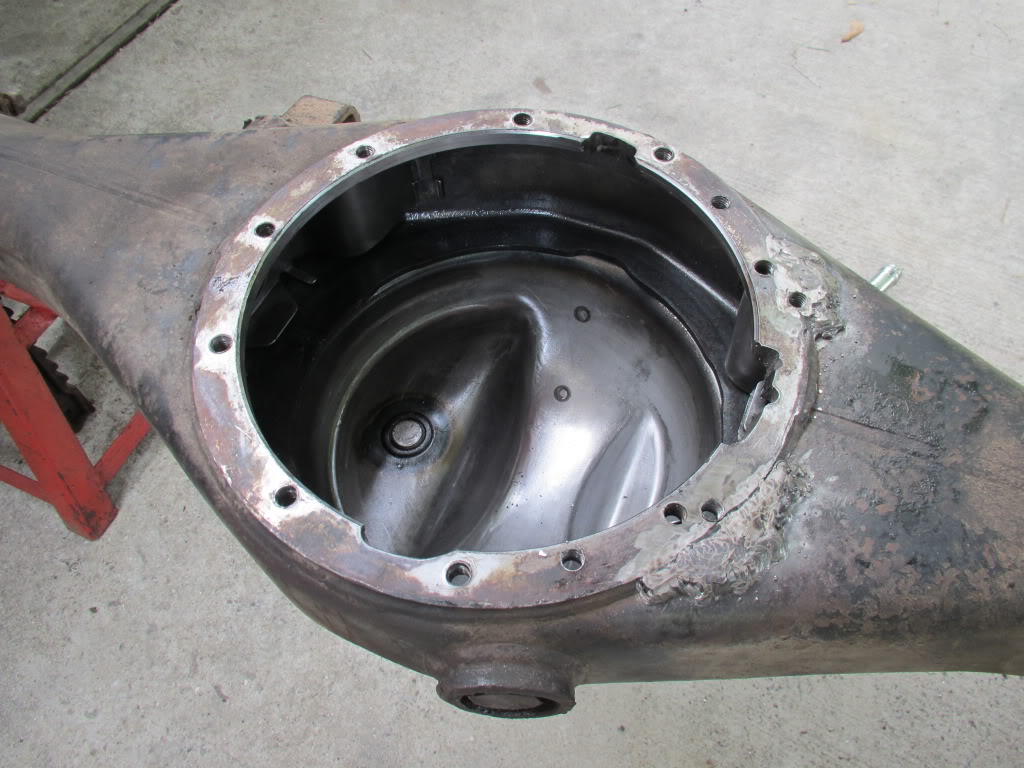
this is what's under my rig right now (plus a bit more taken out of the red areas- i didn't measure the first time, d'oh!), plus studs and a locker
May 23, 2013 | 05:13 AM
#2294


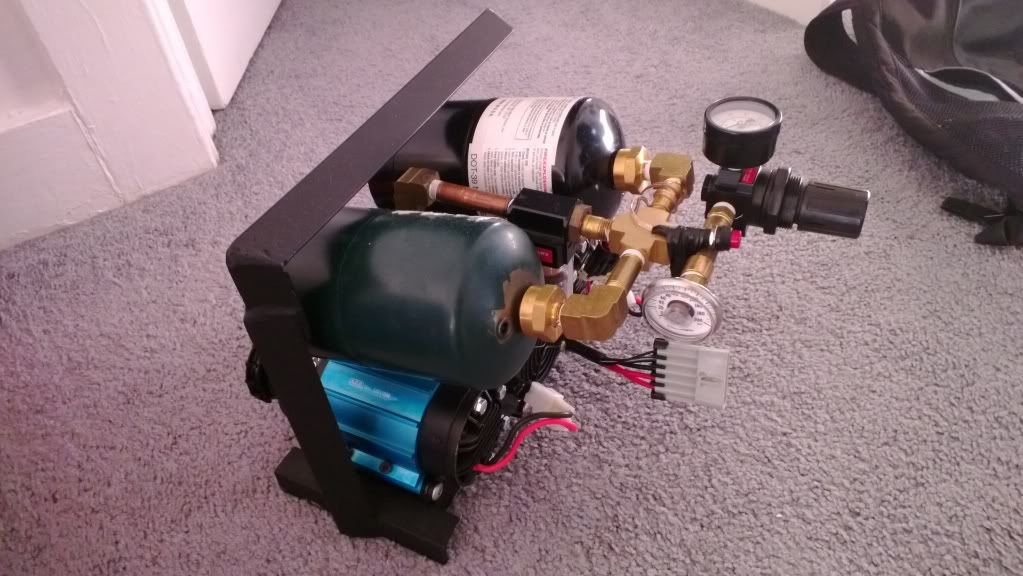
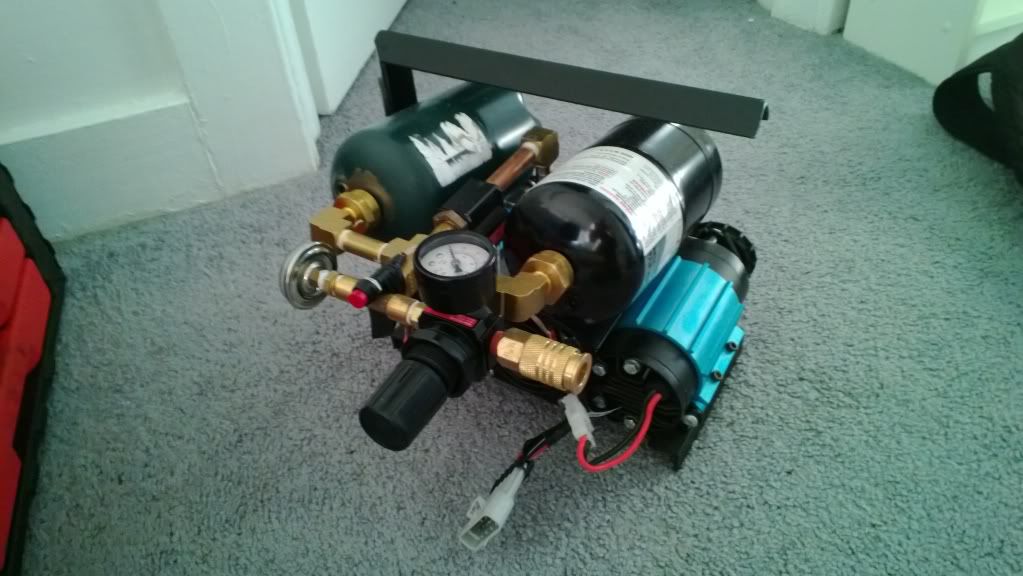
What a great Idea!! I would also love to see a writeup on this setup you have here. I never would have thought to use Propane Tanks.
 May 24, 2013 | 08:03 PM
#2296
swapped in an energy suspension motor mount this evening

lots of write-ups online, so it was easy. the new mount takes all of the elasticity out of accelerating. not "more" power, rather "more readily-available" power
lots of write-ups online, so it was easy. the new mount takes all of the elasticity out of accelerating. not "more" power, rather "more readily-available" power
May 31, 2013 | 08:15 AM
#2298
cool, thanks. looks like it's gonna be a late '13 / early '14 project for me, but i'm still collecting parts.
and for my future sas, i'm now considering leaf suspension in place of links to keep cost down. i hafta think it over, but the option is there
and for my future sas, i'm now considering leaf suspension in place of links to keep cost down. i hafta think it over, but the option is there
May 31, 2013 | 09:28 AM
#2299
Registered User
Joined: Jan 2010
Posts: 3,795
Likes: 33
From: Bloodymore
Links are more $$, but I always consider two things when doing any modification....
1. Is my effort to install this going to be the same to do either?
2. What's the cost difference between the options?
Btw, anyone doing an SAS, get real familiar with a right angle grinder. You are going to spend lots of time under your truck grinding down all the factory welds(and there are plenty), I think I logged about ten hours total. That's no exaggeration, I actually tried to keep track. That is probably the worst part of an SAS. I'll gladly help anyone do an SAS, but grinding, you are on your own.
May 31, 2013 | 10:34 AM
#2300
money-wise, it'll be a bit cheaper with leaves, and time-wise, i can mount some stuff on the truck while the ifs is still on, giving me little down-time.
in the end, they're both money-hungry and involved, but i think i'm better suited for doing leaves right now (it'll cost more money and time for links, and i want to get up and wheeling asap!)
though given the choice (independent of financial restrictions) i wouldn't hesitate to choose links.


