
the dragons 88 runner buildup/rebuild
 Jun 14, 2014 | 02:33 PM
#1021
finally bought the headlight harness upgrade for my ol girl an got more frameless wiper blades my current ones getting a bit streaky
in other news i want to enjoy my runner this summer likely gona be the last i do dr's want to do or i should say they are recommending...
a below the knee amputation of my right foot due to the long term non healing wound
in other news i want to enjoy my runner this summer likely gona be the last i do dr's want to do or i should say they are recommending...
a below the knee amputation of my right foot due to the long term non healing wound
Jun 16, 2014 | 11:41 PM
#1022
I cant believe they have to go that far up to get your wound healed. That would be a lot to comprehend. Hope all goes as well as it can be. Hoping for the best for you on that.
Jun 17, 2014 | 12:27 PM
#1023
Thread Starter
Registered User
Joined: Jul 2012
Posts: 2,365
Likes: 4
From: Idaho
easy to understand no so easy to accept an just do...
got several things coming headlight harness couple LED fog lights couple aluminum door lock pulls ill have to run the tap down to make metric for the rear seat lock pulls one of mine is broke (the plastic pull)
still need rear sheet metal been looking at new front pass side fenders on ebay several have shown up around 92 bucks


 Best of luck with the leg!
Jun 19, 2014 | 02:24 PM
Best of luck with the leg!
Jun 19, 2014 | 02:24 PM
#1025
Thread Starter
Registered User
Joined: Jul 2012
Posts: 2,365
Likes: 4
From: Idaho
so today was a collection of not quite fits got my new frameless wiper blades an they wont work unless i modify the locking mechanism which is not like the older version i have so that will come later
then also got the aluminum door lock pulls which as i expected didnt fit the seat back locks on the rear seats but we can MAKE it work! since one of mine was missing an the other was stripped out
so here they are the aluminum needs shortening way too long they hit the bottom of the pull up seat

it looks like its too big its not the aluminum is threaded smaller down inside an a non metric thread

cutting to length

drilled out for the larger metric thread which i will explain more in a moment

tapping threads, the thread pitch is right for the stem inside the seat but not the diameter its a odd thread for plastic i guess i didnt have anything i could use like it

the fix squishing the aluminum a bit to oval the threads surprisingly this makes it fit perfectly!

they thread right on an tighten puling the locks is easy an they wont strip out an were cheap to get

then also got the aluminum door lock pulls which as i expected didnt fit the seat back locks on the rear seats but we can MAKE it work! since one of mine was missing an the other was stripped out
so here they are the aluminum needs shortening way too long they hit the bottom of the pull up seat
it looks like its too big its not the aluminum is threaded smaller down inside an a non metric thread
cutting to length
drilled out for the larger metric thread which i will explain more in a moment
tapping threads, the thread pitch is right for the stem inside the seat but not the diameter its a odd thread for plastic i guess i didnt have anything i could use like it
the fix squishing the aluminum a bit to oval the threads surprisingly this makes it fit perfectly!
they thread right on an tighten puling the locks is easy an they wont strip out an were cheap to get
Jun 22, 2014 | 07:15 PM
#1026
Thread Starter
Registered User
Joined: Jul 2012
Posts: 2,365
Likes: 4
From: Idaho
head light harness upgrade
head light harness upgrade was today (with a loss of ac idler pulley parts) i tried to get a picture of the difference tween through the new harness an the old but they didnt come out clear cut but in person! this was a HUGE difference like between yellow paper an pure white paper
laid out the harness see where its goin an routing stuff

relays an harness partly tucked in behind engine bay fuse block pulled my battery an its plastic tray moved the washer bottle an thats when i was gona put my ac compressor back in in prep to get AC working an found my idler pulley was missing....the zip tie is holding the old headlight plug an the new harnesses connector to it with a wrap of electrical tape around it (not in the instructions but im electrical OCD)

bit better shot of the connections the new harness has ceramic connectors for the headlights so they can handle them HID upgrades

the rest of the harness tucks in front of radiator then front of coolant catch bottle each headlight gets a new ground so you have to find a spot to attach those easy really the main positive i hooked up to the battery direct as per instructions
the following 2 pictures are of the left side on new harness right (drivers) on the original harness


overall i think this is going to be excellent upgrade for anyone with headlights run on the stalk an not via relay easy to install the high beam indicator works headlights brighter the amps of the 2 halogen headlights i run are now NOT running through the stalk switch but through relays an not through the harness into the cab into the column ..you get the drift
i have to go out after its dark to realign them as they will now be way to bright at their current aim
laid out the harness see where its goin an routing stuff
relays an harness partly tucked in behind engine bay fuse block pulled my battery an its plastic tray moved the washer bottle an thats when i was gona put my ac compressor back in in prep to get AC working an found my idler pulley was missing....the zip tie is holding the old headlight plug an the new harnesses connector to it with a wrap of electrical tape around it (not in the instructions but im electrical OCD)
bit better shot of the connections the new harness has ceramic connectors for the headlights so they can handle them HID upgrades
the rest of the harness tucks in front of radiator then front of coolant catch bottle each headlight gets a new ground so you have to find a spot to attach those easy really the main positive i hooked up to the battery direct as per instructions
the following 2 pictures are of the left side on new harness right (drivers) on the original harness
overall i think this is going to be excellent upgrade for anyone with headlights run on the stalk an not via relay easy to install the high beam indicator works headlights brighter the amps of the 2 halogen headlights i run are now NOT running through the stalk switch but through relays an not through the harness into the cab into the column ..you get the drift
i have to go out after its dark to realign them as they will now be way to bright at their current aim
Jun 22, 2014 | 08:53 PM
#1028
Thread Starter
Registered User
Joined: Jul 2012
Posts: 2,365
Likes: 4
From: Idaho
also realized my tags are expired since may 31st ...eep...i didnt get a renewal notice! yeah like a cop would believe that...
Jun 22, 2014 | 09:47 PM
#1029
Registered User
Joined: Aug 2009
Posts: 2,173
Likes: 0
From: hohenwald tn.
Might look into that if I can ever get mine running and keep it that way. I drove my pickup for 9 months with expired plates once even got pulled for a seat belt violation and he didn't catch it, not complaining about that tho.
Jun 22, 2014 | 11:22 PM
#1030
The knobs turned out great. I am someday going to do the headlight upgrade. Looks like a great deal on that.
This look like a different style of ac pulley. Starting at the top and going to the bottom is how it disassembled. I will see if I have another set up, that has the power steering style pulley.
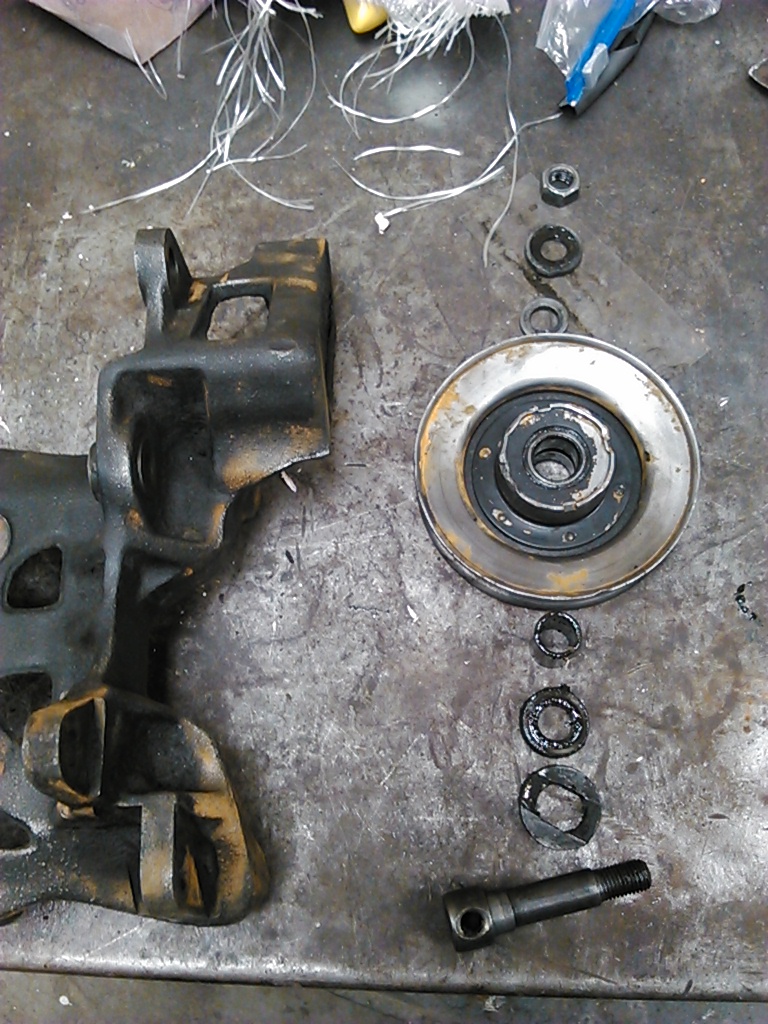
This look like a different style of ac pulley. Starting at the top and going to the bottom is how it disassembled. I will see if I have another set up, that has the power steering style pulley.
 Jun 23, 2014 | 11:37 AM
#1031
Thread Starter
Registered User
Joined: Jul 2012
Posts: 2,365
Likes: 4
From: Idaho
thank you terry, i can apparently get a replacement with spacers an the bolt portion for around 45 off ebay likely gona have to do that costly mistake of leaving the pulley loose while waiting for better weather an other parts :-(
Jul 9, 2014 | 06:19 PM
#1032
Thread Starter
Registered User
Joined: Jul 2012
Posts: 2,365
Likes: 4
From: Idaho
4wheelers save a RV motor home from the ocean
toyota 4x4 pickup included
http://www.ebaumsworld.com/video/watch/84200711/
toyota 4x4 pickup included
http://www.ebaumsworld.com/video/watch/84200711/
Jul 11, 2014 | 10:53 PM
#1034
Thread Starter
Registered User
Joined: Jul 2012
Posts: 2,365
Likes: 4
From: Idaho
ok i know i made a post about my AC / fog light install i know i did...
ok i did something wrong? shakes head
so i will redo it
ok AC braket sans the missing bits got the pulley but ehh bought a new one its on the way

ohh the stuff you have to take off to make sure your system is sealed up i had to take so much off left fittings off intentionally so could replace o rings good thing too some were pretty squashed and the receiver/drier is smaller than original bit longer (white box in bag on radiator)

AC compressor in yay progress

that concludes yesterdays post which has mysteriously poofed.....
ok i did something wrong? shakes head
so i will redo it
ok AC braket sans the missing bits got the pulley but ehh bought a new one its on the way
ohh the stuff you have to take off to make sure your system is sealed up i had to take so much off left fittings off intentionally so could replace o rings good thing too some were pretty squashed and the receiver/drier is smaller than original bit longer (white box in bag on radiator)
AC compressor in yay progress
that concludes yesterdays post which has mysteriously poofed.....
Jul 11, 2014 | 11:15 PM
#1035
Thread Starter
Registered User
Joined: Jul 2012
Posts: 2,365
Likes: 4
From: Idaho
ok today we got several of the hoses an connections made in the ac system we flushed them out bit by bit with ..a gas you ..never mind (epa ) an then promptly didnt have ONE last darn o ring of the right size AGH so AC gauges all hooked up to the previously converted R-134 the drier left sealed up so it has NO chance to get moisture from the air will get one from local napa tomorrow so system can be drawn down total vacuum oil added an wait for the idler pulley
i started on the fog light install in earnest yep i took the MAP an air box off too on top of valve cover

ok this is where im working on my mad plan of the fogs only work with head lights low beams on

bit of wrangling the switch harness into the truck then out the window for testing the switch im gona put in the cruise control blank its replaceable (somewhat)

switch (replaced the cheap junk they put on the harness with a good solid one)

bit of testing to make sure it works only hooked up one light an its on a body ground in final version relay will be run like low beam head light off the old drivers side connector again a relay an the LED lights bright as they are nothing like a headlight or worse halogen one on the stalk switch

an AHHHHH im blind

) an then promptly didnt have ONE last darn o ring of the right size AGH so AC gauges all hooked up to the previously converted R-134 the drier left sealed up so it has NO chance to get moisture from the air will get one from local napa tomorrow so system can be drawn down total vacuum oil added an wait for the idler pulley i started on the fog light install in earnest yep i took the MAP an air box off too on top of valve cover
ok this is where im working on my mad plan of the fogs only work with head lights low beams on
bit of wrangling the switch harness into the truck then out the window for testing the switch im gona put in the cruise control blank its replaceable (somewhat)
switch (replaced the cheap junk they put on the harness with a good solid one)
bit of testing to make sure it works only hooked up one light an its on a body ground in final version relay will be run like low beam head light off the old drivers side connector again a relay an the LED lights bright as they are nothing like a headlight or worse halogen one on the stalk switch
an AHHHHH im blind
Jul 11, 2014 | 11:20 PM
#1036
Thread Starter
Registered User
Joined: Jul 2012
Posts: 2,365
Likes: 4
From: Idaho
oh an something cute i picked up had to have it
wait till ya see the two mud flap girls i found for a side window Rowwr!
just noticed this was my 2k post **yay**

wait till ya see the two mud flap girls i found for a side window Rowwr!
just noticed this was my 2k post **yay**
Last edited by Cyberhorn The Dragon; Jul 12, 2014 at 11:29 AM.
Jul 12, 2014 | 09:25 AM
#1038
That is the way it goes for me. Should be a simple job and winds up having to disassemble the whole truck. Urghh!!! You got the lights working like you wanted and that is progress.
Jul 12, 2014 | 11:27 AM
#1040
Thread Starter
Registered User
Joined: Jul 2012
Posts: 2,365
Likes: 4
From: Idaho
thank you
yep! always been that way even my 79 had to take half the truck apart to fix/do something
nono i think its killing me but i digress
nono i think its killing me but i digress


