
ChefYota4x4's 1987 4Runner Build-Up Thread
 Jan 14, 2014 | 09:26 AM
#8281

Registered User
Joined: Mar 2013
Posts: 1,060
Likes: 48
[QUOTE=ChefYota4x4;52158086]Chris suuuuup! Lol....
1.) Spartan X 2
2.) TG 4" LIFT SPRINGS w/ 6" Shackles ( soon to be modified or changed in some way to get rid of a little bit of a rake...)...
3.) The only rubbing I had really that you HEAR in the videos is going on in the front. It's the plastic fender skirt. ( its actually only happening on the left side also... The driver side)... When you stuff in a turn to the left, stuffed on the left, the axle comes back words fairly dramatically and as it rubs and pushes on the plastic fender skirt that actually is only attached by a pop pin or screw..... It forces it out, similar to say something like the hardcover of the notebook... I can only resist so much against a 35, and then it catches that edge and bent out and from then on out on the trip you will basically have like a card in the bicycle spokes. I sent them have pounded all the pinch welds and stuffed that's under skirt inside of pinch welds before hammering.... The same thing happens with the rear axle when you have a double camber flex especially... It comes back and rubs hard. It's basically because these springs are not running with a centerpin that is at the center of the spring leaf pack... The springs are much longer to the rear of the pin, same as the front leaves... The way the shackle compresses the springs the actual up and back around 10 degrees. You may know all this but I figured I might as well just share it now to get it out of the way? Lol. Forgive any typos I'm too tired to go back and correct it, just ask me and I will go back and explain tomorrow. Hahaha
Hey, doing good thanks. How about you?? I saw that you had some mouth health problems. Are you doing better?
I think I got most of that about the rubbing. haha So, is there anything that can be done, or is it not really a big deal? Also what were you doing up at 2am?!?!
Jan 14, 2014 | 10:05 AM
#8282
Thread Starter
Registered User
iTrader: (5)
Joined: Jun 2009
Posts: 19,281
Likes: 20
From: Lake Havasu, AZ
You put your post inside of my quoted post.... So I'm guessing it won't even appear here. Lol. Thanks man... I'm doing okay... Although it's a little more than just my mouth. I won't go into that right now... Save it for another day, but thank you.
I'm up at 2 a.m. Because I have to work pretty late sometimes and then I have to come take care of my mother and make sure she gets to bed. Left to her own devices she will sit there till 1 in the morning asleep on the couch, nodding off and getting up and nodding off and getting up.... Pretty much destroyed her whole night sleep. She's also using a CPAP machine now and it is just getting to the point where is hopeless for her to get it on herself. That about a hundred other things regarding giving for her on top of my own stuff... It often keeps me up late. If you've ever had a life like that you know that by the time you sit down at 1230 or one of the morning, you're wired. Lol...
As far as the rubbing, its always serious... Serious enough to at least look into that is. The corners of the fender wear the pinch weld is... Which is basically where they fold the metal under to make a smooth edge, as these trucks were never meant to be turned into this... That metal is basically like an unsharpened knife. If you start rubbing hard on one of the corners off the pinch weld ... They can literally tears in Nobbys right off of your truck tires. I know that people have popped tires as well on pinch welds that got sharp.
Last edited by ChefYota4x4; Jan 14, 2014 at 10:17 AM.
Jan 14, 2014 | 10:27 PM
#8285

Registered User
Joined: Nov 2013
Posts: 5
Likes: 0
From: Los angeles
Hey Chef,
Thanks for the advice. Im a big fan of your 4runner build. I've literally watched all your videos on youtube. You have inspired me to build my truck. I think you should do an exhaust video of your rig, because that thing sounds wicked compared to the stuff thats on youtube.
thanks
Thanks for the advice. Im a big fan of your 4runner build. I've literally watched all your videos on youtube. You have inspired me to build my truck. I think you should do an exhaust video of your rig, because that thing sounds wicked
compared to the stuff thats on youtube. thanks
Jan 19, 2014 | 04:22 PM
#8287
Thread Starter
Registered User
iTrader: (5)
Joined: Jun 2009
Posts: 19,281
Likes: 20
From: Lake Havasu, AZ
Hey Chef,
Thanks for the advice. Im a big fan of your 4runner build. I've literally watched all your videos on youtube. You have inspired me to build my truck. I think you should do an exhaust video of your rig, because that thing sounds wicked compared to the stuff thats on youtube.
thanks
Thanks for the advice. Im a big fan of your 4runner build. I've literally watched all your videos on youtube. You have inspired me to build my truck. I think you should do an exhaust video of your rig, because that thing sounds wicked
compared to the stuff thats on youtube.thanks
Sure would have loved to have you down for a couple days....BTW, HAMMERS? Looking like 6th-8th is all I can swing, JonnyBoy too.... Redeth005 can't come, most likely.... But I have talked to many fabricators and shops and so forth regarding if they are coming, on Instagram... It looks like I will have quite a few people to look up and find, including Joe Dirt of Hawaii Renato of all 4 off road (A4OR).... Kirk of 4wheelparts....CDTFAB(might have that one wrong) also of Hawaii. ... many more... ZD426 mayyyybe? John might go if I can reach him( the guy in the extra cab surgeon pick up the blow up his clutch @ Angeles Crest).... I think this is about the latest we can get started on planning a meet. I suppose I should start a trip planning thread, but it looks to me as though that forum is fairly dead. Maybe it's just my posts, I have no idea... Hahaha...... Haven't had time to bump anything, etc. Lol.
It will likely be so packed on those days that I doubt any free range wheeling will be simple... But I'm sure would be incredibly fun and lots of good picture of your titties of some of the most sick vehicles in the world! I believe there are 150 entries in the Nitto event... Out of 125, only 25 completed the course last year. I'm sure many of those guys were card on building up whatever exploded... Lol. So it could be a large finalists list.
Jan 19, 2014 | 08:35 PM
#8289
Thread Starter
Registered User
iTrader: (5)
Joined: Jun 2009
Posts: 19,281
Likes: 20
From: Lake Havasu, AZ
HELLLLLLLP! .......kinda? Lol...
Recently, I've been tinkering and fine-tuning and adjusting and assessing what modifications I might want to do on my rig, regarding suspension and clearance and so forth... I recently pounded the pinch welds and did a fairly good job as I cannot find any rubbing any longer...
HOWEVER, thanks for the help of JonnyBoy, and a few people on Instagram and elsewhere... I have at least been able to investigate a bit and take a peek at a couple suspects in regards to something in particular....
*DOUBLE TOE OUT SYNDROME* ......
Granted, after some of the serious wheeling I have done in the last year, it only makes sense that things would need to be gone over and adjusted and checked as to whether they are tightened to specs, including the HiSteer ARP studs, all the hanger bolts & nuts, etc etc etc etc....lol. However, as I probably mentioned, toward the end of our trip to the Angeles Crest, both my tires were toe out. John adjusted as I watched and had to adjust the rod to the ends of the rod ends available threads... I will post pictures, but I'm sure most of you know what I'm talking about.
Upon discussing this with Eric, of Yotamasters, he and a couple others I spoke to suggested that they have pretty much never seen even the TG high steer arms bend... Neither have they seen the rods bend... They simply break, when that happens at all...
Eric, most definitely a professional with lots of experience, also shared that the only thing he could think of that could cause that, to that degree, would be the axle tube bending.
This, after much investigation and tearing down the wheel ends, ++++.... Did not seem to be the case... It just does not seem likely that my wheels would rotate so freely and have no binding or grinding within the actual tubes, especially having Dirty 30's in there. Not only that, but another check is to look from the end with the free wheel hub removed and look at the axle in the tube... If the birf is cocked to the side and difficult to move in the opposite direction whichever side is cocked to... That could indicate and in fact would most likely mean that the axle tube is definitely bent. As you will see in the pictures, it just does not seem to be the case. ARP stud nuts torqued down to around a hundred pounds... And also not forgetting to mention, the fact that none of those nuts were loose... It just seems so odd that the steering rod would have to be adjusted all the way to the last thread/ up toward the cup on the tie rod end...... Wthhhhhh?
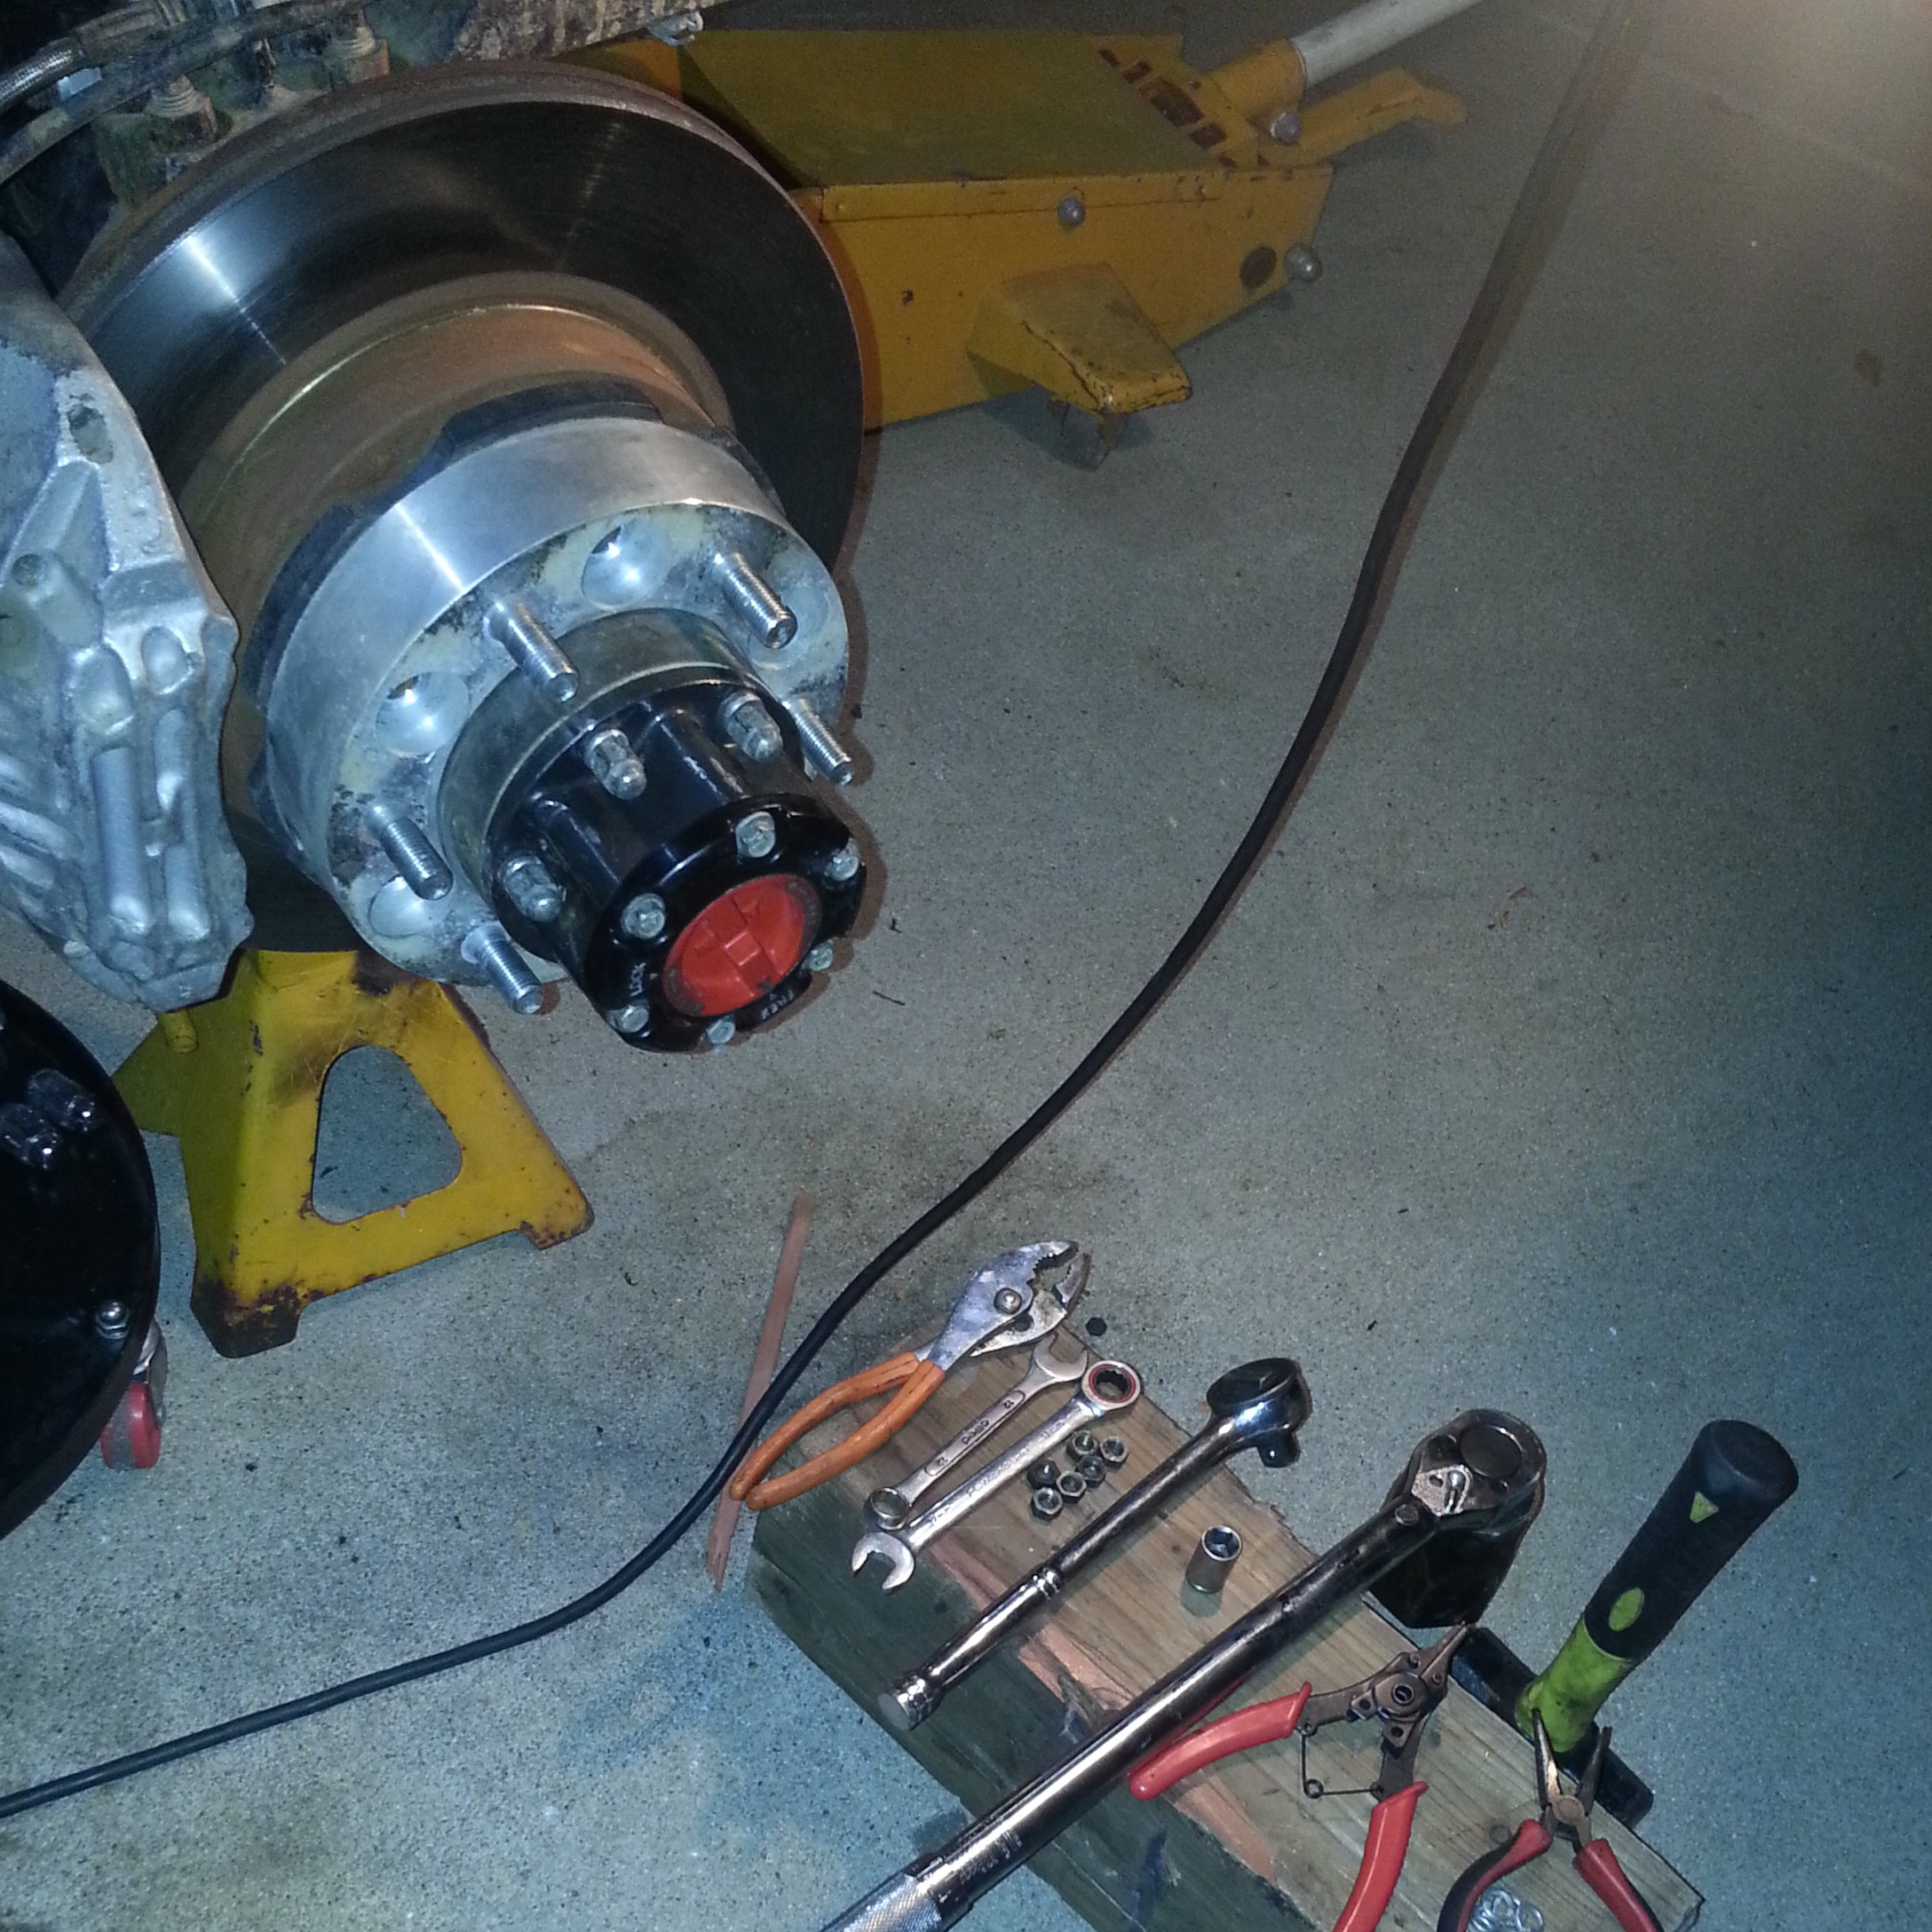
PICS AND INFO....
Got the front up and took a good look from behind. Obviously most bends, if they are minor, will not reveal a bent axle to the naked eye. Especially not enough to force the steering rod to be adjusted out another half an inch on each side? Lol... But just for posterity sake....
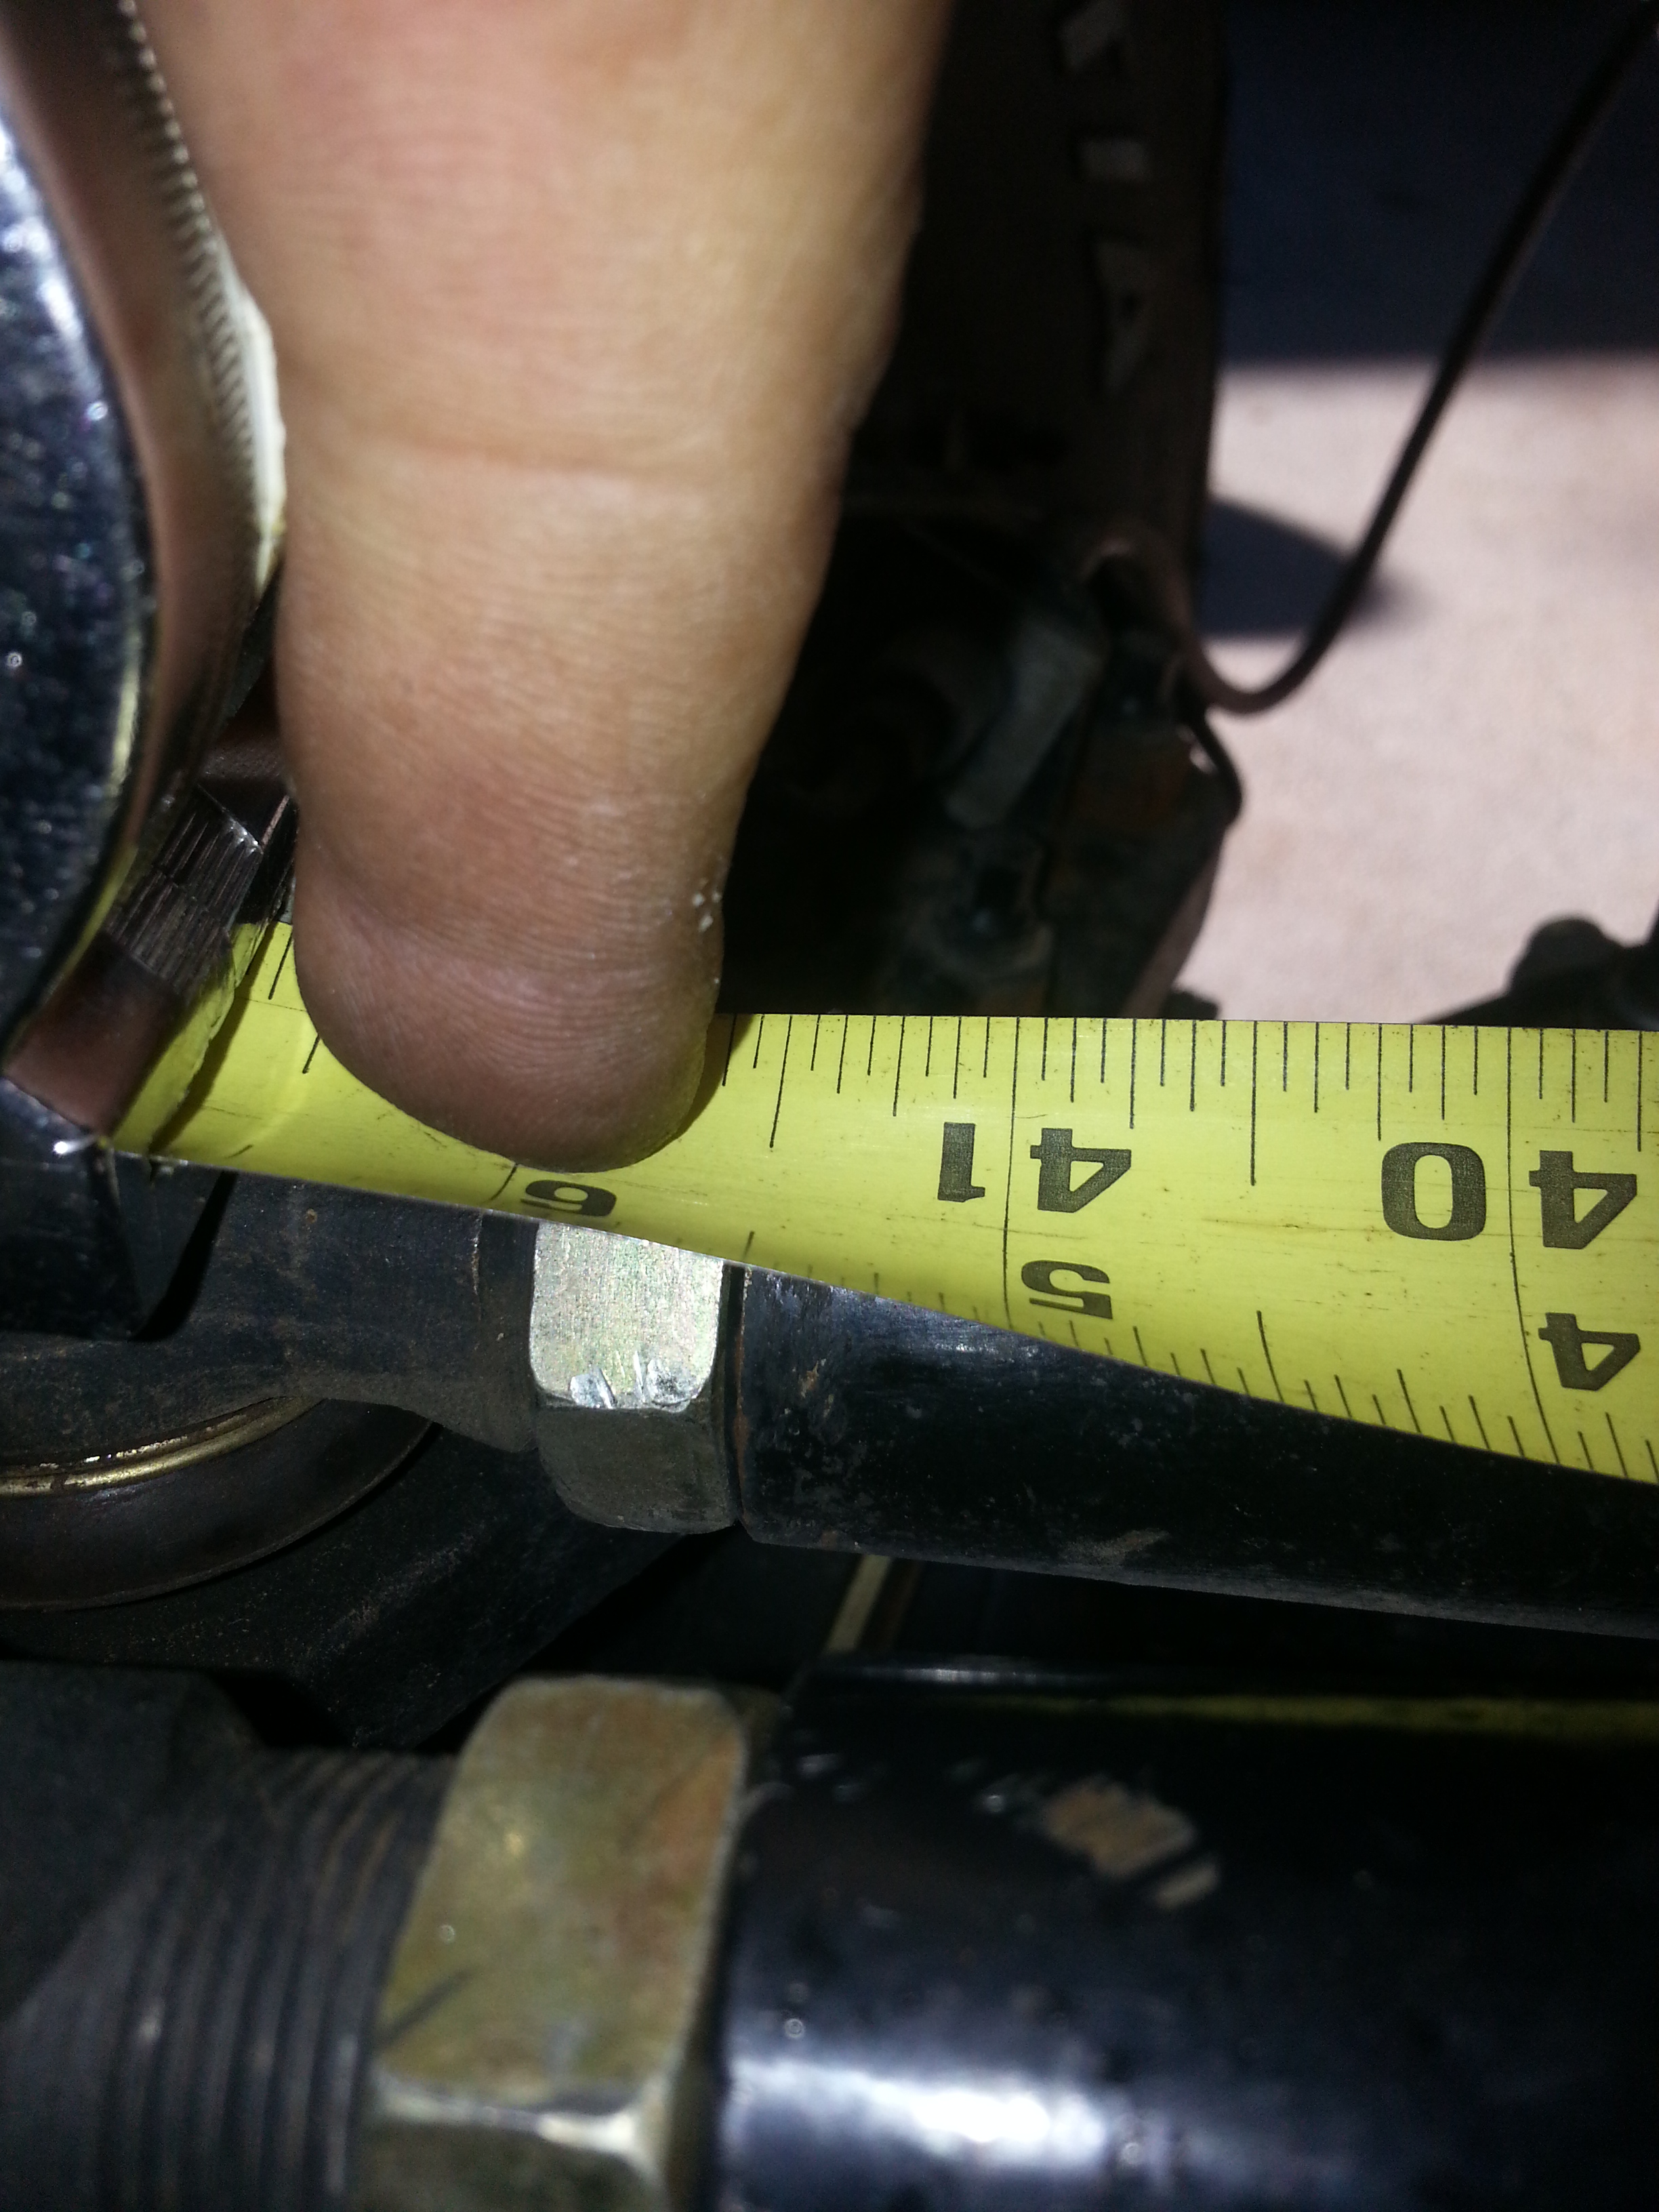
These next pictures are to give you an idea of exactly what I mean in regards to the steering rod being adjusted all the way out...
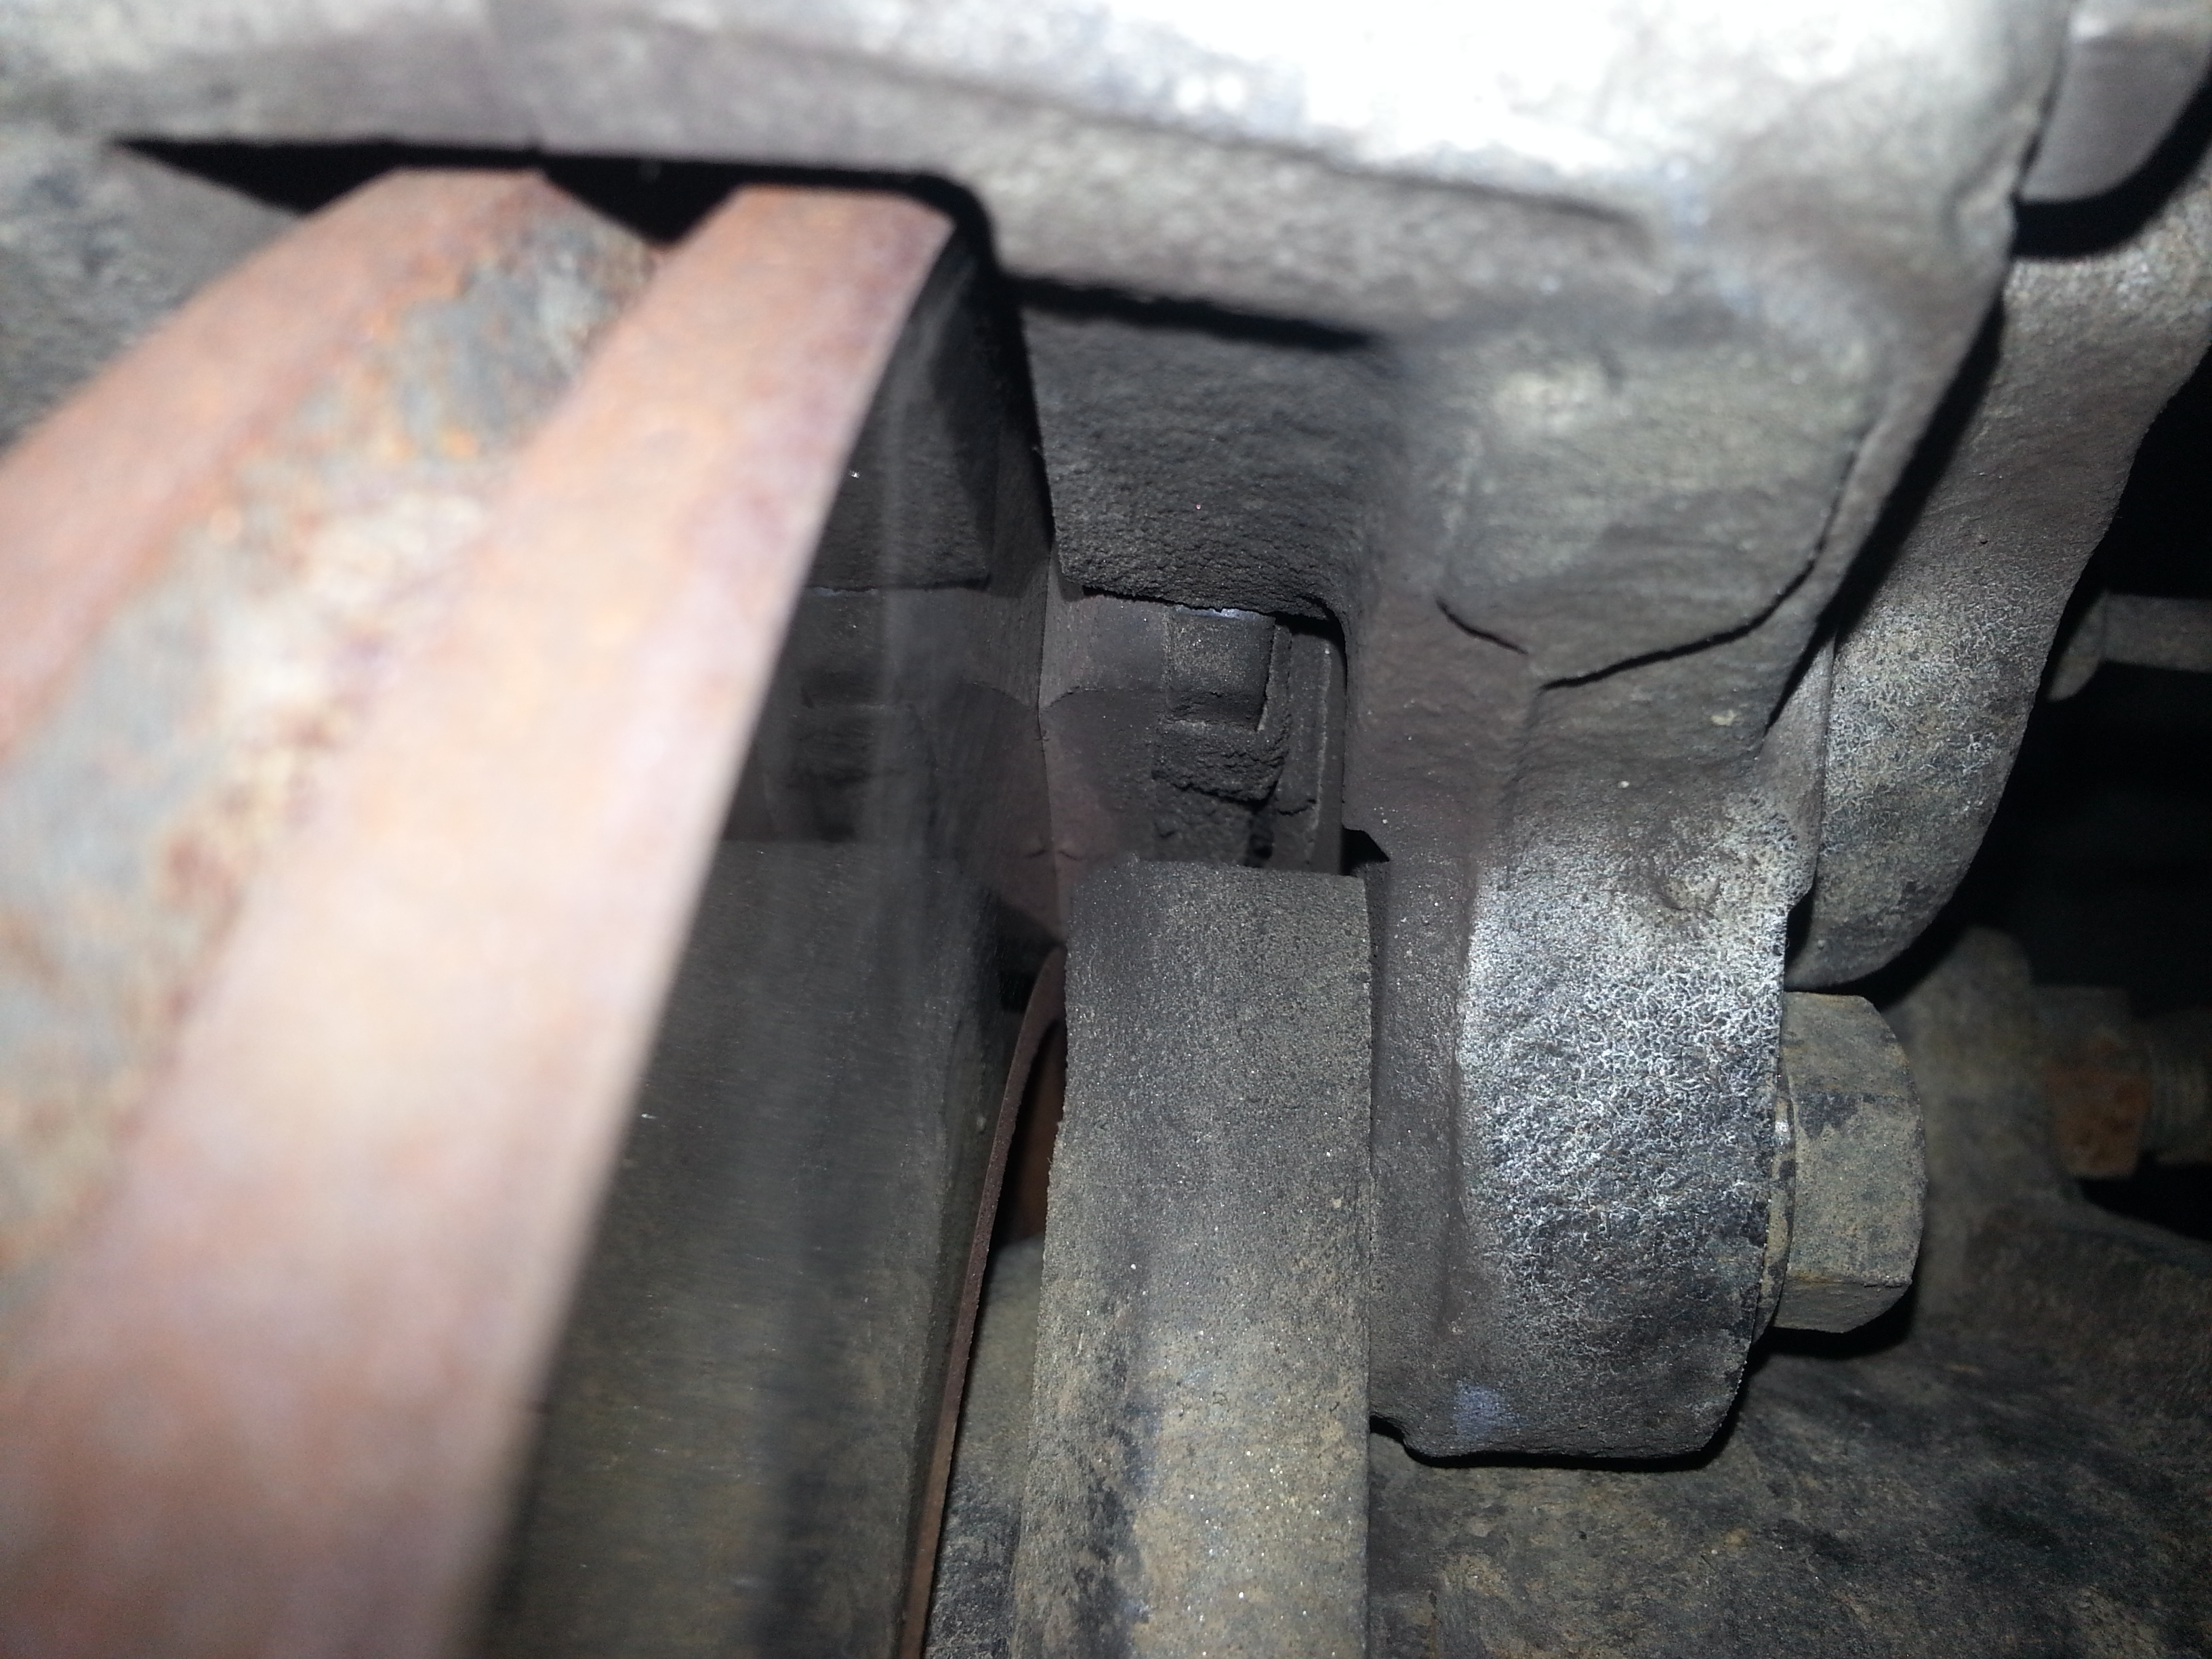
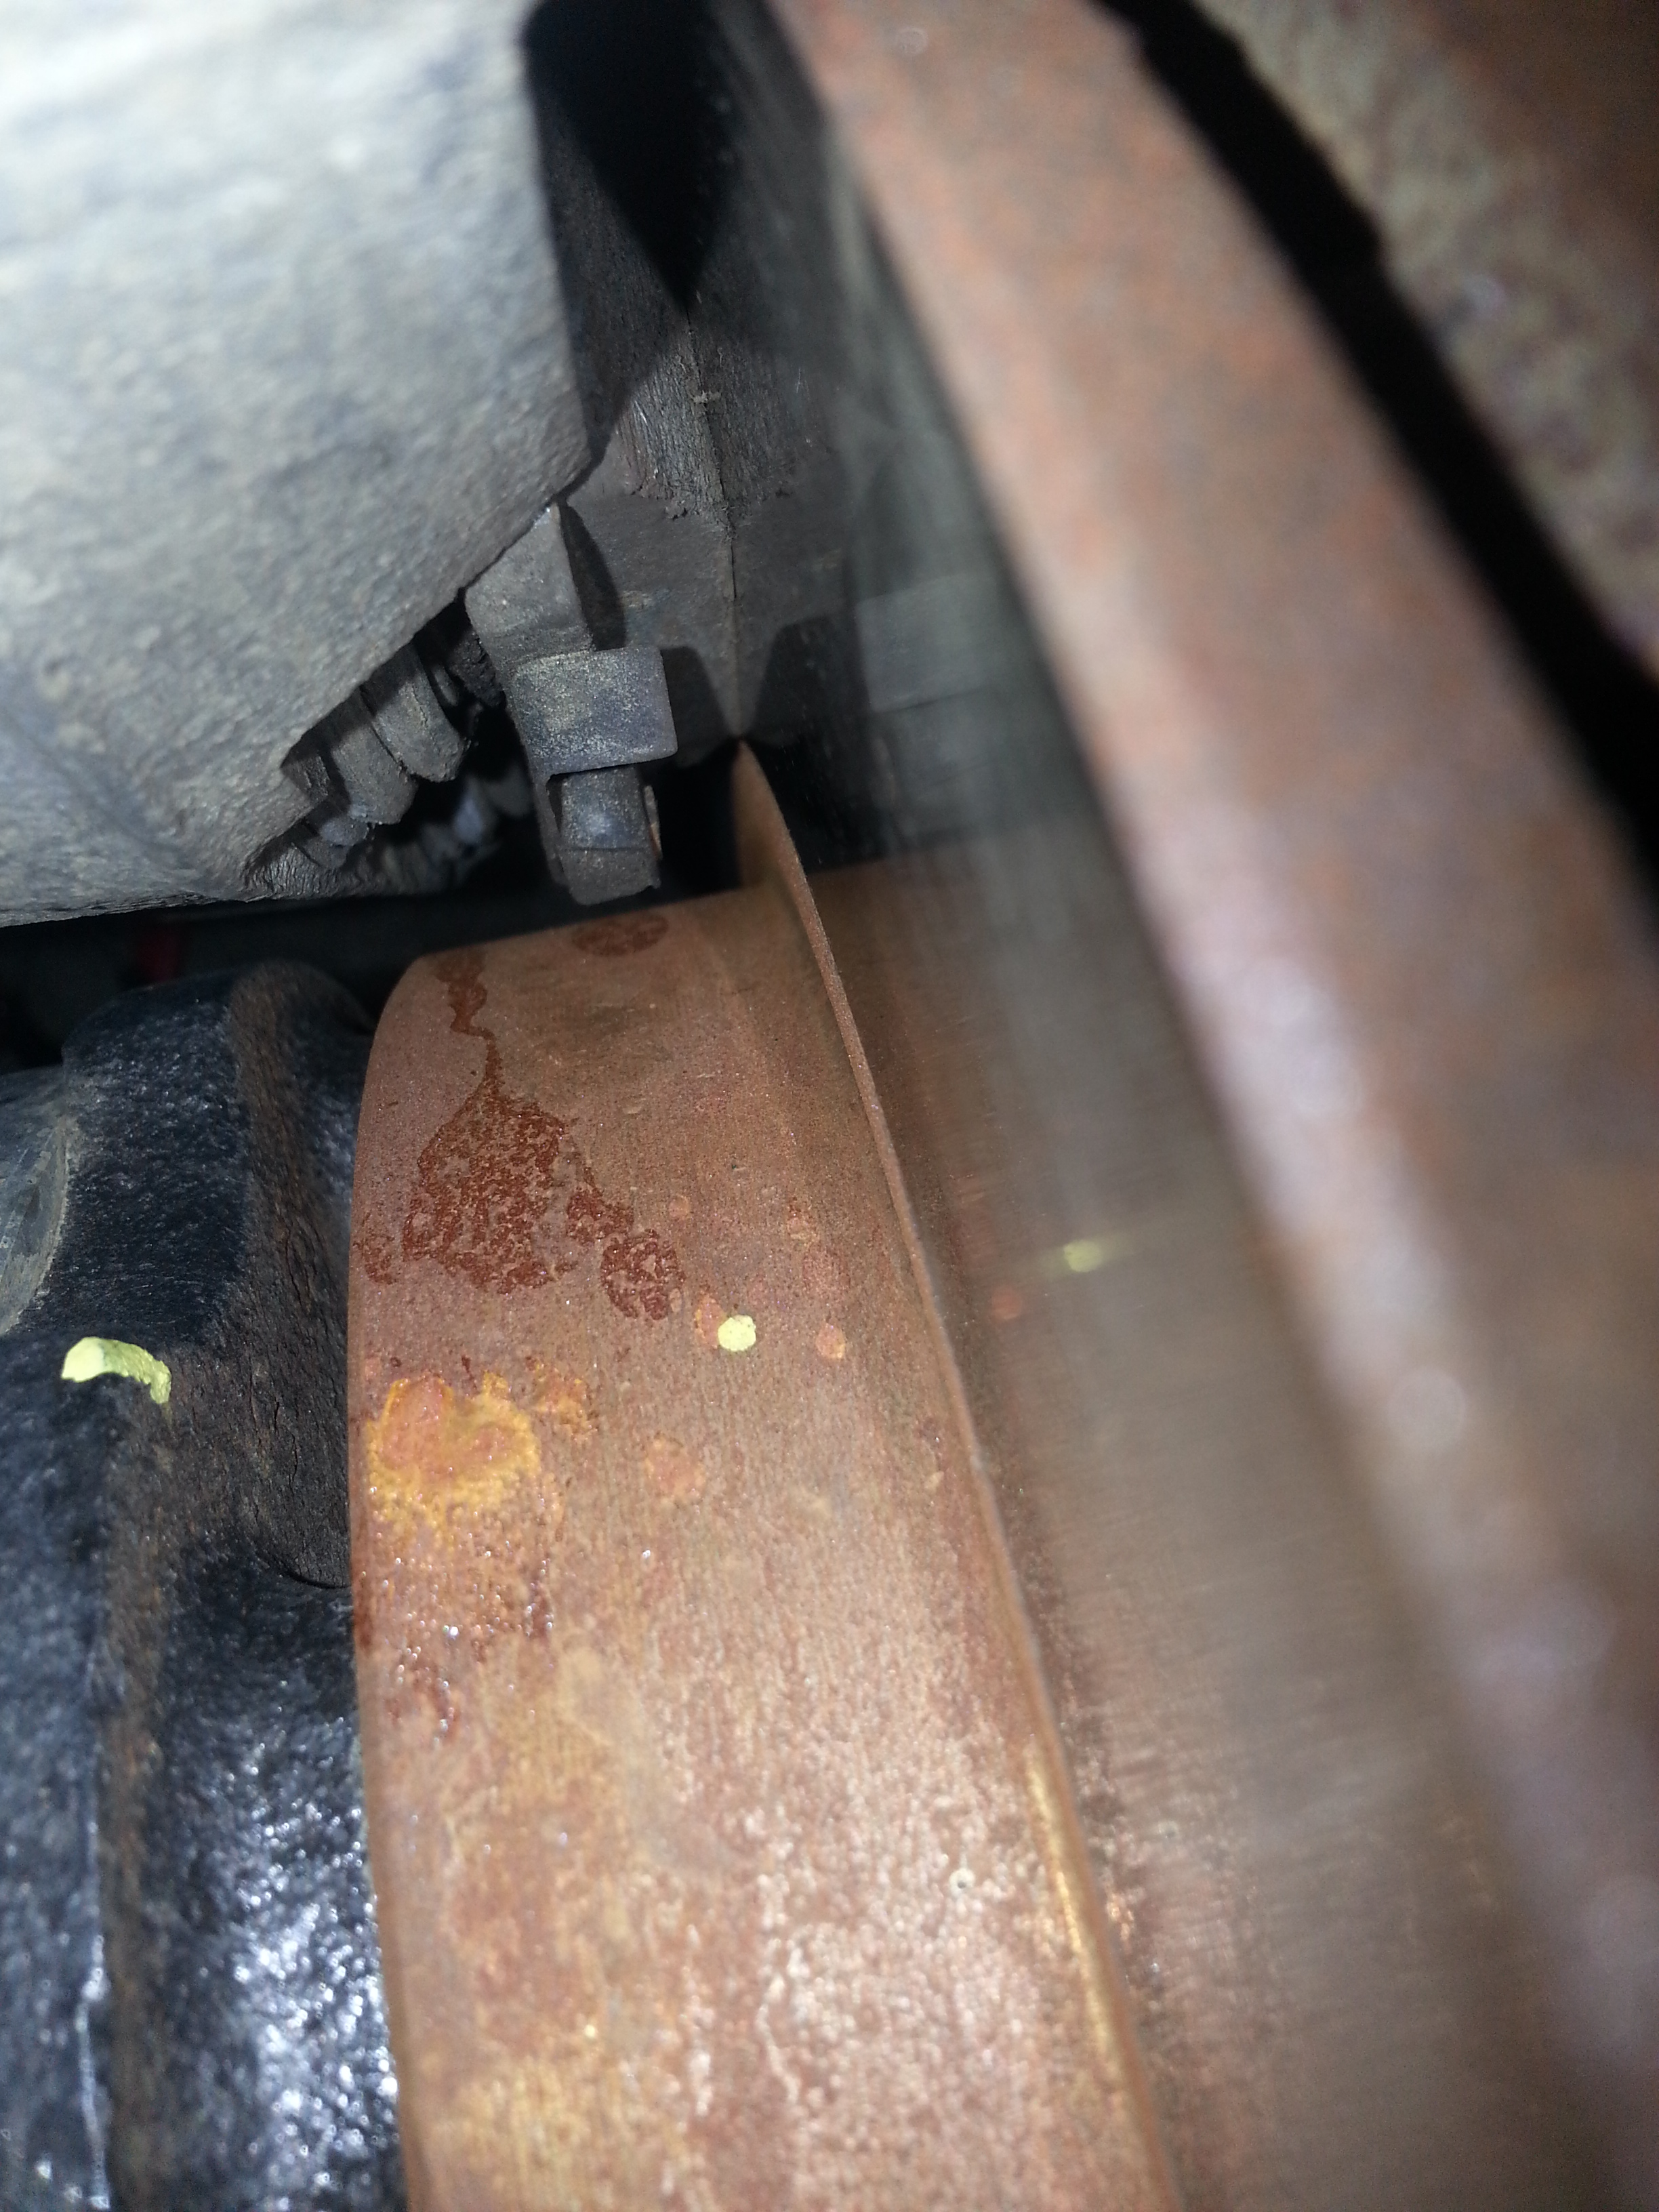
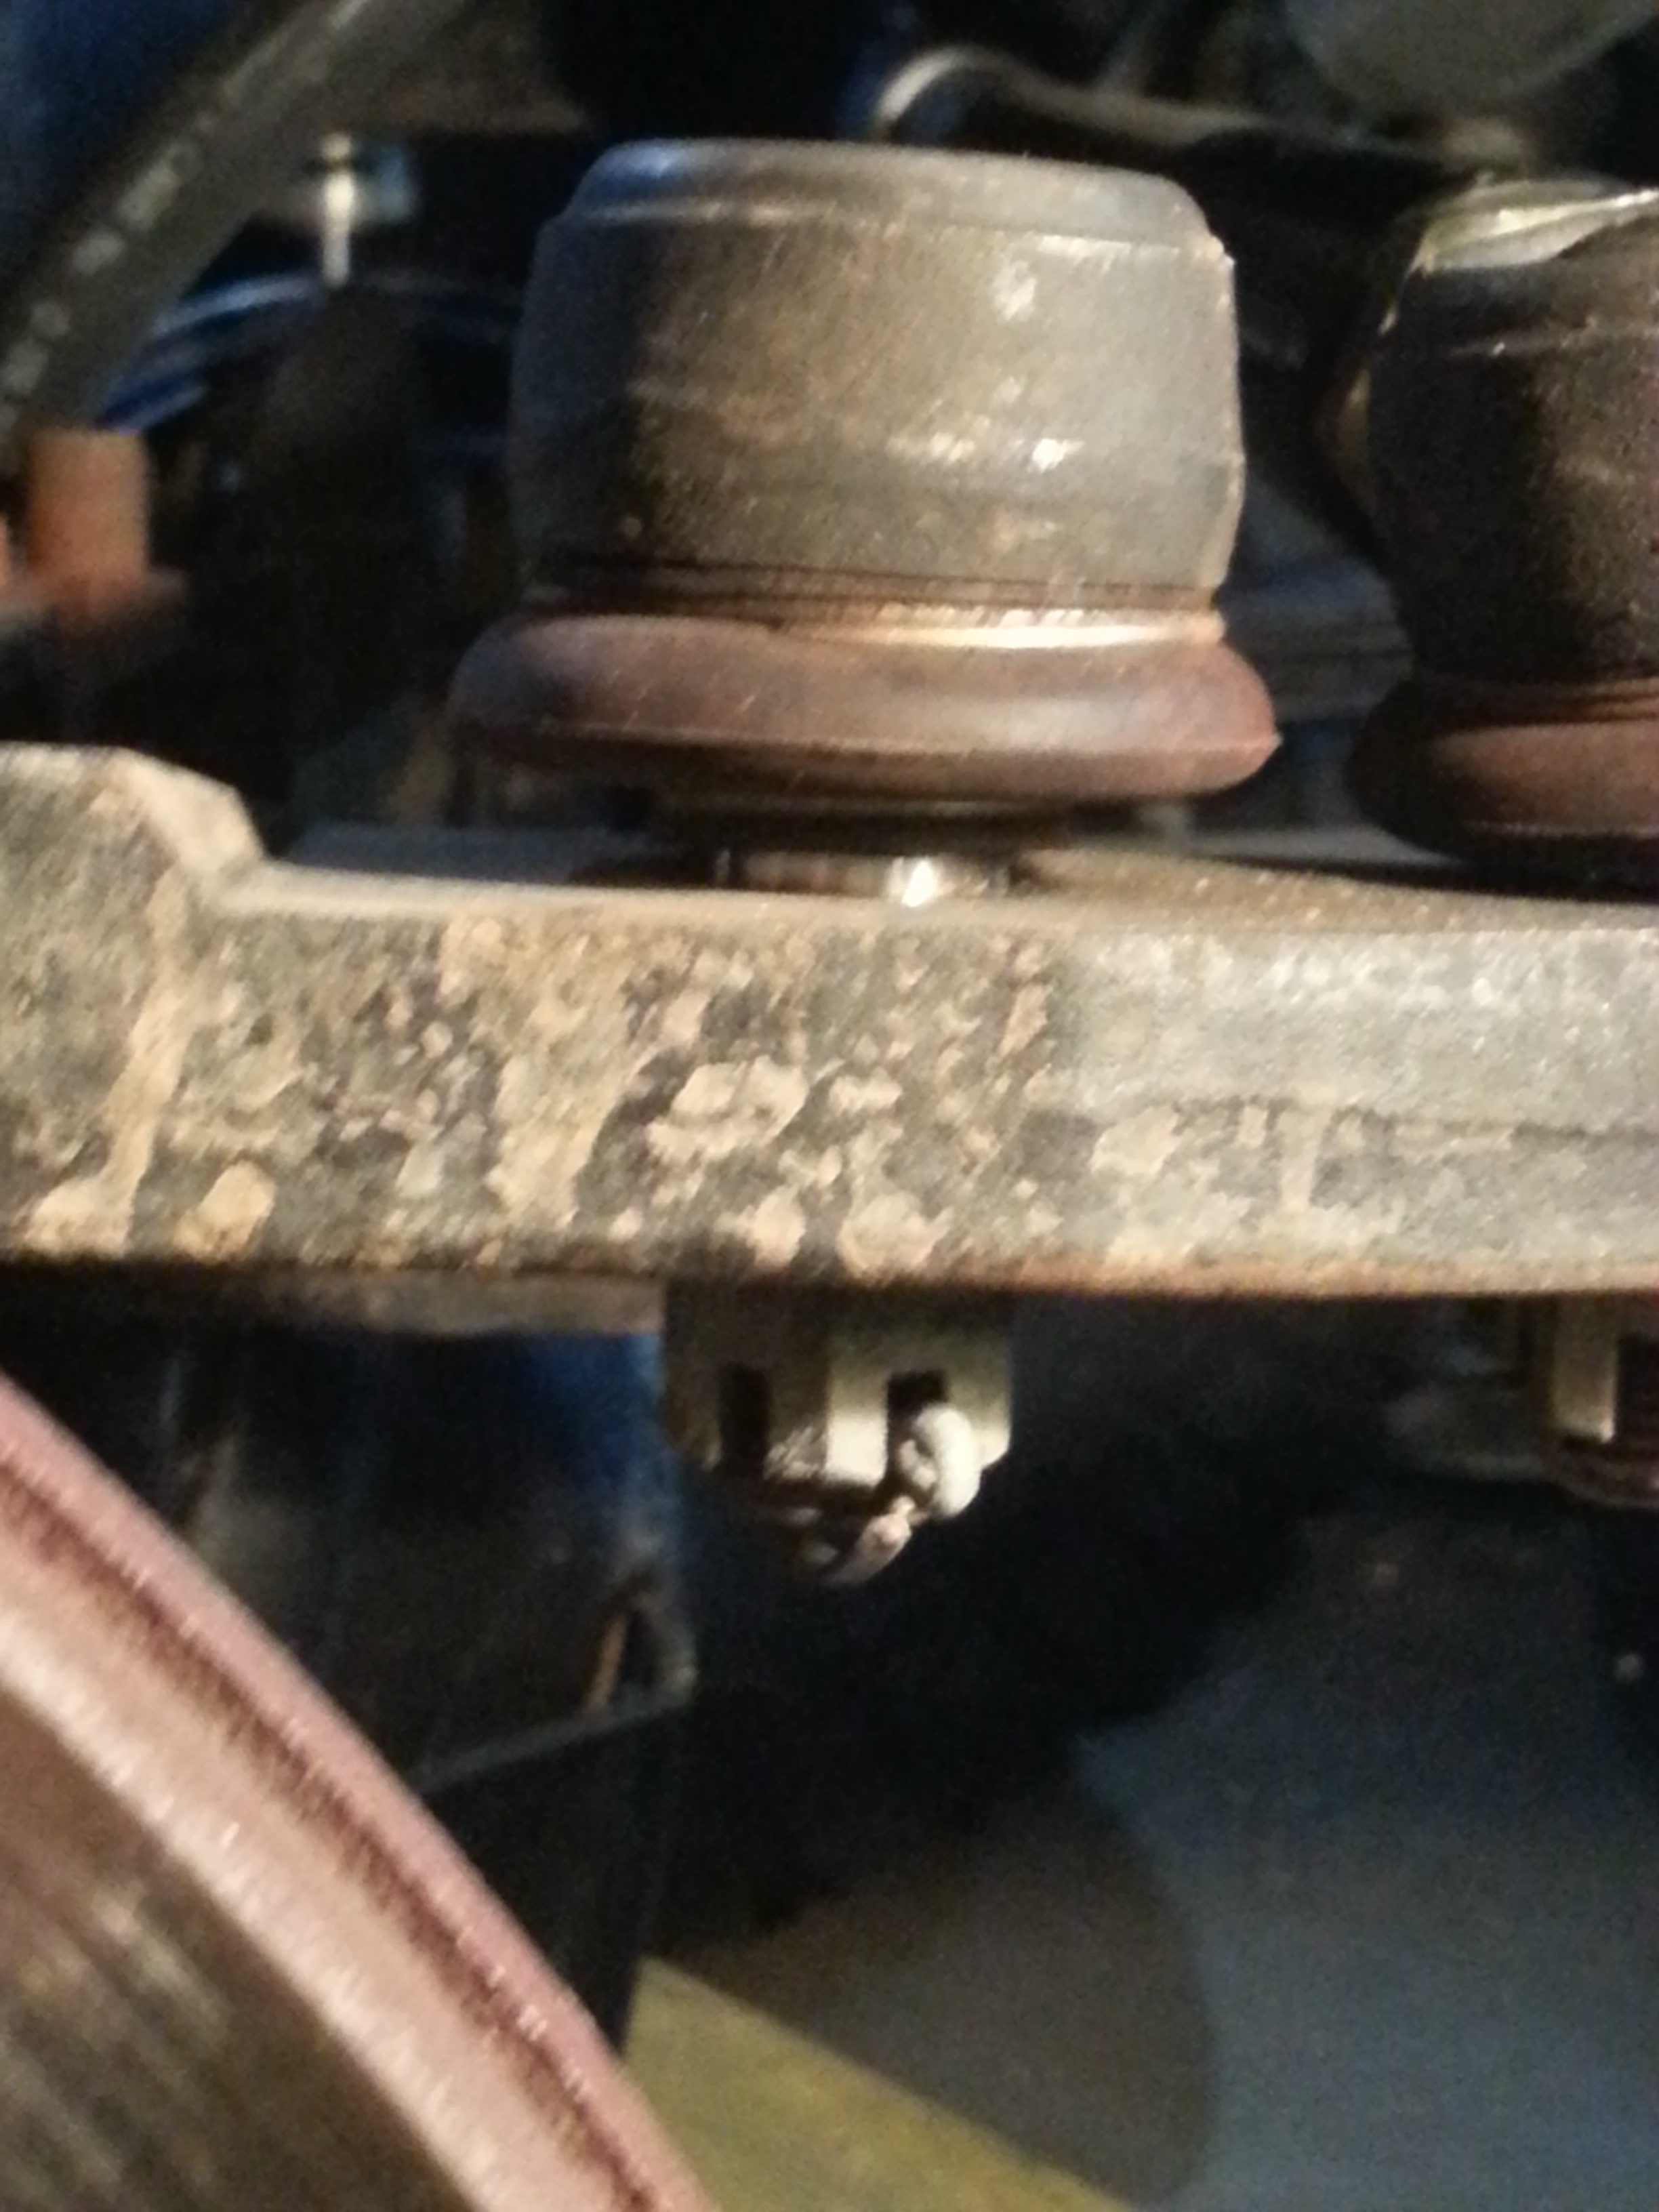
Here, you can see I pulled the free wheel hubs off to get a look straight down the tubes and see if the axle was pushing hard to one side( I also had jacked it up on both sides, one of the time, full turn and so forth, checking for any binding I could... Any grinding in the tube at all... Just nothing revealed itself) .....

Just posting the next ones to show the brakes are wearing perfectly..... I'm not sure why the last pics showed up like the rotors were hamburger! Haha....Light refraction from the flash? Meh.....anyway.....
Just showing here that the 2nd leaf/loose wrapper has been cruising out on me with the 3rd off to the side.... Got it worked back over and seems to be stayin..... Gonna double check the center pin nut torque value......
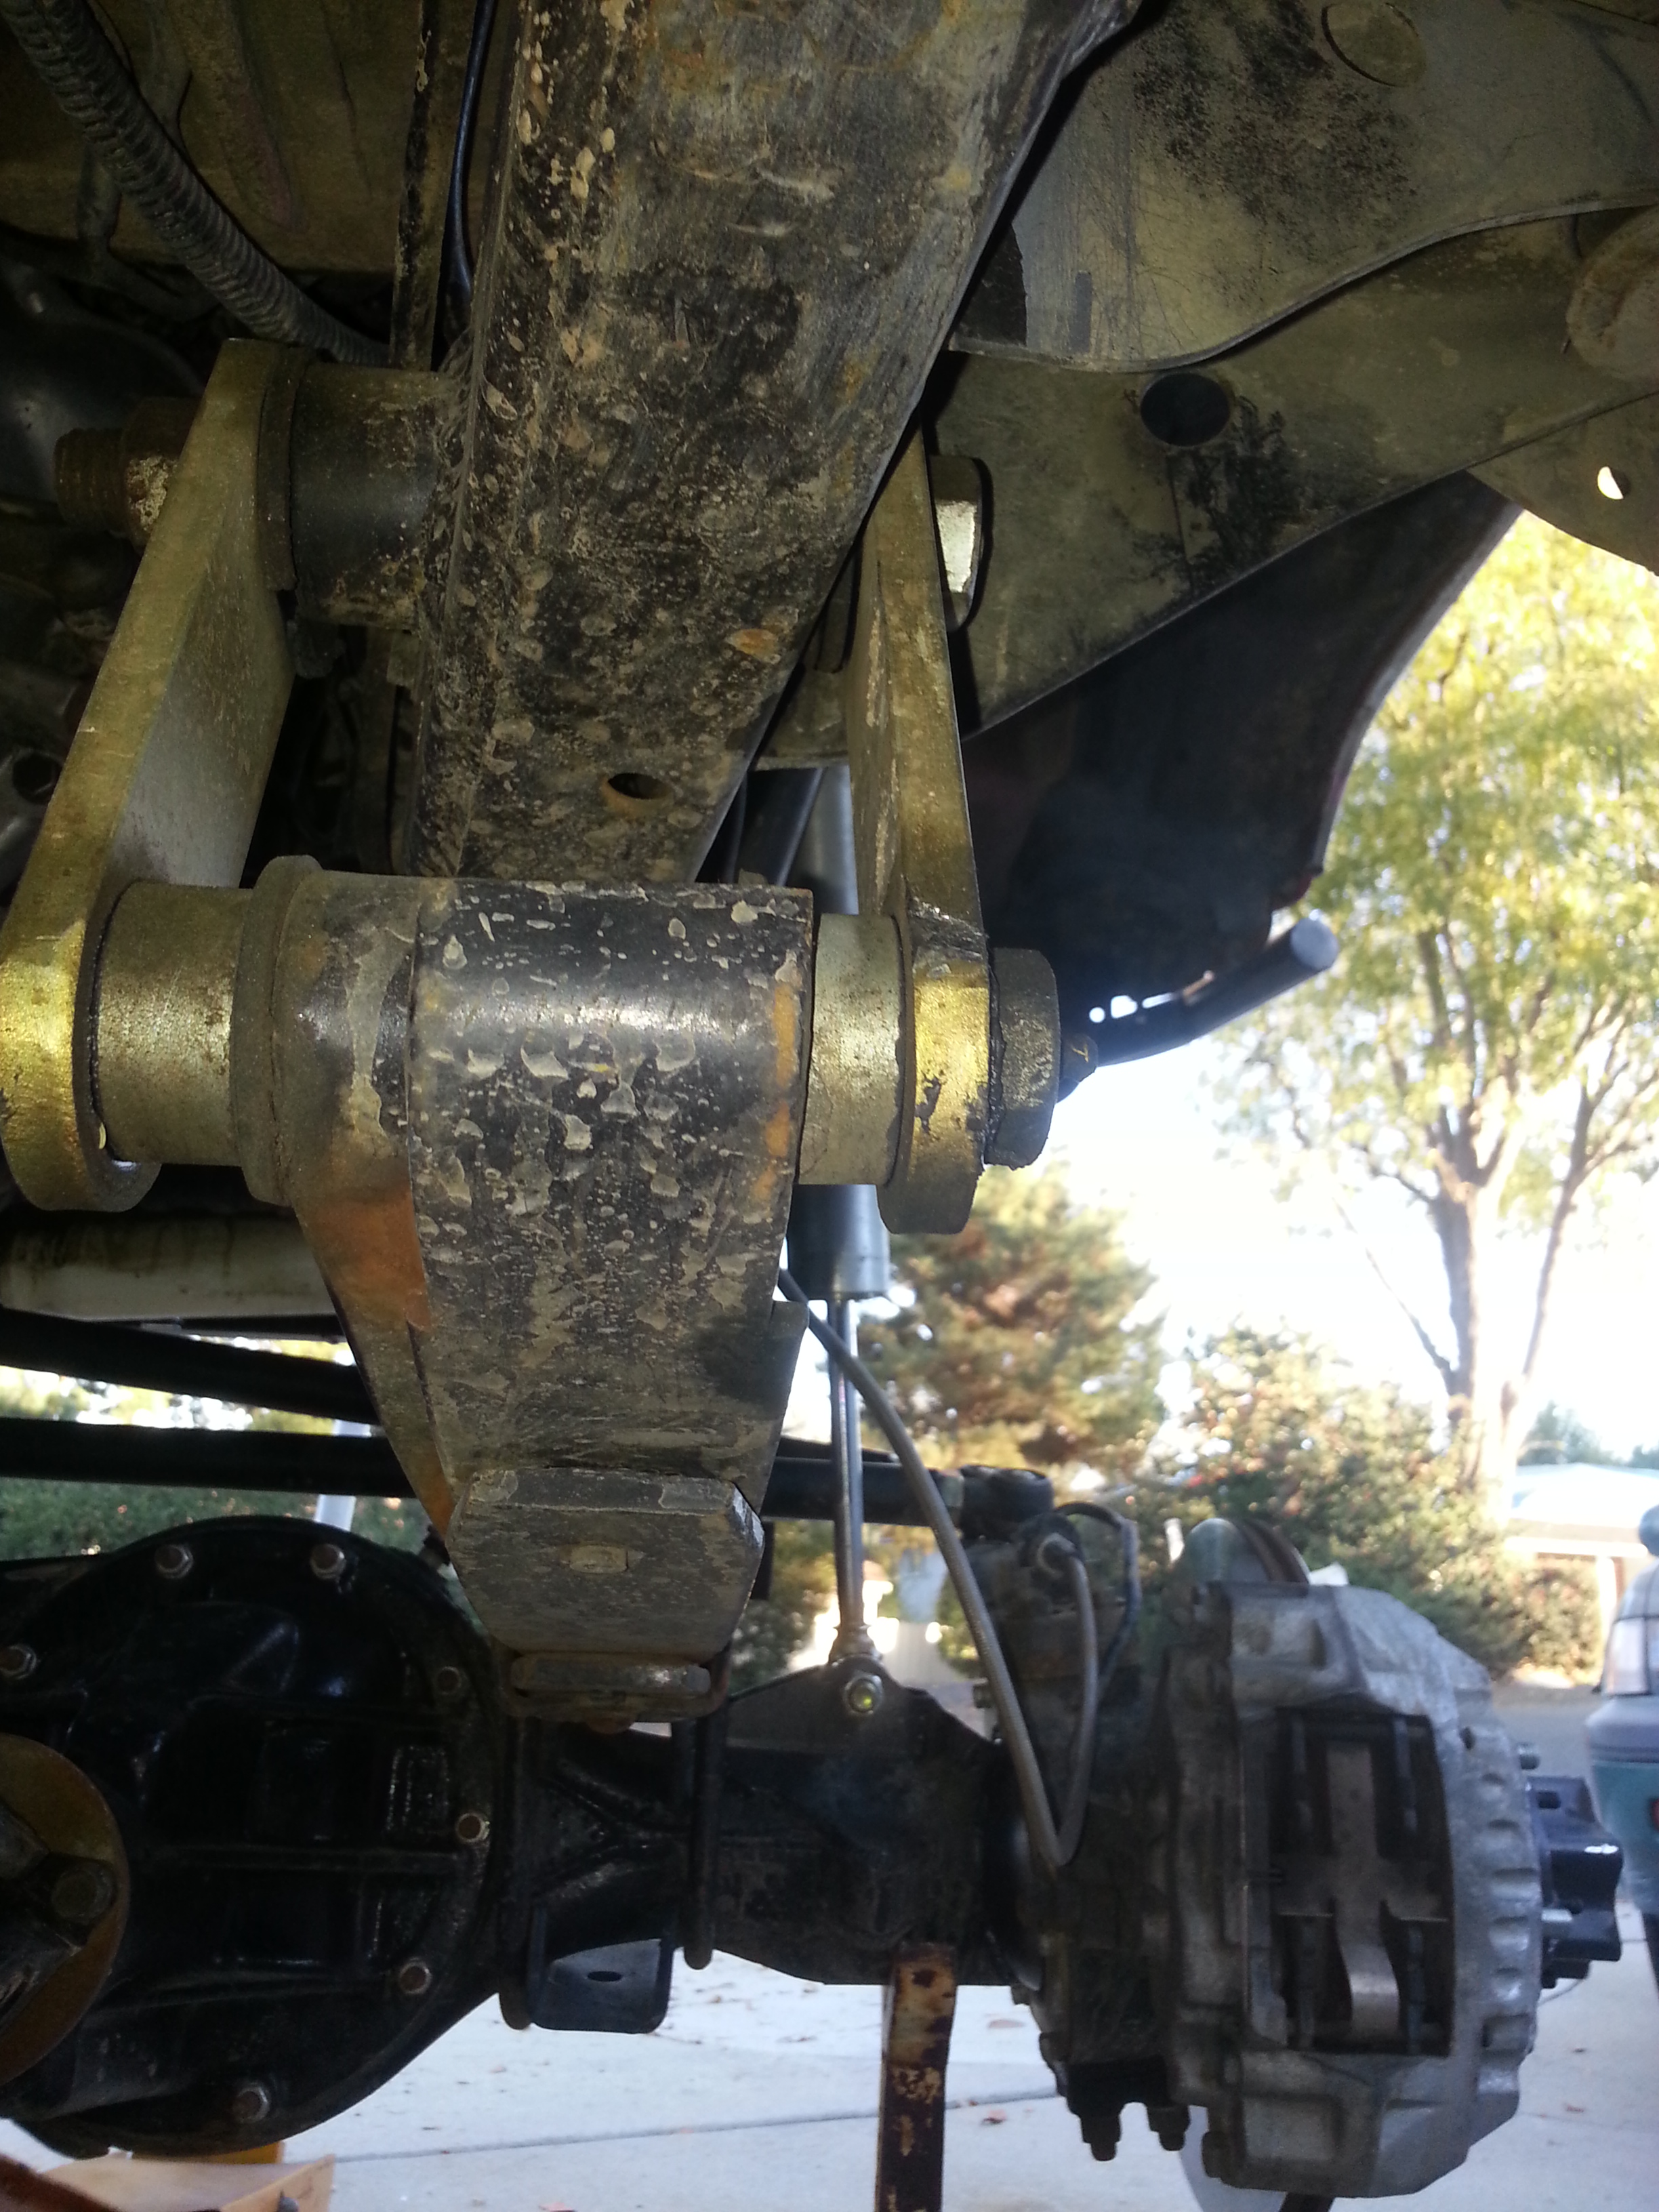
Worked back over with leaves relaxed....

One reason I bring this up, the truck is squatting more on the drivers rear springs than the passenger side. ....
Driver side REAR.....
Passenger side REAR.....
The obvious lean.... BUT WHYYYYYYYYYY? haha..... (Full tank of fuel, whatever, it's definitely sagging on th we driver side.... A full 1.5"! Grrrrrr)
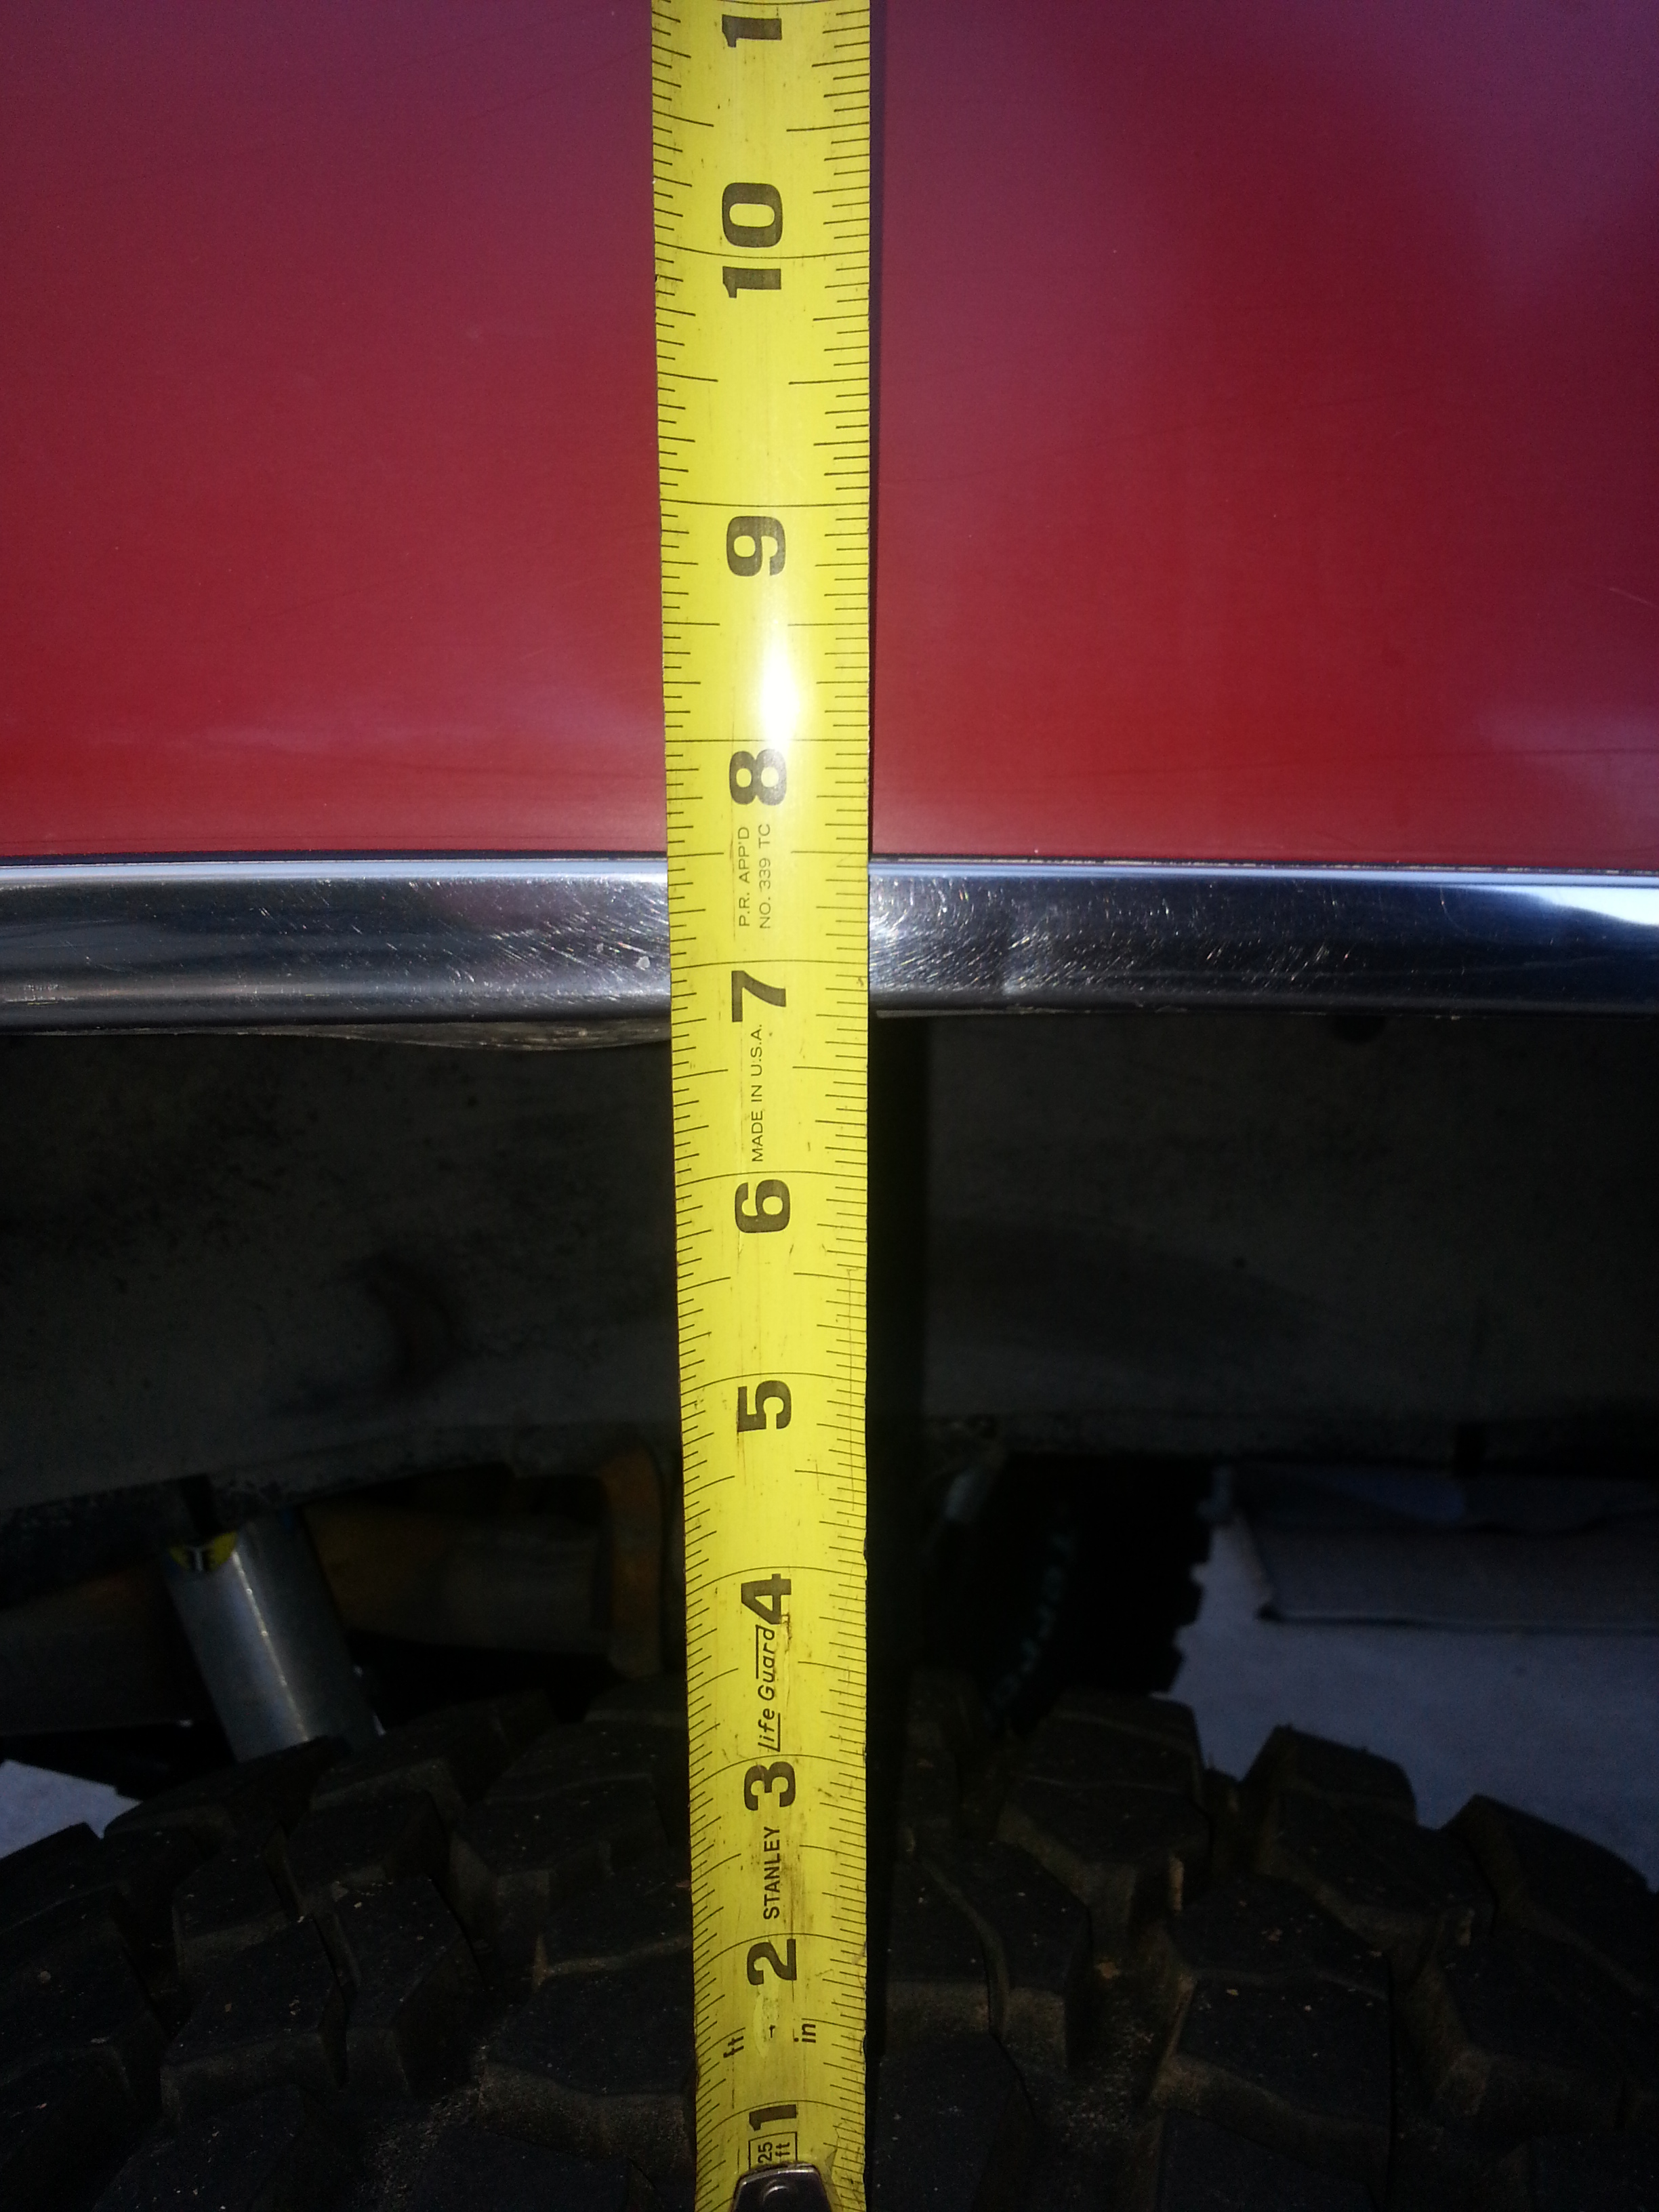
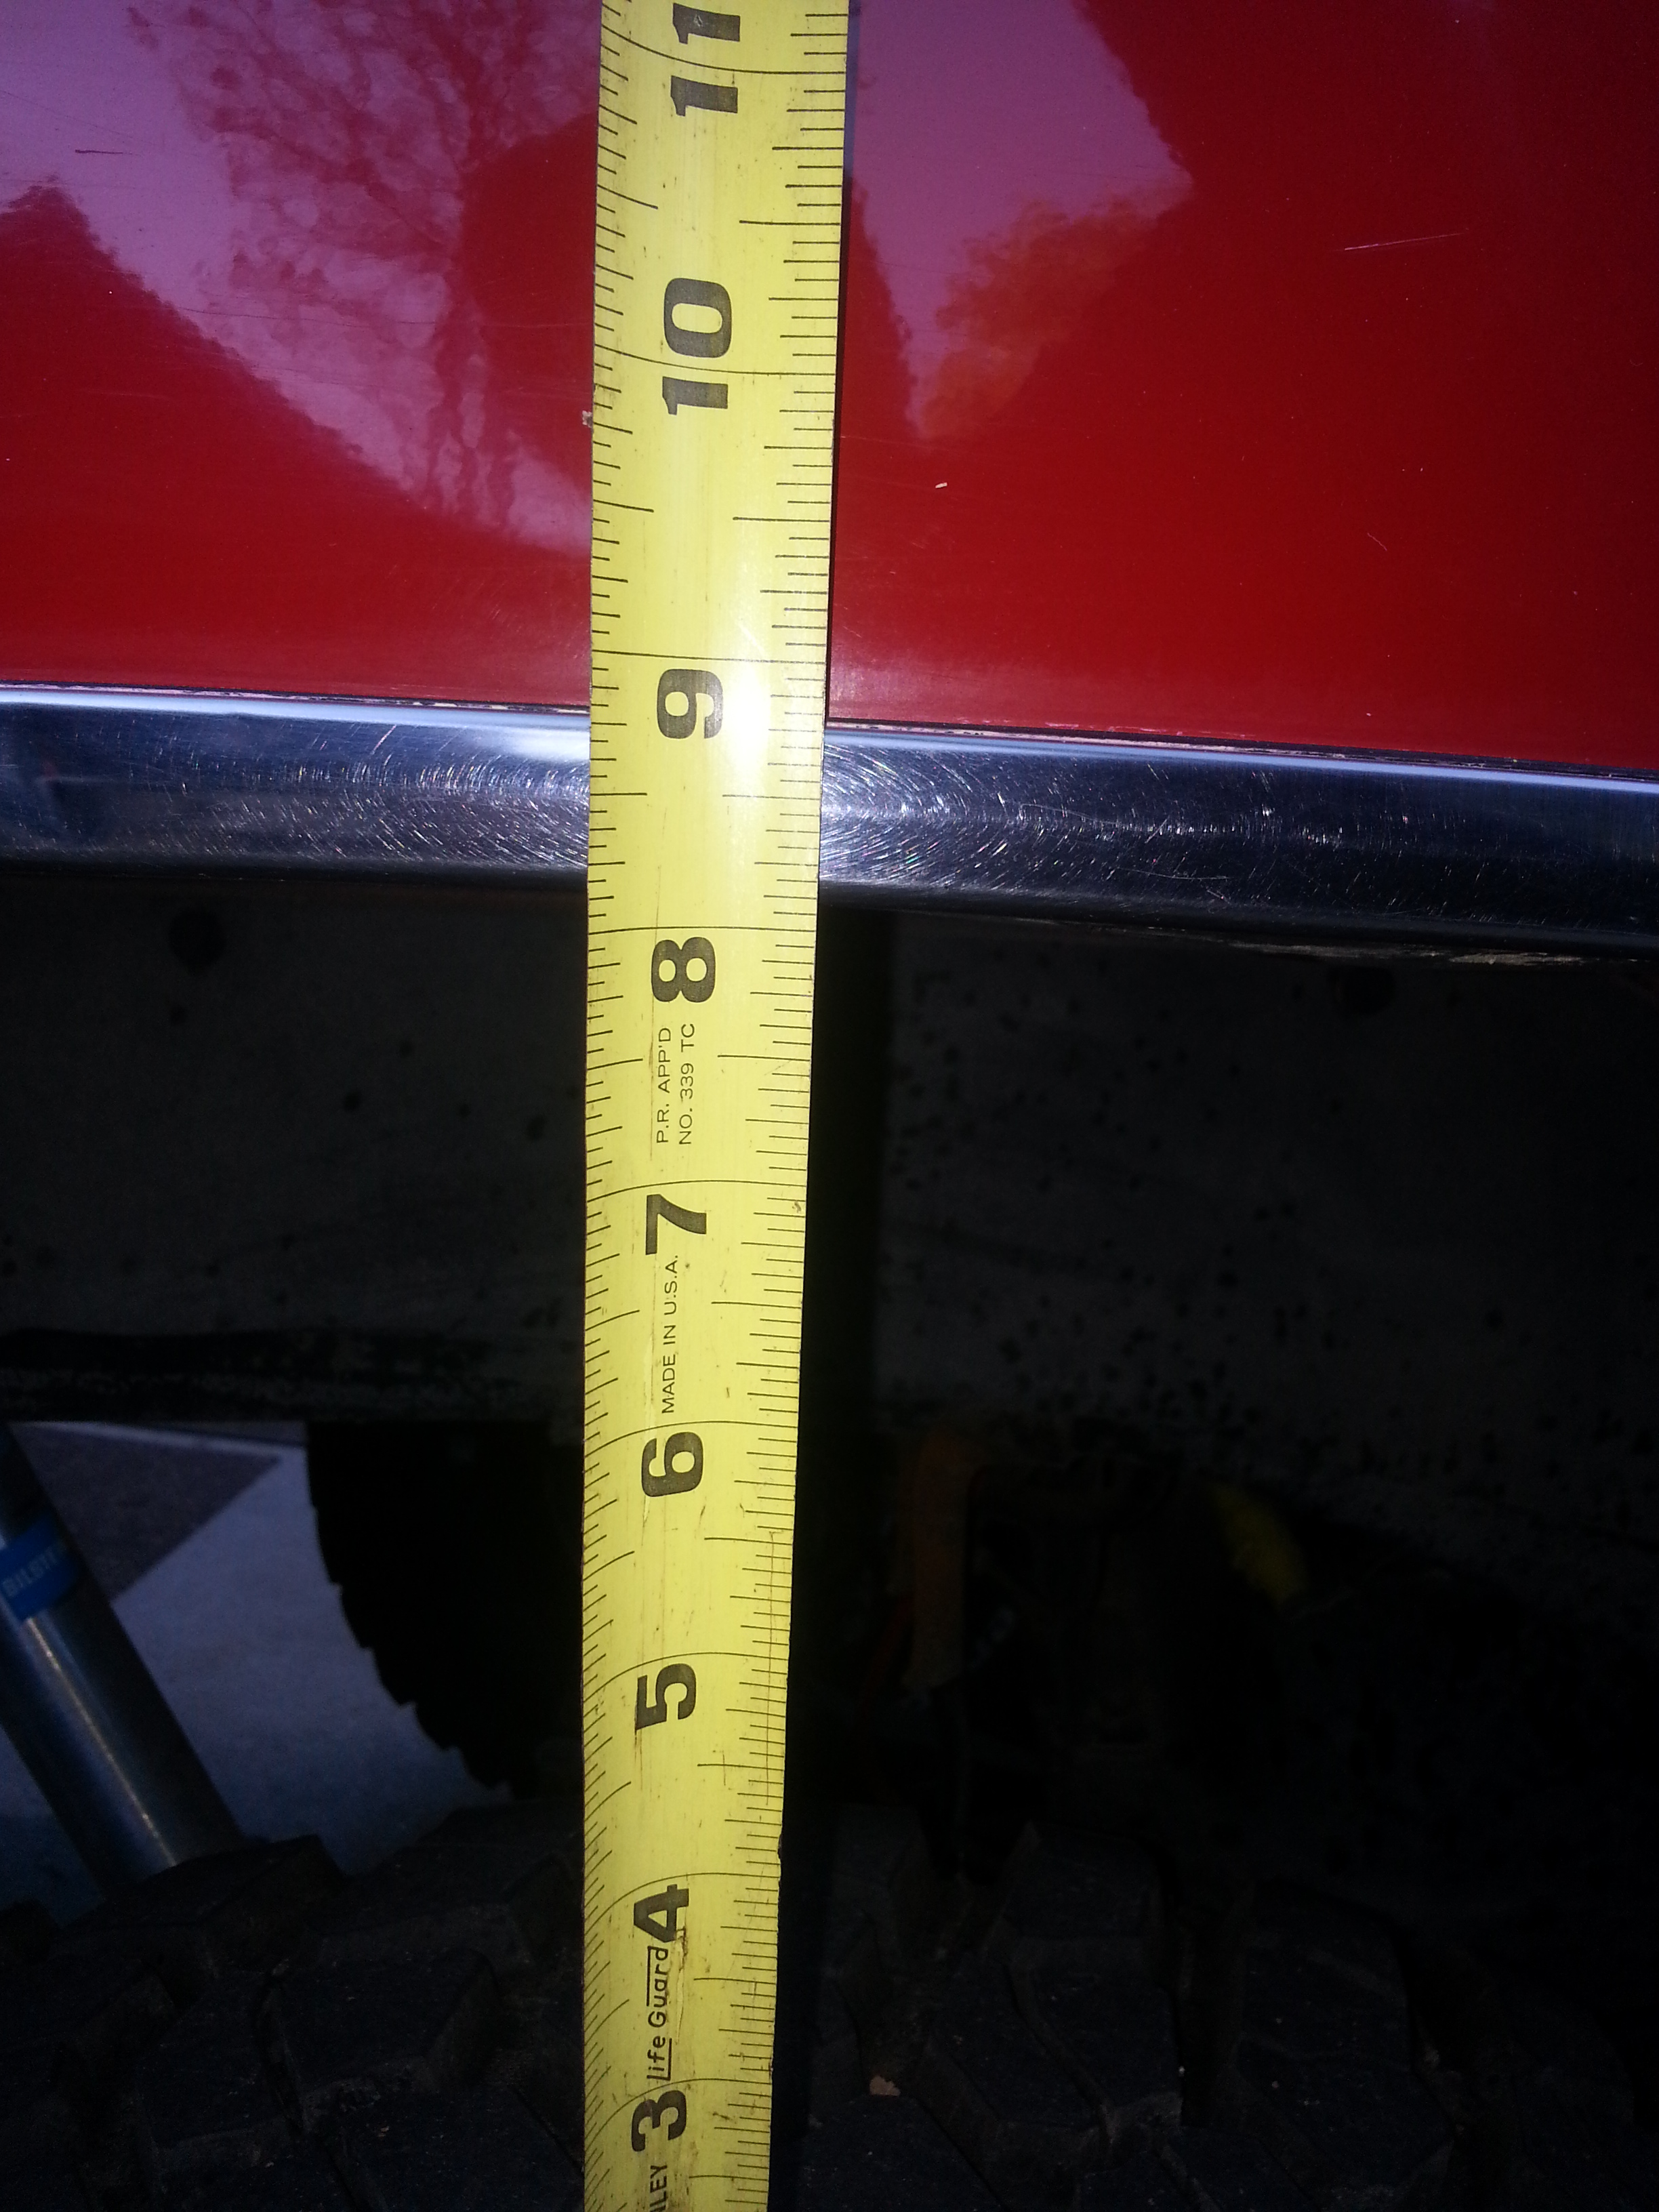
Just showing that I do have the right rod.....As per TG specs, 41.5" ....
Ends...none of em seem tweaked.
.. I'm gonna pull em both and try to check for obvious damage from the couple good ditch poundings that I put her through!
Did a Lil test fit of the Outlaw 2's to see if I'd like em on the Ruby R3DruM!.....
Recently, I've been tinkering and fine-tuning and adjusting and assessing what modifications I might want to do on my rig, regarding suspension and clearance and so forth... I recently pounded the pinch welds and did a fairly good job as I cannot find any rubbing any longer...
HOWEVER, thanks for the help of JonnyBoy, and a few people on Instagram and elsewhere... I have at least been able to investigate a bit and take a peek at a couple suspects in regards to something in particular....
*DOUBLE TOE OUT SYNDROME* ......
Granted, after some of the serious wheeling I have done in the last year, it only makes sense that things would need to be gone over and adjusted and checked as to whether they are tightened to specs, including the HiSteer ARP studs, all the hanger bolts & nuts, etc etc etc etc....lol. However, as I probably mentioned, toward the end of our trip to the Angeles Crest, both my tires were toe out. John adjusted as I watched and had to adjust the rod to the ends of the rod ends available threads... I will post pictures, but I'm sure most of you know what I'm talking about.
Upon discussing this with Eric, of Yotamasters, he and a couple others I spoke to suggested that they have pretty much never seen even the TG high steer arms bend... Neither have they seen the rods bend... They simply break, when that happens at all...
Eric, most definitely a professional with lots of experience, also shared that the only thing he could think of that could cause that, to that degree, would be the axle tube bending.
This, after much investigation and tearing down the wheel ends, ++++.... Did not seem to be the case... It just does not seem likely that my wheels would rotate so freely and have no binding or grinding within the actual tubes, especially having Dirty 30's in there. Not only that, but another check is to look from the end with the free wheel hub removed and look at the axle in the tube... If the birf is cocked to the side and difficult to move in the opposite direction whichever side is cocked to... That could indicate and in fact would most likely mean that the axle tube is definitely bent. As you will see in the pictures, it just does not seem to be the case. ARP stud nuts torqued down to around a hundred pounds... And also not forgetting to mention, the fact that none of those nuts were loose... It just seems so odd that the steering rod would have to be adjusted all the way to the last thread/ up toward the cup on the tie rod end...... Wthhhhhh?
PICS AND INFO....
Got the front up and took a good look from behind. Obviously most bends, if they are minor, will not reveal a bent axle to the naked eye. Especially not enough to force the steering rod to be adjusted out another half an inch on each side? Lol... But just for posterity sake....

These next pictures are to give you an idea of exactly what I mean in regards to the steering rod being adjusted all the way out...


Here, you can see I pulled the free wheel hubs off to get a look straight down the tubes and see if the axle was pushing hard to one side( I also had jacked it up on both sides, one of the time, full turn and so forth, checking for any binding I could... Any grinding in the tube at all... Just nothing revealed itself) .....


Just posting the next ones to show the brakes are wearing perfectly..... I'm not sure why the last pics showed up like the rotors were hamburger! Haha....Light refraction from the flash? Meh.....anyway.....


Just showing here that the 2nd leaf/loose wrapper has been cruising out on me with the 3rd off to the side.... Got it worked back over and seems to be stayin..... Gonna double check the center pin nut torque value......

Worked back over with leaves relaxed....

One reason I bring this up, the truck is squatting more on the drivers rear springs than the passenger side. ....
Driver side REAR.....

Passenger side REAR.....

The obvious lean.... BUT WHYYYYYYYYYY? haha..... (Full tank of fuel, whatever, it's definitely sagging on th we driver side.... A full 1.5"! Grrrrrr)
Just showing that I do have the right rod.....As per TG specs, 41.5" ....

Ends...none of em seem tweaked.
.. I'm gonna pull em both and try to check for obvious damage from the couple good ditch poundings that I put her through!

Did a Lil test fit of the Outlaw 2's to see if I'd like em on the Ruby R3DruM!.....

Last edited by ChefYota4x4; Jan 19, 2014 at 11:57 PM.
Jan 19, 2014 | 09:59 PM
#8290

Registered User
Joined: Apr 2007
Posts: 1,580
Likes: 1
From: Park City, UT
Haha, I just love some of your autocorrects Mark!
On a serious note, though, something is definitely up and we're completely stumped as to what. I checked back through Mark's pictures of during the sas and after he first got it back, and the rod ends had at least 1/2-3/4" of thread showing, per side! I'm definitely not gonna say Eric let the runner leave his shop after that much work with that much toe out, even if he didn't do a perfect alignment there or take it somewhere for it to be put on a rack. I don't know of any fabricator, pro or amateur, that would do something so careless, regardless of how much they're getting paid, and I've heard nothing but good about Eric. So please, any ideas how toe out could happen without the rod ends loosening up somehow(the jam nuts were tight when I got under there to adjust it that morning), even the really off the wall stuff at this point, share them with us!
Things pretty well ruled out:
Rod ends self adjusting
Trunnion bearings(camber is still perfect)
Bent axle tube(unless you know of how it could be bent and not display signs of it in the tests/checks he's done so far)
Tie rod bending(would cause shorter tie rod, not longer)
Wrong tie rod bar
Wheel bearings
Loose high steer arms/nuts/studs
Jan 20, 2014 | 06:08 PM
#8291
Registered User


Joined: Mar 2012
Posts: 7,125
Likes: 681
How To Make High-Beam Indicator Work WithH4 Conversion Harness
Hey, Mark!
Here's how high-beam indicator works with the H4 conversion harness.
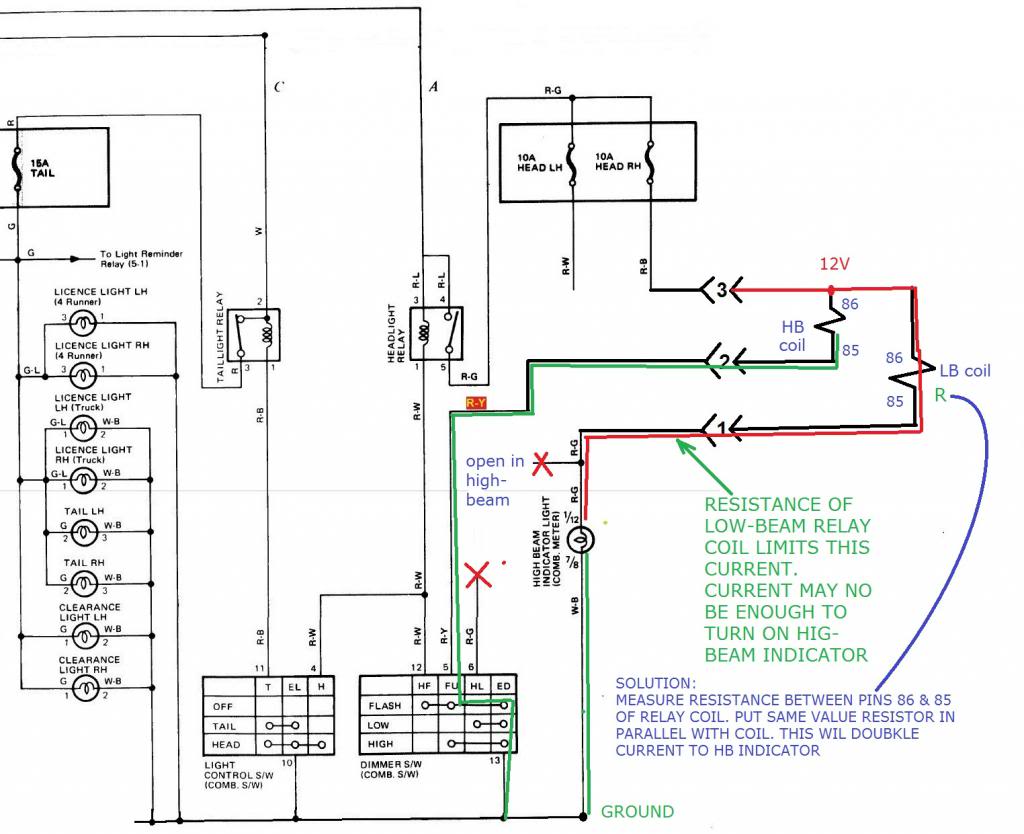
IF relays used have high resistance (not a bad thing), current to HB indictaor may be too low to turn it on.
I suggest you:
If that still does not work, solution would be to put an additional resistor in parallel with Coil of low-beam relay. This will increase current to HB indicator.
Also ask Grego what his coils measure across. That would give us a better idea.
let me know what coil resistance you measured, I've already tried certain resistance that would allow HB indicator to work (need to look at the values again). We can find out the right combination.
You'd want the highest resistor that would still allow indicator to work. This way you limit current draw through your dimer combo low beam contacts. This would still be much less than what goes through there in stock circuit.
Here's how high-beam indicator works with the H4 conversion harness.
IF relays used have high resistance (not a bad thing), current to HB indictaor may be too low to turn it on.
I suggest you:
- Measure across pins 86 and 85 of your harness relays.
- If you have an extra relay with compatible pin-outs & load current capacity, measure coil resistance of those, too.
- Use one with lowest coil resistance for the Low-beam and see if HB indicator works.
If that still does not work, solution would be to put an additional resistor in parallel with Coil of low-beam relay. This will increase current to HB indicator.
Also ask Grego what his coils measure across. That would give us a better idea.
let me know what coil resistance you measured, I've already tried certain resistance that would allow HB indicator to work (need to look at the values again). We can find out the right combination.
You'd want the highest resistor that would still allow indicator to work. This way you limit current draw through your dimer combo low beam contacts. This would still be much less than what goes through there in stock circuit.
Last edited by RAD4Runner; Jan 20, 2014 at 06:14 PM.
Jan 21, 2014 | 03:17 PM
#8292
Thread Starter
Registered User
iTrader: (5)
Joined: Jun 2009
Posts: 19,281
Likes: 20
From: Lake Havasu, AZ
 lol.... I'll have to pull the battery to get to those relays when I have time... I thought maybe it was doing it because both connectors aren't connected to the switch, wheher by jumper or just adding a second connector. I guess I was wrong. Lol. I had to pay, however fair the price, for the entire kit, and then remove these cool relays?!?! Lol.
I installed the headlight wiring harness upgrade kit, for anyone who wonders what he's talking about... I know, I've had a thing for about 6 months, go figure right? Lol.
I will do a write up with pictures on a little bit what I did. I definitely noticed an improvement in the brightness of the headlights and high beams. Unfortunately, I had to hurry and get started before I could do anything night time pictures before and after. Just gotta work with the spontaneous free time that comes up, you know what I mean?
Last edited by ChefYota4x4; Jan 21, 2014 at 04:23 PM.
 Jan 21, 2014 | 04:57 PM
#8295
Registered User
Joined: Mar 2012
Posts: 7,125
Likes: 681
Don't worry ' Mark, we're on same boat. My HighBeam indicators does not work either, 'cause I still need to rewire it However, I think we're pretty good about not forgetting it anyway; like I don't need a reminder to wear a seatbelt.
Jan 21, 2014 | 06:36 PM
#8296
Thread Starter
Registered User
iTrader: (5)
Joined: Jun 2009
Posts: 19,281
Likes: 20
From: Lake Havasu, AZ
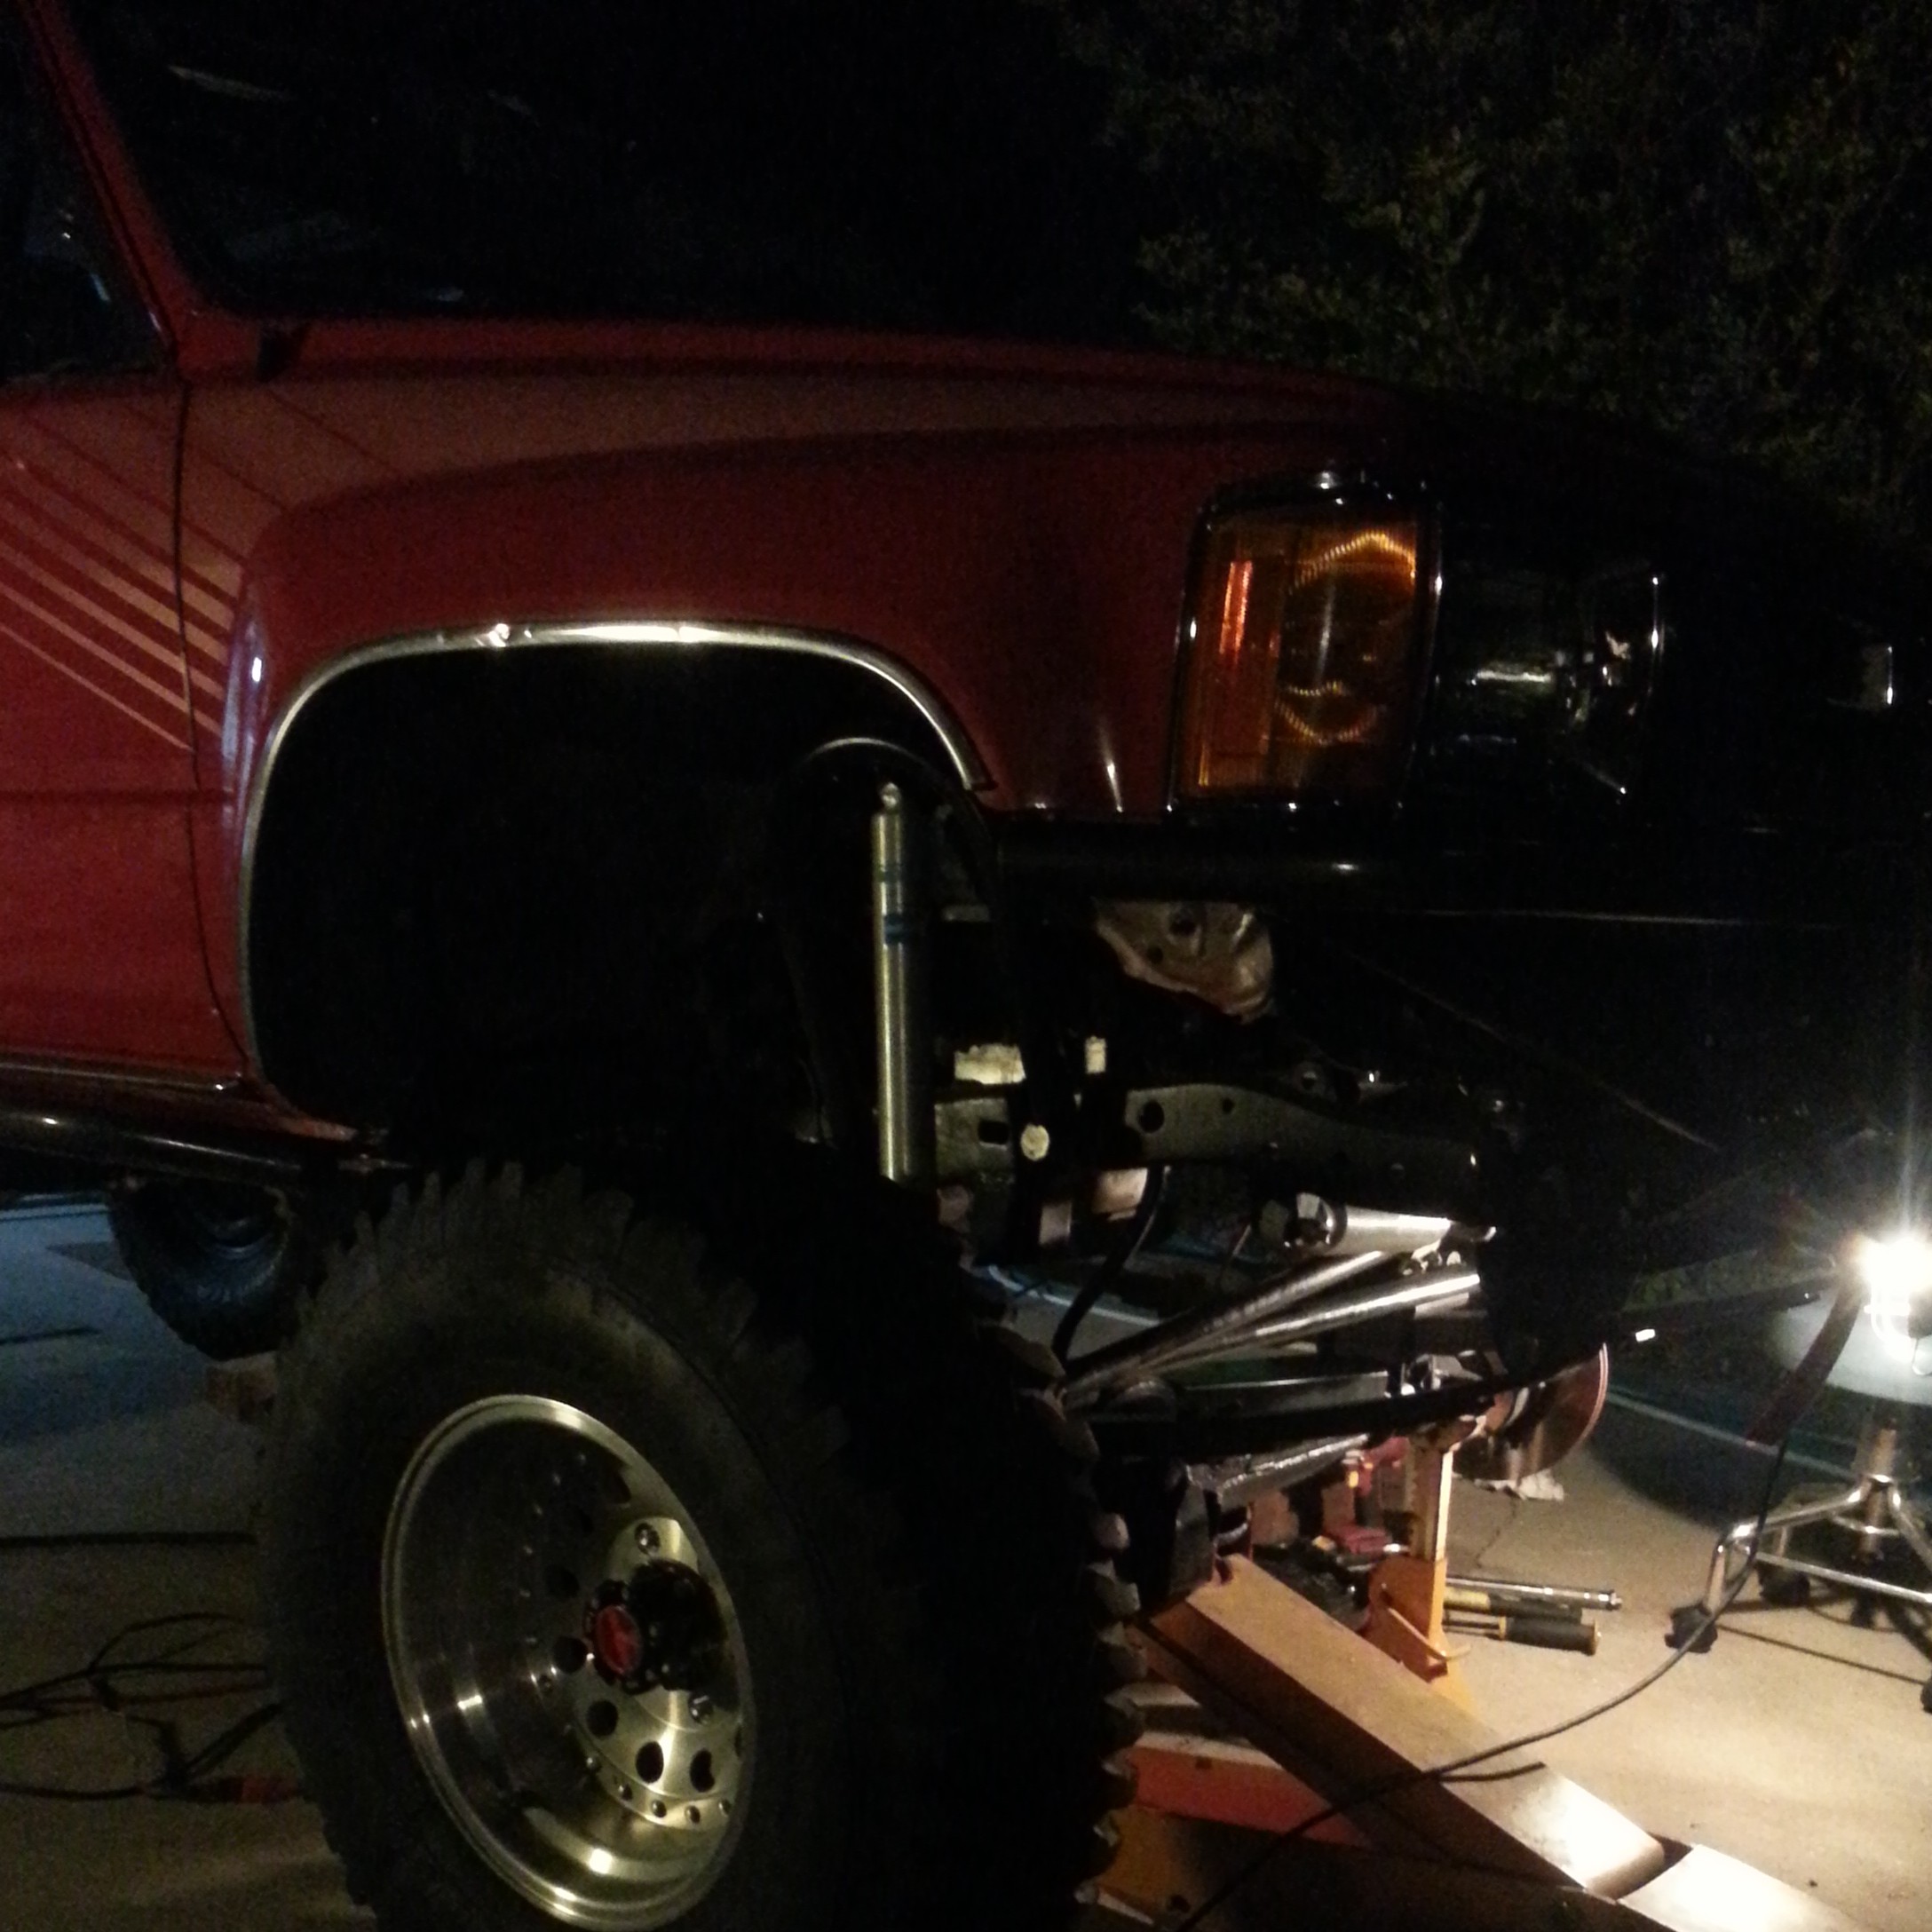
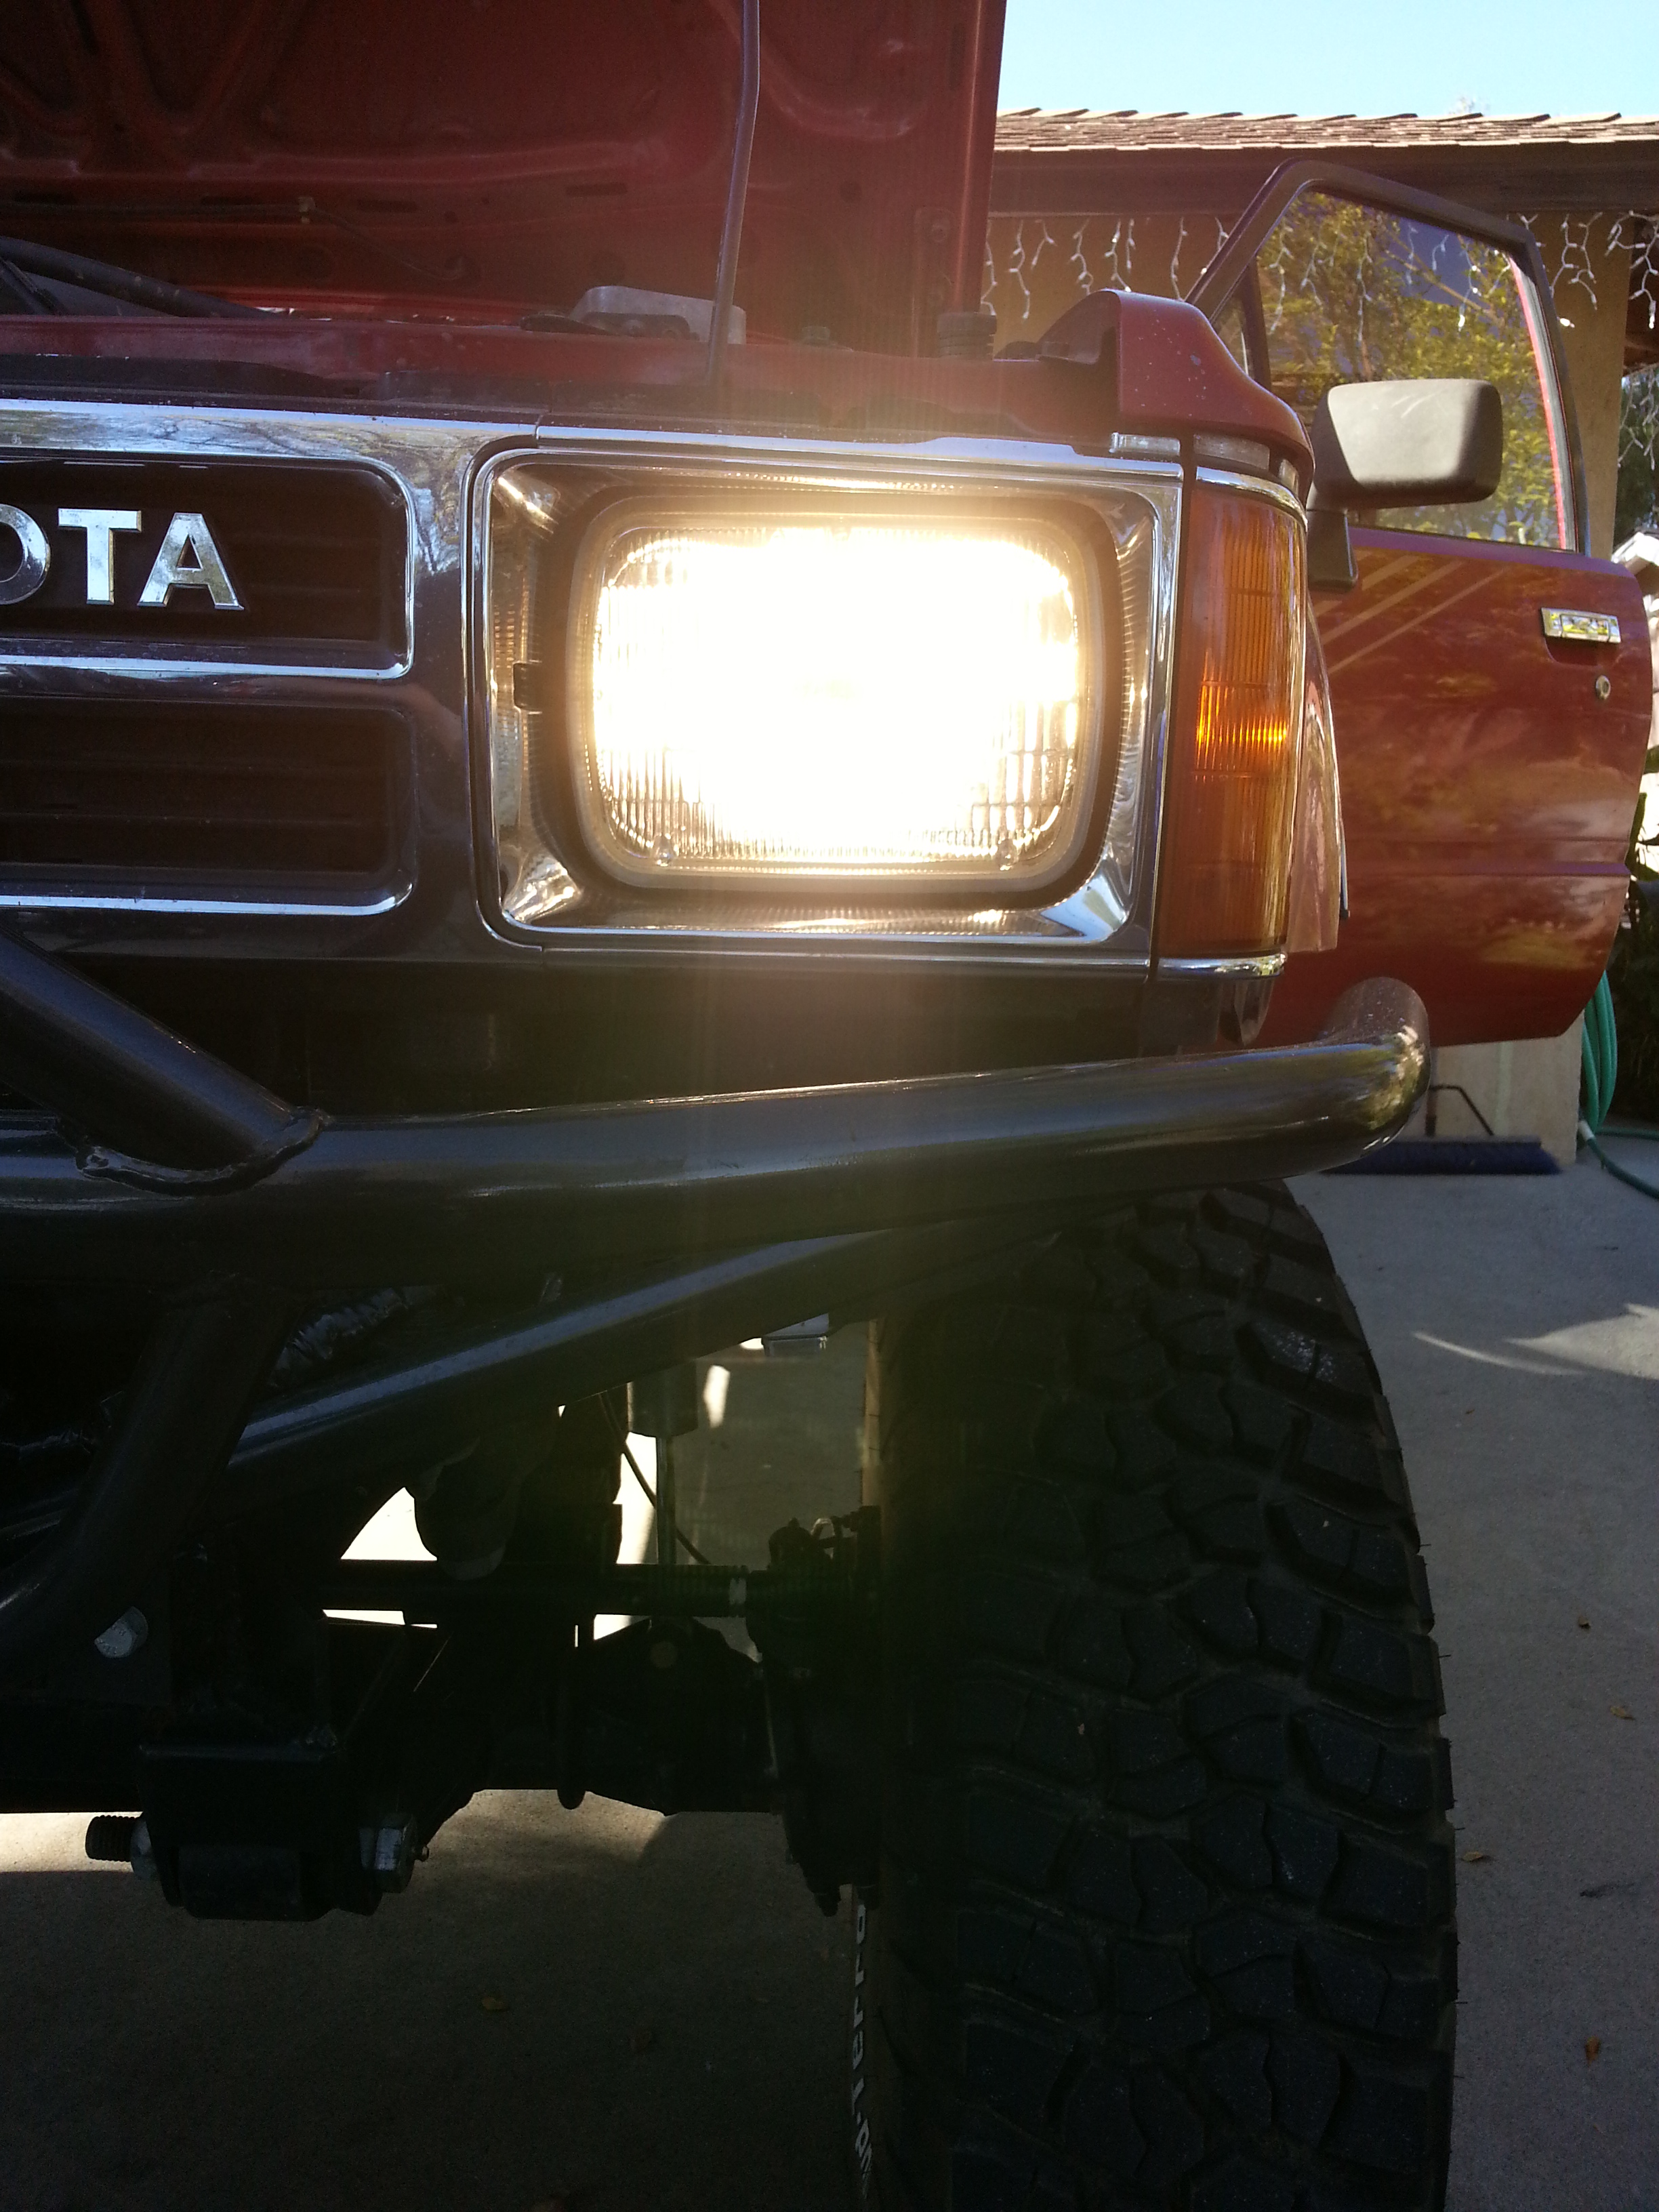
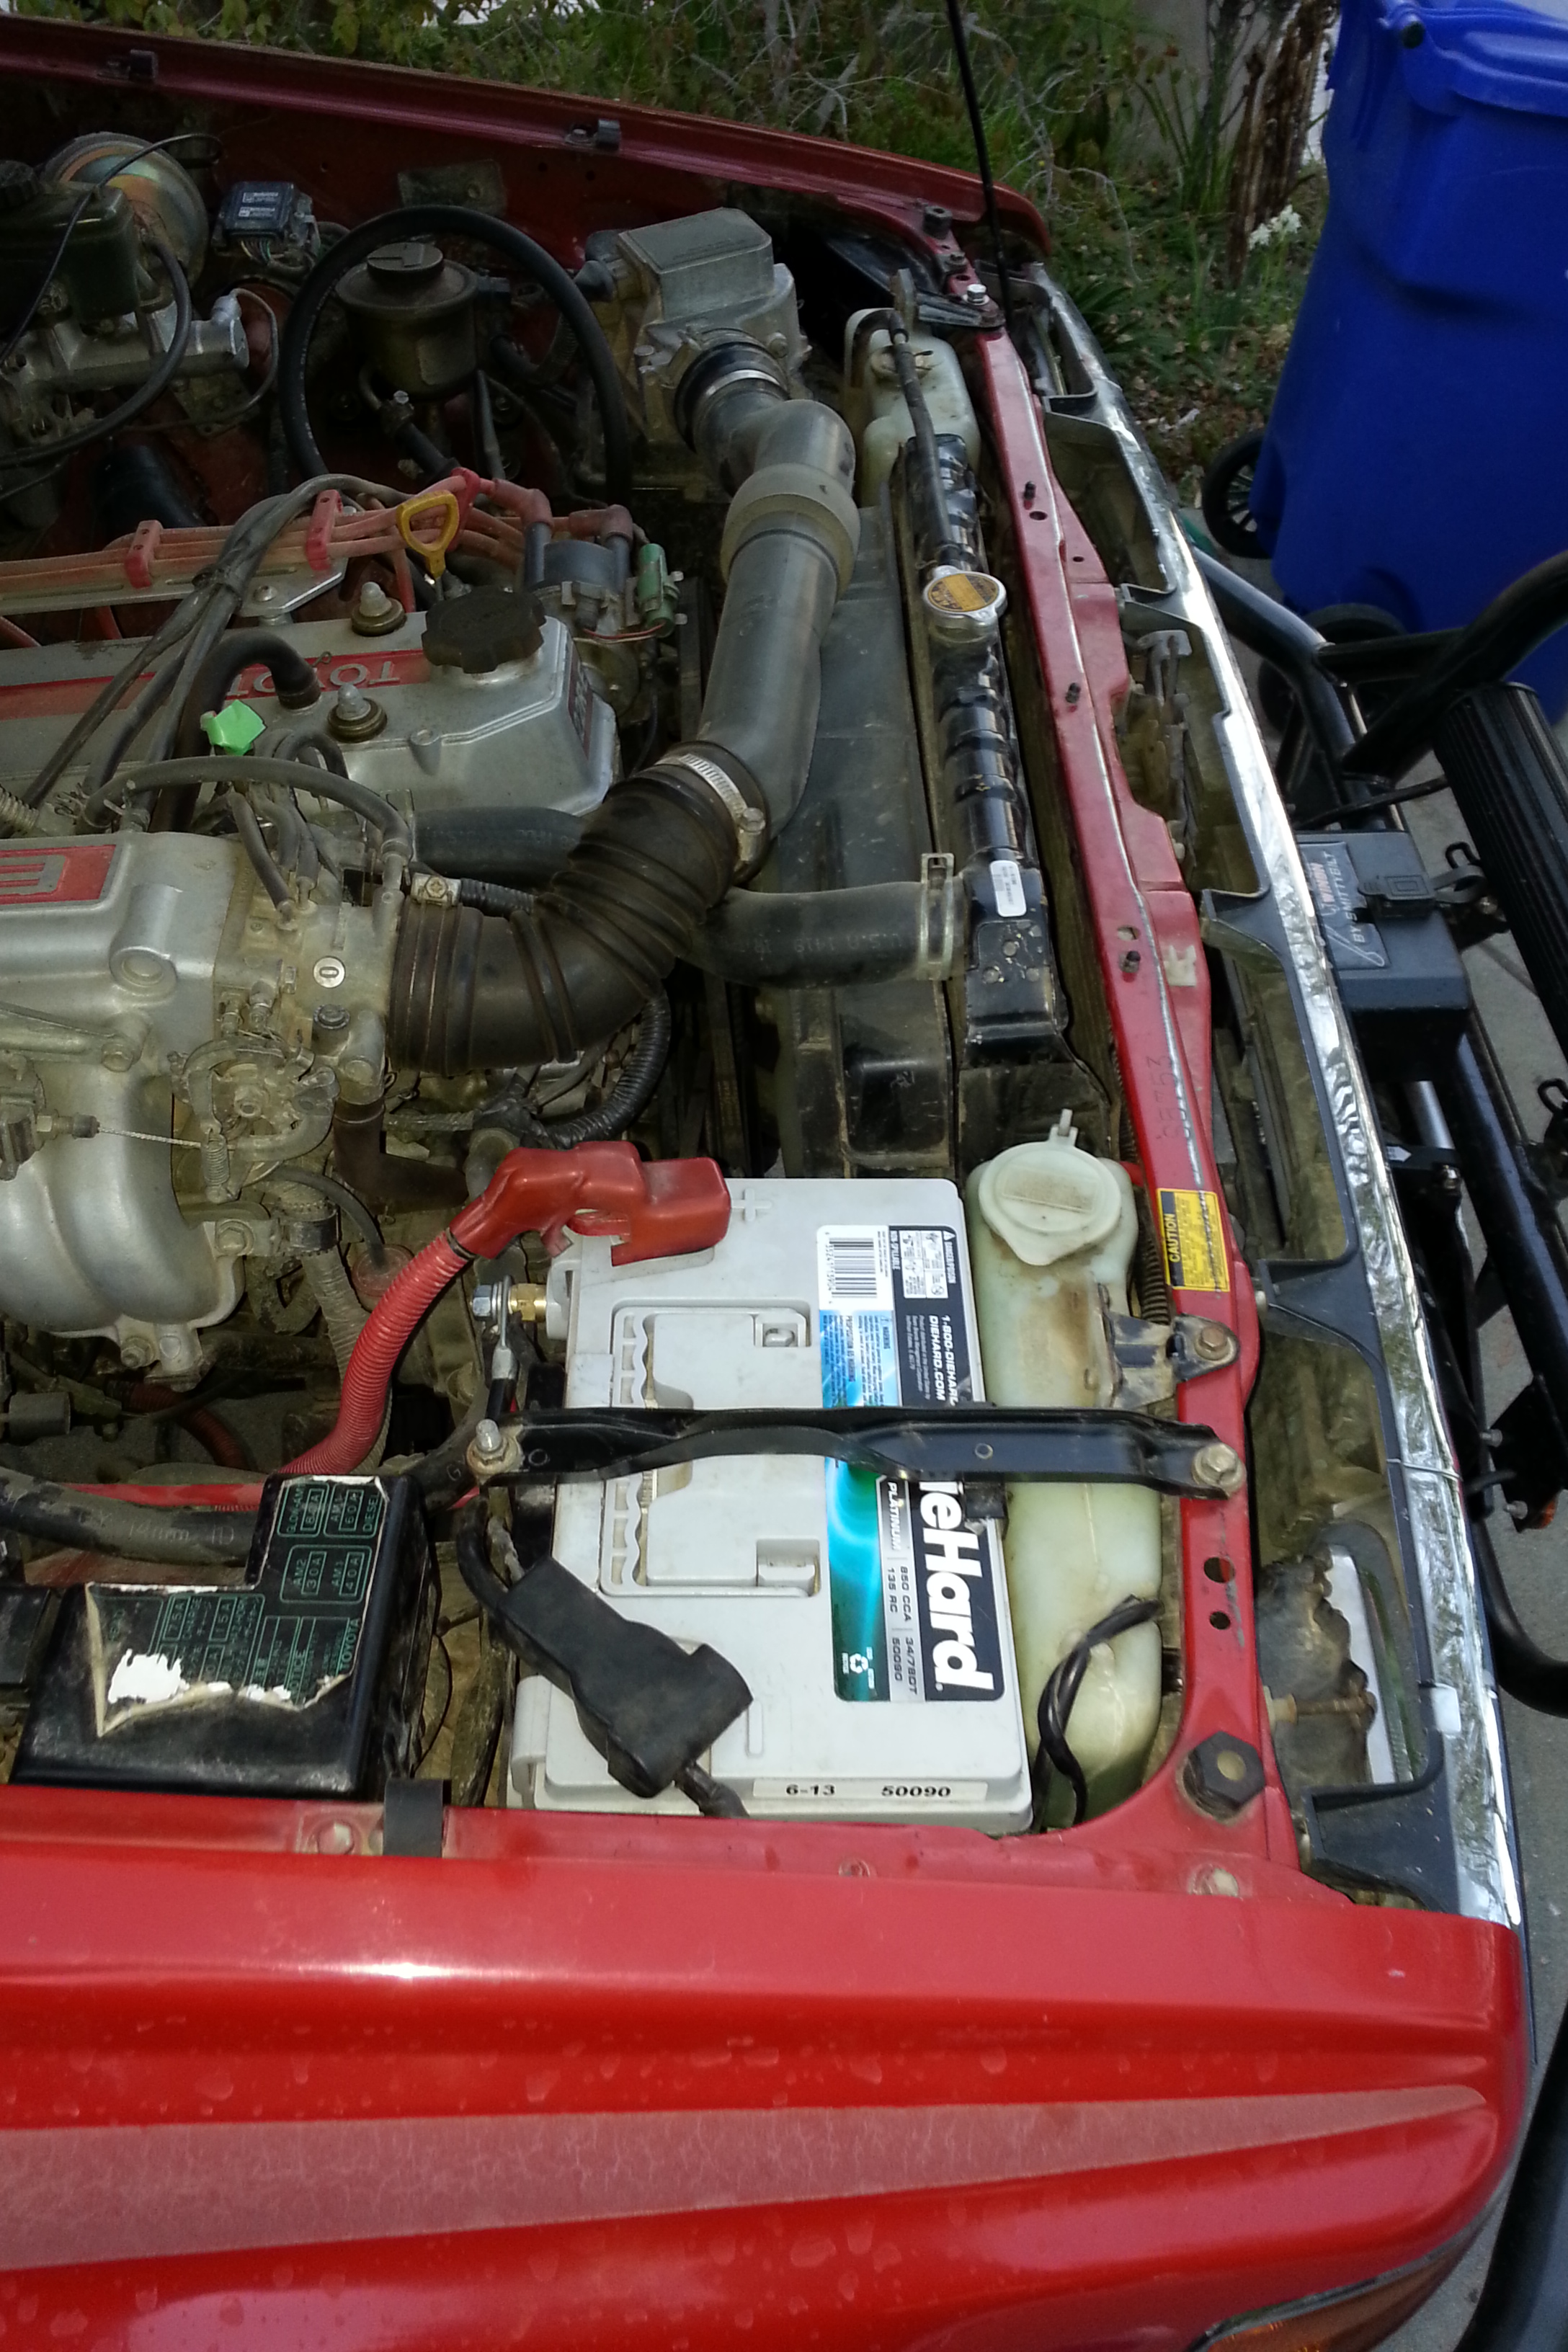
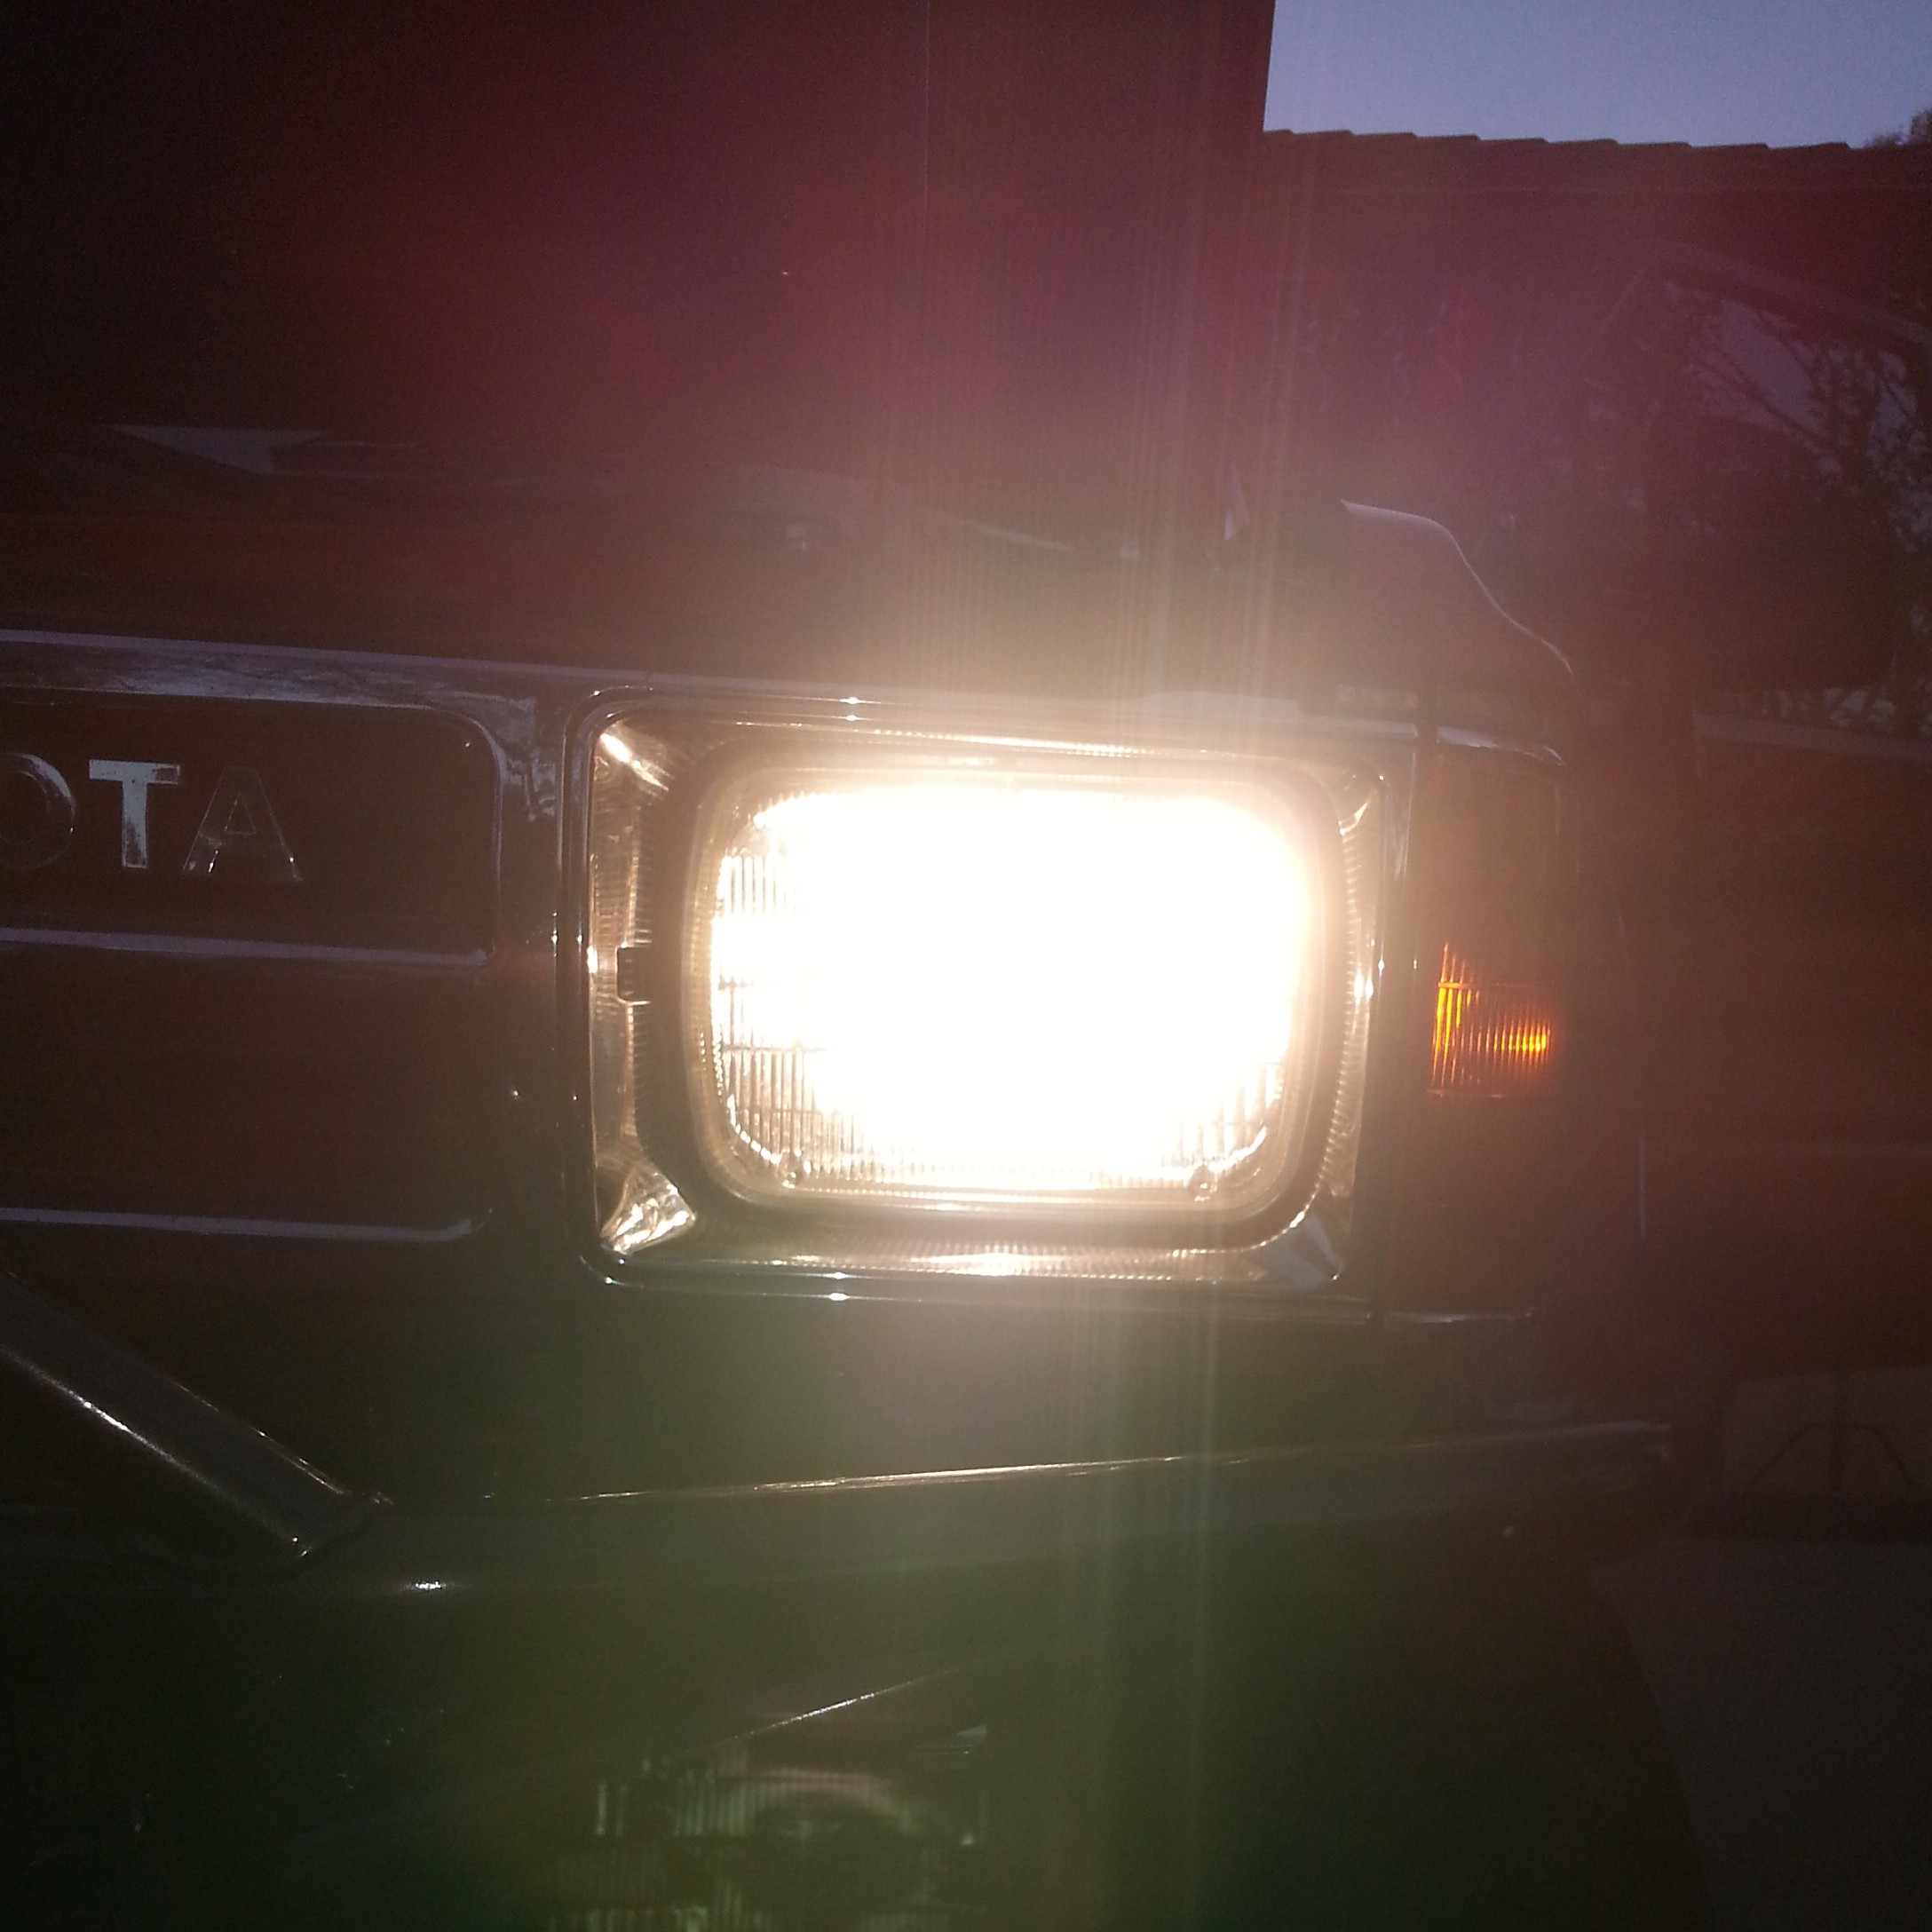
Well, I finally got around to installing my headlight wiring harness upgrade with the ceramic connectors.....

First, shot of the headlights before... They were better with the Silver Star - Sylvania, over stock, but I definitely saw an improvement after the wiring
upgrade as well....
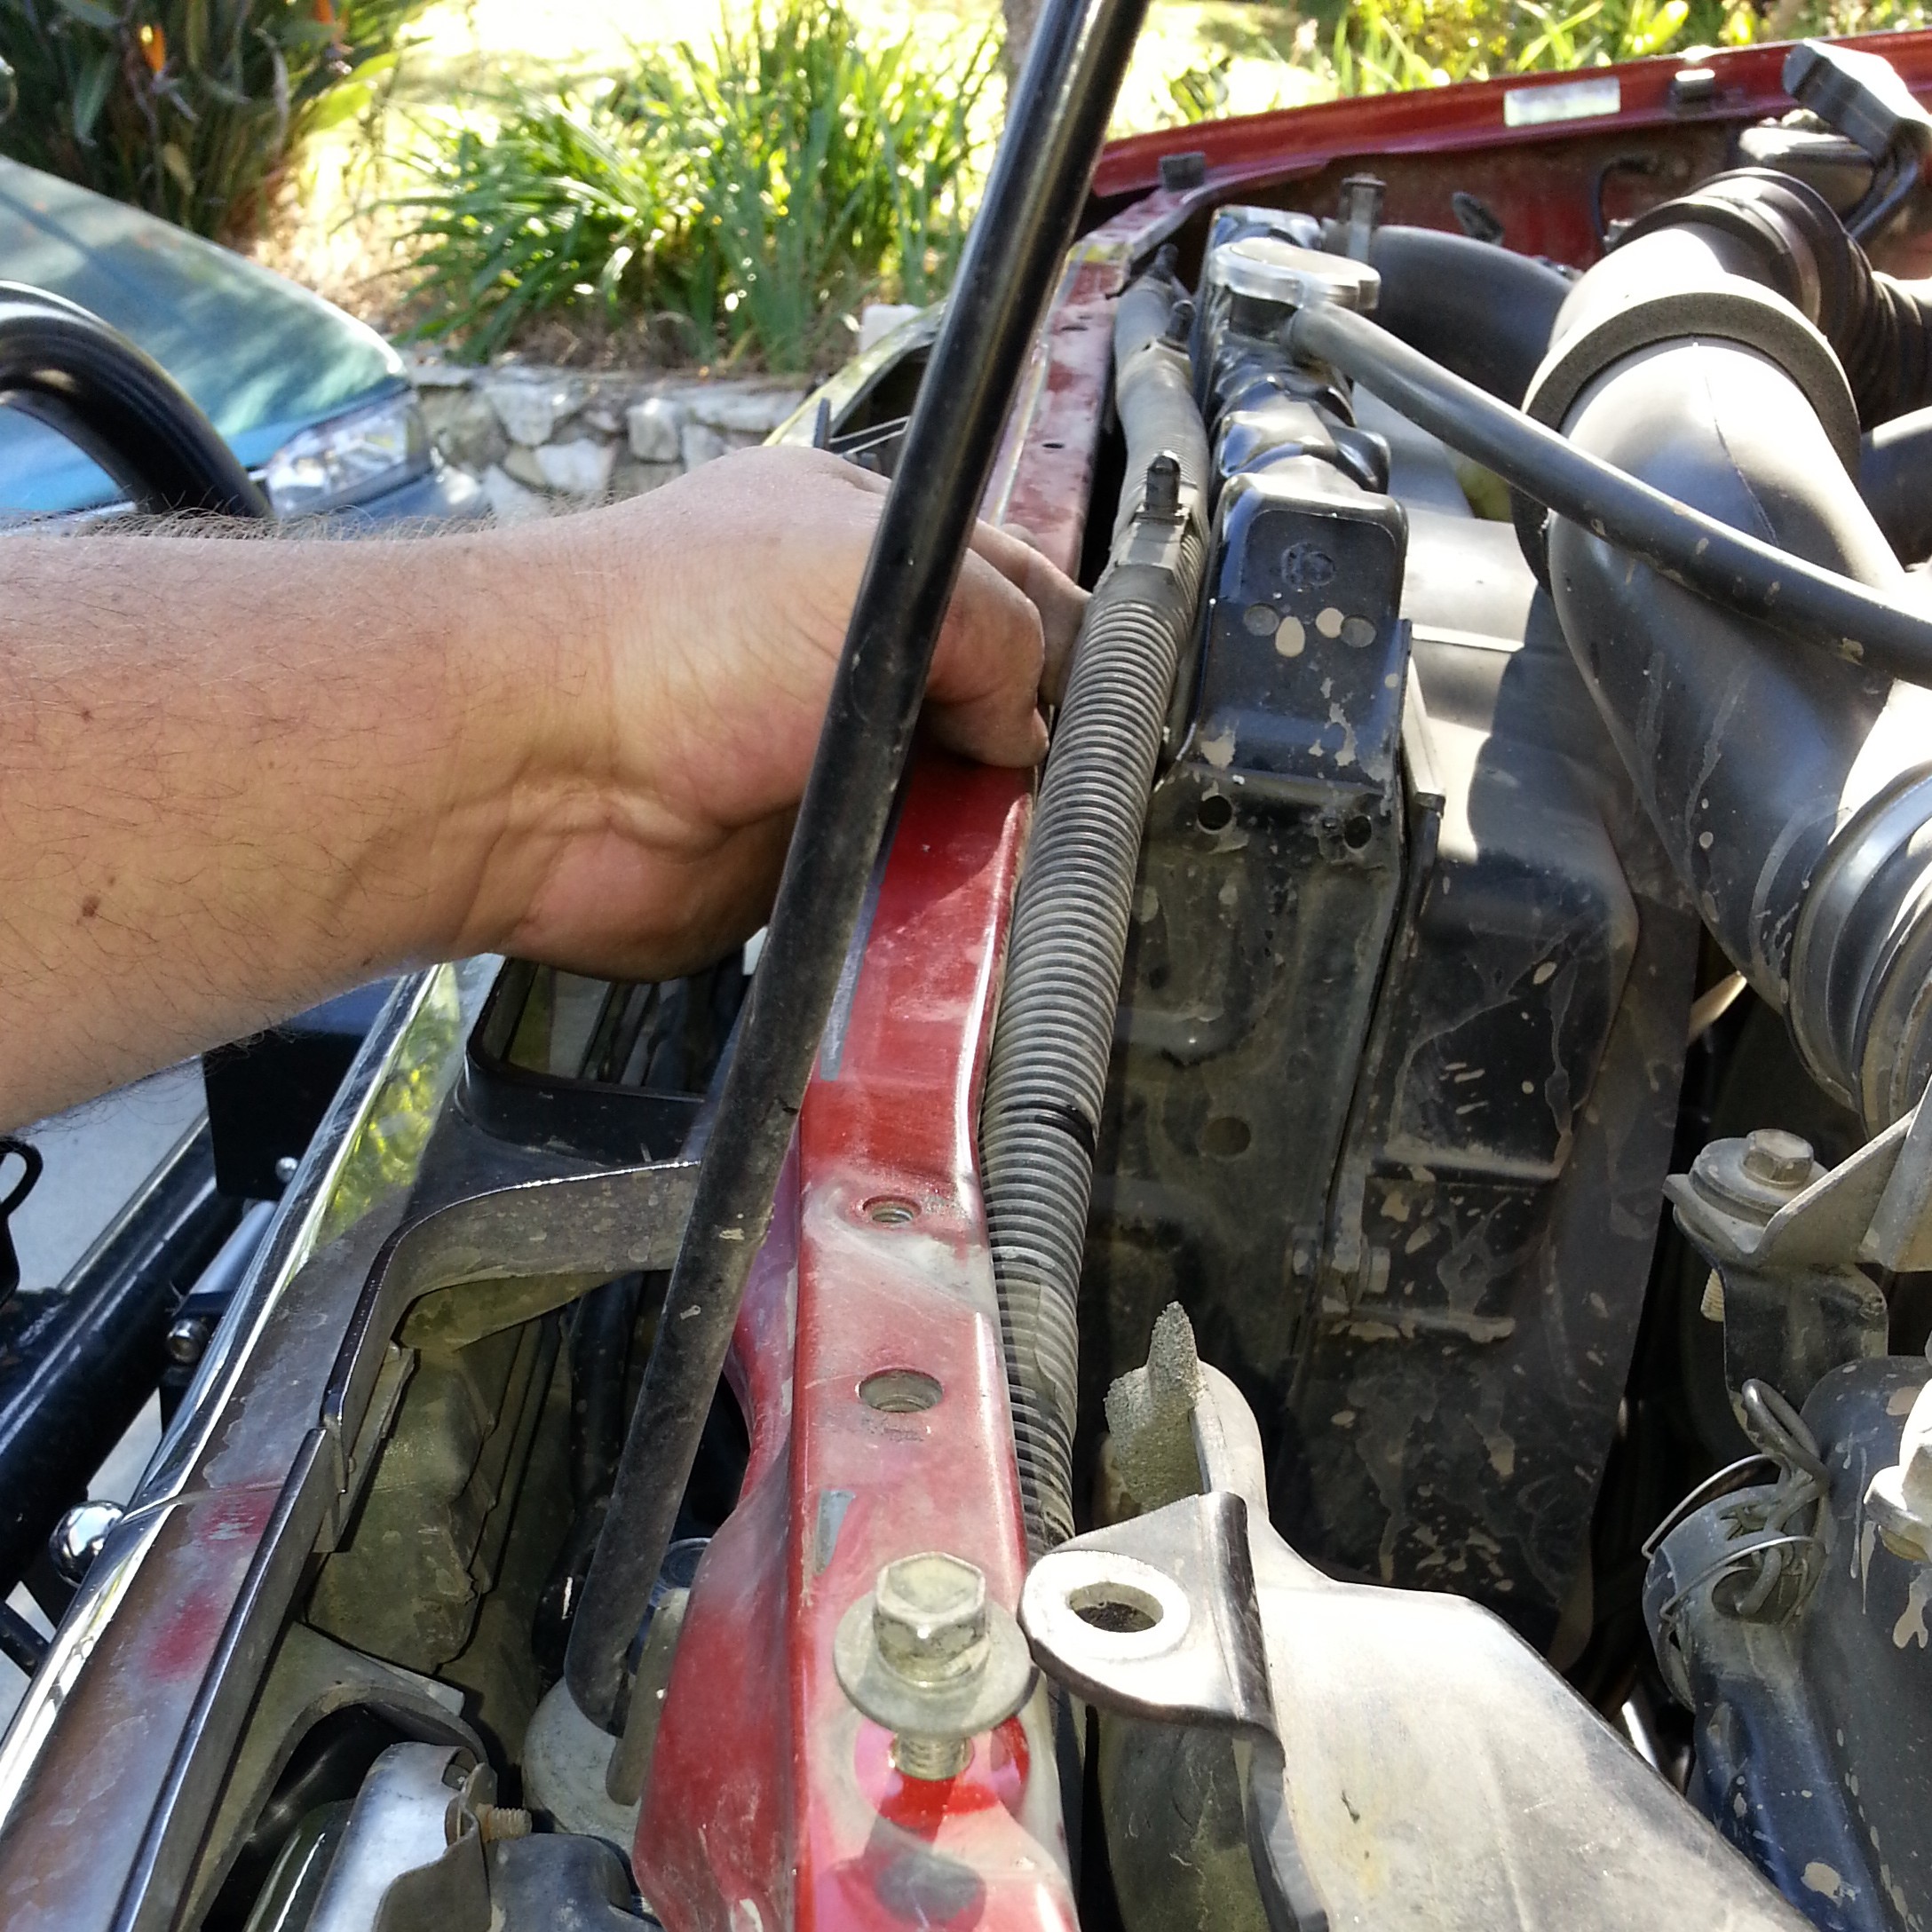
I had to pull the battery, the windshield wiper fluid reservoir and the coolant overflow reservoir...
Then I used my handy set of tangled long nose pliers to carefully release the clips holding in the factory headlight harness wiring...

Pulled the loom up to stuff my new lil loom inside it...
All clean and invisible..... .....Mostly, hehe....

Before and after, head on, but at different times of the day......
Before....
After....
Lil video of this stuff......

First, shot of the headlights before... They were better with the Silver Star - Sylvania, over stock, but I definitely saw an improvement after the wiring
upgrade as well....

I had to pull the battery, the windshield wiper fluid reservoir and the coolant overflow reservoir...
Then I used my handy set of tangled long nose pliers to carefully release the clips holding in the factory headlight harness wiring...

Pulled the loom up to stuff my new lil loom inside it...

All clean and invisible.....
.....Mostly, hehe....

Before and after, head on, but at different times of the day......
Before....
After....

Lil video of this stuff......
Last edited by ChefYota4x4; Jan 21, 2014 at 06:44 PM.
Jan 21, 2014 | 11:13 PM
#8300
Thread Starter
Registered User
iTrader: (5)
Joined: Jun 2009
Posts: 19,281
Likes: 20
From: Lake Havasu, AZ
http://pages.ebay.com/motors/link/?n...d=330813121438
And yes buddy, I do notice a difference..... Not only in brightness, but I can't seem to duplicate the problem I've been having with my RPM's dropping as I turn the headlights on. I had to disconnect the battery so I will see if that comes back in the next couple days.
Very easy... Just that the bumper and lift made it a bit more work, coupled with not feeling to great. But CAKE, all in all!
Right on....update us, daily! Lol...


