
ChefYota4x4's 1987 4Runner Build-Up Thread
 Oct 17, 2012 | 07:17 PM
#5061
Thread Starter
Registered User
iTrader: (5)
Joined: Jun 2009
Posts: 19,281
Likes: 20
From: Lake Havasu, AZ
Chef,
Gotta post pics of those eyelets, what they look like. Would threshold cover them up? How about removing them, elongating the hole - make them more like slots - then instead of eyelets, just do button hole stitch to finish slots? For heavy duty stitches, I use upholstery nylon thread for Jo-ann's Fabric or other store.
Gotta post pics of those eyelets, what they look like. Would threshold cover them up? How about removing them, elongating the hole - make them more like slots - then instead of eyelets, just do button hole stitch to finish slots? For heavy duty stitches, I use upholstery nylon thread for Jo-ann's Fabric or other store.
 .......
Here ya go, RAD, ... not a pic, but I TRY to explain them until I can get a pic for ya.
*** First pic is the original that I took to and edited in "PAINT"... You can see the WHITE, PLASTIC EXPANSION NUTS at the end of the tailgate. This is what the carpets fixed plastitabs slip over, TIGHTLY, and hold the carpet VERY TIGHT from slack... ESPECIALLY now that I've added more padding stuff underneath ........
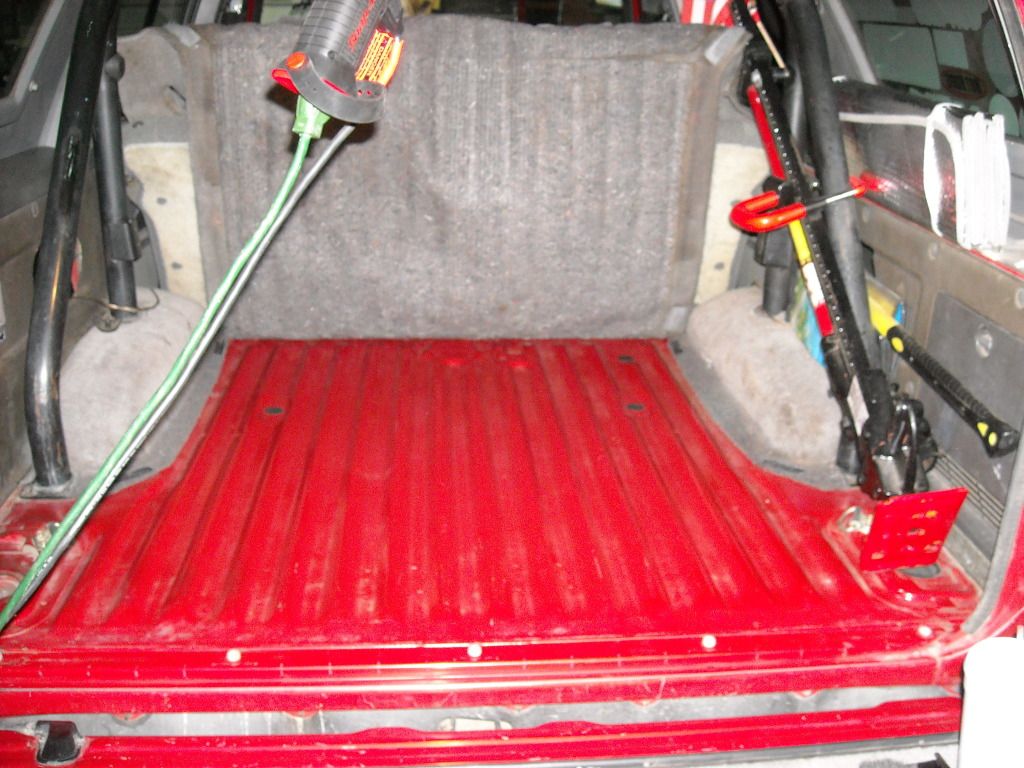
Next pic is the edited one.. Sorry, it's terrible, but hopefully you'll get the point. AND I KNOW you can buy these things and sew them into carpet edges(Just picture a newer car that has "Floor Mat Stabilizing Rings"... that keep the floor mat from moving... SAME thing, just VERY hard to break, yet pliable plastic......
 Oct 17, 2012 | 07:37 PM
#5062
Registered User
Joined: Jul 2012
Posts: 2,365
Likes: 4
From: Idaho
DRAGON, lol.... you're gonna be mad, .....
Not what I meant... but I LIKE THAT TOO!
What I meant was this.... LEAVE THE TOP GOLD.... but, instead of inverting the stripes into red on the gold top(opposite of what they are on the truck)... Rather, make the stripes just continue. So all you'd be doing was taking the red portions of the stripes on the truck onward into the top... IOW, just add those small red inbetween sections to the top... so it looks like BIG gold strips, rather than big red ones on the gold top... make sense? hahahahaa.
Not what I meant... but I LIKE THAT TOO!
What I meant was this.... LEAVE THE TOP GOLD.... but, instead of inverting the stripes into red on the gold top(opposite of what they are on the truck)... Rather, make the stripes just continue. So all you'd be doing was taking the red portions of the stripes on the truck onward into the top... IOW, just add those small red inbetween sections to the top... so it looks like BIG gold strips, rather than big red ones on the gold top... make sense?
hahahahaa.now ya have all kinds of options
 Oct 17, 2012 | 07:52 PM
#5064
Registered User


Joined: Mar 2012
Posts: 7,125
Likes: 681
Oct 17, 2012 | 08:22 PM
#5065
Thread Starter
Registered User
iTrader: (5)
Joined: Jun 2009
Posts: 19,281
Likes: 20
From: Lake Havasu, AZ

 ..... I'm trying, just wish I had as much time as I do dreams! hehe.
  Oct 17, 2012 | 08:27 PM
#5066
Registered User
Joined: Mar 2012
Posts: 7,125
Likes: 681
Hey RAD, ....You can see the WHITE, PLASTIC EXPANSION NUTS at the end of the tailgate. This is what the carpets fixed plastitabs slip over, TIGHTLY, and hold the carpet VERY TIGHT from slack... ESPECIALLY now that I've added more padding stuff underneath ...Just picture a newer car that has "Floor Mat Stabilizing Rings"... that keep the floor mat from moving... SAME thing, just VERY hard to break, yet pliable plastic......
Oct 17, 2012 | 08:37 PM
#5067
Thread Starter
Registered User
iTrader: (5)
Joined: Jun 2009
Posts: 19,281
Likes: 20
From: Lake Havasu, AZ
 hahahaha... Soda spills, etc....... HEY, I'm sober now, wont happen anymore, PROMISE! hahaha. Remember, i've had this thing for 10 YEARS!
  lol.
lol. That's a GREAT idea... THAT WAY, I can keep the carpet mounted where it goes under the back seats... THEN, it will not get out of alignment where it goes perfectly around the roll bar, etc, ya know?
PS> I WANT new tabs there(The white ones... at least 2 appear to be shaved off)
Last edited by ChefYota4x4; Oct 17, 2012 at 08:41 PM.
 Oct 17, 2012 | 08:59 PM
#5069
Thread Starter
Registered User
iTrader: (5)
Joined: Jun 2009
Posts: 19,281
Likes: 20
From: Lake Havasu, AZ
OH, no RAD, hahaha.. I meant the 5 tabs that insert into the chassis that the rear trim piece goes over. The expansion nuts that the screws go into, ya know? Toyota MIGHT have em... I'll just call tomorrow. I've been buying new grill clips and other things like this, like the yellow ones that go in the fender that hold the skirt on... for DAYZ! lol... HOPEFULLY my buddy at DCH Toyota can get me some. :great;
Oct 19, 2012 | 01:00 AM
#5070
Thread Starter
Registered User
iTrader: (5)
Joined: Jun 2009
Posts: 19,281
Likes: 20
From: Lake Havasu, AZ
Rear Cargo Area Progress; Slow but steady..
First, wanted to share Home Depot's Version of Peel and Seal.....


It's a little cheaper, but I'm guessing probably the same stuff. BUT, I have to say, I smelled both of them in the same hour... And U-Seal seemed to be quite a bit less smelly than the P&S. It's probably all in my head/or I got used to smelling the u-seal first.. But I'm telling ya... it just seemed less stinky.
PS> This says 'Three Layer Reinforced'.... Is P&Seal the same? I forgot to look... thought maybe the U-Seal has less 'tar' or something, maybe that's why I might have thought it was less smelly? (I know, like I said, it's probably the same thing)
*************************************
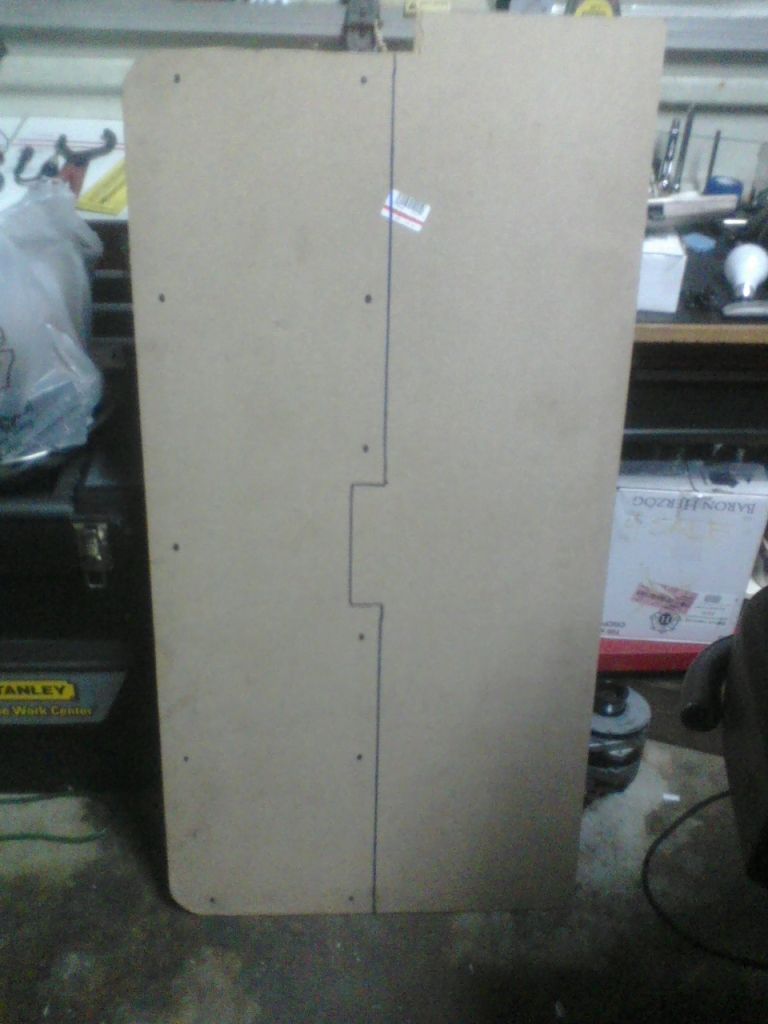
Today, I picked up 1/4" Tempered Project Board to redo the tailgate panel..... I've nearly finished it, but this pic shows what I did.... Laid the panel over the new board.. To the edges, then drew in the corners and started that way(less cuts)...... Marked all the spots where the screws will go...
*************************************
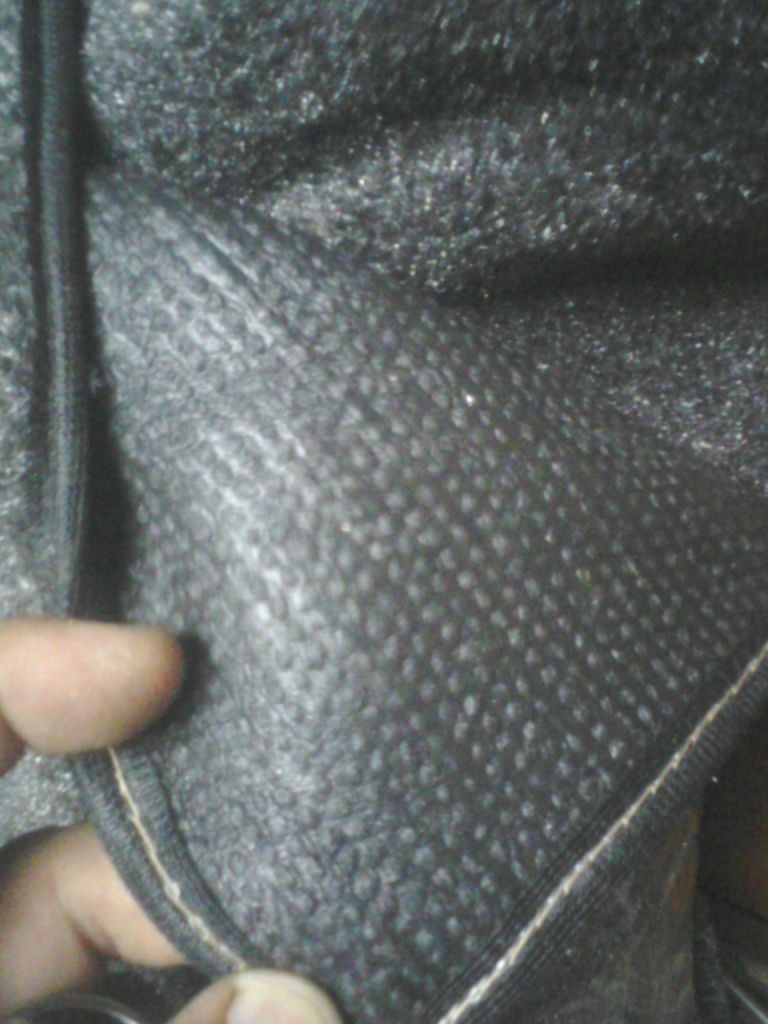
I spoke with a guy I know who said he had some readied pieces of "BED-RUG"... It's VERY heavy duty poly-fiber carpet that I can't seem to pull out any fibers from,... and it seems to have a VERY sturdy Rubberized bottom. NOT SUPER THICK, as they need to shape it really well over things, etc.... This will, for now, go on my tailgate and POSSIBLY my panels..........

**************************************
This is the aluminum on both sides insulation stuff that I was speaking of going over the top of the ThermoShield(The ThermoShield will be taped in all corners with foil tape as well)... Then, this stuff will go under the wheel wells hump carpet, actually under the carpet padding, adhesive stuck to the paint, using 'removable super glue puddy dots' to keep it still...and Foil taped in the corners.........

***************************************
I wanted to share pics of the spray foam insulation that is available at any Home Improvement Store........ There are some for inside the home that are apparently MUCH less odorous, etc.........


****************************************
Saw these while out, thought I'd take some crappy cell phone pics... BUT, I also have news... I GOT A NEW A4300 CANON P&SHOOT.... WOOT! (well, I had to, cuz my Koolpix FINALLY died! lol)...


It's a little cheaper, but I'm guessing probably the same stuff. BUT, I have to say, I smelled both of them in the same hour... And U-Seal seemed to be quite a bit less smelly than the P&S. It's probably all in my head/or I got used to smelling the u-seal first.. But I'm telling ya... it just seemed less stinky.
PS> This says 'Three Layer Reinforced'.... Is P&Seal the same? I forgot to look... thought maybe the U-Seal has less 'tar' or something, maybe that's why I might have thought it was less smelly? (I know, like I said, it's probably the same thing)
*************************************
Today, I picked up 1/4" Tempered Project Board to redo the tailgate panel..... I've nearly finished it, but this pic shows what I did.... Laid the panel over the new board.. To the edges, then drew in the corners and started that way(less cuts)...... Marked all the spots where the screws will go...
*************************************
I spoke with a guy I know who said he had some readied pieces of "BED-RUG"... It's VERY heavy duty poly-fiber carpet that I can't seem to pull out any fibers from,... and it seems to have a VERY sturdy Rubberized bottom. NOT SUPER THICK, as they need to shape it really well over things, etc.... This will, for now, go on my tailgate and POSSIBLY my panels..........
**************************************
This is the aluminum on both sides insulation stuff that I was speaking of going over the top of the ThermoShield(The ThermoShield will be taped in all corners with foil tape as well)... Then, this stuff will go under the wheel wells hump carpet, actually under the carpet padding, adhesive stuck to the paint, using 'removable super glue puddy dots' to keep it still...and Foil taped in the corners.........
***************************************
I wanted to share pics of the spray foam insulation that is available at any Home Improvement Store........ There are some for inside the home that are apparently MUCH less odorous, etc.........
****************************************
Saw these while out, thought I'd take some crappy cell phone pics... BUT, I also have news... I GOT A NEW A4300 CANON P&SHOOT.... WOOT! (well, I had to, cuz my Koolpix FINALLY died! lol)...
Oct 19, 2012 | 03:57 AM
#5071
Registered User

Joined: Jan 2010
Posts: 3,795
Likes: 33
From: Bloodymore
Chef,
The spray foam oder may last a day or two max. The peal and seal will linger. Also, be careful using the spray foam around things that vibrate slightly. The foam may come loose and the squeak till you loose your mind....ask me how I know.... No don't bother. It is easily remixed with the radio or breaking off the stiff foam makin noise.
The spray foam oder may last a day or two max. The peal and seal will linger. Also, be careful using the spray foam around things that vibrate slightly. The foam may come loose and the squeak till you loose your mind....ask me how I know.... No don't bother. It is easily remixed with the radio or breaking off the stiff foam makin noise.
Oct 19, 2012 | 05:58 AM
#5073
Registered User
Joined: Apr 2012
Posts: 2,817
Likes: 2
From: Los Angeles CA
Hmm this is gonna be a fun project to watch. I wanna see how you pull off those side panels with the subwoofers. Hope you will take life if pix for that process. End didn't show very much on how to get that done. I'm sure I can figure it out but you know what I mean.
Oct 19, 2012 | 11:14 AM
#5074
Registered User
Joined: Jul 2012
Posts: 2,365
Likes: 4
From: Idaho
chef if that spray foam gets any water in it its gona cause rust an a lot of it id advise against it they use it to hack an pack rustouts for cheating repairs putting bondo over it an then paint just comes back worse and the afore mentioned squeaking too
Oct 19, 2012 | 11:20 AM
#5075
Thread Starter
Registered User
iTrader: (5)
Joined: Jun 2009
Posts: 19,281
Likes: 20
From: Lake Havasu, AZ
GOTCHA, GUYS, ...thanks! NO FOAM it is, lol. I wasn't planning on using it, I'd just heard it mentioned a few times, so wondered what people did wit it.... Actually came here to start asking. BUT, I've heard certain types of caulking can help/work well on certain things, like speaker boxes, etc.
Anyway, haven't gotten out there yet... BUT, trying to
Richard, I wasn't sure on the message ... Could you explain more what you mean on this >>> "Hope you will take life if pix for that process. End didn't show very much on how to get that done." ......... What did you mean by 'End'? Sorry, not sure what you meant, and I wanna help if I can.
Last edited by ChefYota4x4; Oct 19, 2012 at 11:27 AM.
Oct 19, 2012 | 11:50 AM
#5076
Registered User
Joined: Apr 2012
Posts: 2,817
Likes: 2
From: Los Angeles CA
Oh gosh that's a horrible typo lol my mistake.
I meant, "hope you will take a lot of pix for that process. RBX didn't show to many pix of how he did it on his thread"
"RBX" was auto corrected to spell end lol
So pretty much I was hinting for you take take a lot of pictures of this subwoofer side panel project as you go. I'd really like to see how you do it.
Oct 19, 2012 | 12:34 PM
#5077
Thread Starter
Registered User
iTrader: (5)
Joined: Jun 2009
Posts: 19,281
Likes: 20
From: Lake Havasu, AZ
Oh of course, Richard.... especially now that I have the Canon Powershot
I think RBX used his existing panels, no? I'll have to go back, I've read so many freakern threads lately on rear panels and P&S and, .........AHHHHHHHHHHHHH! hahaha.
I'll do a video soon just explaining what I'm TRYING to accomplish. RAD has a good idea in that he's going to do a "Ship in a bottle" type assembly of a box INSIDE his panels.. And, like me, mount the Sub in a 'built OUT' portion that winds up putting the sub in between the roll bar pillars/set back to around the middle of the pillars or so(Then, we can place flatbar or something over that, LOCK it to the roll bar and then GOOD LUCK GETTING THOSE SUBS OUT if I'm driving around with the top off, etc. ya know? )
)
I think RBX used his existing panels, no? I'll have to go back, I've read so many freakern threads lately on rear panels and P&S and, .........AHHHHHHHHHHHHH!
hahaha. I'll do a video soon just explaining what I'm TRYING to accomplish. RAD has a good idea in that he's going to do a "Ship in a bottle" type assembly of a box INSIDE his panels.. And, like me, mount the Sub in a 'built OUT' portion that winds up putting the sub in between the roll bar pillars/set back to around the middle of the pillars or so(Then, we can place flatbar or something over that, LOCK it to the roll bar and then GOOD LUCK GETTING THOSE SUBS OUT if I'm driving around with the top off, etc. ya know?
)
Oct 19, 2012 | 04:16 PM
#5078
Registered User
Joined: Mar 2012
Posts: 7,125
Likes: 681
Re: Panel Vibration
Chef,
U-Seal's probably same as P&S. About 1/16-inch thick. Should be enuf to add mass to panels to minimize vibration. It dawns on me...Many want the "best"/the thickest/expensive deadener because they want it to minimize panel vibration from powerful Sub-woofers -maybe like yours, Chef. I believe that for minimizing vibration from road noise any additional mass would be enough. Hence, P&S/U-seal for me.
Re:insulation
After we minimize panel vibration, sound will still come though the floors and panels. This is when "insulation" would help. Basically, slowing/stopping movement of air will reduce transmission of noise. Hence, stuffing air spaces with soft material (i.e., fiberglas batting inside walls). I concur with many on spray foam- Could get messy and sometimes hard to control compression. On floor, closed-cell foam, carpet padding and the Thermoshield will all help. BTW, suggest that you place Thermoshield directly on floor/on top of stock deadener / P&S. Then on top of that place the carpet padding and/or closed-cell foam. Should trap heat under the Thermoshield.
For more insulation on side panel, we could drape closed-cell foam (like a curtain) behind the side panels. Still need to figure out how to do secure that.
Yeah, that's good stuff. Same as the rear seat side panels.
I think Thermo Shield would work better for the footwells/firewall, because Reflectix is more for reflecting radiant heat (like under hood or as sun shade)
Would trap heat when placed on top of Thermo Shld, but not necessary since Thermo Shield already has a foil top and have carpet padding/ closed-cell foam pad on top of it.
Chef,
U-Seal's probably same as P&S. About 1/16-inch thick. Should be enuf to add mass to panels to minimize vibration. It dawns on me...Many want the "best"/the thickest/expensive deadener because they want it to minimize panel vibration from powerful Sub-woofers -maybe like yours, Chef. I believe that for minimizing vibration from road noise any additional mass would be enough. Hence, P&S/U-seal for me.
Re:insulation
After we minimize panel vibration, sound will still come though the floors and panels. This is when "insulation" would help. Basically, slowing/stopping movement of air will reduce transmission of noise. Hence, stuffing air spaces with soft material (i.e., fiberglas batting inside walls). I concur with many on spray foam- Could get messy and sometimes hard to control compression. On floor, closed-cell foam, carpet padding and the Thermoshield will all help. BTW, suggest that you place Thermoshield directly on floor/on top of stock deadener / P&S. Then on top of that place the carpet padding and/or closed-cell foam. Should trap heat under the Thermoshield.
For more insulation on side panel, we could drape closed-cell foam (like a curtain) behind the side panels. Still need to figure out how to do secure that.
Today, I picked up 1/4" Tempered Project Board...
This is the aluminum on both sides insulation stuff that I was speaking of going over the top of the ThermoShield(The ThermoShield will be taped in all corners with foil tape as well)... Then, this stuff will go under the wheel wells hump carpet, actually under the carpet padding, adhesive stuck to the paint, using 'removable super glue puddy dots' to keep it still...and Foil taped in the corners.........
Would trap heat when placed on top of Thermo Shld, but not necessary since Thermo Shield already has a foil top and have carpet padding/ closed-cell foam pad on top of it.
Oct 19, 2012 | 10:21 PM
#5079
Thread Starter
Registered User
iTrader: (5)
Joined: Jun 2009
Posts: 19,281
Likes: 20
From: Lake Havasu, AZ
Hey Rad, I hear ya on all that. Still haven't decided whether or not to do/what to do, IF I DO/ U-seal or just a minimal amount of Butyl base Sound Deadener. I REALLY REALLY don't want ANY smell at all, period... Even the Project board threw me off for a minute.. BUT, I didn't mean to coat the fender with that foil tape.... I mean with the double foil sided insulation stuff, under it. that stuff is VERY heat resistant... And, it's a layer of air in between,.... like bubble wrap, but stronger. But anyway, yeah, I have to plan it out still to the tee....
However, I do want to fill in the valleys with closed cell foam, wrapped in foil tape hahaha. IF I do u-seal below that... it'll be COMPLETELY taped in by foil tape and then covered with the closed cell foam in the valleys and THEN the thermoshield and THEN the Double foil air pack thinsulate.. and THEN Carpet. This is all pretty thin... maybe .50" compressed when done... 1" when decompressed. Elongating the eyelets, IF I keep the same carpet, is a great and simple idea, buddy!
***************
I have pics and video guys.... Used my new camera, stoked on it, it works great and it's SO SIMPLE! lol. Just have to load them up.
However, I do want to fill in the valleys with closed cell foam, wrapped in foil tape
hahaha. IF I do u-seal below that... it'll be COMPLETELY taped in by foil tape and then covered with the closed cell foam in the valleys and THEN the thermoshield and THEN the Double foil air pack thinsulate.. and THEN Carpet. This is all pretty thin... maybe .50" compressed when done... 1" when decompressed. Elongating the eyelets, IF I keep the same carpet, is a great and simple idea, buddy! ***************
I have pics and video guys.... Used my new camera, stoked on it, it works great and it's SO SIMPLE! lol. Just have to load them up.
Oct 19, 2012 | 10:46 PM
#5080
Thread Starter
Registered User
iTrader: (5)
Joined: Jun 2009
Posts: 19,281
Likes: 20
From: Lake Havasu, AZ
Just wanted to letcha know... I finally got this tailgate panel cut, screw holes drilled out... Here's before drilling.. I have pics of how I cut it, but it was on my Cell, they're TERRIBLE, ... but I'll still probably upload them for the "Tailgate Repair" Thread, lol...

Here I did some more trimming around the handle 'U' kinda shape...Drilled out the holes, then had to do a lil 'ELONGATE THIS WAY' tracing...

Voila......
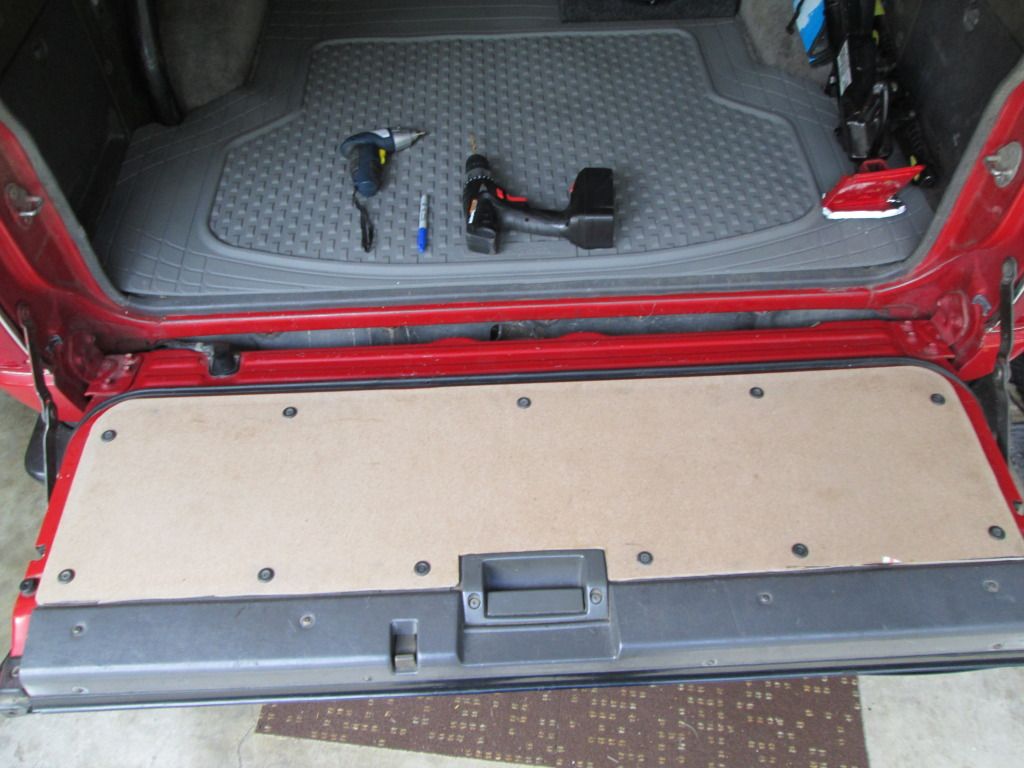
Have to carefully test fit it and shave away to get the cover, which protrudes a bit, especially with carpet and Drawer liner that's going under it, to be sure it clears the bottom and sides.(shouldn't have a problem if you trace it well using your original panel.. But it took a LIL shaving with the Zurkonia Flap Disc on the angle grinder/LOVE THAT FREAKING TOOL! hahaha).....

I just have to do a recess bit where the screws go, to sink the screws a lil further... Otherwise, they wont be long enough to push out the tabs in the 'EXPANSION NUTS'... (I might just need new expansion nuts.. but I THINK they're all in really good condition. I did video explaining what I mean if you don't get it)... It's still uploading. BUT, considering I only had an hour today to finish trimming it, drill it out, etc... I was pretty happy about at least getting something done, ya know?
Here I did some more trimming around the handle 'U' kinda shape...Drilled out the holes, then had to do a lil 'ELONGATE THIS WAY' tracing...
Voila......
Have to carefully test fit it and shave away to get the cover, which protrudes a bit, especially with carpet and Drawer liner that's going under it, to be sure it clears the bottom and sides.(shouldn't have a problem if you trace it well using your original panel.. But it took a LIL shaving with the Zurkonia Flap Disc on the angle grinder/LOVE THAT FREAKING TOOL! hahaha).....
I just have to do a recess bit where the screws go, to sink the screws a lil further... Otherwise, they wont be long enough to push out the tabs in the 'EXPANSION NUTS'... (I might just need new expansion nuts.. but I THINK they're all in really good condition. I did video explaining what I mean if you don't get it)... It's still uploading. BUT, considering I only had an hour today to finish trimming it, drill it out, etc... I was pretty happy about at least getting something done, ya know?


