When you click on links to various merchants on this site and make a purchase, this can result in this site earning a commission. Affiliate programs and affiliations include, but are not limited to, the eBay Partner Network.
And I'm back! Spending a lil time and money on the runner again. The plan is to make it tolerable to drive on the street so I can sell my 99 accord (with 277k mi) and then buy a newer car next tax season. So I sent my rear diff to coreswest for 5.29s.
Great turn around time and great pricing.
I've got to do some little stuff, but also going to do the chevy swap too before I drive it. Currently I have a broken leaf spring. Will look into possible Chevy spring under... we'll see how it sits. Needs an alignment too. Death wobble at like 40mph. So that's what's goin on!
I'm removing the overload leaf and plan on running the remaining 4 leafs. Although I saw a Tacoma go with 3 leafs so maybe I should only do 3? Hmm... anyone have experience??
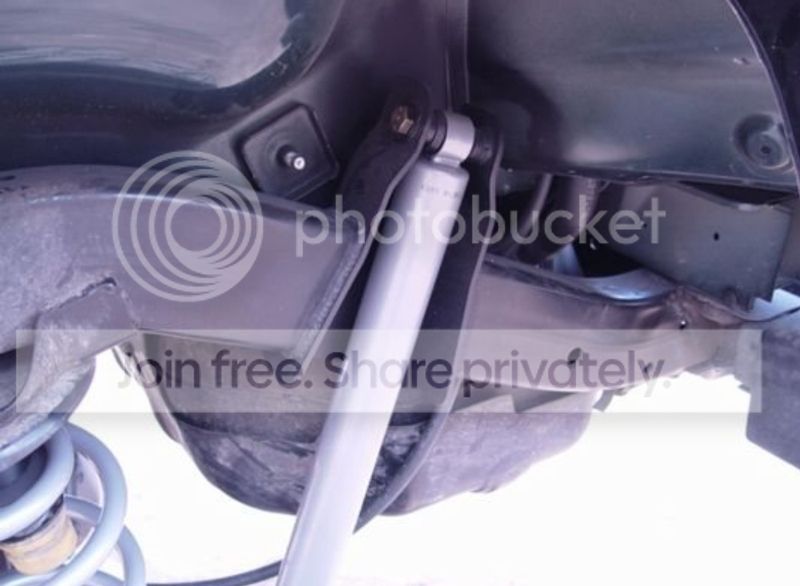
also considering outboarding the rear shocks if it will fit. This is the space I have. I would need to move the brake calipers to the side.
It might work! Maybe do a small French with a ford tower... sort of like these photos:
But not that frenched.
So that's some plans I have. Just need more time to work on it!
Last edited by crashburnoveride; Jun 29, 2018 at 11:40 AM.
I was waiting to see what Lowrange Offroad's independence day sale was gonna be before I bought the 63 swap kit. Turned out to be 5%. I got 10% off from poly performance so I made the purchase last night. $170.
It will be nice to have something legit on this truck. A lot of the projects I've done have always fealt rushed to make it to a wheeling trip or something and from now on I want to spend the time and do things nicely.
using a sanding wheel on my angle grinder and losing 10 lbs. of sweat and it was off to paint.
Doing this takes a long time but it looks so good!
The next spring will be a bit more work. The picker at the yard I went to got hasty and just burnt it off leaving the mounts. If only I had a plasma. Oh well.
Wish me luck.
Last edited by crashburnoveride; Jul 12, 2018 at 06:43 AM.
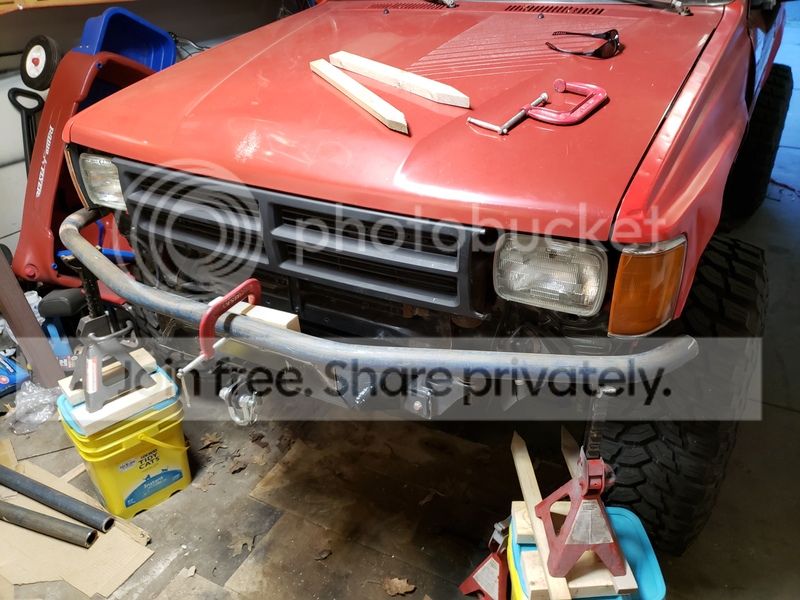
Put rear springs on hold and built a front bumper from some pipe my dad had acquired a while ago. This stuff is 1/4" thick, it's grade A beef.
The design stage:
Build pics:
My first time tube notching. Not easy with a cutoff wheel.
I still need to add some D ring mounts and maybe an upper bar and an LED bar would be nice, but I love how it turned out! It's good enough for now. Rear suspension time. Plus gathering more parts for the SAS.
Last edited by crashburnoveride; Sep 10, 2018 at 11:59 AM.
Chevy 63s are in. I've been trying to flex it out to decide where to locate my shock mounts. I have 12 inch travel shocks to throw on. Lowrange offroad upper and lower mounts. Some flex pics.
That's about where I want to setup my bump stops, but I think it can droop further so I need a higher ramp.
This picture you can see the lower mounts tacked on. I'm going to buy 2 new rear brake soft lines and connect them together for my extended rear line.
However, the lspv is in the way where the upper mount needs to go. So I will be bypassing and deleting the lspv. Going to test it without any prop valve cuz I've got rear discs and will add one later if needed. It's great to have made some progress with the ol' girl even if its snail speed.
Randomly decided to start to seal up the rear shifter. Remember my transfer case is clocked so it's a bit off to the side.
Honestly this was way more work than I thought it was gonna be. Glad it's over with! The 2 round buttons are currently controlling the rear window, they gotta go and the tape is hiding cracks and holes. Needs repaired. I want to see if the factory switch I have works or can be repaired then move it to the dash. Can you use the power antenna switch to operate the rear window?
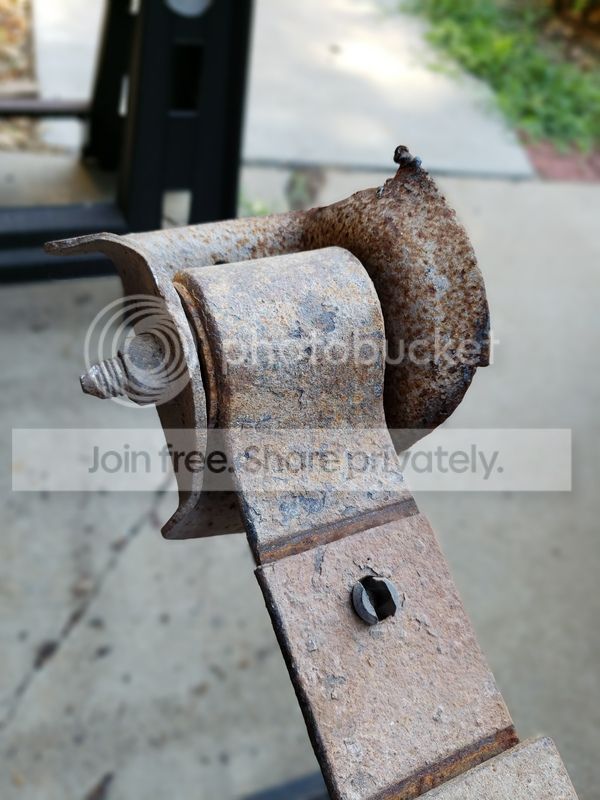
This needed to be done to weld on my upper shock mount. This is just a fancy way of deleting the return line from the lspv.
I got a spare bracket at the junkyard that had another L fitting on it. The dude at Upullit gave me it for free which was awesome. I took off the stock bracket then cut off the T fitting.
Weld on the L fitting in its place. It looks great! Shout out to whoever it was that I saw do this online you the real mvp!
I really wanna do the 1" master cylinder and brake booster swap while I'm doing this brake stuff. We'll see.
I bought these gabriel shocks. Read a post on them being super cheap 12 inch travel shocks. The post said you needed to resize the bushing holes to fit your application, but all I had to do was grind down the upper sleeve just barely to squeeze into my upper mount. That was it! 2 gas charged shocks for $48.
2 rear brake lines = 1 extended line
Picked up an upgrade.
Soldered the wiring harnesses together.
Is this an aftermarket MC and booster? I noticed the forward line comes out of the top not the side like I thought all v6 MC's did. I didn't have to bend my line tho. Got both for $34.
Hey gang! I'm still alive and still own the 4runner. Lately I started really working on the SAS.
I found an E-locker diff and have it regeared to 5.29, and pretty much have everything I need. Truck has been down for far too long. I need to finish this! Hoping to post more progress soon!
Helloooo. Thank God for warm weather in Nebraska in December. I'm about to finish up this SAS people!
I could hold the record for smallest most crammed messy garage to sas in.
At this point im finishing brake lines. I lost the mounts that I cut off of the frame so I robbed some from my ifs suspension. Welded em near the bottom of the frame rail and ran new hard lines. I using 2 rear center lines daisy chained for a 24" soft hose that screws directly into the caliper. Time will tell if thats a problem.
Tonight i plan to finish the drivers side, bleed, and test drive! Who needs front shocks??
Still needs shocks, which I've ordered. I gotta finish wiring the locker and switch. Man this thing shakes like crazy when starting from a stand still. I might need new motor mounts and I wanna redo my exhaust mounts too. I used cheap exhaust mounts from autozone. I was so stoked to drive this thing around tho!!!
I am now trying to figure out the best way to mount my ford shock towers. I kinda wish I'd bought 14" travel shocks instead of 12" because I had wanted to mount the bottom of the tower flush with the bottom of the frame. With the 12's it looks like it will need to be lower like this.
I'm currently searching for a way to flex the suspension out. I don't have a ramp or engine hoist... The truck isnt licensed so I cant go find a loading dock or ledge somewhere without possibly getting a ticket. I may have to risk it some night... gotta scout a good spot.

 Jun 21, 2018 | 05:41 AM