
c0ugar69's 1989 4Runner Build-Up Thread
 May 31, 2010 | 05:28 AM
#101
Thread Starter
Registered User
Joined: Mar 2010
Posts: 594
Likes: 0
From: Fresno, California
i think maybe my cat is plugged, not sure tho, as far as the a/c just get a retrofit kit at pepboys or kragens, if the system is empty of the r-12 you can just fill it with the 134a, The kit is not very exspensive it comes with the freon, fittings to change you exsisting ones and a couple of cans of freon with oil. right after I fill mine it is nice and cold but only last a day or so then its back to where I started,
Jun 3, 2010 | 05:45 AM
#102
Thread Starter
Registered User
Joined: Mar 2010
Posts: 594
Likes: 0
From: Fresno, California
did my ZUK mod and as promised I have some pics

starting measurement off rear bumper.

gotta take these off, some sort of helper spring not sure exactly.

What is this valve for the brakes?? what is the purpose?

Cut my bump stop to get it ready for the springs to go in.

Here is the spring next to my favorite tool, 14" 100# rated.

Spring fit right in there. Had to remove shocks and front leaf spring bolt to get it to drop enough to get spring in there.

Here is both springs in and ready to put tires back on and see where it goes to.

Here is the after shot, I am thinking it may be too much and I may need to cut the spring a little.

Final measurement, I got about 5" of lift, I may take out 2 inches not sure yet, I cranked the torsion bars 3.5 turns and now they are at 13.5" fender to top of rim so I can go a little more on that. what is the rear measurement fender to top of rim?? for stock. Came out good, ride is great, alot softer than with the helper thingy on there.
starting measurement off rear bumper.
gotta take these off, some sort of helper spring not sure exactly.
What is this valve for the brakes?? what is the purpose?
Cut my bump stop to get it ready for the springs to go in.
Here is the spring next to my favorite tool, 14" 100# rated.
Spring fit right in there. Had to remove shocks and front leaf spring bolt to get it to drop enough to get spring in there.
Here is both springs in and ready to put tires back on and see where it goes to.
Here is the after shot, I am thinking it may be too much and I may need to cut the spring a little.
Final measurement, I got about 5" of lift, I may take out 2 inches not sure yet, I cranked the torsion bars 3.5 turns and now they are at 13.5" fender to top of rim so I can go a little more on that. what is the rear measurement fender to top of rim?? for stock. Came out good, ride is great, alot softer than with the helper thingy on there.
Jun 3, 2010 | 07:56 PM
#104
Thread Starter
Registered User
Joined: Mar 2010
Posts: 594
Likes: 0
From: Fresno, California
thanks. I may just leave it, but i did notice when i first start moving thru first gear i feel a little vibrating then as I speed up it goes away. I didnt have that before and am wondering if its from lifting it up. anyone have any suggestions, is it maybe driveline, only does it when driving slow from a stop till about 15 or 20 mph.
 Jun 5, 2010 | 05:00 PM
#106
Thread Starter
Registered User
Joined: Mar 2010
Posts: 594
Likes: 0
From: Fresno, California
yea they werent too hard to get in there, cut the bump stop and widen it slightly then i took out the front leaf bolt to let them drop down as well as unbolting the shock at the bottom then they fit right in there. I cut the springs today down to 12" from the 14" they were. I think it looks better almost level now, front is still a little lower. I may get some bj spacers then loosen the torsion bars a bit. here is a flex pic with the ZUK mod in place.


Jun 5, 2010 | 09:18 PM
#107
Looks good, man! DANG I WANT TO MOVE ON TO THIS STUFF! Can't though, not until I figure out what's wrong with how it's running. HECK NO if I'm gonna burn out a valve or brand new CAT, ya know?
Looks great, Cougar....you liking the coils? Tires? How they wearing so far?
Looks great, Cougar....you liking the coils? Tires? How they wearing so far?
 Jun 5, 2010 | 10:17 PM
#110
Registered User
iTrader: (2)
Joined: Dec 2009
Posts: 2,159
Likes: 7
From: Pleasanton, CA - SF Bay Area
Nice work Cougar! Cool flex shot too 
The valve you see attached on the passenger side and to the axle/brake line is the Load Sensing Proportioning Valve (LSPV) - it varies the brake line pressure between front and rear by "sensing" the load you're carrying. It measures the distance between the frame and the axle, so if you're sagging a little due to heavy load in the back, it will change the amount of stopping power distributed to the rear brakes.
I'm not sure, but you may want to read up more on it and see if you need to mod it to accommodate your lift, since you're now "riding light", according to the LSPV
Jun 6, 2010 | 12:14 PM
#111
Thread Starter
Registered User
Joined: Mar 2010
Posts: 594
Likes: 0
From: Fresno, California
cool thats good to know, thanks philbert. thats a nice rig you had there chef, I like the mod with the lights. I like the tires so far they are great, I am still getting used to the springs, more bounce, I think I need new shocks. welp gotta go for now. I will check in later.
Jun 26, 2010 | 09:14 PM
#112
Thread Starter
Registered User
Joined: Mar 2010
Posts: 594
Likes: 0
From: Fresno, California
Well I was at it again. I had some steel from another project so I desided to make a front bumper which will be temporary till i get a winch bumper later when work gets better. so first I removed my stock bumper.

next I made the part that bolts to the original bumper location. this will be the mount for the bumper.

The steel is 1 1/2" square tubing that is .083 thickness. its not as thick as the winch bumper I want to get later but better than stock for sure.


next I welded the two cross bars on. made sure they were level and tacked them in.

Next I cut the tubing and bent it back to get it to flow better with the front of the runner. and i put some small pieces in between the top and bottom to keep them aligned and give it some strength.

once I got the angles where I wanted them I welded them in place.


Next i took a scrap piece and figured out how i wanted the ends to be and i cut out the tubing to bend it to the angle that i wanted then tacked everything in place.


Thats as far as I got on it tonight, I still want to add a bar to go up and across the front just below the level of the hood. a stinger of sort. once i get that on I will take it off and finish welding everything up and clean and paint it black. another thing I have been working on is some patrol boxes for my sons troop. its been a lot of work to build them but the are coming out nice. I just need to build some bases with leg attachments to stand them on. The things we do for our kids, and Trucks . I never did this much work to my ford probe!!
next I made the part that bolts to the original bumper location. this will be the mount for the bumper.
The steel is 1 1/2" square tubing that is .083 thickness. its not as thick as the winch bumper I want to get later but better than stock for sure.
next I welded the two cross bars on. made sure they were level and tacked them in.
Next I cut the tubing and bent it back to get it to flow better with the front of the runner. and i put some small pieces in between the top and bottom to keep them aligned and give it some strength.
once I got the angles where I wanted them I welded them in place.
Next i took a scrap piece and figured out how i wanted the ends to be and i cut out the tubing to bend it to the angle that i wanted then tacked everything in place.
Thats as far as I got on it tonight, I still want to add a bar to go up and across the front just below the level of the hood. a stinger of sort. once i get that on I will take it off and finish welding everything up and clean and paint it black. another thing I have been working on is some patrol boxes for my sons troop. its been a lot of work to build them but the are coming out nice. I just need to build some bases with leg attachments to stand them on. The things we do for our kids, and Trucks
. I never did this much work to my ford probe!!
 Jun 26, 2010 | 09:47 PM
#114
Way to go, Cougar! Looking good! Can't wait to see that bumper all painted and such. BTW, very cool, the boxes! Yes, the things we do for our kids, IT'S GREAT THOUGH, EH? lol. Just imagine, ...if more dads did so, ....we wouldn't be producing so many "Carjackers of the Future" right now in this generation! Grrrr, lol. You're a cool dad, Cougar, ....keep up the great work!
PS> let's see some daytime pics of this rig again when the bumper is done, OKKKK? lol '
Mark
PS> let's see some daytime pics of this rig again when the bumper is done, OKKKK? lol '
Mark
Jun 26, 2010 | 09:57 PM
#115
Registered User
Joined: Nov 2009
Posts: 504
Likes: 2
From: Central Sierra Nevadas (Oakhurst)
Unique approach! You may find that you would prefer to have less bumper toward the lower corners if you take it into the rocks much. I'm intrigued!
Build is looking good. When you get ready to hit the trail, let me know. Malteserunner, B4runner and I all live in the Oakhurst area, and we'd love to have you along for some fun.
Build is looking good. When you get ready to hit the trail, let me know. Malteserunner, B4runner and I all live in the Oakhurst area, and we'd love to have you along for some fun.
Jun 27, 2010 | 07:56 AM
#116
Thread Starter
Registered User
Joined: Mar 2010
Posts: 594
Likes: 0
From: Fresno, California
Thanks chef, I hear ya on the kids. Lots of parents dont even care really! I will get some more day time pics later when i get the bumper finished in a few days. Mountain cop, I would like to join you guys some time. I know malteserunner said he was going out this weekend. I just got back from summer camp last week so will have to take a rain check. also on the ends your probably right, I havent ever really been wheelin so dont know all those little details but this is just for now, the stock bumper was all bent in from a rear ending before i got the runner. I am hoping to get MC front and rears next year some time if work pics up. so much on the to do list. Lockers front and rear, with regear to 4.88s. change transfer to 4.70 maybe. bodylift and then gas tank lift. ohh well a little at a time.
Jun 27, 2010 | 04:37 PM
#117
Registered User
Joined: Nov 2009
Posts: 504
Likes: 2
From: Central Sierra Nevadas (Oakhurst)
Yeah, I've been coveting 4.88s and Aussies F&R... and a 4.7. It doesn't make it any better that I mentioned that to my neighbor (who finally joined YT... Db something or other), and he went ahead and installed all of the above. The front binds a little in the rocks, but the rest of the package is pretty trick. He's running on 31's and the 4.88s are nice. I'm still on 4.10s with 33s, and there is a loss of power- but I can live with it for a little while.
Anyhow, keep us up on the build. I love to see homemade bumpers.
MC
Anyhow, keep us up on the build. I love to see homemade bumpers.
MC
Jun 30, 2010 | 06:27 PM
#119
Thread Starter
Registered User
Joined: Mar 2010
Posts: 594
Likes: 0
From: Fresno, California
Got the bumper finished today

this is it when I finished welding the bar across the top. today i took it off and painted it and then mounted some new LED lights for the turn signals.


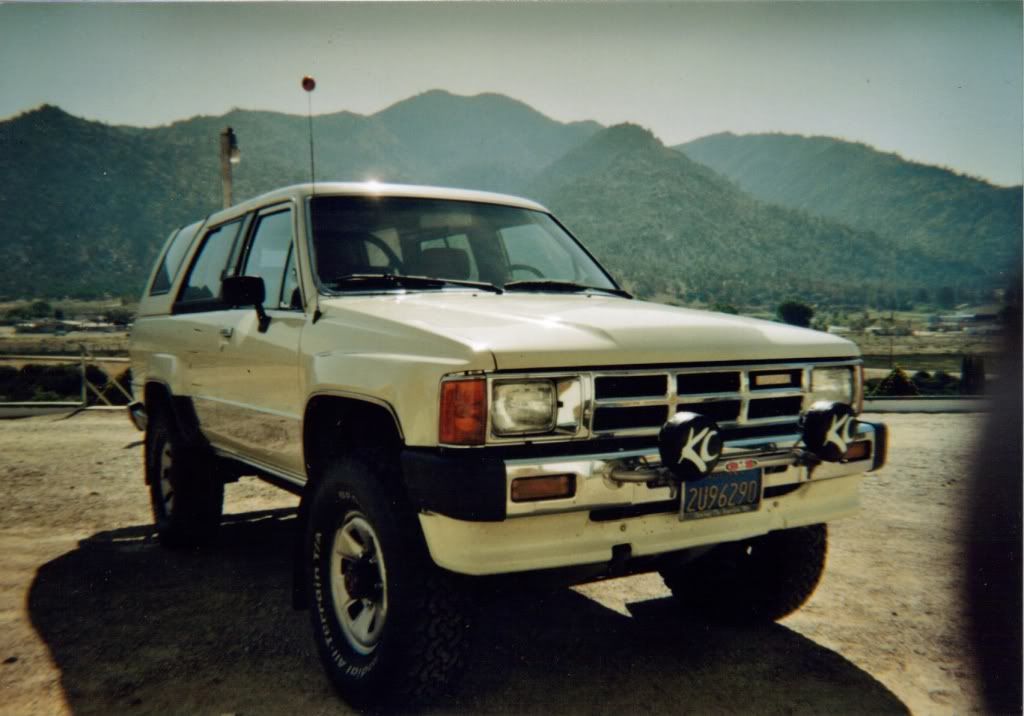
Now here is a couple of pics for Chefyota, this is the whole truck from the front corner and from the side.


hope you guys enjoyed the build pics, not sure what will be next. money is tight so it may be a while, i would like to do lockers front and rear with 4.88s but probably wont be for a while.
this is it when I finished welding the bar across the top. today i took it off and painted it and then mounted some new LED lights for the turn signals.
Now here is a couple of pics for Chefyota, this is the whole truck from the front corner and from the side.
hope you guys enjoyed the build pics, not sure what will be next. money is tight so it may be a while, i would like to do lockers front and rear with 4.88s but probably wont be for a while.
Jun 30, 2010 | 07:37 PM
#120
WOO HOO! lol.... I feel special! hahaha. Seriously, I love that rig, probably part of which is due to having a white one of my own that you saw. Thing was TOIGHT! LOL. Like the Zuks?
Looks great, and love the Fabumper! It's comin together, surenuff
Looks great, and love the Fabumper! It's comin together, surenuff
Last edited by ChefYota4x4; Jun 30, 2010 at 07:38 PM.


