
1987 4Runner Cyber Dude
 Apr 21, 2014 | 09:50 PM
#501
Registered User


Joined: Mar 2012
Posts: 7,125
Likes: 681
I suspect those green wires are for the switch that tells buzzer when key is still i ignition. Junk4u,
Is your dome light consistently not working with passenger side door but consistently works with driver side door?
Is your dome light consistently not working with passenger side door but consistently works with driver side door?
Apr 22, 2014 | 12:18 AM
#502
I haven't had to do the brakes on mine yet. Still what ever came on them and they still have a lot of meat on them so not sure what I will use when I have to replace mine.
If I understood right, the dome light doesn't work on the drivers side? Is the buzzer box still in your truck? Some remove the box and don't realize the light runs thru the buzzer. That buzzer is annoying. I pull the box out and just bend the tab back to stop the buzzer and keep the light working.
If I understood right, the dome light doesn't work on the drivers side? Is the buzzer box still in your truck? Some remove the box and don't realize the light runs thru the buzzer. That buzzer is annoying. I pull the box out and just bend the tab back to stop the buzzer and keep the light working.
Apr 22, 2014 | 03:36 AM
#503
Thread Starter
Registered User
iTrader: (1)
Joined: May 2012
Posts: 835
Likes: 2
From: South Florida
RAD4Runner, I'm guessing the same with those green wires since they head over to the ignition switch. The dome light does not work with the Drivers side door. The Passenger side works perfectly. I get continuity from the Black cable connector leading up to the dome light. Going from the black cable connector to the passenger side I get continuity, but nothing from the Black cable back down to the door switch. Something from the door switch to the black cable connector must be terminated, burned or cut.
I haven't had to do the brakes on mine yet. Still what ever came on them and they still have a lot of meat on them so not sure what I will use when I have to replace mine.
If I understood right, the dome light doesn't work on the drivers side? Is the buzzer box still in your truck? Some remove the box and don't realize the light runs thru the buzzer. That buzzer is annoying. I pull the box out and just bend the tab back to stop the buzzer and keep the light working.
If I understood right, the dome light doesn't work on the drivers side? Is the buzzer box still in your truck? Some remove the box and don't realize the light runs thru the buzzer. That buzzer is annoying. I pull the box out and just bend the tab back to stop the buzzer and keep the light working.
I'll probably end up using Semi-metallic brakes pads because they were originally installed in these trucks way back and my understanding they have changed a little for the better since first brought to market.
The light doesn't work on the drivers side door. the buzzer is still there as it is annoying when you get into the car and put the key in. I may have to look at the buzzer to see if there is a problem emanating from it that could cause the issue, but it is still there annoying as usual. Thanks for that reminder as it jogged my head to think a little more before pulling everything apart on the dash.
Last edited by junk4u; Apr 22, 2014 at 03:37 AM.
Apr 22, 2014 | 03:52 AM
#504
Thread Starter
Registered User
iTrader: (1)
Joined: May 2012
Posts: 835
Likes: 2
From: South Florida
More LED
Okay I just purchased some more lead lights this time maybe for the dome light. It's a warm white color instead of the bright cool white color. Don't know if it would be any different in brightness than the festoon bulb already in there being that it's a warm white. It's got 48 mini LED's so it should be pretty bright.

If it doesn't workout with the dome light as the size is cutting the fit about 1 5/8" x 2 1/3". I haven't measure the inside of the dome light yet dah...(not morse code). Anyhow if it doesn't work I'll hook up a glove box switch and mount it in the glove to make a glove box light, something that is not there on the 87 or 86 runner.
I Could also add this to the bottom of the front seats towards the rear to give light where you never see anything rear passenger floor area. As well add light to the front floor area so you can also see the floor. Comes in handy when you drop something and could never find it because it's so dark down there.
Apr 22, 2014 | 11:28 AM
#505
Thread Starter
Registered User
iTrader: (1)
Joined: May 2012
Posts: 835
Likes: 2
From: South Florida
Brake Booster
Okay, I think I have to change my brake booster sooner than I thought. I was driving down the road and came up to the back of a car at the stop light, but the brakes went hard on me and I had to jam the brakes hard to get the truck to stop. Several thing happen when I step on the brake leaving me to believe that the booster is shot. The brake is stiff very stiff, the truck idles is very rough when I step on the brake (leaves me to believe the booster is leaking vacuum internally) and the idle is down to 400 rpms. Let go of the brakes idle returns up to 800 - 900 rpms. To do a rush change I'm going to try to change out only the booster when I get home and see what that does.
Kind of scary moment when you are coming up fast to the back of a car and you can't stop. Luck me. At least I have that spare and thought i would have a spare when I swapped it out. Well, I'll just have to look for another spare to come up at the scrap yard.
Kind of scary moment when you are coming up fast to the back of a car and you can't stop. Luck me. At least I have that spare and thought i would have a spare when I swapped it out. Well, I'll just have to look for another spare to come up at the scrap yard.
Apr 22, 2014 | 11:41 AM
#506
Tomorrow I am workining on the 86 pickup and the annoying door alarm is going bye bye.
Copied.
I thought I was going to fix a problem and created another. I always got tired of hearing my door buzzer alarm and first thing I did was find it under the Steering Column.
All was fine until I noticed that I did not have a dome light when I opened the drivers door. Passenger door worked and so did the switch on the cab. First thing I thought was the door switch was bad or dirty or corroded. I checked it out and it was good.
Did some looking around and you have to have the door alarm in for the drivers door light to work.
Also found the cure for the alarm on YT. Just bent the tab out a little so as not to make contact. If you ever want to hear it again, it can be bent back in.
Here is the Buzzer Box under the Steering Column.
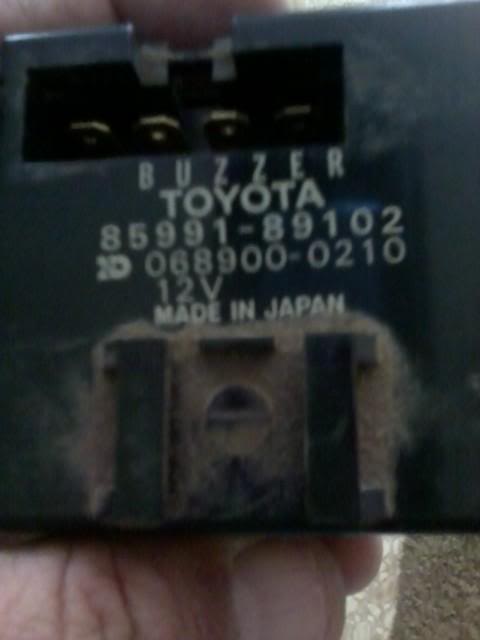
Just bend the tab out from the bottom a little bit.
Here it is going back together. There are 2 tabs to the cover that I just pryed a pocket knife. Life is good now.

Apparently this is a fairly common problem. What I found on different threads is that a lot of the door switches and buzzers get removed. This was as far as I had to go to troubleshoot. Also I did find that by bending the tab you can control how loud the buzzer is.
Copied.
I thought I was going to fix a problem and created another. I always got tired of hearing my door buzzer alarm and first thing I did was find it under the Steering Column.
All was fine until I noticed that I did not have a dome light when I opened the drivers door. Passenger door worked and so did the switch on the cab. First thing I thought was the door switch was bad or dirty or corroded. I checked it out and it was good.
Did some looking around and you have to have the door alarm in for the drivers door light to work.
Also found the cure for the alarm on YT. Just bent the tab out a little so as not to make contact. If you ever want to hear it again, it can be bent back in.
Here is the Buzzer Box under the Steering Column.
Just bend the tab out from the bottom a little bit.
Here it is going back together. There are 2 tabs to the cover that I just pryed a pocket knife. Life is good now.
Apparently this is a fairly common problem. What I found on different threads is that a lot of the door switches and buzzers get removed. This was as far as I had to go to troubleshoot. Also I did find that by bending the tab you can control how loud the buzzer is.
Apr 23, 2014 | 04:13 AM
#507
Thread Starter
Registered User
iTrader: (1)
Joined: May 2012
Posts: 835
Likes: 2
From: South Florida
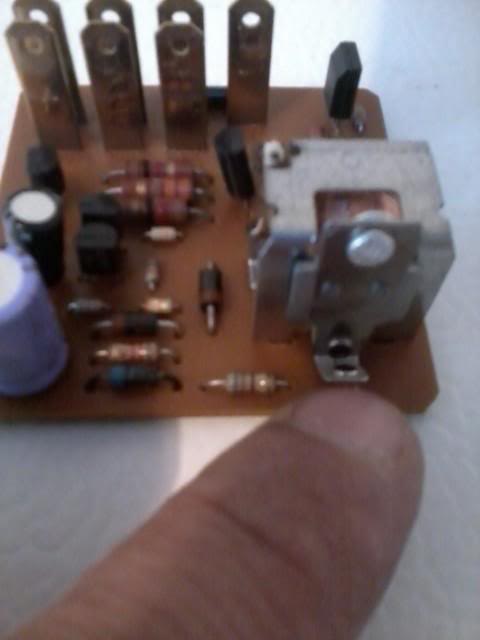
Terry, thanks for the heads up on this unit. I am guessing that since I don't have all those added features maybe a diode doesn't exist based on the diagram.
I am guessing what we call door buzzer Toyota is calling a light reminder relay. I will have to look at that closer.
I am thinking this is the flow as i don't have a door control (power windows, mirrors,etc...) nor a door courtesy light which I'm assuming the one found on some doors. I have outlined in red what I think the flow is which could mean that there is an issue inside the buzzer box, the buzzer does work fine, just not the drivers side lights. Please correct me if I am wrong, I am in a rush as i have to leave soon and have just enough time to make a few post.
Apr 23, 2014 | 04:30 AM
#508
Thread Starter
Registered User
iTrader: (1)
Joined: May 2012
Posts: 835
Likes: 2
From: South Florida
Booster Brake Issue
Well, most that have read know that I lost my brakes yesterday. It felt like the brake boosters had gone as it required a great deal of push to stop the truck.
After taking off the Master Brake Cylinder I determined that it was leaking brake fluid and would require changing. I decided to take apart the Brake MC to see how bad the inside was and determine if it could be rebuilt. It was filled with garbarge The second piston would not come out even after blowing compressed air in it. Eventually it did release after plunging it down a million times.
Here's what it looked like after I disassembled it.
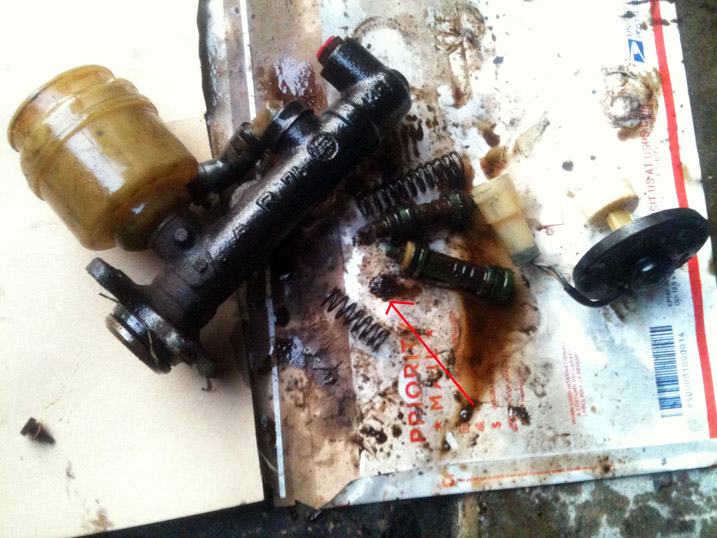
Red arrow points to a cluster of gunk that came out of it. And that's only a small portion of it. These pistons are aluminum and covered in gunk. The other one I just rebuilt was made out of metal. I'd have to check the cylinder to see if I can reuse it as this one is made of metal and could be rusted up inside even though it didn't look like it last night.
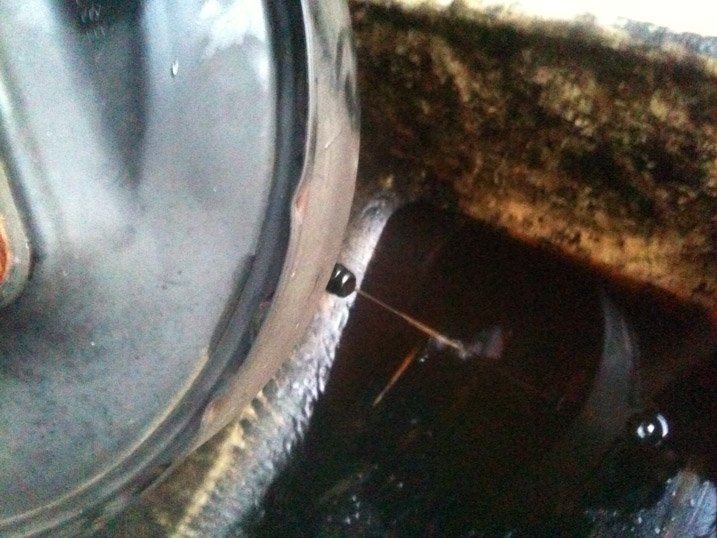
Took off the booster and set it aside after a few minute I notice pouring out the line where the vacuum line connects is fluid. I pick it up and more fuild starts to pour out of it. I then push the rod in where the peddle goes and can see that air blows out the other side and this isn't suppose to happen. This is how the booster is filled with brake fluid. The Brake MC is leak out the piston hole and the diaphragm inside the booster was leaking air (hence air as this is why I can assume the idle would drop when I stepped on the brake) and when i release it, it would suck in the leaking brake fluid. Here's a few pictures of it pouring out.
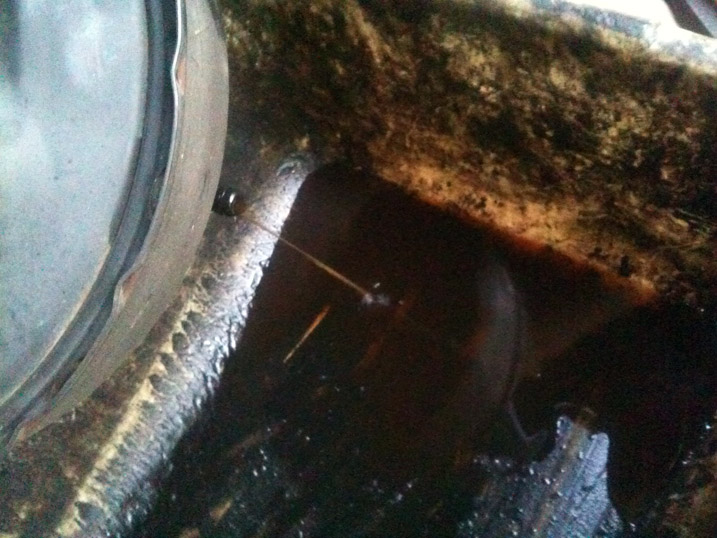
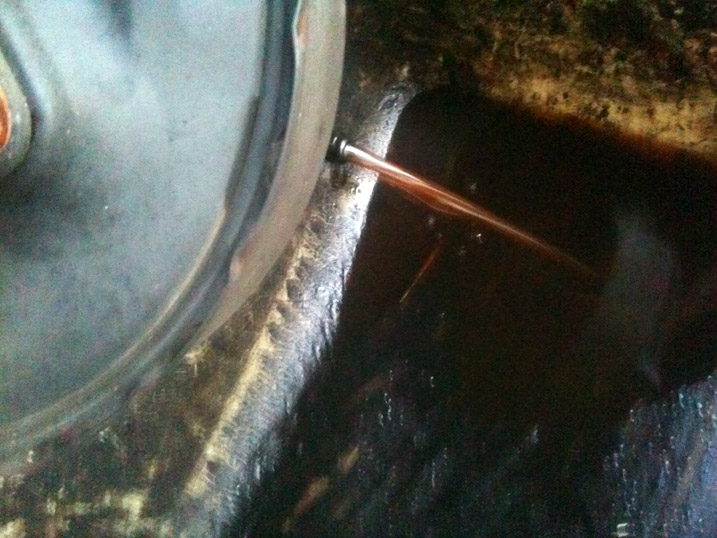
Could be almost 1/2 a quart of brake fluid poured out of it.
After taking off the Master Brake Cylinder I determined that it was leaking brake fluid and would require changing. I decided to take apart the Brake MC to see how bad the inside was and determine if it could be rebuilt. It was filled with garbarge The second piston would not come out even after blowing compressed air in it. Eventually it did release after plunging it down a million times.
Here's what it looked like after I disassembled it.
Red arrow points to a cluster of gunk that came out of it. And that's only a small portion of it. These pistons are aluminum and covered in gunk. The other one I just rebuilt was made out of metal. I'd have to check the cylinder to see if I can reuse it as this one is made of metal and could be rusted up inside even though it didn't look like it last night.
Took off the booster and set it aside after a few minute I notice pouring out the line where the vacuum line connects is fluid. I pick it up and more fuild starts to pour out of it. I then push the rod in where the peddle goes and can see that air blows out the other side and this isn't suppose to happen. This is how the booster is filled with brake fluid. The Brake MC is leak out the piston hole and the diaphragm inside the booster was leaking air (hence air as this is why I can assume the idle would drop when I stepped on the brake) and when i release it, it would suck in the leaking brake fluid. Here's a few pictures of it pouring out.
Could be almost 1/2 a quart of brake fluid poured out of it.
 Apr 23, 2014 | 05:51 AM
#510

Oh man thats alot of fluid in the booster. Glad you figured it out though, and got it all back together. I am going to have to change my master soon. It acts kind of strange sometimes. But what can I expect from a 29yr old master cylinder.
Apr 24, 2014 | 03:40 AM
#511
Thread Starter
Registered User
iTrader: (1)
Joined: May 2012
Posts: 835
Likes: 2
From: South Florida
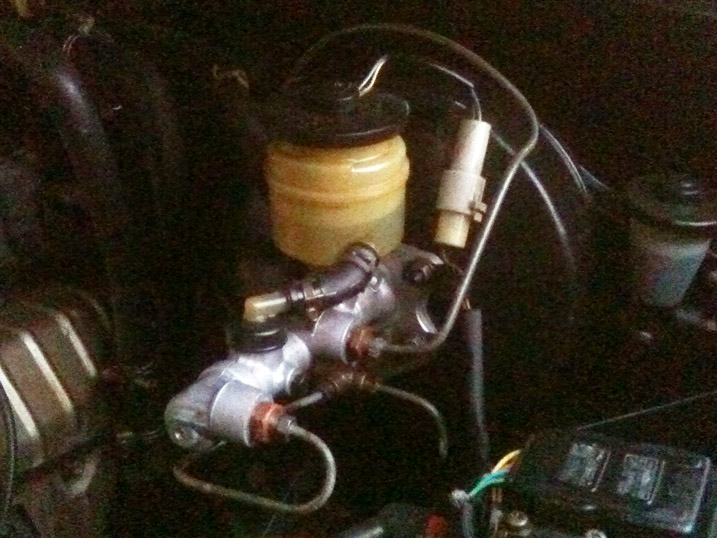
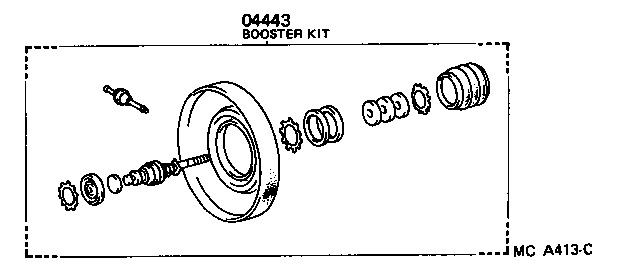
I'm wondering if this booster can be rebuilt? Toyota listed at one time a rebuild kit to rebuild these, but when you run the part number, it comes back discontinued. The other part would be who would want the rebuild kit as toyota was pricing was $200, a re-manufactured one was $100 to $150.
When I installed the booster, because I was in a rush I used the spacer that it originally had and thought it would be OK as the screw stems inside where longer than the one pulled from the truck. Was I wrong about that, the push rods were the same, that meant that the stem pushing the pistons in the MC was to short to reach. I've got to remove the Booster and swap out the space. There are 2 different spacers, the push rod could not be extended as it was out as far as it would adjust. Once I swap out the spacer, I know I will need to adjust the push rod shorter.
The spacer on the right is the original spacer in the truck and I will be swapping that one back in and the one on the left is the other type.
Apr 24, 2014 | 05:00 AM
#512
did you put a different booster on as well? Is that why the spacer was different from what it was previously. Im scatter brained this morning and cant seem to wrap my head around anything. haha
Apr 24, 2014 | 08:11 AM
#513
Thread Starter
Registered User
iTrader: (1)
Joined: May 2012
Posts: 835
Likes: 2
From: South Florida
1) The spacer is different. ( I found out that I have to use this one because of the length of the push rod and the length of the studs.
2) I must use the larger spacer that was with in the first place which i tried out this morning using the smaller spacer, but the push rod can not be adjusted that much. So in using the larger spacer i have to adjust the push rod max out and adjust the push rod on the MC side to be long enough to reach.
The best part is that rebuild kit I put in there is leaking out. Found that out when I had to change out the spacers. Good thing I check now, I want to see whats going on to make it leak, maybe I put the seals on incorrectly or they just don't work. I'll have to do that another time. I went and purchased one of those re-manufactured with reservoir and everything at local auto parts store for $49 and got a $20 discount which made the MC $29 and tax. Kind of disappointed about the rebuild of the MC
 , but maybe I didn't rebuild it correctly. Got to wait and see when i take it apart again.
Apr 24, 2014 | 10:59 AM
, but maybe I didn't rebuild it correctly. Got to wait and see when i take it apart again.
Apr 24, 2014 | 10:59 AM
#514
Thread Starter
Registered User
iTrader: (1)
Joined: May 2012
Posts: 835
Likes: 2
From: South Florida
Okay I work on the truck today because the brakes were a major issue. Like I said before I ended up purchasing a after market Brake MC for $29. Went in with a charm, then I started bleeding the system, Will do it again when i get to changing the front Brake calipers later on. Bleed the brakes out then went to do the LSVP and I couldn't get the bolt off, I turn a little right then left and then notice that the bolt did not look like it was suppose too. I'm guessing that the bolt has seized and cracked so I'm leaving for another day like when I get an extra one or clean up this one.
The BrakeMaster Cylinder is done and the booster. Man I didn't have a clue to how bad the brakes were. The brake are soft realy soft and when i push down on them the you start to brake immediately. It doesn't take much to stop the truck now. Still need to work on those front Brake calipers, that is for another day.
The BrakeMaster Cylinder is done and the booster. Man I didn't have a clue to how bad the brakes were. The brake are soft realy soft and when i push down on them the you start to brake immediately. It doesn't take much to stop the truck now. Still need to work on those front Brake calipers, that is for another day.
Apr 24, 2014 | 03:53 PM
#515
Thread Starter
Registered User
iTrader: (1)
Joined: May 2012
Posts: 835
Likes: 2
From: South Florida
Okay Now just to recap I pretty much finished up the Booster and the Brake Master Cylinder. Just have to bleed the LSPV which at this time I can't because the bolt is rusted and about to break off.
Moving on the the Master Cylinders, I thought I would take the time to know why the rebuild didn't work to well. As it turns out the MC leaked because I hastily put the seal on backwards only one though the one on the outer end the most important one.
Some other review of the Pistons are different. I wondered why the rebuild kit had 5 of the seals and thought it may have been an extra one. It turns out I was wrong. The one I rebuilt only has 4 seals the one I just took off the truck uses all 5 seals. The pistons diameter are different as well. the one rebuilt has a small diameter that the one I took off. I'm guessing somewhere along the line something changed as far as AISIN. These are the things different about the rebuilt one and the one taken off the truck.
1) the cylinders of the one I rebuilt is aluminum and the one that was on the truck was cast iron.
2) The pistons on the rebuilt is thinner and the piston on the taken off was aluminum
3) The seals on the pistons Rebuilt had 4 take off truck 5
4) The out going lines positions were different rebuilt front line was parallel with the rear line. Taken off the truck front was vertical.
5) Piston thickness was different as well.
Here's a pic of what I am talking about. image at the top is from the one taken off the truck and the one at the bottom is the one I rebuilt

I believe either one will work as the one rebuilt was given to me from CoryC85 as it was taken off his truck. I will clean it up again and store it away and order another kit to rebuild the one taken off the 87 4Runner.
Moving on the the Master Cylinders, I thought I would take the time to know why the rebuild didn't work to well. As it turns out the MC leaked because I hastily put the seal on backwards only one though the one on the outer end the most important one.
Some other review of the Pistons are different. I wondered why the rebuild kit had 5 of the seals and thought it may have been an extra one. It turns out I was wrong. The one I rebuilt only has 4 seals the one I just took off the truck uses all 5 seals. The pistons diameter are different as well. the one rebuilt has a small diameter that the one I took off. I'm guessing somewhere along the line something changed as far as AISIN. These are the things different about the rebuilt one and the one taken off the truck.
1) the cylinders of the one I rebuilt is aluminum and the one that was on the truck was cast iron.
2) The pistons on the rebuilt is thinner and the piston on the taken off was aluminum
3) The seals on the pistons Rebuilt had 4 take off truck 5
4) The out going lines positions were different rebuilt front line was parallel with the rear line. Taken off the truck front was vertical.
5) Piston thickness was different as well.
Here's a pic of what I am talking about. image at the top is from the one taken off the truck and the one at the bottom is the one I rebuilt
I believe either one will work as the one rebuilt was given to me from CoryC85 as it was taken off his truck. I will clean it up again and store it away and order another kit to rebuild the one taken off the 87 4Runner.
Apr 25, 2014 | 05:17 AM
#517
I was suprised to see that much fluid in your booster. I always wonder why more issues of fluid in the booster isnt more common as I see it sitting in the hole there. I dont think there is a way of rebuilding a booster. I looked into it one time and the edges are crimped.
Where did you get your rebuild kit? Are they both Aisin?
Where did you get your rebuild kit? Are they both Aisin?
Apr 25, 2014 | 02:47 PM
#518
Thread Starter
Registered User
iTrader: (1)
Joined: May 2012
Posts: 835
Likes: 2
From: South Florida
I was suprised to see that much fluid in your booster. I always wonder why more issues of fluid in the booster isnt more common as I see it sitting in the hole there. I dont think there is a way of rebuilding a booster. I looked into it one time and the edges are crimped.
Where did you get your rebuild kit? Are they both Aisin?
Where did you get your rebuild kit? Are they both Aisin?
I think the booster could be rebuilt or could have at one time as toyota sold a rebuild kit for it.
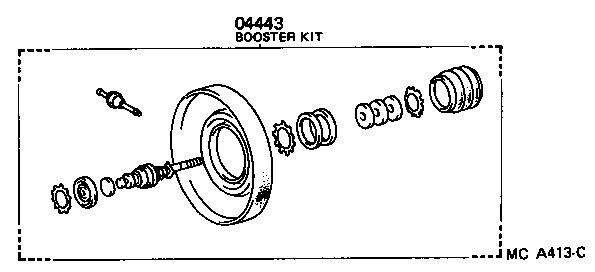
The part number with toyota should be 04443-35570, if do search online or call the dealer they will tell its discontinued. The best part is that they still some parts for it. the seal that is bad on the booster I took off is the one on the side of the Master Cylinder and I took the retainer off and the seal and it look brand new inside. I drained and rinsed the inside and blew it out with air then used a heat gun to dry it out. Since toyota still sells the retainer and seal that I need for it I'm going to give that a try.
The Master cylinder rebuild kits leaked because I put one of the rubber seals in backwards because I was in a rush. When I took it apart when I had time is when I found it was backwards. No the kit was not toyota, it was an after market. Once I changed the seal around I did notice a difference in resistance so that was the issue. Even so, it only had 4 seals as oppose to the one I took off the truck had 5 seals and the kit brought 5 seals I thought it was an extra seal just in case I was wrong. I am comfortable knowing that it works and I made the mistake of putting things in backwards.
Apr 27, 2014 | 08:16 AM
#519
Thread Starter
Registered User
iTrader: (1)
Joined: May 2012
Posts: 835
Likes: 2
From: South Florida
Hey RAD4Runner, just in case you are checking in. I saw your post last year on the led light strip you setup in the cargo area. How many led lights did you use? I'm think 30leds on that strip.
Apr 27, 2014 | 11:28 AM
#520
Registered User
Joined: Mar 2012
Posts: 7,125
Likes: 681
Sorry, don't remember. It's just a random item I bought at an electronics market place in China  - 5 stories of various electronics, tools, appliances, gadgets, even a bbq chicken stand nex to an electronics booth - LOL!
Pretty much any 12V LED strip would do. Just test it at the store.
I used used a single-pole double-throw switch (used a power antenna up-down switch) to do same as stock deck light switch, Then I wired existing deck switch to be just a plain on-off light as a night light. Will put red LED bulb in there.
Regards,
RAD
- 5 stories of various electronics, tools, appliances, gadgets, even a bbq chicken stand nex to an electronics booth - LOL!Pretty much any 12V LED strip would do. Just test it at the store.
I used used a single-pole double-throw switch (used a power antenna up-down switch) to do same as stock deck light switch, Then I wired existing deck switch to be just a plain on-off light as a night light. Will put red LED bulb in there.
Regards,
RAD


