
85 Extra Cab Saved from Crusher
 Feb 27, 2015 | 04:55 AM
#681
Thread Starter
Super Moderator
iTrader: (1)
Joined: Aug 2008
Posts: 11,787
Likes: 28
From: Anderson Missouri
Hello 86 Toy.. I am going to need to pull my back glass as well. The little metal clips would work great in holding it in place. I am going to see if a interior shop sells something like those posted above and if not, that is something that I am going to start getting at the yards when I get the chance. I need to replace my rear seal as well. I see alot of the rear windows get cut out, and not sure why they do that as you need the seal and it does come out fairly easy.
Hello ToyoTolor.. Welcome to my thread and hope there is some information that can help. On the gray, you can buy it off of the shelf. On the brown you will need it custom mixed. I get mine from Orielly. You will need to find the store that supports all of the other stores and being in Jackson you probably have one down the road. My supprt store is 40 miles away. I would suggest taking your kick panel in as it is probably in the best shape and they can scan it and mix up a can of rattle can paint. You can get it for a spray gun but the rattle can works best.
You might could get away with one can but I would get two if you are doing it all at once. Here it cost $24 a can for me. Get a can of Adhesion Promoter as well, one can will be enough. It has to be Interior Paint. The secret is cleanliness. I use a mixture of Simple Green and water and a good rinsing. That takes the longest. A light spray of Adhesion Promoter, wait a minute and then one or two coats of Interior paint.
I am sure other part stores mix interior paint but I started getting mine from Oriellys and just stayed with them. Eventually I will give everything a final coat as the orginal color and new color will be a couple of shades off, but when all coated at once and the same time, you will never know the true color and will look new. The new look really adds to the pleasure of owning a truck. I recommend doing just the plastic and vinyl only and not cloth.
I will say that new looking plastic makes everything else look drab like the carpet. You can get new carpet for a truck for around $100 and you would use that much in paint. For your instrument cluster use Turtle Wax Headlight Lense Retorer and when all is done, it is nice driving down the road and seeing everything looking like it did back in the 80's.
Feb 28, 2015 | 09:41 PM
#682
Registered User
Joined: Nov 2014
Posts: 119
Likes: 0
From: Jackson, MS
Thanks for all the information, I had been wondering what to do with my interior plastics for a while. I did some research, and the O'reilly's support store isn't the closest one to me, but it's about 20 minutes away, which isn't bad at all. Being in an industrial type area like Jackson is nice because we have a pretty good selection of most industrial type products suppliers.
Mar 2, 2015 | 11:54 PM
#683
Thread Starter
Super Moderator
iTrader: (1)
Joined: Aug 2008
Posts: 11,787
Likes: 28
From: Anderson Missouri
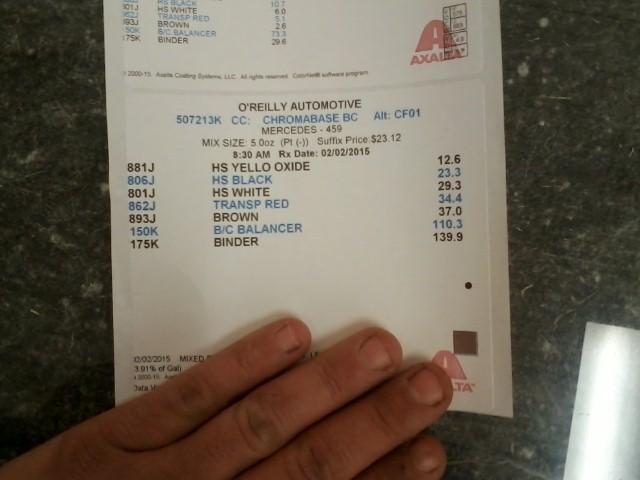
Hello ToyoToler...Here is the mixture I am using. I plan on getting another can tomorrow and will try to get most of my interior panels finished in the next couple of days.
Mostly a reference for me but here is the paint mixture I am using.
Mostly a reference for me but here is the paint mixture I am using.

Last edited by Terrys87; Mar 2, 2015 at 11:56 PM.
Mar 17, 2015 | 10:45 AM
#686
Thread Starter
Super Moderator
iTrader: (1)
Joined: Aug 2008
Posts: 11,787
Likes: 28
From: Anderson Missouri
Some how I got roped into helping Misty on her projects. Somehow they went from HERS to OURS. I dont mind. She lets me mess with my projects so when the few that come along, it really doesnt take long to get hers done. Been doing alot of other things around the house and hope to get some things done on the trucks in the next few days.
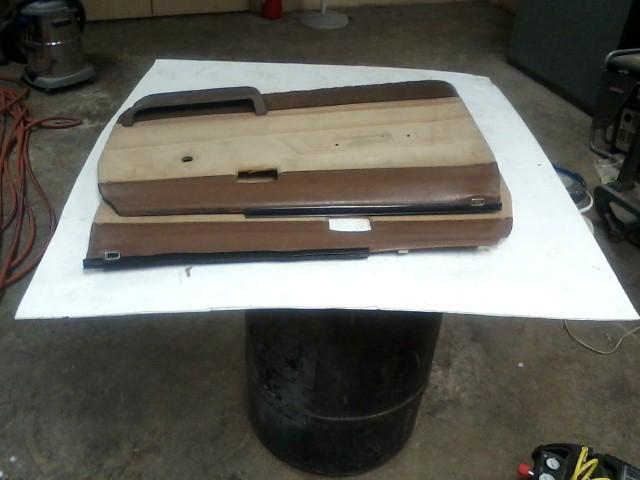
My old handles were gray so I removed the door panels to color them.

Some reason I am having problems with Photobucket so am not getting as many pictures as I would to post. Put a fresh coat on the door panels vinyl.
My old handles were gray so I removed the door panels to color them.

Some reason I am having problems with Photobucket so am not getting as many pictures as I would to post. Put a fresh coat on the door panels vinyl.


 Mar 18, 2015 | 09:35 PM
#688
Thread Starter
Super Moderator
iTrader: (1)
Joined: Aug 2008
Posts: 11,787
Likes: 28
From: Anderson Missouri
Thanks Slacker.. I follow your threads as well and you do some amazing work. I am hoping to get my skills up to your level some day. It takes time out in the shop to get them there, just wish there was a faster way to get the skills up. I cant beleive it has been nearly 4 years on your Trekker build already, time does fly by.
Mar 18, 2015 | 09:37 PM
#689
Thread Starter
Super Moderator
iTrader: (1)
Joined: Aug 2008
Posts: 11,787
Likes: 28
From: Anderson Missouri
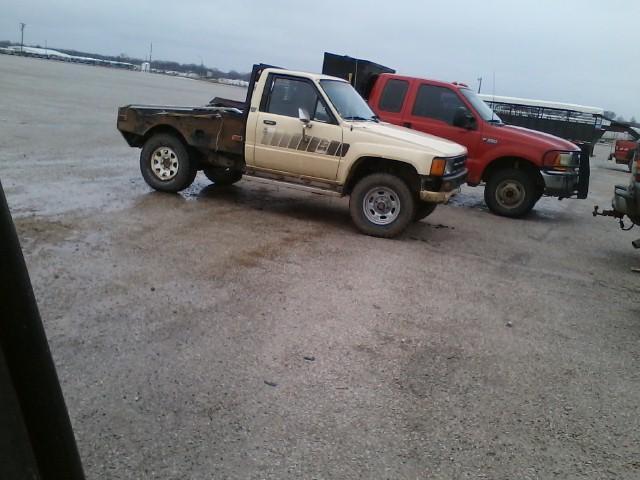
I was out in town and seen this 85, It has a flat bed with the ball hitch in the center, This truck gets used on a farm but was in great shape for its age but you can see the frame that its days are numbered for being on the highway. It was in bad shape.

Last edited by Terrys87; Mar 18, 2015 at 09:39 PM.
Mar 19, 2015 | 10:25 AM
#690
Registered User
Joined: Jul 2012
Posts: 2,365
Likes: 4
From: Idaho
farm use is where they end up in their last days here then the farmers sell them for scrap value when they die totally, ive told mark more than once ive seen rolled over newer toyotas cabs all crooked windsheilds nonexistant still being driven round on the dairy's wheels bent an such
i dont know which is a better end for a yota old age on a farm or 50 cal gun platform on the middle east taking an rpg to the engine an stagering away on 3 cyl
i dont know which is a better end for a yota old age on a farm or 50 cal gun platform on the middle east taking an rpg to the engine an stagering away on 3 cyl
Mar 19, 2015 | 04:50 PM
#691
Thanks Slacker.. I follow your threads as well and you do some amazing work. I am hoping to get my skills up to your level some day. It takes time out in the shop to get them there, just wish there was a faster way to get the skills up. I cant beleive it has been nearly 4 years on your Trekker build already, time does fly by.
Trekker has been a while since it's completion .. she's been to a few car shows , and won some trophies
 ... still a real fun truck . I'm building another now , well actually 2 for myself .. the 2WD "hot rod" , and the Mojave tribute .. I might just TURBO this engine , so watch out for that .
anyway , I don't mean to hijack , so back to your stuff
.
Mar 19, 2015 | 06:13 PM
#692
I think the total result of your build is going to be so sick, knowing it was almost in the Toyota grave, but looking like a real gem. Hey you might like this. Found it earlier, just such a great truck http://atlanta.craigslist.org/wat/cto/4936885430.html
*continues staring at those door panels*
*continues staring at those door panels*
Mar 19, 2015 | 07:26 PM
#693
Thread Starter
Super Moderator
iTrader: (1)
Joined: Aug 2008
Posts: 11,787
Likes: 28
From: Anderson Missouri
Hello Cyberhorn.. I have an IFS frame for that truck. That is one I would like to get ahold of and do a frame swap on. It would quick and easy as that one is all together. I will start keeping an eye out in that area for it. To bad as it actually is in great shape when you see the rest of the truck.
Hello Slacker... Dont worry about hijacking on my thread. I enjoy the conversations. Your little two wheel drive ht rod truck is neat and your Mojave build is a sweet truck. I have thought of building a two wheel drive again just so I dont have to jump up into it and better gas mileage.
I would like to get into a business like you do. Just dont think I am fast enough to do it and still getting my shop built. It is my long term goal of doing it as a side business and when I retire in 10-11 more years. It is one of my life regrets of not doing this for a living. Wish I would of got into it right out of school instead of so much later. When I got out of school electronics was the way to go and I did like it but that field has died out. Was always told to follow your passion and I screwed up.
Thanks bootscootboogie... I am really trying to make this one nice truck and going thru it slowly. I was hoping to get the floors repaired this weekend but that isnt going to happen. I am supposed to get some arm rest this weekend and then get carpet and find some nice seats for it, most of the interior will be done and it should look like a truck soon. Just been tied up on several other things and hoping to get back on this truck soon. I am ready to be driving it, so close, yet so far. It is getting there.
Last edited by Terrys87; Mar 19, 2015 at 07:31 PM.
Mar 19, 2015 | 07:28 PM
#694
Thread Starter
Super Moderator
iTrader: (1)
Joined: Aug 2008
Posts: 11,787
Likes: 28
From: Anderson Missouri
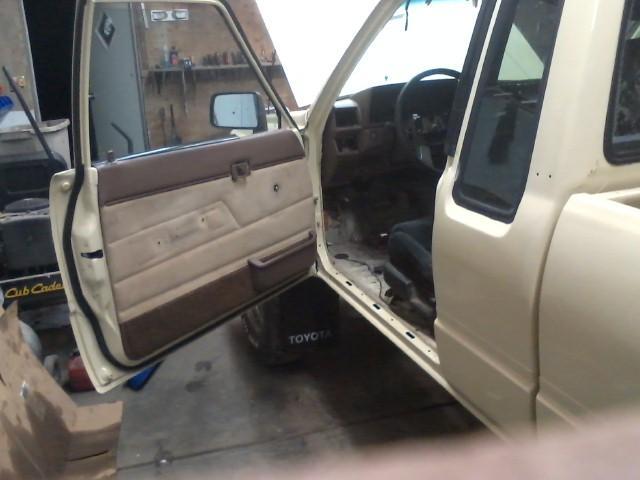
Here you go bootscootboogie..I think I have Photbucket working again. It was maxed out and I had to upgrade. Once I get the armrest in and can get a good shot of everything together out in natural sunlight, I think it will look better then what the picture is showing. I am liking the way it is turning out. Trying to show dash with door panel. I do know where a tan 1st gen truck is and have offered to buy it and it is similar to what the CL posting is. Would be a nice truck and easy fix for me if I could get a hold of it. Be about the easiest project I would of worked on. I still want a 1st gen and will have one someday. Just may be a while.
Something I found and want to try,
You're E-Brake should click no more than 5 or MAYBE 6 times for a FULL GRAB or your rears are out of adjustment and forcing your front rotors to do all the work to stop the truck.[/color][/b] When the rears are out of adjustment, the front disc breaks have to work harder, causing them to get hotter and potentially warp. In severe situations, the pedal may feel mushy and the vehicle may "nose-dive" during a hard break. When the rears are properly adjusted, the vehicle will only slightly nose-dive and the vehicle wil be much more "controlled" when coming to a quick stop.
There's two ways to adjust your rear drum brakes on a Toyota (pretty much any vehicle for that matter).
The first way requires you to get under the vehicle and gain access to the adjustment "port" on the backside of the drum and insert a screwdriver and manually "ratchet" the adjustment wheel to reduce the gap between the shoes and the drum.
However, there's a much easier and MUCH quicker method that you can do from the driver seat. You adjust the rears by putting the truck in REVERSE, then going about 3MPH-5MPH in REVERSE, you pull up and release the E-Brake rapidly while keeping the button depressed, basically ratcheting the rear drums - with your FEET OFF THE PEDALS. You will FEEL the rear brakes get tighter and tighter as the tolerance for the gap between the shoes and the drum is reduced with each pull. You'll have to ratchet the handle 20-50 times depending on how badly they're out of adjustment. I just push in the button and keep it there, then "pump" the handle up and down quickly (from fully pulled to a fully released position) while keeping my foot OFF the brake while rolling in reverse. I usually do it on a hill in my neighborhood so I don't have to touch the gas either. 3-5MPH is plenty fast enough.
You should do this about once per month or about every 1000 miles to keep them adjusted.
[B]
[COLOR=Yellow]When mine are "fresh" (recent adjustment), I can't pull the handle hard enough to get 7 clicks. Period.
Last edited by Terrys87; Mar 20, 2015 at 02:12 PM.
Mar 20, 2015 | 06:26 PM
#695
However, there's a much easier and MUCH quicker method that you can do from the driver seat. You adjust the rears by putting the truck in REVERSE, then going about 3MPH-5MPH in REVERSE, you pull up and release the E-Brake rapidly while keeping the button depressed, basically ratcheting the rear drums - with your FEET OFF THE PEDALS. You will FEEL the rear brakes get tighter and tighter as the tolerance for the gap between the shoes and the drum is reduced with each pull. You'll have to ratchet the handle 20-50 times depending on how badly they're out of adjustment. I just push in the button and keep it there, then "pump" the handle up and down quickly (from fully pulled to a fully released position) while keeping my foot OFF the brake while rolling in reverse. I usually do it on a hill in my neighborhood so I don't have to touch the gas either. 3-5MPH is plenty fast enough.
You should do this about once per month or about every 1000 miles to keep them adjusted.
[B]
[COLOR=Yellow]When mine are "fresh" (recent adjustment), I can't pull the handle hard enough to get 7 clicks. Period.
You should do this about once per month or about every 1000 miles to keep them adjusted.
[B]
[COLOR=Yellow]When mine are "fresh" (recent adjustment), I can't pull the handle hard enough to get 7 clicks. Period.
20-50 times is a little excess though ... if you think there out that much , or if you can pull the handle to the max , you should pull the wheel and drum off and adjust them by hand .. always good to confirm the thickness of your shoes and condition of the drum
.
Last edited by slacker; Mar 20, 2015 at 06:27 PM.
Mar 28, 2015 | 09:18 AM
#696
Thread Starter
Super Moderator
iTrader: (1)
Joined: Aug 2008
Posts: 11,787
Likes: 28
From: Anderson Missouri
Thanks Slacker.. I havent given this a try just yet. I did have a friend help me do the brakes on the rear and next to my 3rd gen I would say these are the best brakes I have on my trucks.
Mar 28, 2015 | 09:21 AM
#697
Thread Starter
Super Moderator
iTrader: (1)
Joined: Aug 2008
Posts: 11,787
Likes: 28
From: Anderson Missouri
I did get my arm rest and will get them on later this week. They are in great shape. I did try to do some welding on my floor boards and welding Toyota metal is turning out to be what I have heard of it. I keep burning thru. I may get some help on fixing 4 small spots on my floor. Not going to throw the towel in on it just yet. Would like to get this welding thing down soon. I want to fix the floor boards and then get some sound deadner on the floor.
Buggered up welding and not my thing just yet. Hope to get welding down soon.

Buggered up welding and not my thing just yet. Hope to get welding down soon.
 Mar 28, 2015 | 11:32 AM
#698
Registered User
Joined: Jul 2012
Posts: 2,365
Likes: 4
From: Idaho
turn down the power just a bit an dont try an make pass welds stitching a dab here then move to elsewhere dab it seems to work bit better with toyota metal welding on other metal seems to be able to do pass welds with the toy metal speaking from what we had to do to mine
Mar 30, 2015 | 11:33 AM
#700
Registered User
Joined: Jul 2012
Posts: 2,365
Likes: 4
From: Idaho
we could with the patches we put in mine but it was new dishwasher front door metal my friend appliance repair man gets scratch an dent metal from customers who are 'it has a scratch right there' an its less than the size of this i so warranty replacement of the door UGH


