
775Toy's 84 X-cab build Thread
 Mar 14, 2014 | 11:10 AM
#221
Thread Starter
Registered User
Joined: Dec 2011
Posts: 415
Likes: 1
From: 775 Reno Nevada
Just finished reading through your thread. Love the build. Came a very long way from the first few pics of it in the field.
Im also curious on the ford shock towers. They look awfully close in resemblance to the stock towers on the 84-84 trucks. What year ford are they from?
Im also curious on the ford shock towers. They look awfully close in resemblance to the stock towers on the 84-84 trucks. What year ford are they from?
Couldn't tell ya exactly what years but I think 80s - 2000s f250/350 used these towers simply bolted on to the frame. There are a few differant styles through the years but all pretty much the same. My local ford dealer sells them new for 18$ ea and seen them as cheap as 10$ ea online. Google search pulls up a lot of threads covering questions and part numbers. They are famous for ripping off the frame if not welded on good and braced. I've seen hoops do the same if directly welded to frame. Many run them with no problems , I hope I'm one of them.
Mar 14, 2014 | 06:19 PM
#222
Thread Starter
Registered User
Joined: Dec 2011
Posts: 415
Likes: 1
From: 775 Reno Nevada
Got some birthday sliders ! Should have the gusset set Monday.
Noticed that my English pointer was on point on some quail in the yard after I posted the pic on a local 4x4 site. Those quail drive her nuts !
Noticed that my English pointer was on point on some quail in the yard after I posted the pic on a local 4x4 site. Those quail drive her nuts !
Mar 14, 2014 | 10:59 PM
#223
Registered User
Joined: Aug 2011
Posts: 592
Likes: 0
From: Canon City, Colorado
Nice sliders, my lab does the same things with geese and ducks, he hears them and stares, Ill mess with him and use my duck call just to get a reaction, its funny, my wife says its mean lol. My healer is older and he just looks at the lab and thinks stupid kid, then the healer try to herd my cats, Hes gotten a few cuts to the nose caue of it lol. Its funny how dogs can make you laugh even after the worst days. They are great entertainment.
Mar 21, 2014 | 08:32 PM
#224
Thread Starter
Registered User
Joined: Dec 2011
Posts: 415
Likes: 1
From: 775 Reno Nevada
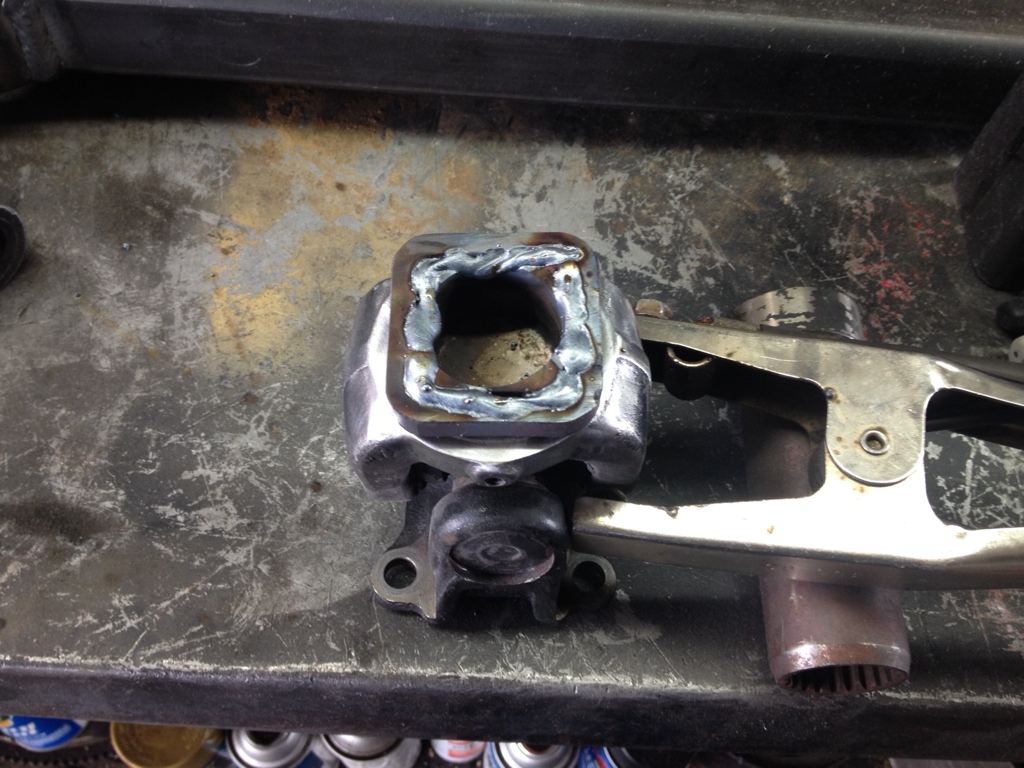
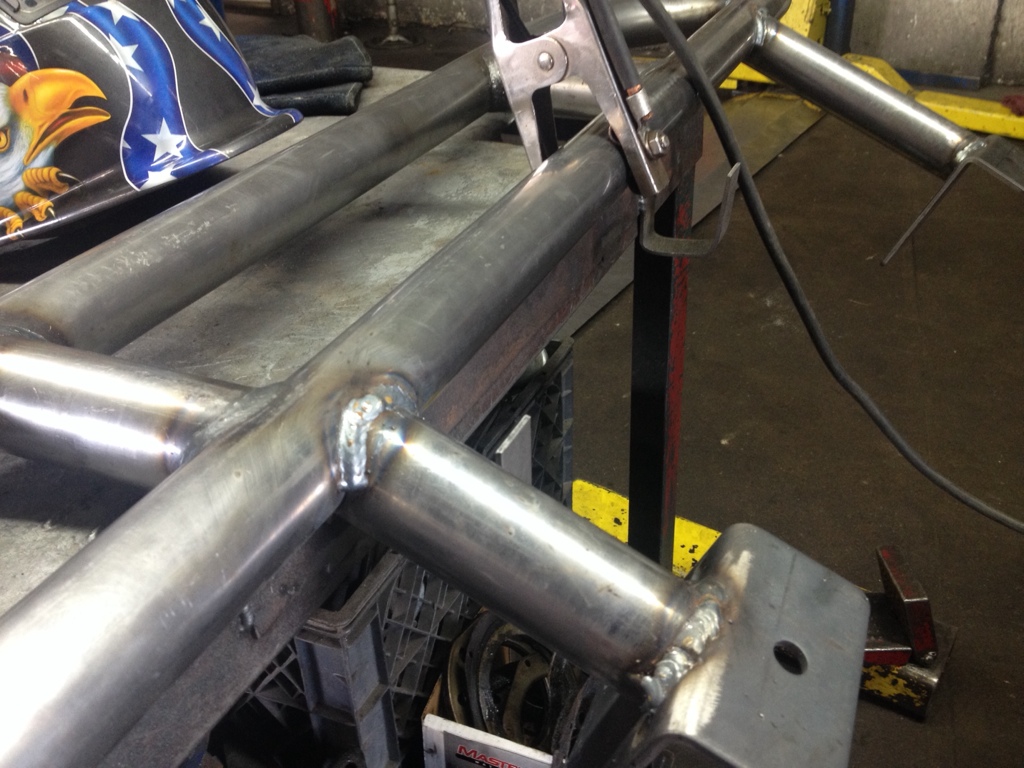
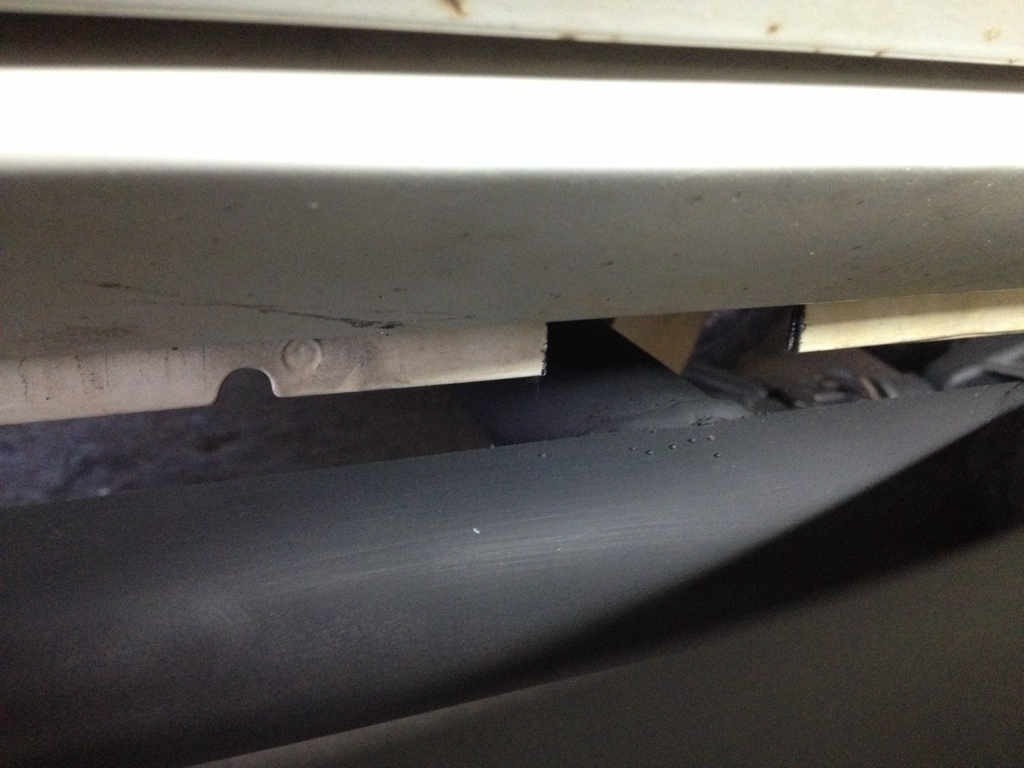
A little square driveline tech.
* disclaimer - this is nothing new , many threads on differant ways to make these. All drivetrain setups are not the same , many differances between year & model yokes /joints & flanges . Materials and measurements will vary. A Tape measure goes along way . This is just how I did it , for my vehicle and requirements. This is only recommended for off road use as they will make some noise due to slop between the 2 peices of tube and cause vibrations at higher speeds. These can not be balanced ! The better you line up the yoke ends the less vibration you will get. There are many threads going over tricks and pointers on how to combat noise & vibrations as well as explaining if you should use a double u-joint ( cv ) or single on tcase side . Grease is not needed , but will help with noise some. Build at your own risk.
-Materials-
2ft of seamless 2.5" square tube 1/4" thick
2ft of 2" square tube 1/4" thick
1 - rear drive flange off a donor tcase to swap out the stock cv style joint flange for the front driveline since I will be running a single u-joint on each end due to my front pinion angle.
Stock pinion side u-joint & yoke
1 - single u-joint & yoke off donor ifs front driveline
-Tools
Die grinder / cutoff wheels / sanding discs / welder / tape measure / chop saw / file.
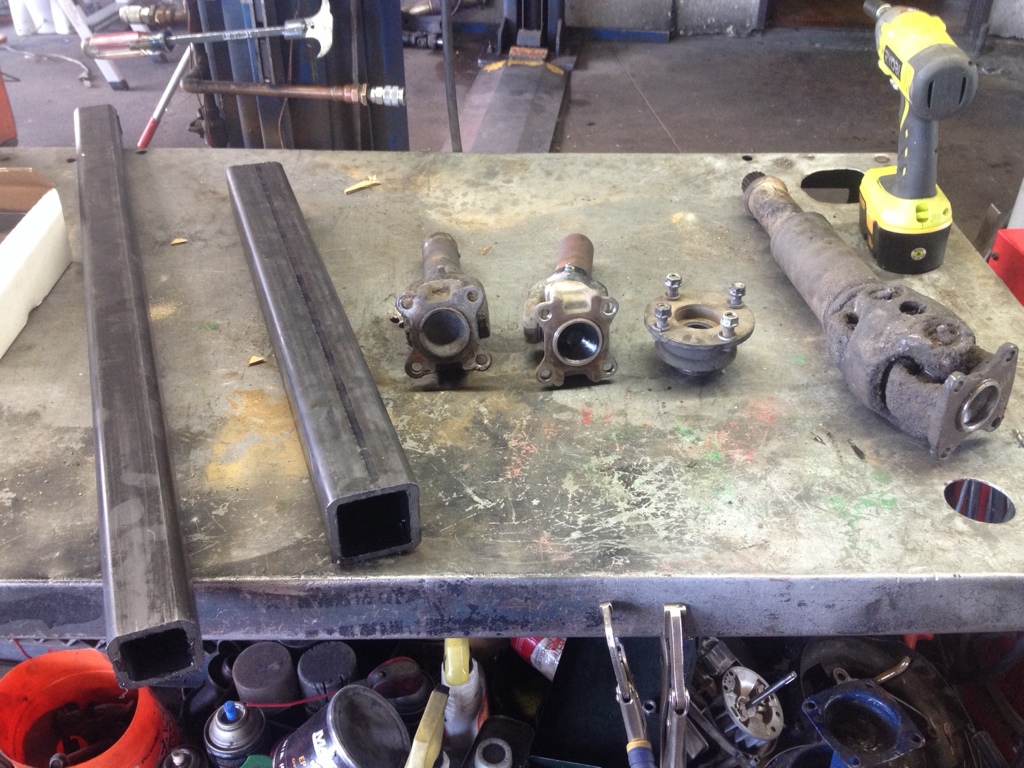
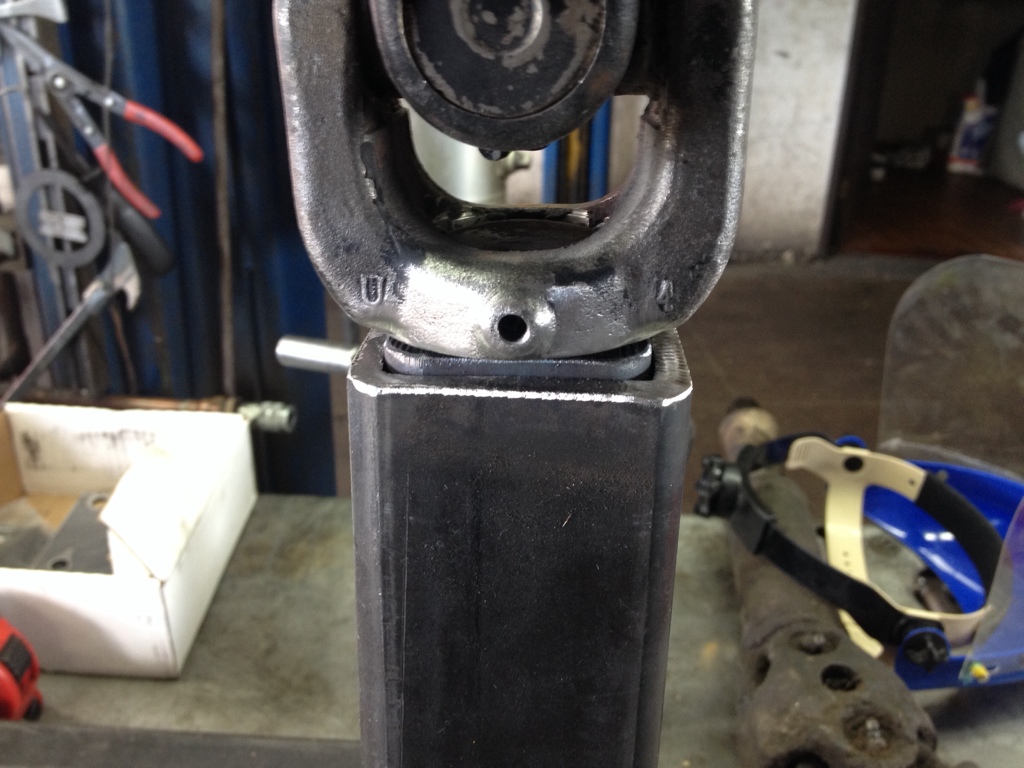
First I cut off most of the yoke , left about a 1/2 or so stub
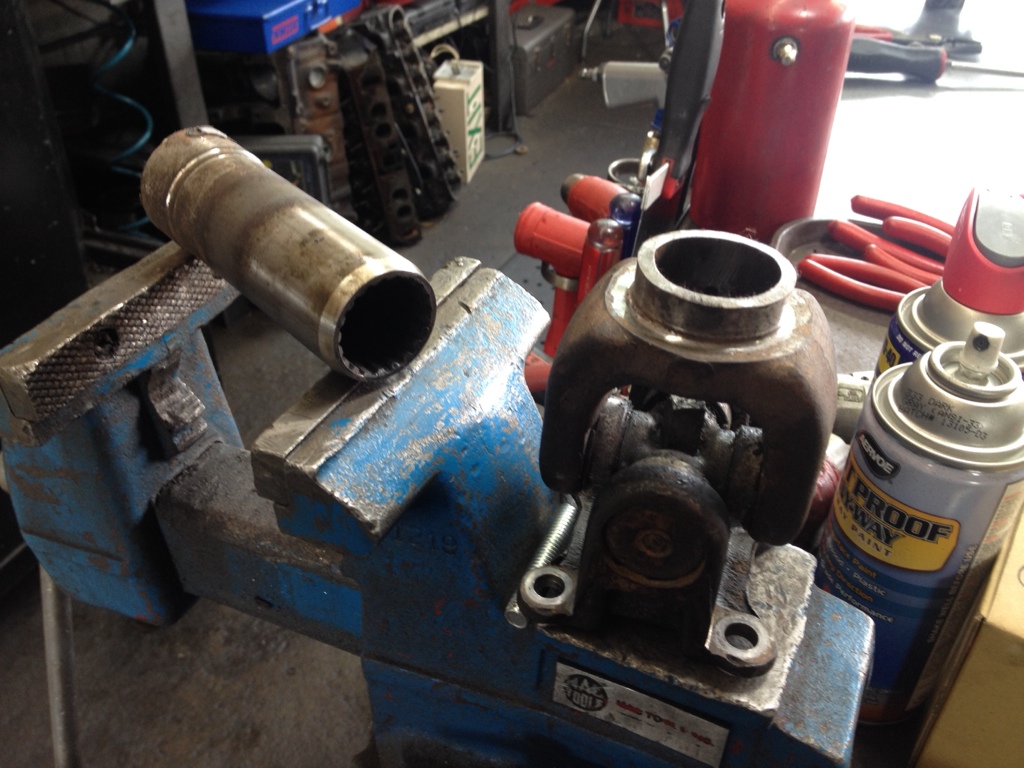
Then take about a 1/2" slice off the 2" square tube to use as a template.
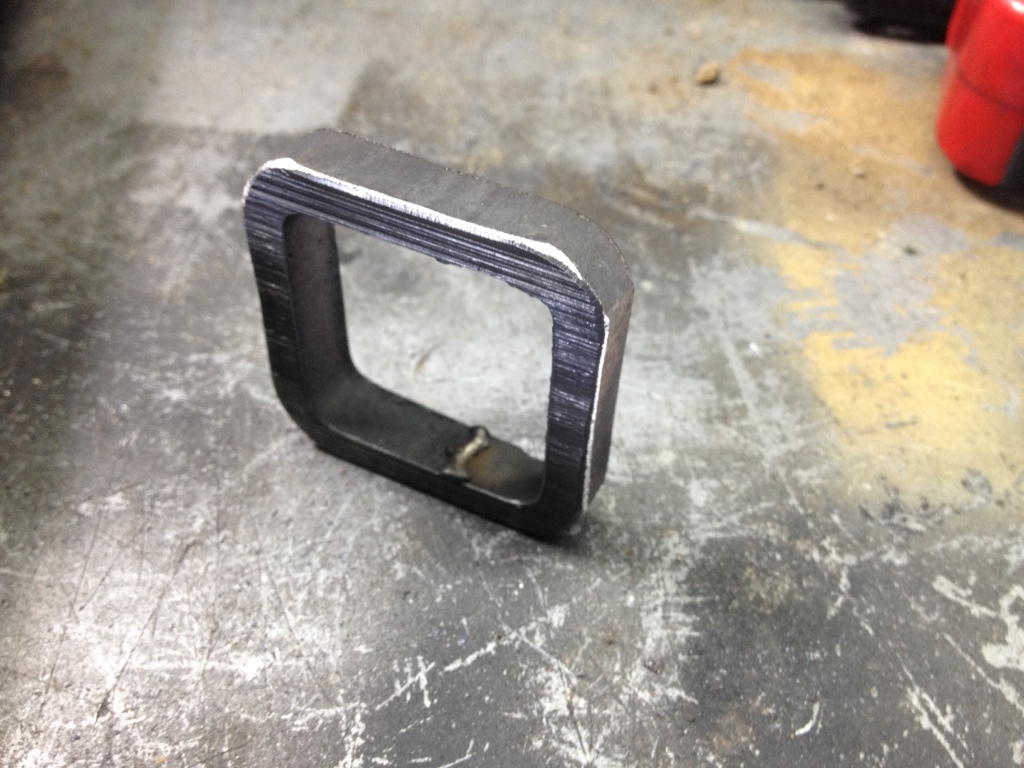
Center the slice of 2" over the yoke I just cut and trace out the inside with a sharpie.
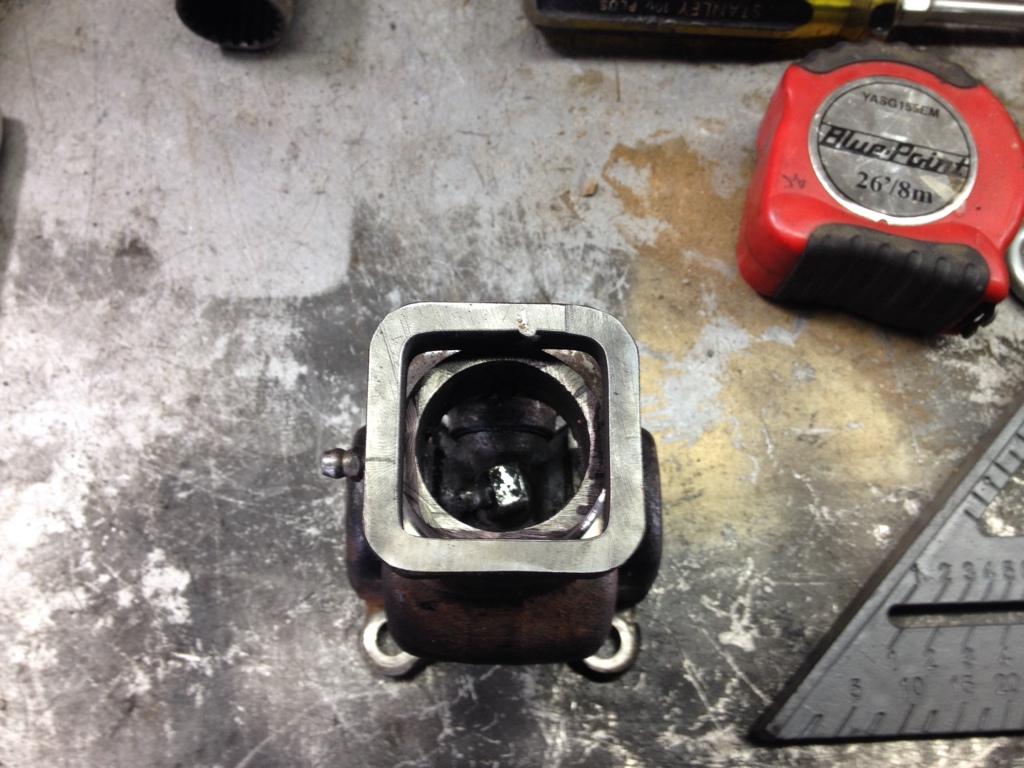
Using a cutoff wheel cut sides off you just traced .
Now that it's square it will slip Inside the 2" tube . It should have a little wiggle to allow you to center it up before tacking it I place . When your happy with its alignment burn it in.
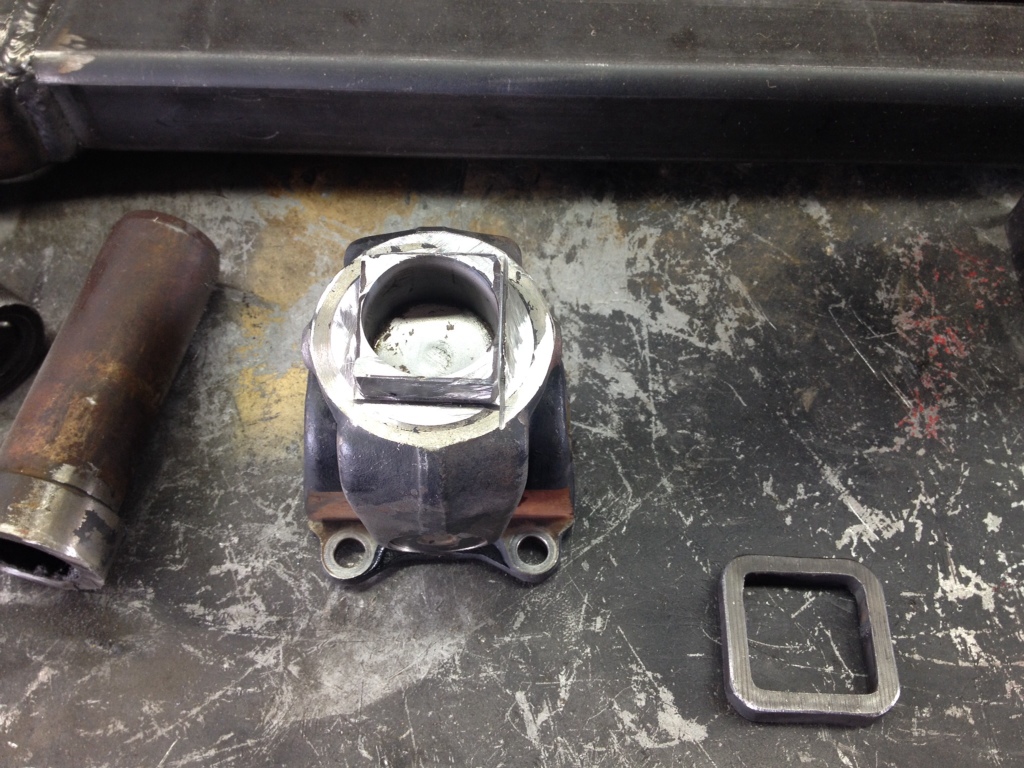
Now for the 2.5" side. I basically cut the yoke off same as before , traced with slice of 2" again , and cut along the trace marks using cut off wheel . But this time once the yoke end was cut into a square I slipped the 1/2" slice of 2" tube over the stub and welded it together on the topside. That way it is a 2" stub that will fit nicely inside the 2.5" tube.
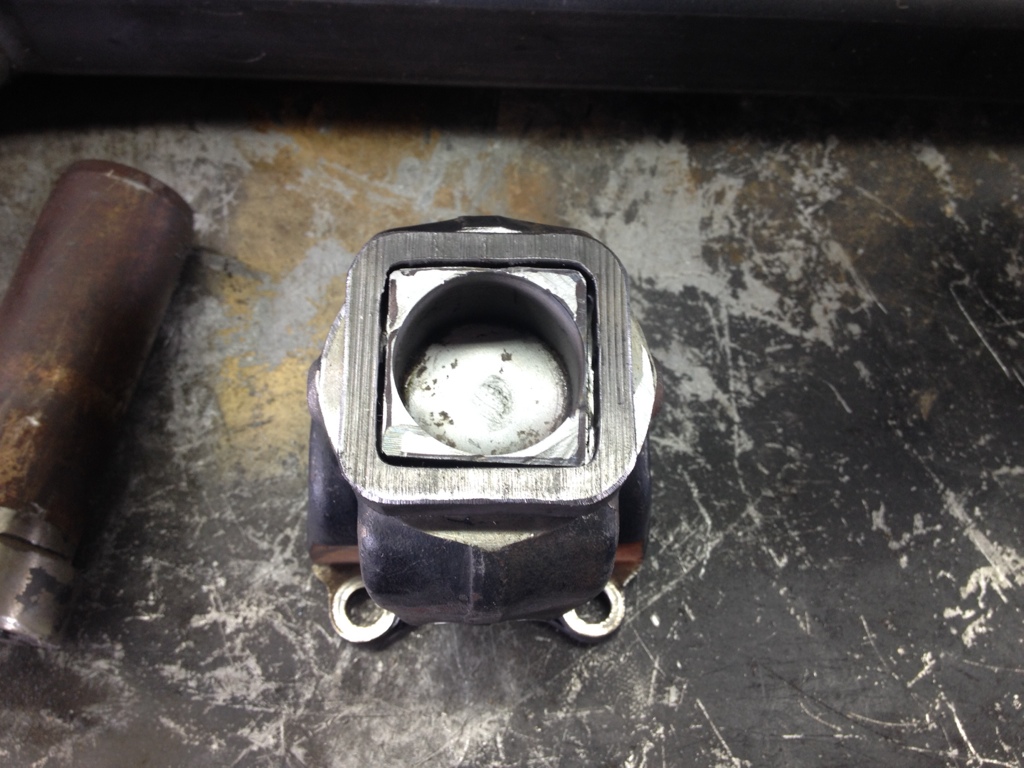
Notice how it fits snugly inside. You still have enough wiggle to center it up.
Now I let it slip in and sit flush against yoke & tube
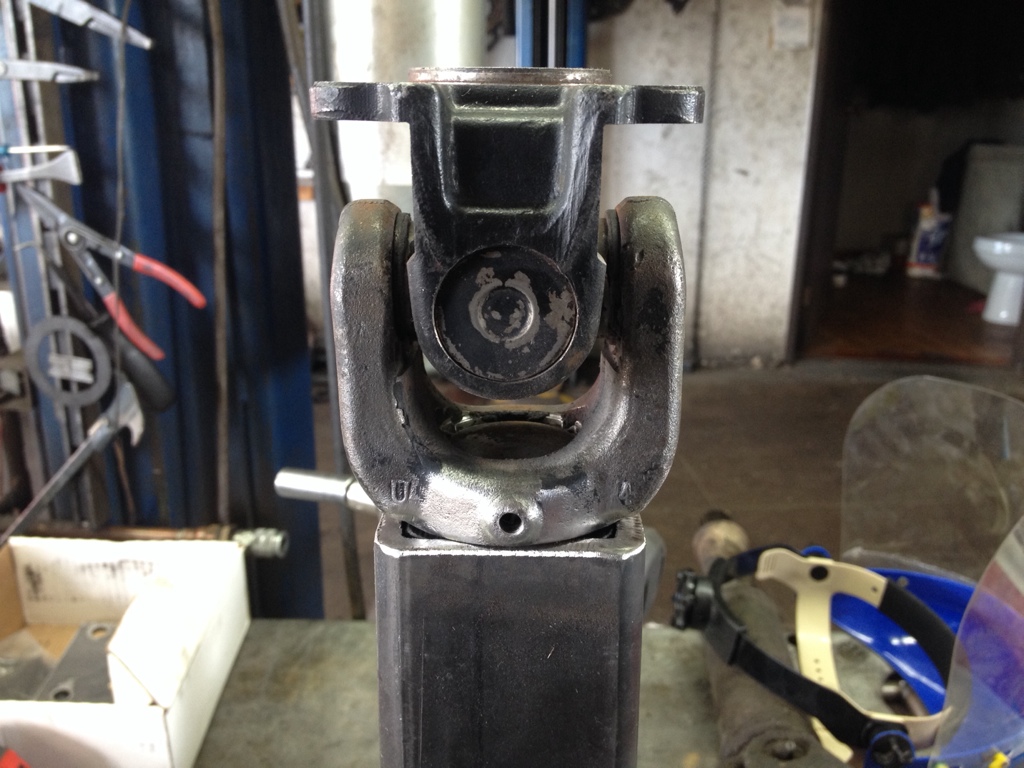
Centered it up and burned it in.
My transfer case flange to pinion flange was just shy of 30" . I wanted Atleast 5" of compression and Atleast 10" of slip. So I cut the 2" & 2.5" to proper length to get those #s
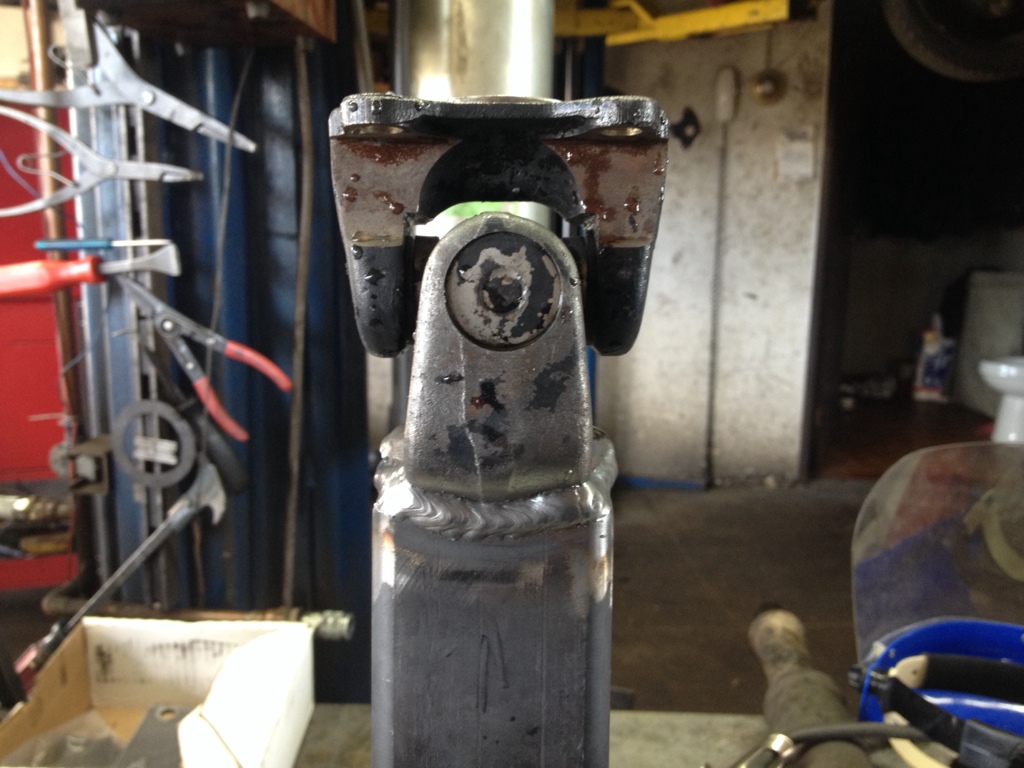
Fully Compressed . Notice it's not compressed all the way to the welds , well this is the side I welded the 2" slice to the yoke end to fit inside the 2.5" tube. Right around 25" compressed .
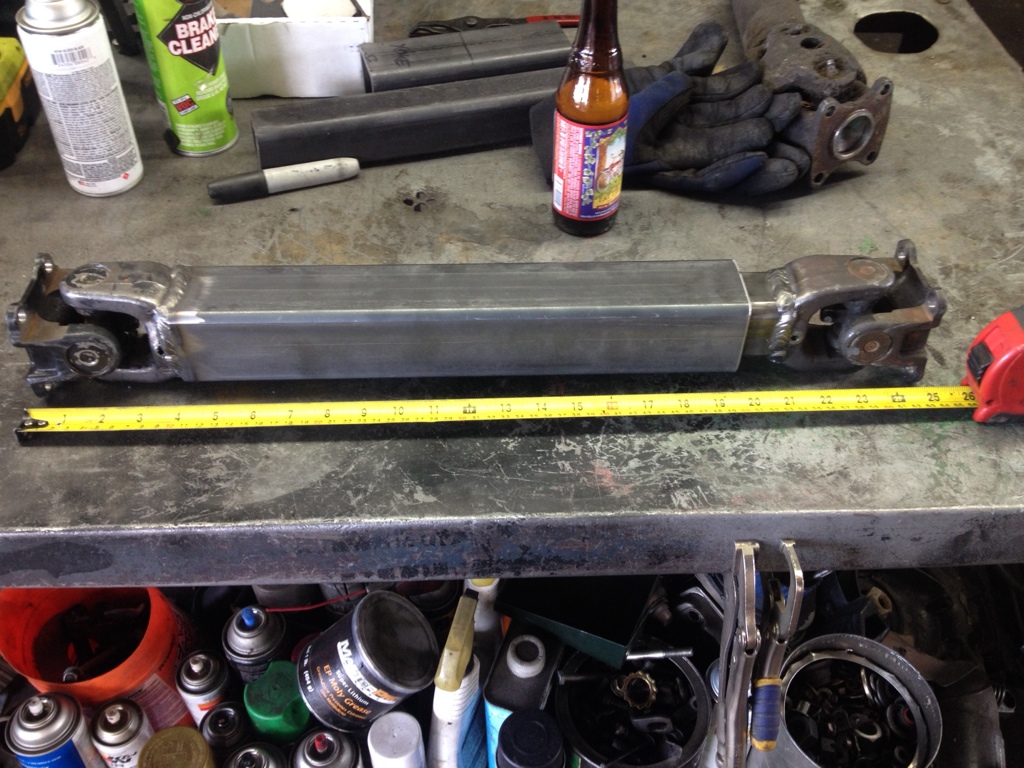
Fully extended with about 1/2" still inside holding them together. About 41"
So I got around 5.5" compression and 11" slip.
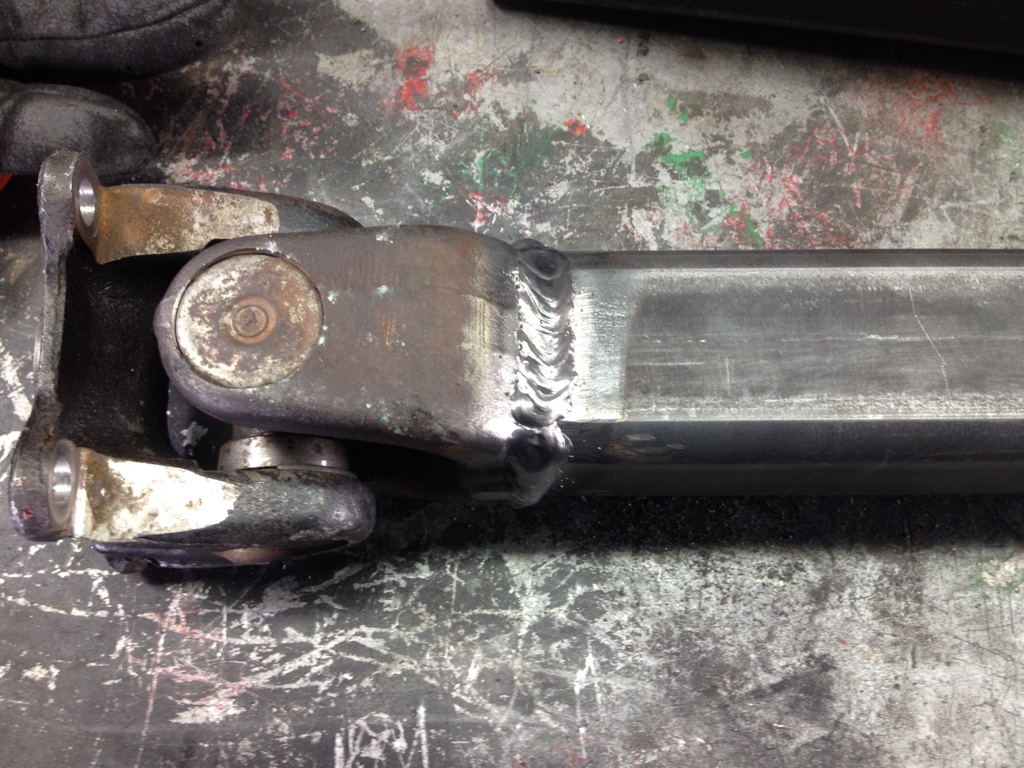
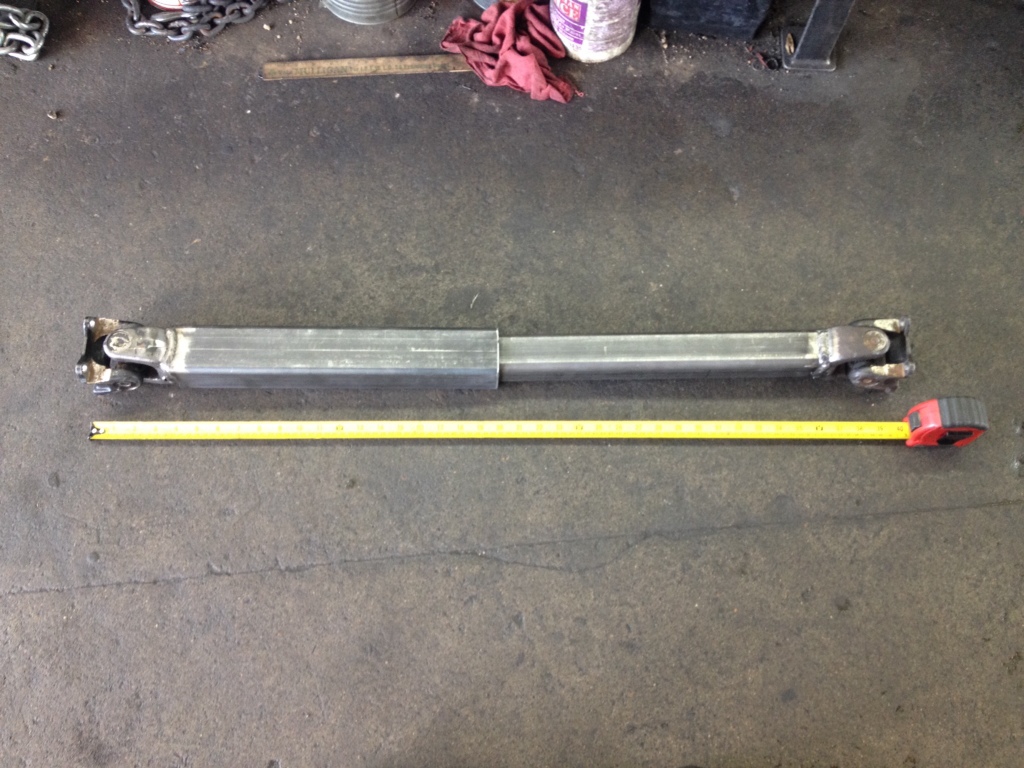
Installed on the hoist -

On the ground -
I got about 50$ in this driveline. Should take abuse for years to come. I will eventually drill and tap a hole along each side of the 2.5" tube to allow me to thread a grease zerk in now and then and grease it up ( taking the zerk out after grease is inserted ) . Will do a drive test next week with hubs locked in 2wd & 4wd to see what speed I get vibes at. Some people claim 20mph some say 60mph no problem , some get lucky and don't notice a differance beside the slight clicking noise from the tubes ?
* disclaimer - this is nothing new , many threads on differant ways to make these. All drivetrain setups are not the same , many differances between year & model yokes /joints & flanges . Materials and measurements will vary. A Tape measure goes along way . This is just how I did it , for my vehicle and requirements. This is only recommended for off road use as they will make some noise due to slop between the 2 peices of tube and cause vibrations at higher speeds. These can not be balanced ! The better you line up the yoke ends the less vibration you will get. There are many threads going over tricks and pointers on how to combat noise & vibrations as well as explaining if you should use a double u-joint ( cv ) or single on tcase side . Grease is not needed , but will help with noise some. Build at your own risk.
-Materials-
2ft of seamless 2.5" square tube 1/4" thick
2ft of 2" square tube 1/4" thick
1 - rear drive flange off a donor tcase to swap out the stock cv style joint flange for the front driveline since I will be running a single u-joint on each end due to my front pinion angle.
Stock pinion side u-joint & yoke
1 - single u-joint & yoke off donor ifs front driveline
-Tools
Die grinder / cutoff wheels / sanding discs / welder / tape measure / chop saw / file.
First I cut off most of the yoke , left about a 1/2 or so stub
Then take about a 1/2" slice off the 2" square tube to use as a template.
Center the slice of 2" over the yoke I just cut and trace out the inside with a sharpie.
Using a cutoff wheel cut sides off you just traced .
Now that it's square it will slip Inside the 2" tube . It should have a little wiggle to allow you to center it up before tacking it I place . When your happy with its alignment burn it in.
Now for the 2.5" side. I basically cut the yoke off same as before , traced with slice of 2" again , and cut along the trace marks using cut off wheel . But this time once the yoke end was cut into a square I slipped the 1/2" slice of 2" tube over the stub and welded it together on the topside. That way it is a 2" stub that will fit nicely inside the 2.5" tube.
Notice how it fits snugly inside. You still have enough wiggle to center it up.
Now I let it slip in and sit flush against yoke & tube
Centered it up and burned it in.
My transfer case flange to pinion flange was just shy of 30" . I wanted Atleast 5" of compression and Atleast 10" of slip. So I cut the 2" & 2.5" to proper length to get those #s
Fully Compressed . Notice it's not compressed all the way to the welds , well this is the side I welded the 2" slice to the yoke end to fit inside the 2.5" tube. Right around 25" compressed .
Fully extended with about 1/2" still inside holding them together. About 41"
So I got around 5.5" compression and 11" slip.
Installed on the hoist -
On the ground -
I got about 50$ in this driveline. Should take abuse for years to come. I will eventually drill and tap a hole along each side of the 2.5" tube to allow me to thread a grease zerk in now and then and grease it up ( taking the zerk out after grease is inserted ) . Will do a drive test next week with hubs locked in 2wd & 4wd to see what speed I get vibes at. Some people claim 20mph some say 60mph no problem , some get lucky and don't notice a differance beside the slight clicking noise from the tubes ?
Last edited by 775Toy; Mar 21, 2014 at 08:57 PM.


 Mar 24, 2014 | 03:01 PM
#226
Thread Starter
Registered User
Joined: Dec 2011
Posts: 415
Likes: 1
From: 775 Reno Nevada
Mar 25, 2014 | 06:45 AM
#228
Mar 25, 2014 | 07:17 PM
#229
Thread Starter
Registered User
Joined: Dec 2011
Posts: 415
Likes: 1
From: 775 Reno Nevada
Then I guess ill see how it does and what things need to be addressed and make a new todo & needs list.
Still got to install my cb stuff / CD player & speakers / rear wood panels / tool box for the bed / rubber bed mat . This stuff can wait tho.
I have a feeling after a shakedown if everything goes well ill have the itch to do some performance drivetrain upgrades. Gears / dual cases or single case 4.7s in the near future ?
Mar 26, 2014 | 06:22 PM
#230
Thread Starter
Registered User
Joined: Dec 2011
Posts: 415
Likes: 1
From: 775 Reno Nevada
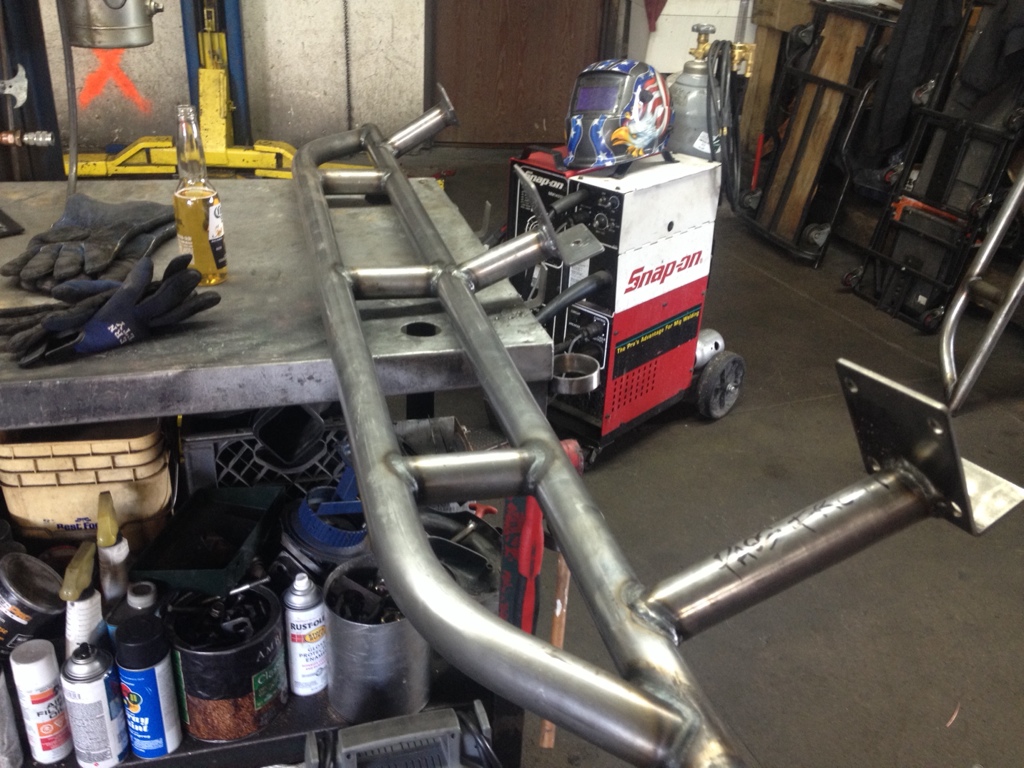
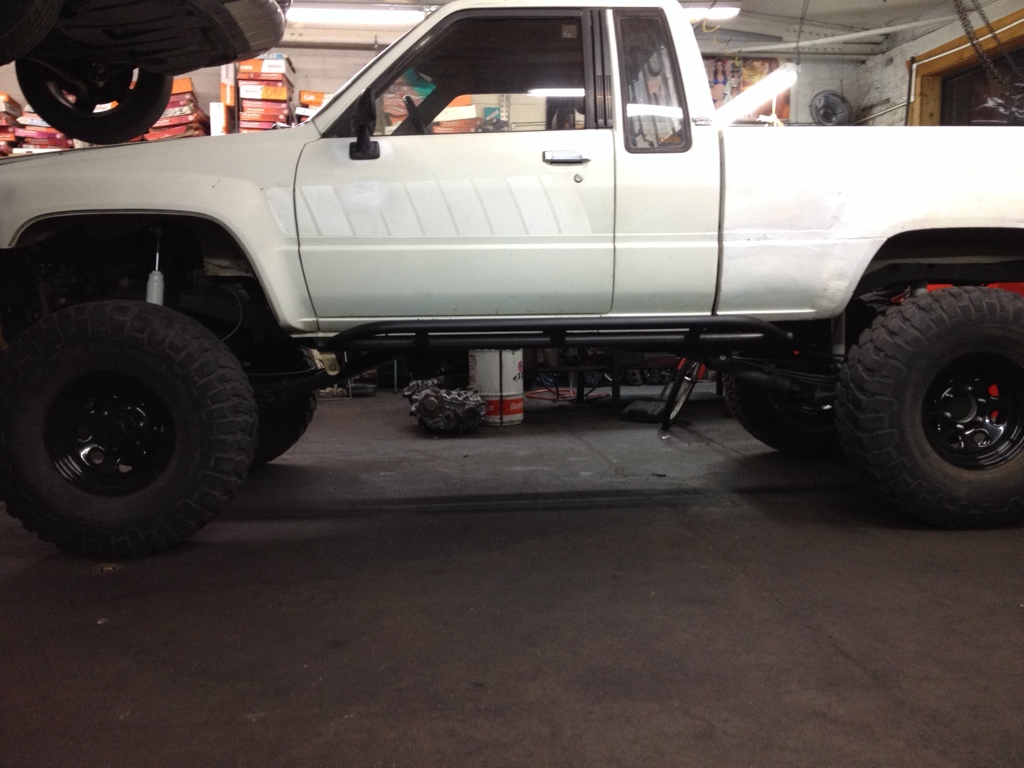
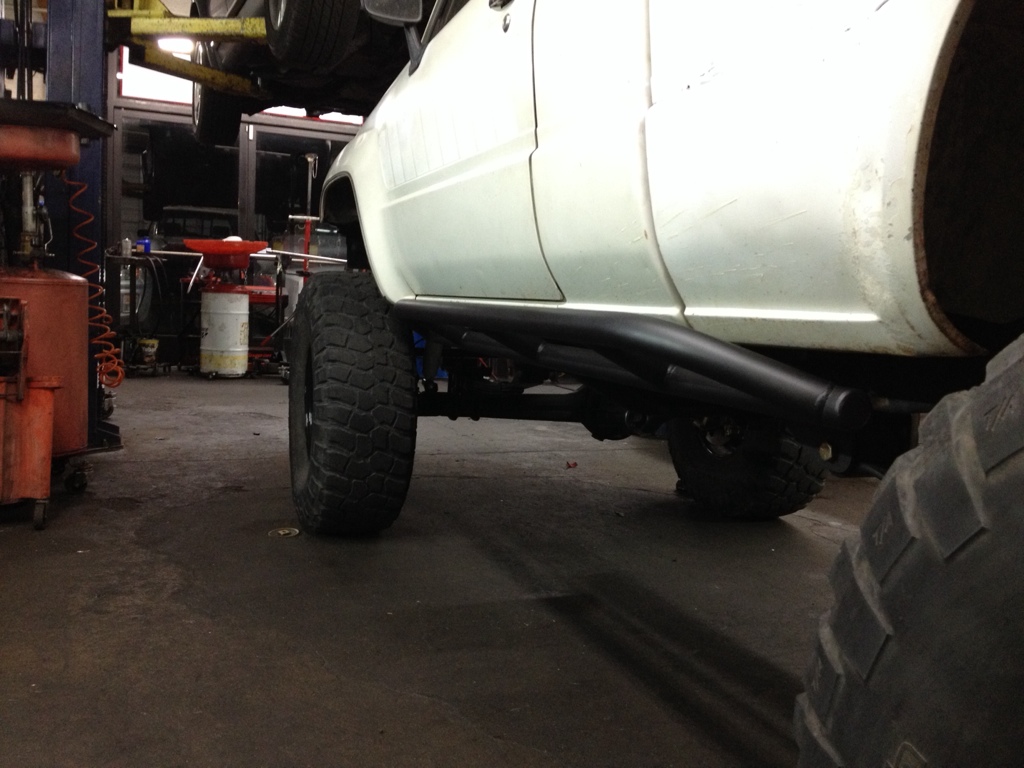
O man , sliders can be very time consuming. Getting them all lined up , desired angle just right , distance just right and cutting the legs correctly was no fun. Not to mention the prep on frame and frame plates. I was a dummy and forgot to weld the gussets onto the plates & legs till after sliders were already welded to the frame lol. Not as easy on the truck to weld those gussets in , I'll remember for the other side for sure. 67" 1035 dom sliders aren't light either.
All mocked up
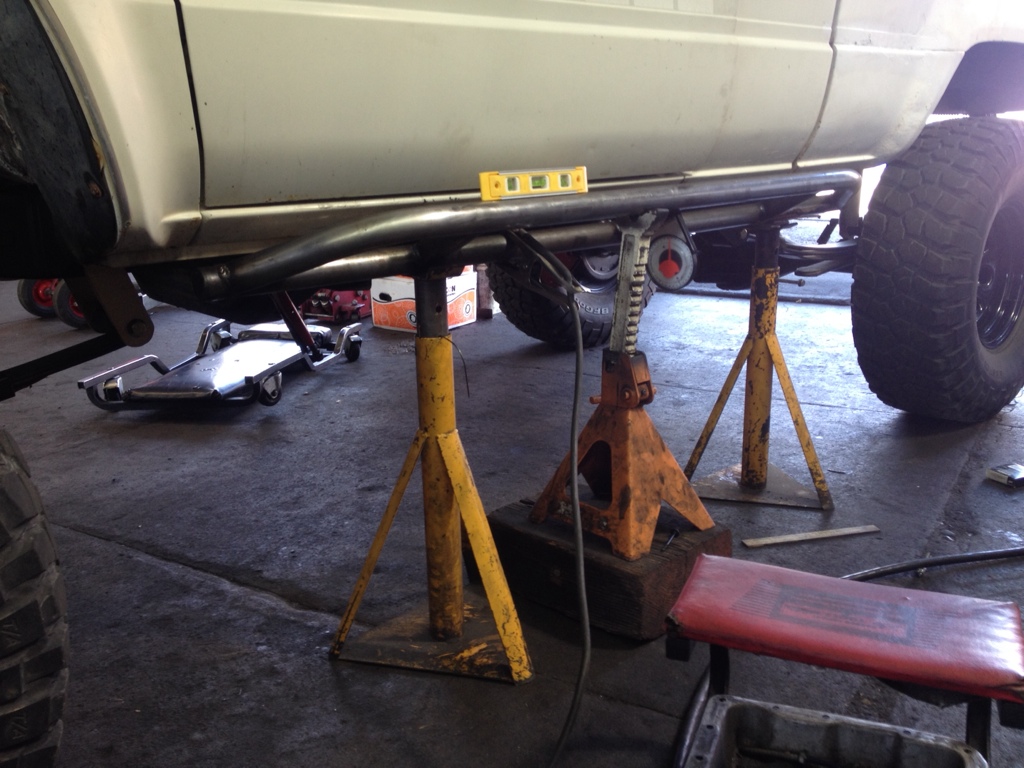
Let's cut and welded on
Frame prepped & frame plates 90% welded in. I suck at weldong upside down , so I'm gonna wait till I have the truck up on a rack to weld bottom side.
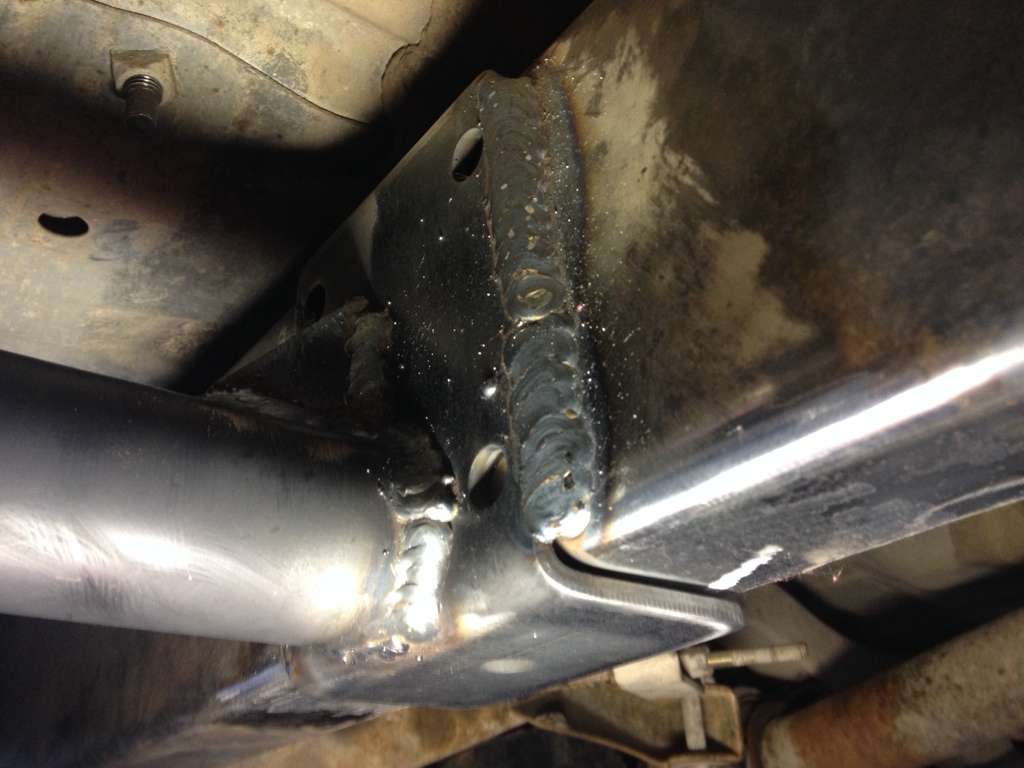
Got them about a 1/8" from the pinch weld , decided I'd knotch out the pinch weld for extra clearance if they decide to come up some under weight.
They are out just about flush with fender flares , 26-27* angle . I stared with a 1/2" gap from slider to bottom of door. Well after welding they came up some . More like 3/8" gap now. Hopefully the gussets will do there job and not let the slider come up much more after smashing on them ?

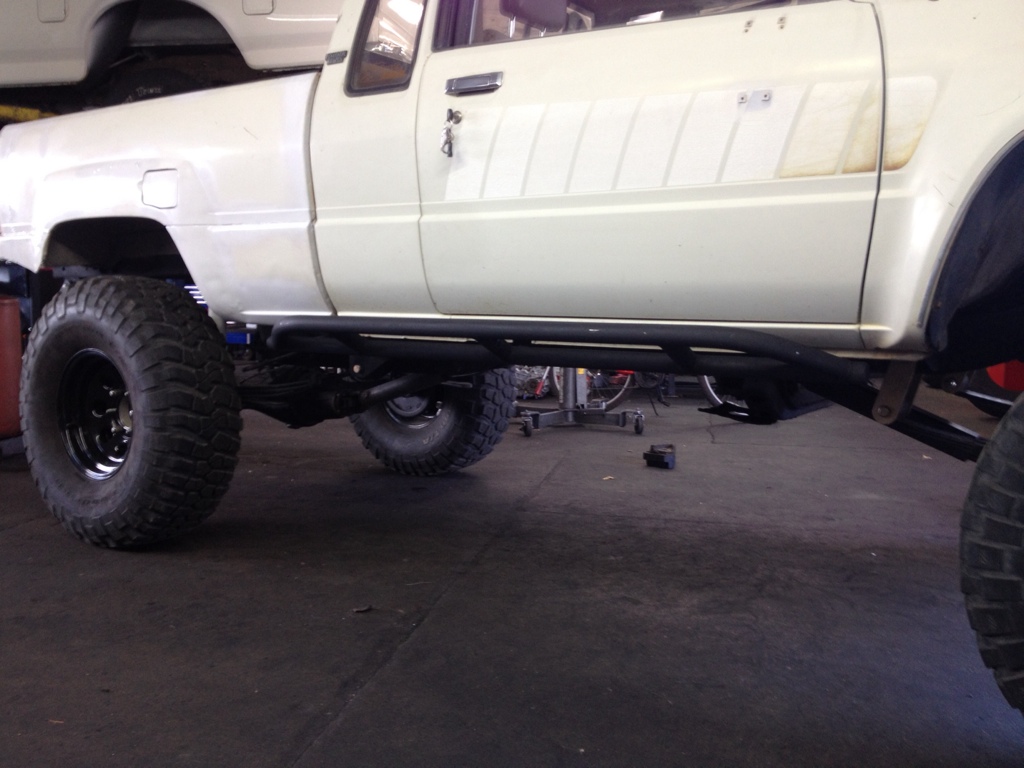
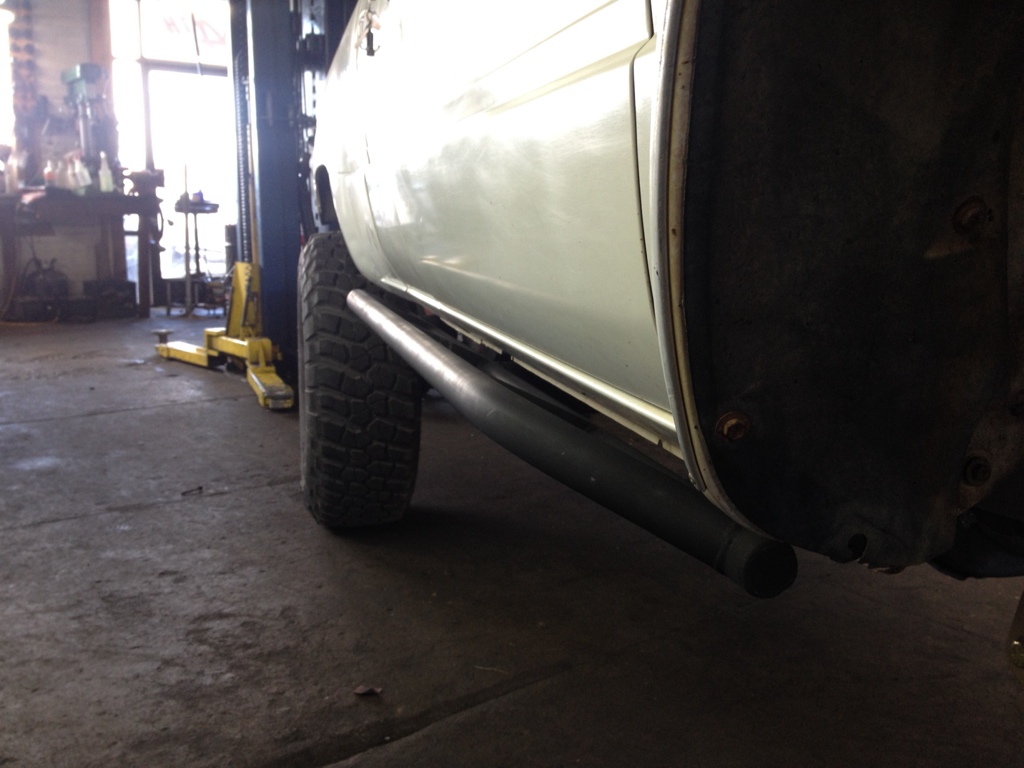

Door gap
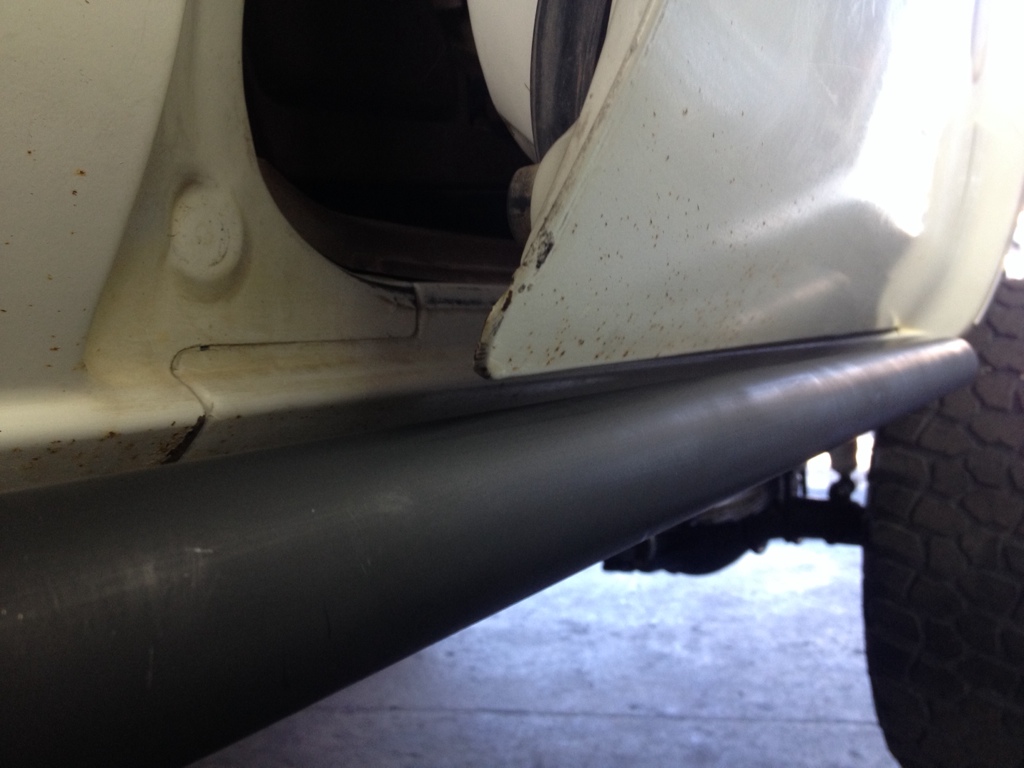
One side done. Hopefully the driverside will go faster .
All mocked up
Let's cut and welded on
Frame prepped & frame plates 90% welded in. I suck at weldong upside down , so I'm gonna wait till I have the truck up on a rack to weld bottom side.
Got them about a 1/8" from the pinch weld , decided I'd knotch out the pinch weld for extra clearance if they decide to come up some under weight.
They are out just about flush with fender flares , 26-27* angle . I stared with a 1/2" gap from slider to bottom of door. Well after welding they came up some . More like 3/8" gap now. Hopefully the gussets will do there job and not let the slider come up much more after smashing on them ?
Door gap
One side done. Hopefully the driverside will go faster .
Mar 26, 2014 | 07:27 PM
#231
Registered User
Joined: Jun 2013
Posts: 363
Likes: 0
From: kelowna BC
driveshaft is awesome, ill need to do that too since i'm moving my rear axle closer to the front since i chopped the end of the frame a little shy.
and the sliders. ... .... ... F"""N SICK! really nice work man. im stoked.
edit- birthday sliders... when was ur bday. happy bday.
and the sliders. ... .... ... F"""N SICK! really nice work man. im stoked.
edit- birthday sliders... when was ur bday. happy bday.
Last edited by Yota; Mar 26, 2014 at 08:17 PM.
Mar 26, 2014 | 08:02 PM
#232
Thread Starter
Registered User
Joined: Dec 2011
Posts: 415
Likes: 1
From: 775 Reno Nevada
Thanks man , appreciate the kind words. I wouldn't recommend square drive line for the rear if driven much on the street , seeing you can't get them balanced . Trail rig for sure tho.
 Mar 28, 2014 | 06:42 AM
#235
Registered User
Joined: Jun 2013
Posts: 363
Likes: 0
From: kelowna BC
Mar 31, 2014 | 05:52 PM
#236
Thread Starter
Registered User
Joined: Dec 2011
Posts: 415
Likes: 1
From: 775 Reno Nevada
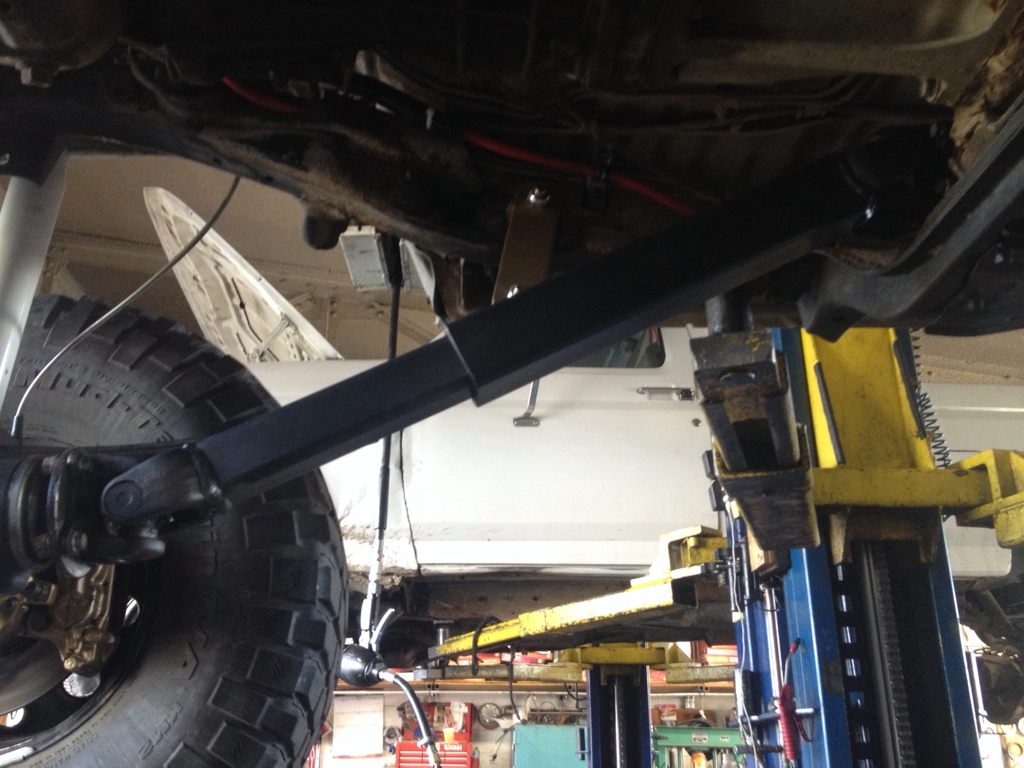
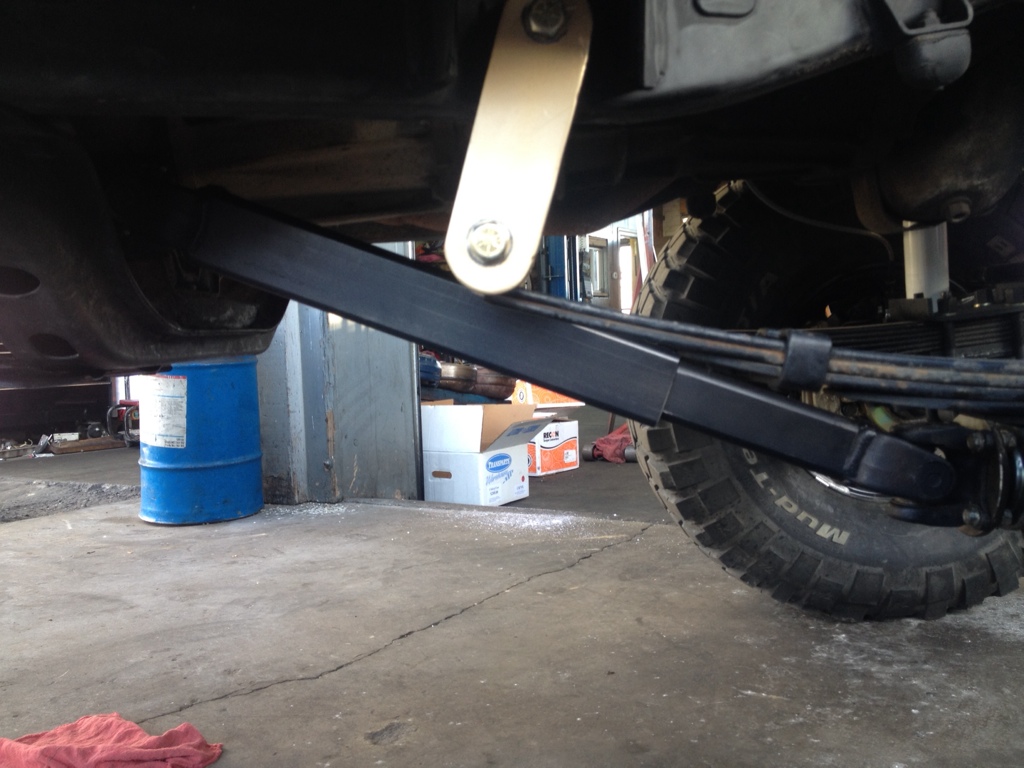
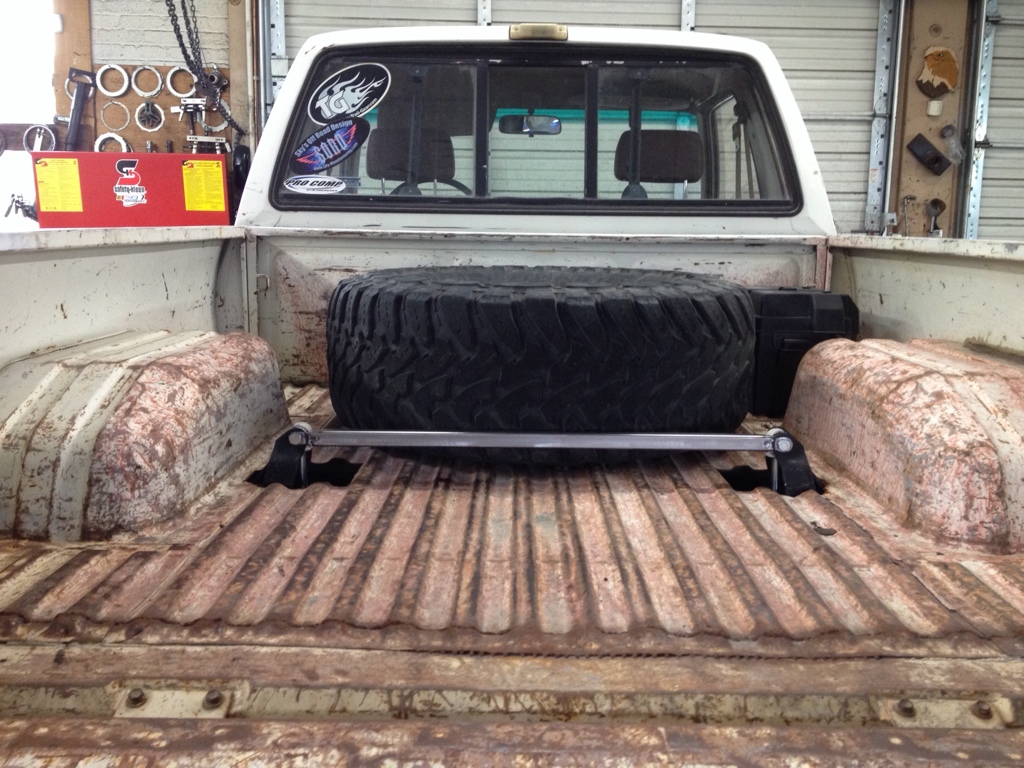
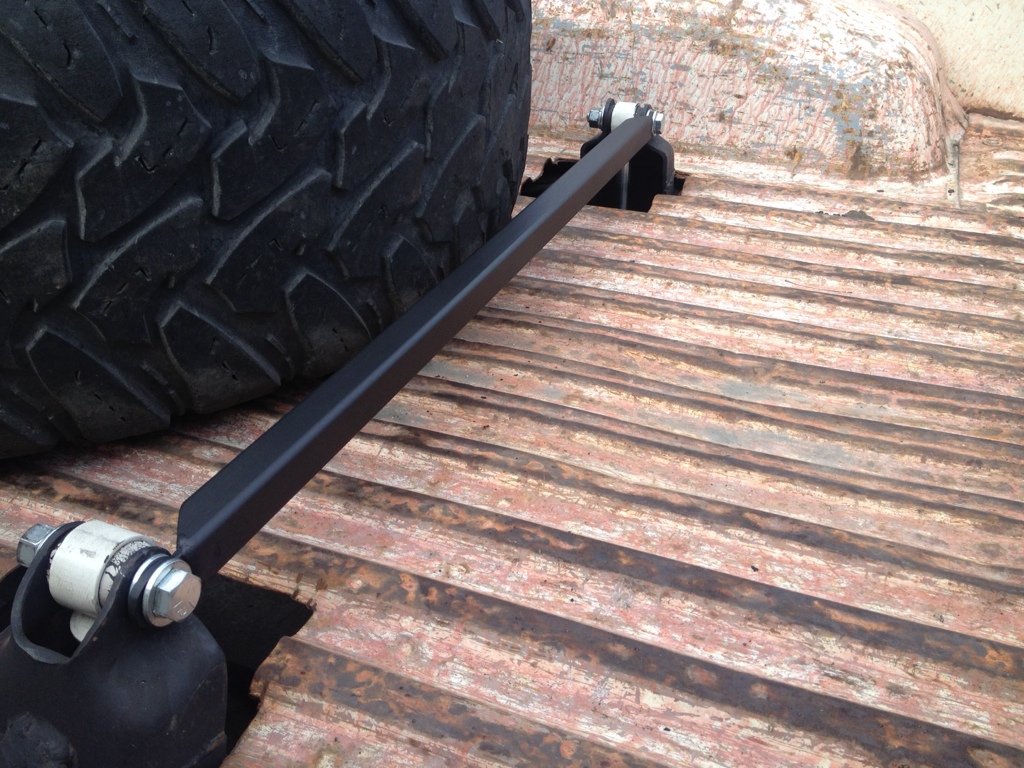
Fairly productive lunch break today. Made a shock tower brace out of some scrap 1" x .95 thick square tube , with 1/8" tabs welded on the ends & drilled out to 1/2" for the shock bolts to run through. Should offer some support to the rear ford towers & also keep my spare tire from sliding around.
Just gotta get a coat of paint on it.
Just gotta get a coat of paint on it.
Last edited by 775Toy; Mar 31, 2014 at 05:53 PM.
Mar 31, 2014 | 09:14 PM
#237
Nice job on the sliders, turned out great! I like the shock tower brace too, good idea! I thought about doing that on my front shock hoops and tying them together through the engine compartment, still kicking the idea around in my head, lol.
Apr 1, 2014 | 07:19 PM
#239
Thread Starter
Registered User
Joined: Dec 2011
Posts: 415
Likes: 1
From: 775 Reno Nevada
^ Thanks rusted & boom
Few small tasks done today . Welded a large crack inside my bed behind the wheel well that would squeak like crazy at idle. Adjusted my tailgate to get the latch to work.
Picked up a few parts -
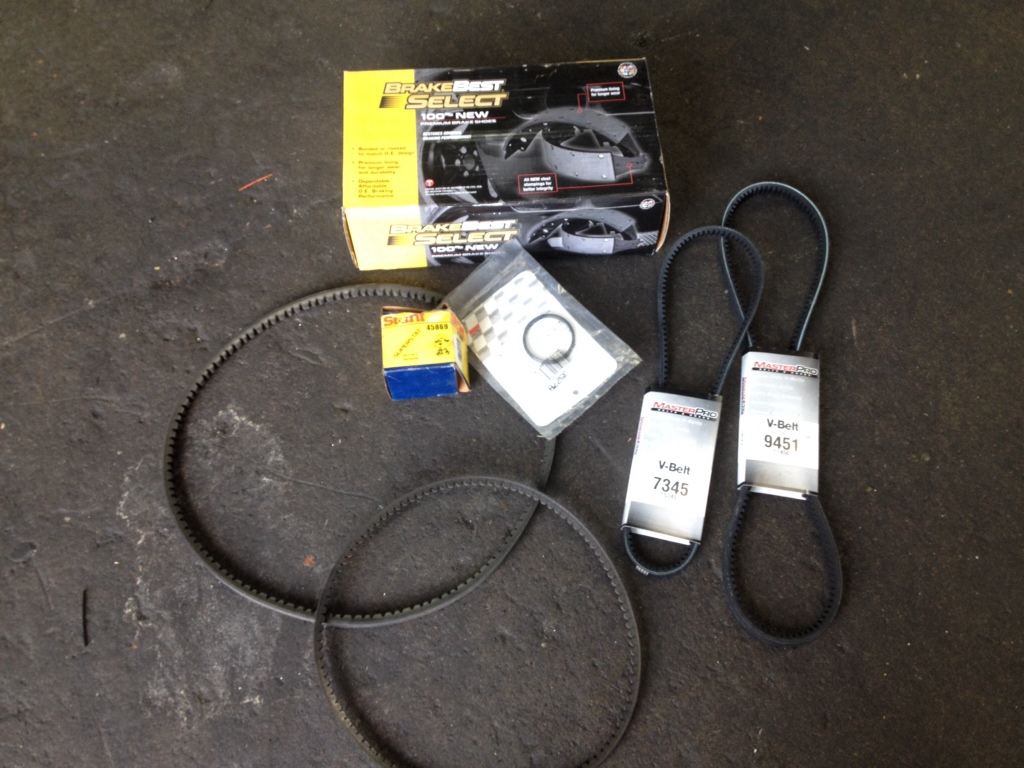
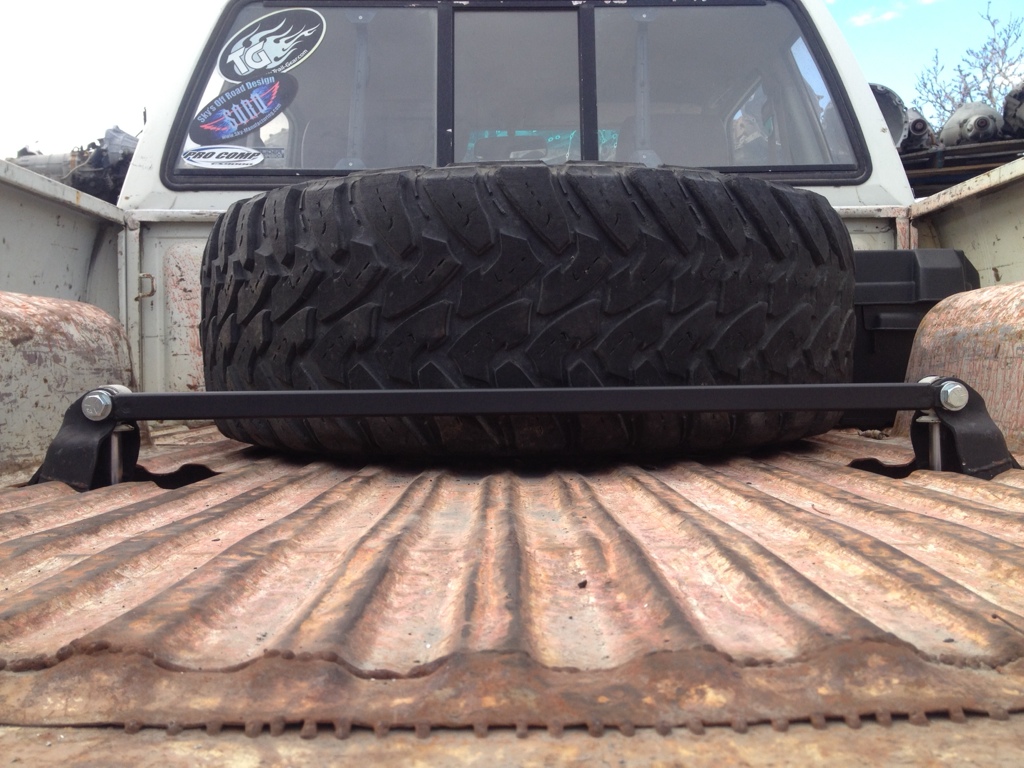
Replaced my old crusty belts & thermostat. Also adjusted my steering stops , they were way out of adjustment since I added wheel spacers. Painted my rear shock tower brace , but would like to get longer bolts before I install it for good. Going to tear the rear brakes apart tomorrow so I can get the drums re-surfaced before new shoes go in.
Few small tasks done today . Welded a large crack inside my bed behind the wheel well that would squeak like crazy at idle. Adjusted my tailgate to get the latch to work.
Picked up a few parts -
Replaced my old crusty belts & thermostat. Also adjusted my steering stops , they were way out of adjustment since I added wheel spacers. Painted my rear shock tower brace , but would like to get longer bolts before I install it for good. Going to tear the rear brakes apart tomorrow so I can get the drums re-surfaced before new shoes go in.
Last edited by 775Toy; Apr 1, 2014 at 07:20 PM.
Apr 3, 2014 | 06:36 PM
#240
Thread Starter
Registered User
Joined: Dec 2011
Posts: 415
Likes: 1
From: 775 Reno Nevada
Got some 3" shock bolts to mount the freshly painted shock tower brace.
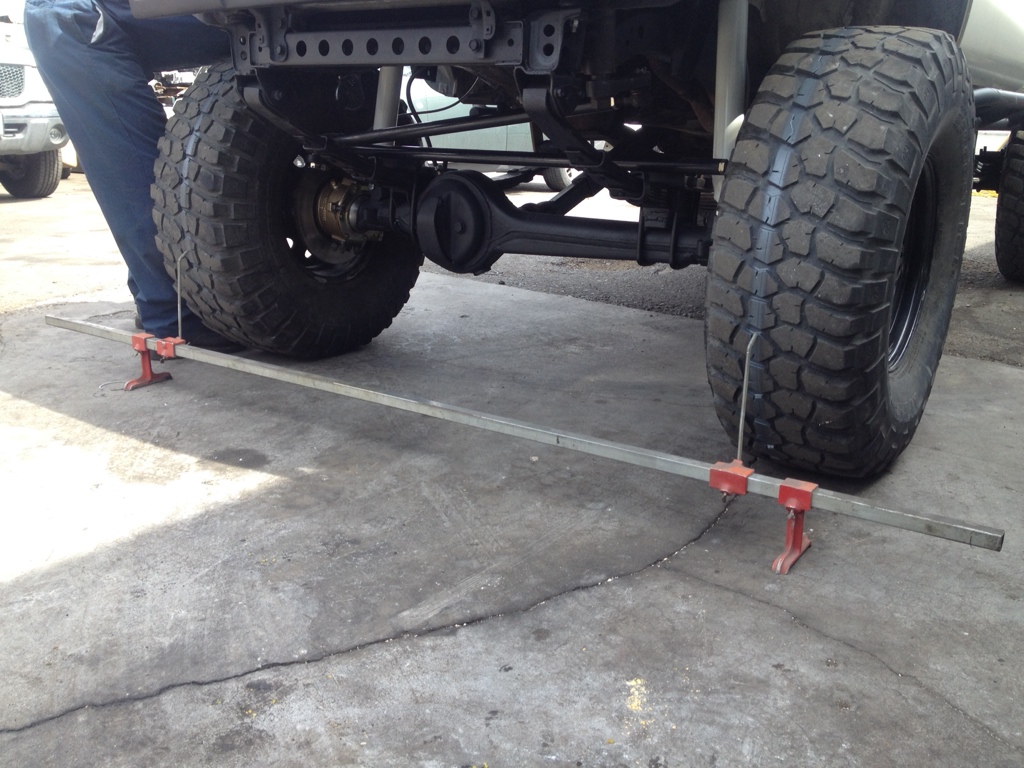
Had a buddy bring his toe in alignment bar over to help with the alignment.
Mark the tires with spray paint . Jack up the tires and spin to apply paint.

Use a fancy tool to scribe a mark in the paint while tire is spinning.
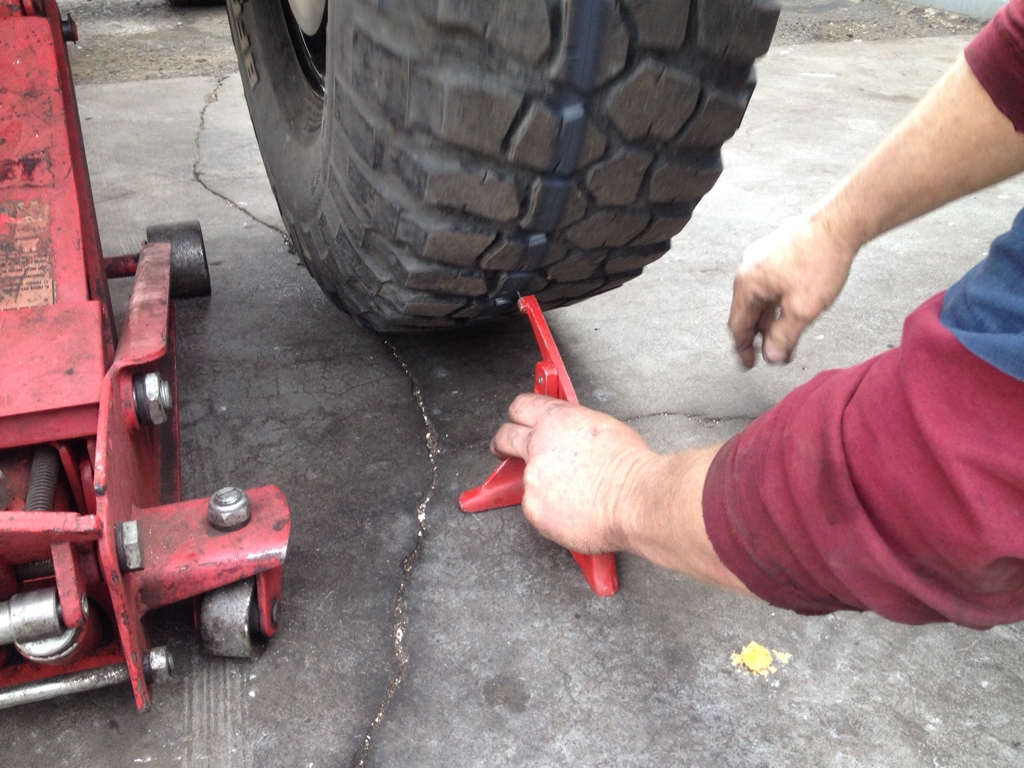
Set the toe in bar to the lines and make adjustments as needed. We got it aligned to 1/8" tow in.
Had a buddy bring his toe in alignment bar over to help with the alignment.
Mark the tires with spray paint . Jack up the tires and spin to apply paint.
Use a fancy tool to scribe a mark in the paint while tire is spinning.
Set the toe in bar to the lines and make adjustments as needed. We got it aligned to 1/8" tow in.
Last edited by 775Toy; Apr 3, 2014 at 06:38 PM.


