
83Toyota88's 1983 Pickup Build-Up Thread
 Apr 13, 2013 | 12:10 PM
#321
Registered User
Joined: Jan 2012
Posts: 325
Likes: 2
From: Kansas City, Missouri
Duh, I feel dumb
My diesel truck (2WD) has no bed, was converted to flatbed, which I removed. I can see the carrier bearing right beneath the back of the cab (easy access!).
So I assumed the 4x4 MUST have one.
Uh, no. The transfer case takes up the room where the short shaft lives in the diesel, so apparently, it was not necessary to put a split drive shaft in the 4X4 models.
I think your truck always had no carrier bearing, like mine. Gee.
I had a couple of extra cab toyotas, One was 4x4, one was 2WD. BOTH of them had the carrier bearing. I could have looked under mine. Sorry about that.
Last edited by 83pingpong; Apr 13, 2013 at 12:14 PM.
Apr 20, 2013 | 09:07 PM
#322
Thread Starter
Registered User
iTrader: (1)
Joined: Apr 2011
Posts: 1,220
Likes: 4
From: Memphis, TN
Worked on the truck a little lately. I bought another SR5 gauge cluster off ebay and installed it. The previous one I had bought had a tach that was screwy. First time I put it in I't didn't work so I pulled it, looked at it, replaced a diode on the board, re-installed and it worked. Later I noticed it still worked but was very slow to respond to rpm change. It would eventually catch up to whatever I was running at. So the new works fine and IT CAME WITH THE WIRE HARNESS AND PLUGS WITH IT! I was super excited about that. Now I have extra connectors and little metal wire inserts if I ever add the SR5 oil and volt meter pod. Hoping to find one on ebay that not over $100 one day lol.
I also fixed my track bar (believe that's what it is called) on the front. Apparently one of the little washers things to hold the bushings tight had its hole stripped out so the front left side became loose. I replaced the washer and tightened it back up. Seems to handle better on bumps now.
Also fixed a problem with my hood latch. It was missing a spring so the handle would never pull back in after popping popping the hood. Always had to push it back in. Made it a pain to latch the hood properly. But one throttle spring later and its fixed.
As soon as I get done working on my brother 79 F-350 (new valve covers and gasket, oil pan gasket, new rebuilt carb, new vacuum lines) and get it out of my garage, I plan to pull my headliner and try and mount my console thing and my GM mirror with compass and navigation. Then eventually I will get to swapping the other bed I have onto it and do the body work and fix the floor pans.
Apr 21, 2013 | 12:07 PM
#323
Registered User
Joined: Jan 2012
Posts: 325
Likes: 2
From: Kansas City, Missouri
I have slowly accumulated a bunch of spare parts. It is great to have a known working spare to swap out on those RARE occasions when something breaks. Our inspections here include an odometer reading, so I can't swap out the speedometer without a "ID/OD" document made by State police. I just hope my gauges keep working!
Apr 21, 2013 | 01:47 PM
#324
Thread Starter
Registered User
iTrader: (1)
Joined: Apr 2011
Posts: 1,220
Likes: 4
From: Memphis, TN
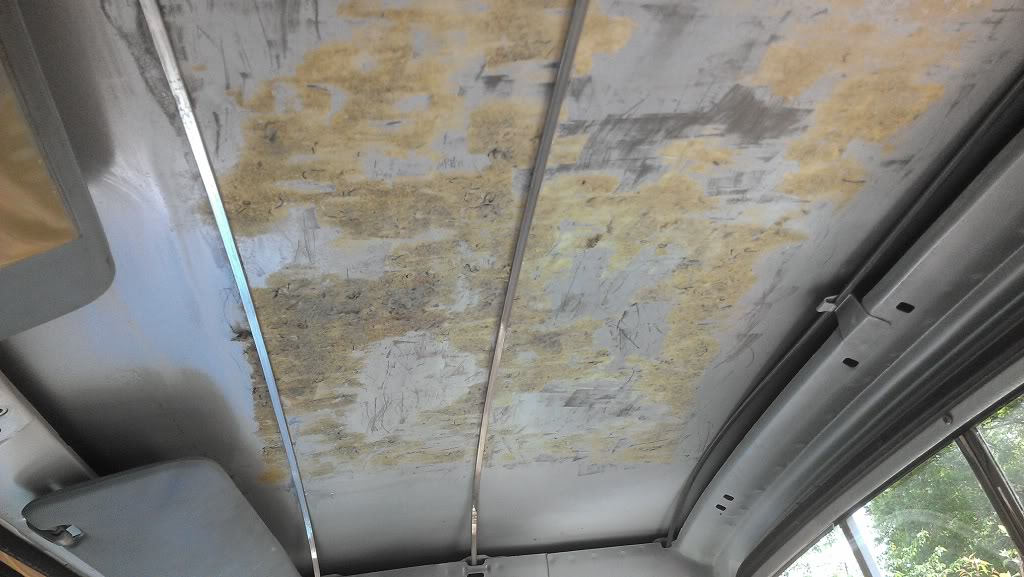
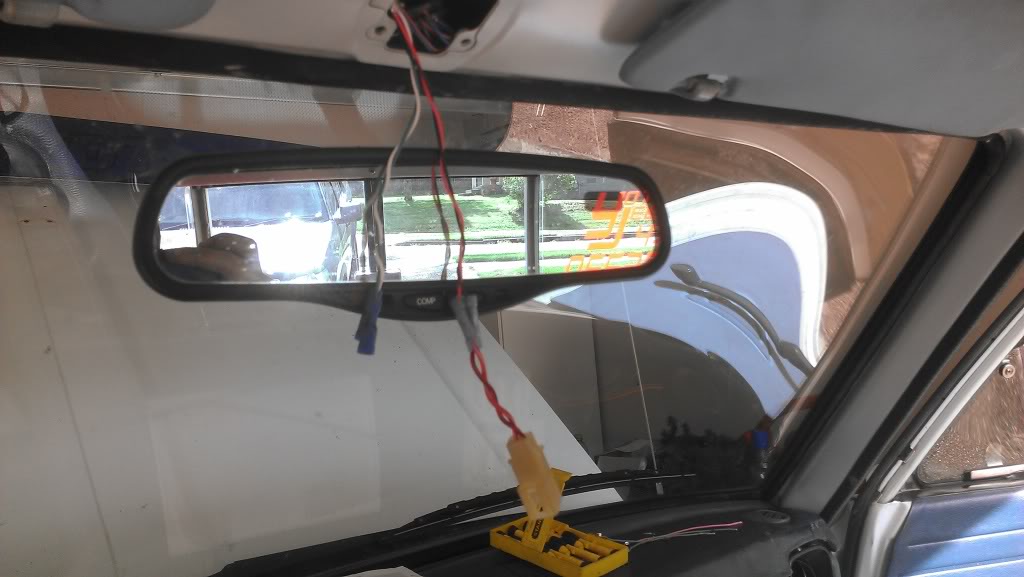
Ok I did sort of a not permanent (might turn out permanent) install of the over head console. Did the GM mirror also, well most of it. I removed my old head liner and found three braces that kept the old liner from sagging. Right now I have two cable ties around them to hold it on. I did this at my parents house so I didn't have all my tools. I plan to fab a way to put a screw in the front section where it screwed into the chevy roof. May just stick with the cable ties on the middle and back. Not sure yet. Anyways here are the pics:
Liner removed and scraped off a lot of the glue. Tried using goop remover but didn't work at all so I got a razor blade and scraped it smooth. I think I might get some dark blue carpet and put on the roof to cover it back up. It will hide the gap between the console and roof. Not in a hurry to do that though:
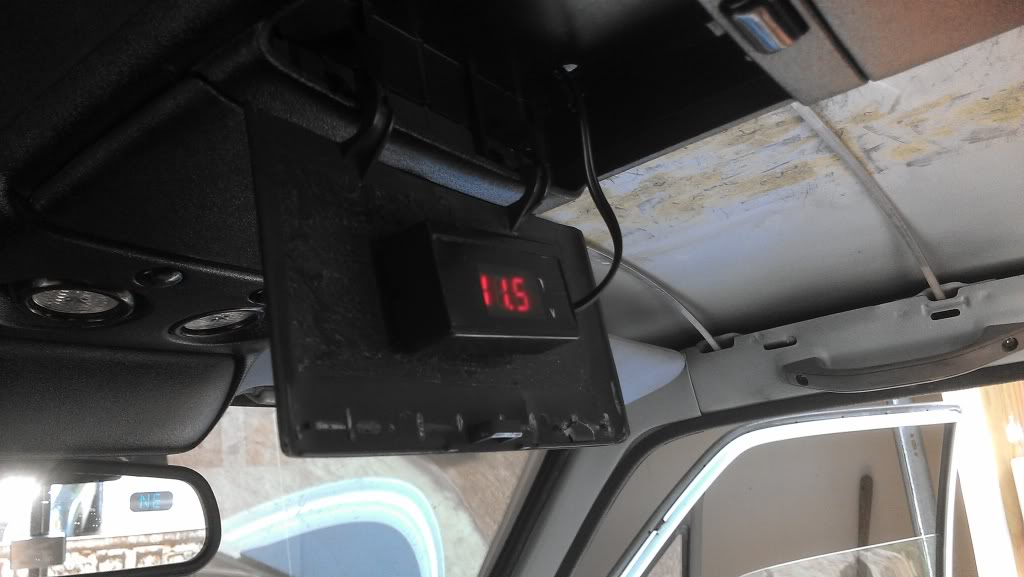
Here is a couple shots of the mirror. The wiring hanging down is the power for the mirror, map lights, and my voltage indicator. The red and black is power and the white and green is the temperature sensor. I re-used the quick connect from the old mirror and bought bullet connectors to do the temp sensor with. Makes for easy removal later.

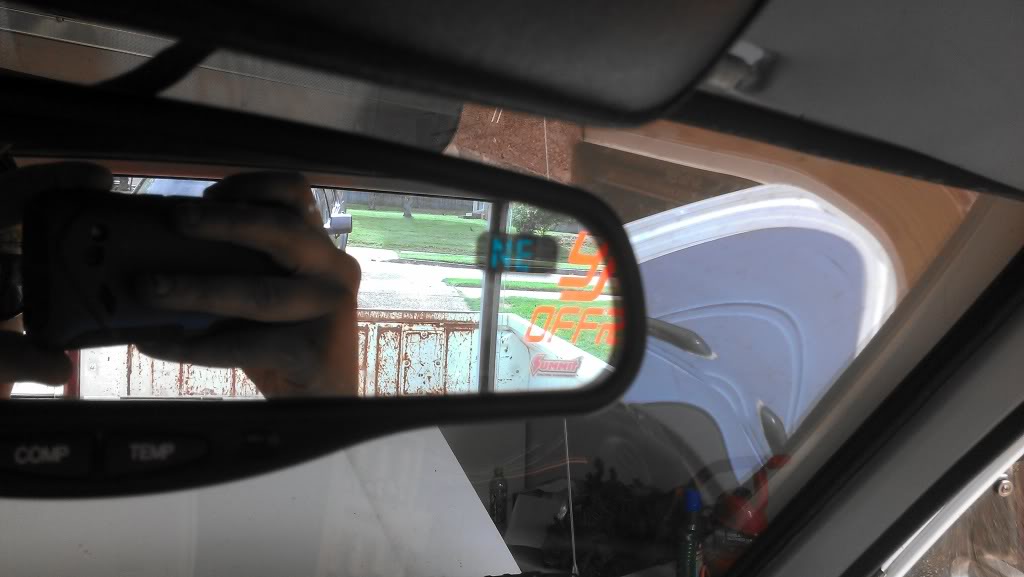
You can see the compass function on this shot:
I forgot to bring the temp sensor with me but I have the wire for it ran behind the grill so it's all ready to go. I love having the slightly bigger mirror. Can see a lot more now.
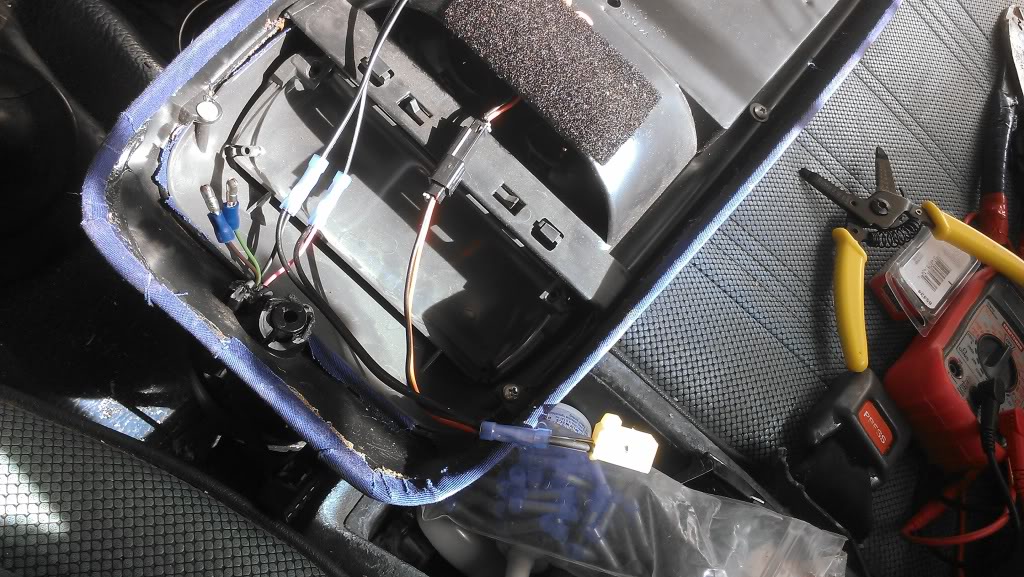
Here is the wiring for the mirror and console. The map lights are not working. I think I messed up when I put them back in after I painted the console. Troubleshoot that later.
Here it is temporarily/ maybe permanently mounted:
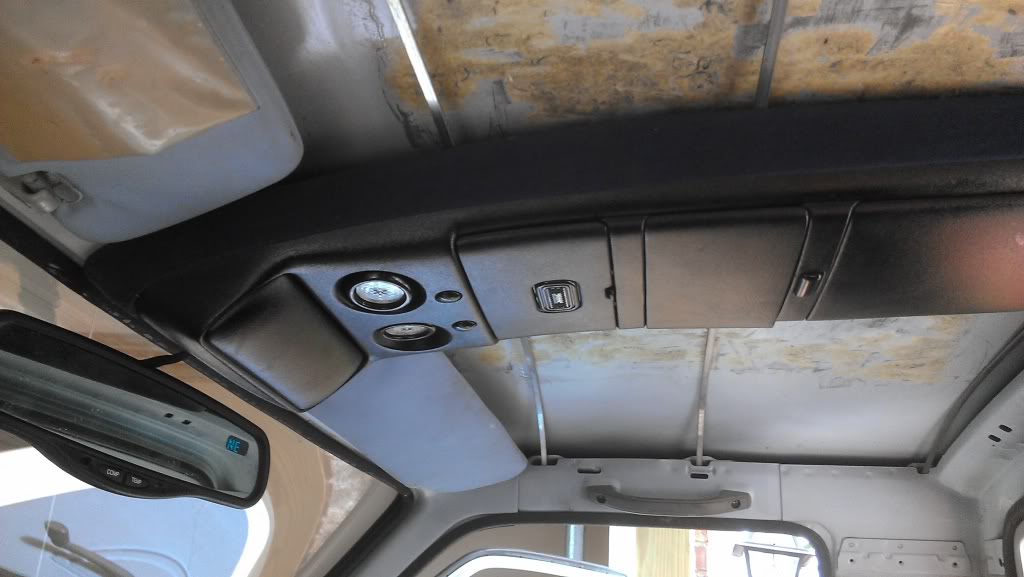
So far I like it. I am putting a switch for my off road lights on the part of the console between the mirror and map lights. Left that at home too. The first pull down thing is obviously for a garage door opener, the middle contains my voltage monitor (so I can make sure my GM alternator is working since my charge light is not functional after the instal of the alt). The last one is suppose to hold CD's but you can put whatever in it.
It will be a lot better after carpet.
Liner removed and scraped off a lot of the glue. Tried using goop remover but didn't work at all so I got a razor blade and scraped it smooth. I think I might get some dark blue carpet and put on the roof to cover it back up. It will hide the gap between the console and roof. Not in a hurry to do that though:
Here is a couple shots of the mirror. The wiring hanging down is the power for the mirror, map lights, and my voltage indicator. The red and black is power and the white and green is the temperature sensor. I re-used the quick connect from the old mirror and bought bullet connectors to do the temp sensor with. Makes for easy removal later.
You can see the compass function on this shot:
I forgot to bring the temp sensor with me
but I have the wire for it ran behind the grill so it's all ready to go. I love having the slightly bigger mirror. Can see a lot more now. Here is the wiring for the mirror and console. The map lights are not working. I think I messed up when I put them back in after I painted the console. Troubleshoot that later.
Here it is temporarily/ maybe permanently mounted:
So far I like it. I am putting a switch for my off road lights on the part of the console between the mirror and map lights. Left that at home too. The first pull down thing is obviously for a garage door opener, the middle contains my voltage monitor (so I can make sure my GM alternator is working since my charge light is not functional after the instal of the alt). The last one is suppose to hold CD's but you can put whatever in it.
It will be a lot better after carpet.
 Apr 22, 2013 | 07:26 AM
#330
dang gone thieves stealing my valve cover ideas! LOL I'm actually thinking about redoing it with my powdercoating kit.
The overhead console looks good and appears to fit well! I was thinking about doing something similar but fabricating it out of steal and welding it in. I'm only looking for a couple of small pockets to stash things like a cell phones, wallets, etc, but this idea looks a bit easier and better.
The overhead console looks good and appears to fit well! I was thinking about doing something similar but fabricating it out of steal and welding it in. I'm only looking for a couple of small pockets to stash things like a cell phones, wallets, etc, but this idea looks a bit easier and better.
Apr 24, 2013 | 06:15 AM
#331
Registered User
Joined: Mar 2009
Posts: 63
Likes: 0
From: Houston
Ordered Me a voltage reader to do the mod on last page of this thread:
https://www.yotatech.com/forums/f123...1/index35.html
Here is the part:
http://www.amazon.com/BestDealUSA-El...T4/ref=lh_ni_t
Also found this one:
http://www.amazon.com/gp/product/B00...&pf_rd_i=typ01
This will help me keep track of my system since my charge light isn't functional due to the GM alt install. FTW!
EXCELLENT idea! Due to my relative ignorance of electrical wiring and desire for simplicity I think I'm going to go GM alternator mod as well...figuring out how to get the stock voltmenter/dash light to work was a huge concern...if i don't go with the generic guage set this is on the list of todo's!
Apr 26, 2013 | 08:13 AM
#332
Thread Starter
Registered User
iTrader: (1)
Joined: Apr 2011
Posts: 1,220
Likes: 4
From: Memphis, TN
Might have to do some carb work soon. My engine has this little sputter/fart sound every 5 seconds or so. I borrowed a timing light and pinched off the vacuum lines to the advance and adjusted it a little to 5*. Also reset the fuel/air to the factory setting of four turns out and the idle to ~900. After the the advance is hooked back up it times to 10* and the idles drops and sputters bad. I can bring the idle back up and the sputter is not near as bad but still has the sputter every now and then. But if I take the advance off it stops the sputtering completely. I sucked on each side of the advance and it held vacuum so I think the advance is still good. The other part is I have thrush glass pack welded on it and I don't have the rest of the exhaust ran out the back yet. Is that messing up any back pressure or anything? I already have a new dizzy cap, rotor, and plug wires coming. Probably gonna get a fuel filter too, its been almost two years since it got changed.
Any other ideas? Only thing else I know to do is new plugs, check sight glass son the carb.
On a random note I believe my gas mileage on my 33's is around 9.6 mpg. I used a quarter tank last nite (assuming the tank is 16 gallons as this thread says https://www.yotatech.com/forums/f114...e-pics-251530/ )and I drove 51 miles which comes out 9.6 mpg. That sucks.
Apr 26, 2013 | 08:21 AM
#333
Thread Starter
Registered User
iTrader: (1)
Joined: Apr 2011
Posts: 1,220
Likes: 4
From: Memphis, TN
I found this thread that has some good things to check:
http://www.4x4wire.com/forums/showfl...=459622&page=0
http://www.4x4wire.com/forums/showfl...=459622&page=0
Apr 26, 2013 | 09:22 PM
#334
My truck had even worse fuel economy with 33s and a stock carb. When I got the carb well tuned, I got back up to 16MPG. Went to a Weber and I was pushing 19-20 MPG with 33s and 23-24 MPG with 31s. Like I said in those PMs, get the timing close and the try to figure out that carb. It's a real PITA to get dialed in. Ever thought about a Weber or do you have emissions in your state?
Apr 27, 2013 | 04:07 AM
#335
Thread Starter
Registered User
iTrader: (1)
Joined: Apr 2011
Posts: 1,220
Likes: 4
From: Memphis, TN
My truck had even worse fuel economy with 33s and a stock carb. When I got the carb well tuned, I got back up to 16MPG. Went to a Weber and I was pushing 19-20 MPG with 33s and 23-24 MPG with 31s. Like I said in those PMs, get the timing close and the try to figure out that carb. It's a real PITA to get dialed in. Ever thought about a Weber or do you have emissions in your state?
Last edited by 83Toyota88; Apr 27, 2013 at 04:09 AM.
Apr 27, 2013 | 09:40 AM
#336
A pregnant wife is no excuse... My wife was 7 months along when I bought my truck! LOL but I s'pose that you do have the edge with two in the oven, especially if they are girls since you'll have to save your money to buy some guns!
Apr 27, 2013 | 12:31 PM
#337
Thread Starter
Registered User
iTrader: (1)
Joined: Apr 2011
Posts: 1,220
Likes: 4
From: Memphis, TN
So far today I put on a new distributor cap, rotor, spark plugs, and plug wires. Seems to run better now. Didn't here the sputtering like I had been. Checked timing again and its still good. Checked to see if the auxiliary accelerator pump was leaking in the vacuum line and it wasn't. Ripped out my seat and flooring last night to survey the rust damage. It's pretty bad. Need to really clean everything up next.
Apr 28, 2013 | 05:45 AM
#339
Thread Starter
Registered User
iTrader: (1)
Joined: Apr 2011
Posts: 1,220
Likes: 4
From: Memphis, TN
Ok here is some pictures.
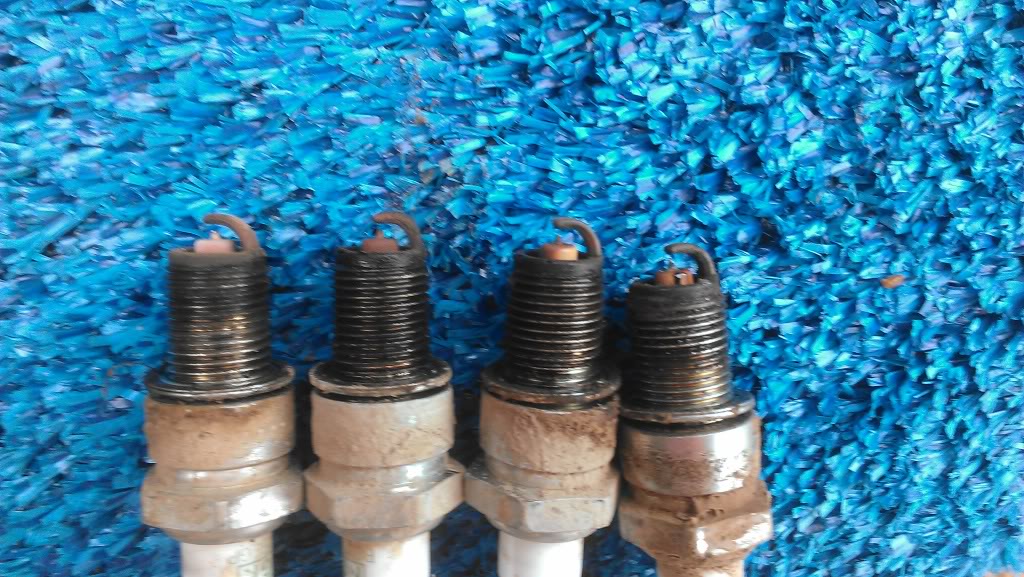
This is the spark plugs I took out yeterday. In order from each cylinder. Maybe some of the engine guru's can tell me if they look good or bad. I replaced them with NGK platinum plugs. There is a lot of people say they are best for our trucks so I got them for $3 each.
Here is a shot of the driver's side floor pan. It's terrible:
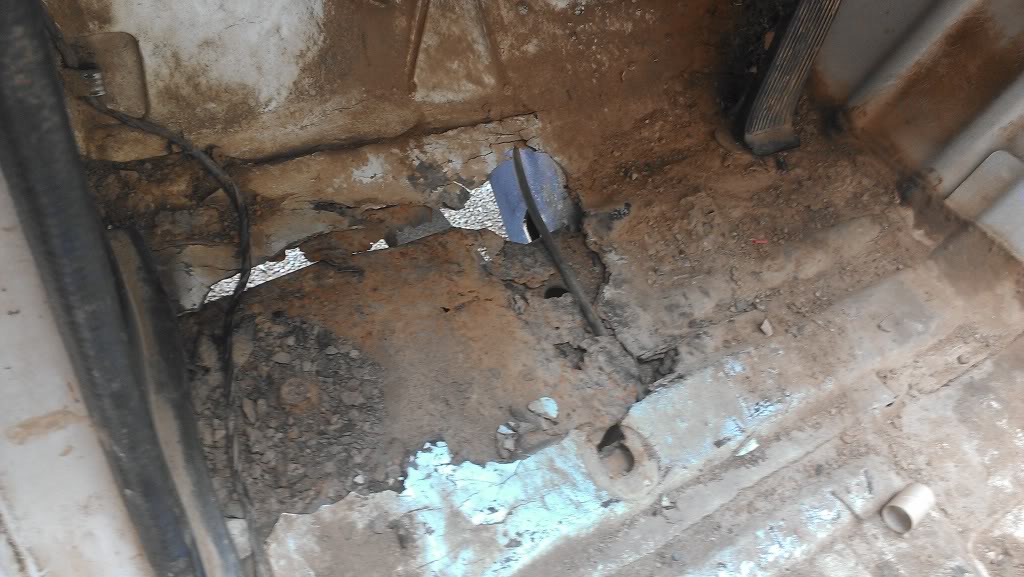
Passenger side is just as bad:
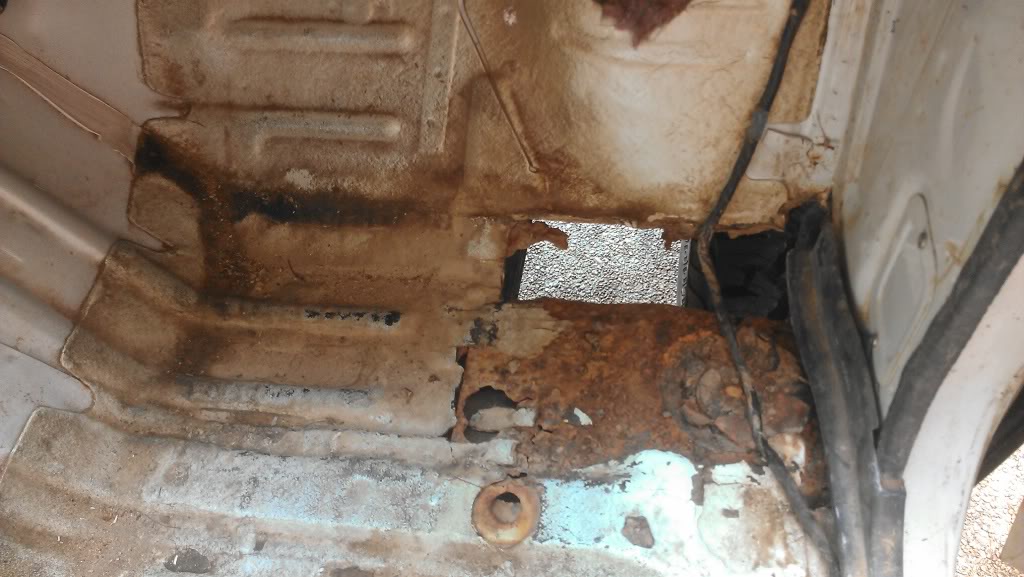
Also got this in the back left corner of the cab:
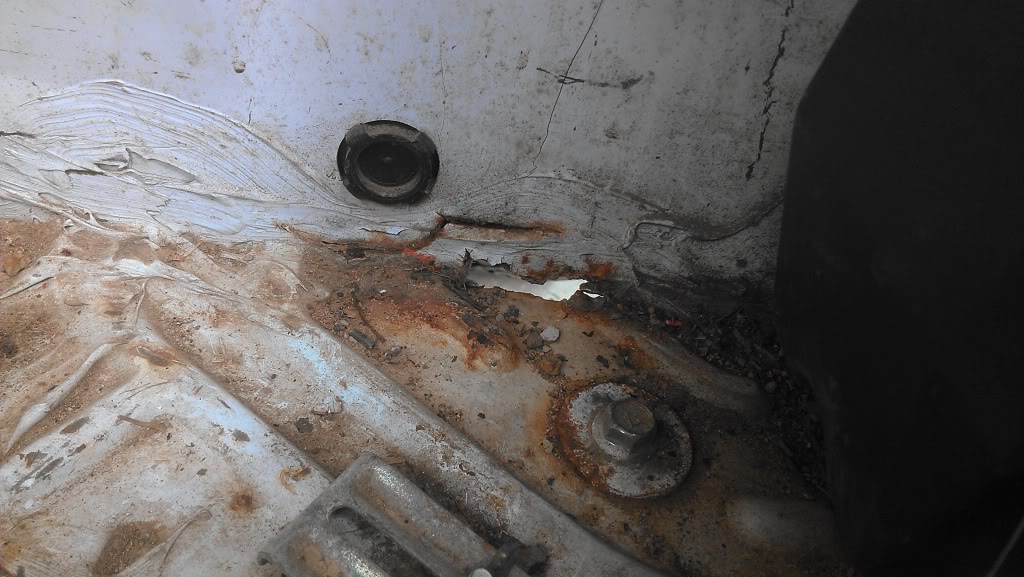
My truck came from the smokey mountains where they use a lot of salt on the road and it certainly did its number on my truck.
Also took off my front bumper this morning. I plan to put a factory bumper on it soon. I like the factory look way better. Eventually I will get one of those hitch mount systems for my winch.
I didn't notice till last night that my turn signals had been relocated to the valance. I assumed it was factory there till I was looking and pictures of other trucks.
Also stuck one of my chevy seats in the truck. It sits 5" taller than the stock bench which only leaves me with 2" of clearance with my head to the roof (I'm 5' 10"). Feels like your sitting in a big rig lol. Gonna have to lower them somehow. Seats are really comfy though.


The bracket on the seat is actually a really good fit. I was surprised.
This is the spark plugs I took out yeterday. In order from each cylinder. Maybe some of the engine guru's can tell me if they look good or bad. I replaced them with NGK platinum plugs. There is a lot of people say they are best for our trucks so I got them for $3 each.
Here is a shot of the driver's side floor pan. It's terrible:
Passenger side is just as bad:
Also got this in the back left corner of the cab:
My truck came from the smokey mountains where they use a lot of salt on the road and it certainly did its number on my truck.
Also took off my front bumper this morning. I plan to put a factory bumper on it soon. I like the factory look way better. Eventually I will get one of those hitch mount systems for my winch.
I didn't notice till last night that my turn signals had been relocated to the valance. I assumed it was factory there till I was looking and pictures of other trucks.
Also stuck one of my chevy seats in the truck. It sits 5" taller than the stock bench which only leaves me with 2" of clearance with my head to the roof (I'm 5' 10"). Feels like your sitting in a big rig lol. Gonna have to lower them somehow. Seats are really comfy though.
The bracket on the seat is actually a really good fit. I was surprised.
Apr 28, 2013 | 06:13 AM
#340
Registered User
Joined: Jul 2012
Posts: 222
Likes: 0
From: Kansas
Yeah that rust is why I don't ever want to buy a 1st gen again. The 4runner I bought is a bit rusty but there was only 1 bad corner and a few holes in the middle of the floor. None of this front corner of the cab needs completely rebuild including the cab mount and rockers nonsense.


