
83Toyota88's 1983 Pickup Build-Up Thread
 Jul 29, 2013 | 12:31 PM
#361
Thread Starter
Registered User
iTrader: (1)
Joined: Apr 2011
Posts: 1,220
Likes: 4
From: Memphis, TN
I have raked my memory to try to remember what my original center console looked like, and there it is. Lol.
When I had my seats redone in the 80s, I took that out, made the seats a little smaller and put in a wider console with drink holders.
Cool to see that original console again. Used to keep my junk in there.
When I had my seats redone in the 80s, I took that out, made the seats a little smaller and put in a wider console with drink holders.
Cool to see that original console again. Used to keep my junk in there.
Jul 29, 2013 | 02:15 PM
#363
Thread Starter
Registered User
iTrader: (1)
Joined: Apr 2011
Posts: 1,220
Likes: 4
From: Memphis, TN
I thought I put up a picture of them a while ago. I have two passenger side front seats from 96-98 GM vehicles. Comfy seats but the brackets are way to tall. Using the stock bracket my head is about an inch from the roof and my head would hit the roof on every bump. Makes you feel like you driving a big rig lol.
Aug 4, 2013 | 06:08 AM
#364
Thread Starter
Registered User
iTrader: (1)
Joined: Apr 2011
Posts: 1,220
Likes: 4
From: Memphis, TN
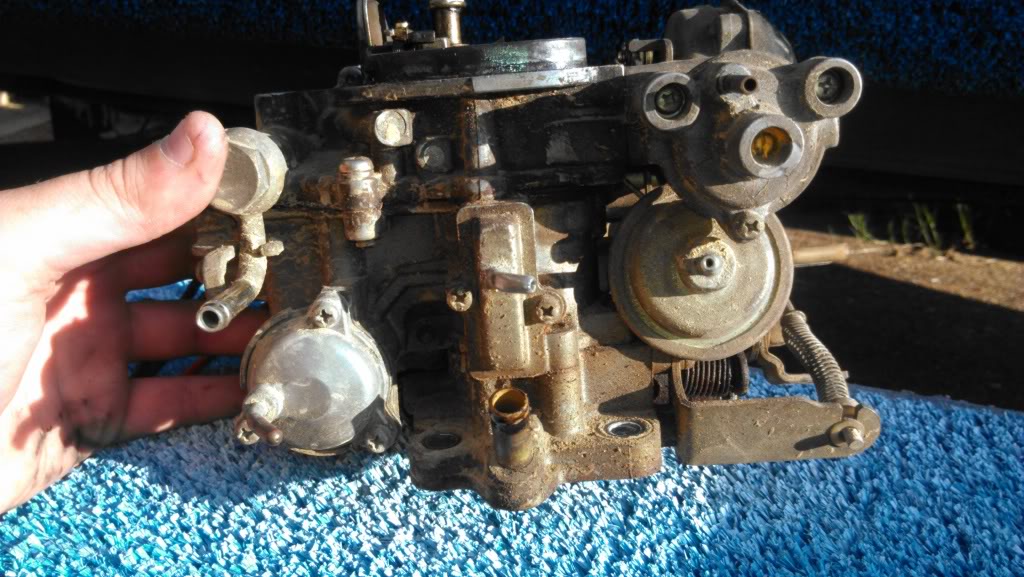
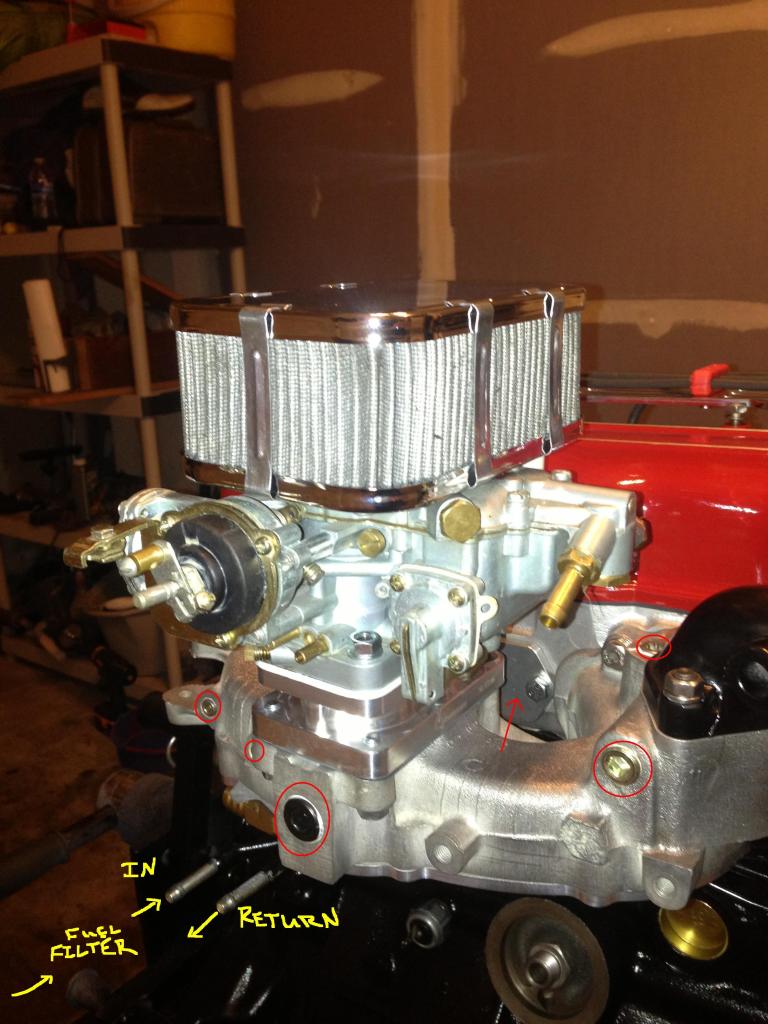
I rebuilt my carb this week/weekend! It was actually a lot of fun, except for when I couldn't get it to run.
Thursday - tore it all apart and took a crap load of pictures on how everything was. Soaked it in a 50/50 mix of simple green. Did a pretty good job, most of the dirt/oil mix on the outside of carb came off.
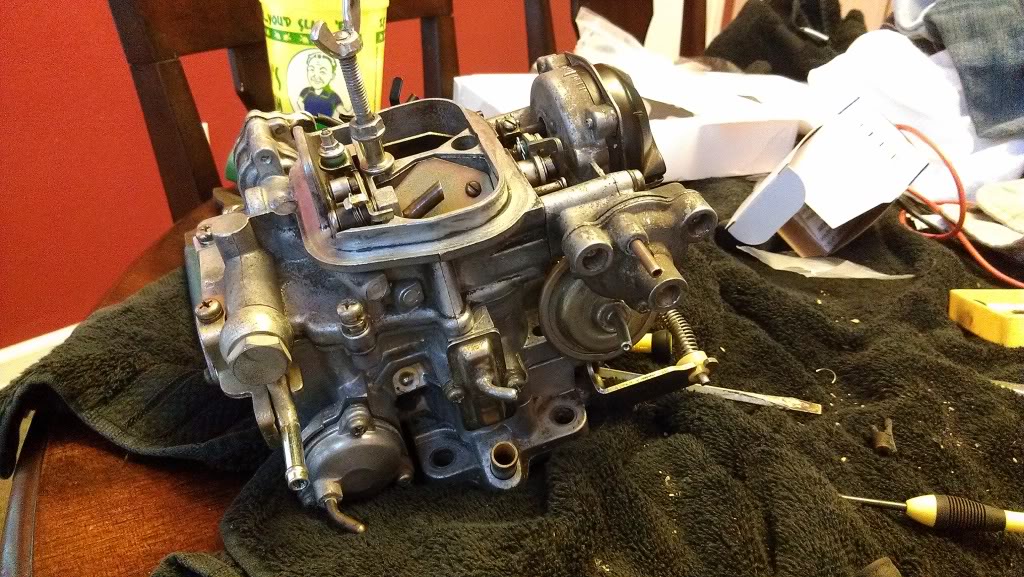
Friday - assembled it back together.
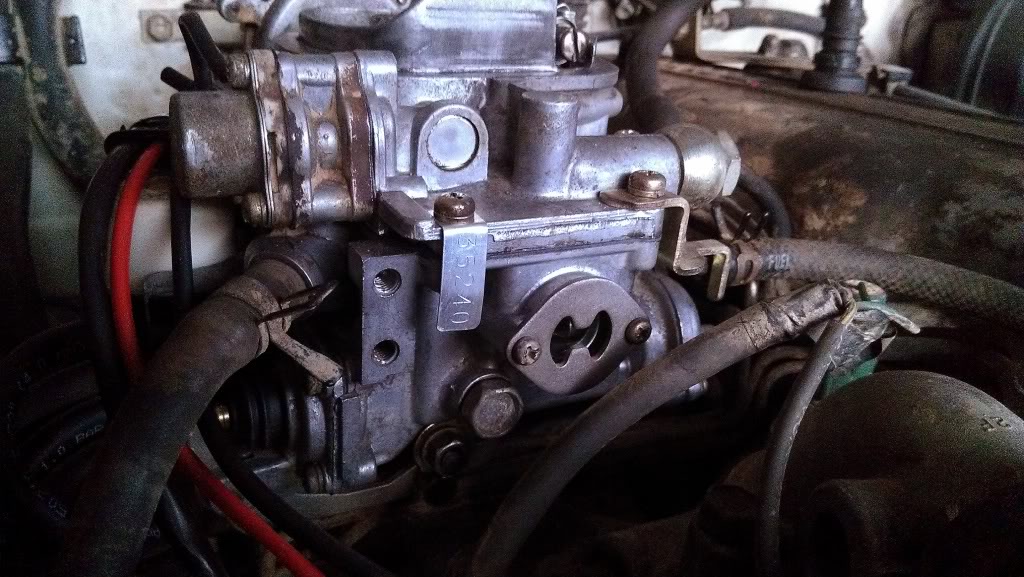
Saturday - installed it in the morning and tried to run it later that evening. Started up but ran like crap. I figured out 2 out of 3 of my mistakes that night. First was I had the metering needle to where the spring on it kept it up and I had to change to down. Second mistake was when I put the new needle valve in the bowl, I didn't put the little spring in the inside of it. Did all that and the truck would run crappy and wouldn't idle under 1Krpm. I then noticed the fuel level filled up past the sight glass. Took the top section of the carb off several time and tried adjusting the float according to the FSM. Ended up to where the truck wouldn't even start anymore. Worked on this till about 12 am.
Sunday - I got up early this morning (thought about it all night) and figured out that the bowl wasn't even getting fuel and I took the fuel hose off from the carb and stuck a piece of spare hose on the fuel inlet of the carb and tried to blow air into it and I couldn't. That meant the float was still setup wrong. So pulled the float back off and bent the tabs on it match what the old float was. Put it back together and the damn thing started right up. Fuel level sits a little below halfway in the glass and I am ok with that. I believe from what I have read that is better for steep angles in helping to keep the carb from flooding.
I did go into adjusting the mixture idle screw a little. Ended up turning it about 1/2 to 3/4 of a turn and then turning the regular idle screw back down. Truck sound a lot better and exhaust smells leaner too. Before it was extremely strong and would almost choke you if you walked behind the truck. Now it just smells like regular exhaust without burning eyes instantly lol.
I tried to adjust the timing by ear a little and then drove it for about 10 minutes and it did really well. I'm trying to see if one of my friends has a timing light I can borrow.
Anyways here is a few pics:
This is the carb before:
Here it is cleaned and re-assembled:
Re-installed back on the truck:
A shot of the float level:

I used the rebuild kit from LCE for $68 (it has spare parts that are used for other Aisin carbs btw) and I purchased a new float from Autozone for $32 and about 8 foot of new vacuum hose for around $9. The only thing I didn't use out of the kit was the new diaphragm and needle assembly in the choke thing that controls the butterfly valve on the drivers side. I know it worked before the rebuild and the only way to get to it is to take the cover off the electric choke coil and pull a pin loose so the diaphragm and needle assembly can slide out the side. However my cover on the electric choke coil is pop riveted on and I didn't want to mess with that. I did test all the other solenoids with my multi-meter per the FSM readings.
In all it was a really fun and great learning experience. The inside of the carb is not very complicated except for the float and you can actually soak the carb in three different pieces without having to take all the linkage apart and worry about getting it back together properly. I will be driving it to church today to see how it handles on the hills and will be watching how much my gas tank needle moves. I expect to be getting more than ~9 mpg now but I'm not gonna worry about testing that till after the timing is checked.
Thursday - tore it all apart and took a crap load of pictures on how everything was. Soaked it in a 50/50 mix of simple green. Did a pretty good job, most of the dirt/oil mix on the outside of carb came off.
Friday - assembled it back together.
Saturday - installed it in the morning and tried to run it later that evening. Started up but ran like crap. I figured out 2 out of 3 of my mistakes that night. First was I had the metering needle to where the spring on it kept it up and I had to change to down. Second mistake was when I put the new needle valve in the bowl, I didn't put the little spring in the inside of it. Did all that and the truck would run crappy and wouldn't idle under 1Krpm. I then noticed the fuel level filled up past the sight glass. Took the top section of the carb off several time and tried adjusting the float according to the FSM. Ended up to where the truck wouldn't even start anymore. Worked on this till about 12 am.
Sunday - I got up early this morning (thought about it all night) and figured out that the bowl wasn't even getting fuel and I took the fuel hose off from the carb and stuck a piece of spare hose on the fuel inlet of the carb and tried to blow air into it and I couldn't. That meant the float was still setup wrong. So pulled the float back off and bent the tabs on it match what the old float was. Put it back together and the damn thing started right up. Fuel level sits a little below halfway in the glass and I am ok with that. I believe from what I have read that is better for steep angles in helping to keep the carb from flooding.
I did go into adjusting the mixture idle screw a little. Ended up turning it about 1/2 to 3/4 of a turn and then turning the regular idle screw back down. Truck sound a lot better and exhaust smells leaner too. Before it was extremely strong and would almost choke you if you walked behind the truck. Now it just smells like regular exhaust without burning eyes instantly lol.
I tried to adjust the timing by ear a little and then drove it for about 10 minutes and it did really well. I'm trying to see if one of my friends has a timing light I can borrow.
Anyways here is a few pics:
This is the carb before:

Here it is cleaned and re-assembled:

Re-installed back on the truck:

A shot of the float level:

I used the rebuild kit from LCE for $68 (it has spare parts that are used for other Aisin carbs btw) and I purchased a new float from Autozone for $32 and about 8 foot of new vacuum hose for around $9. The only thing I didn't use out of the kit was the new diaphragm and needle assembly in the choke thing that controls the butterfly valve on the drivers side. I know it worked before the rebuild and the only way to get to it is to take the cover off the electric choke coil and pull a pin loose so the diaphragm and needle assembly can slide out the side. However my cover on the electric choke coil is pop riveted on and I didn't want to mess with that. I did test all the other solenoids with my multi-meter per the FSM readings.
In all it was a really fun and great learning experience. The inside of the carb is not very complicated except for the float and you can actually soak the carb in three different pieces without having to take all the linkage apart and worry about getting it back together properly. I will be driving it to church today to see how it handles on the hills and will be watching how much my gas tank needle moves. I expect to be getting more than ~9 mpg now but I'm not gonna worry about testing that till after the timing is checked.
Aug 4, 2013 | 06:11 AM
#365
Registered User
Joined: May 2012
Posts: 396
Likes: 2
From: Jackson, TN
Hey bud I just noticed we have the same bugshield, circa 1984. lol.
Excellent.
Mine was my first anniversary present from my wife. hahaha.
I still have it and will be putting it back on when I get it back on the road again.
Excellent.
Mine was my first anniversary present from my wife. hahaha.
I still have it and will be putting it back on when I get it back on the road again.
Aug 4, 2013 | 06:14 AM
#366
Thread Starter
Registered User
iTrader: (1)
Joined: Apr 2011
Posts: 1,220
Likes: 4
From: Memphis, TN
Yea when you started posting on yotatech your bugshield was the first I had ever seen and I loved it. Then I found someone selling one for $20 and I had to have it. It came just plain blue and I had my friend put the lettering on it. That pretty cool we are both in West TN and have the same bug shield.
Aug 4, 2013 | 06:37 AM
#367
Registered User
Joined: May 2012
Posts: 396
Likes: 2
From: Jackson, TN
Cool...
When I get mine on the road we might meet up at Brownsville for coffee or something if you want.
I'm shipping mine to a garage next week over this carb problem and redo brakes front to back...
I'm so over my head. Lol.
When I get mine on the road we might meet up at Brownsville for coffee or something if you want.
I'm shipping mine to a garage next week over this carb problem and redo brakes front to back...
I'm so over my head. Lol.
Aug 4, 2013 | 08:28 AM
#368
Thread Starter
Registered User
iTrader: (1)
Joined: Apr 2011
Posts: 1,220
Likes: 4
From: Memphis, TN
But I would love to see you truck and look at it. I never see any other first gens other than this one old beat up 79 when I go into Memphis.
Aug 4, 2013 | 09:13 AM
#369
Thanks, in the seats. ... I'm sure you for mention it, ..... I'm just too wiped out lately to read back.... But thanks, I'm always looking for that eventual "perfect swap!" Haha. ...
TWINS????? ... OH YEAH, ....YOU WILL LEARN TO LOVE COFEE! ... Congratz! Oh man I hope to see pictures of the little wheelers! Lol. Boys or girls or both?
Congrats on the carburetor too... I have had so few problems with the hot rods we built, but that was one thing that often seemed to rear its head and require a bit of adjusting... They just had to make up with 200 parts, right? Lol.
Aug 4, 2013 | 10:01 AM
#370
Thread Starter
Registered User
iTrader: (1)
Joined: Apr 2011
Posts: 1,220
Likes: 4
From: Memphis, TN
Thanks, in the seats. ... I'm sure you for mention it, ..... I'm just too wiped out lately to read back.... But thanks, I'm always looking for that eventual "perfect swap!" Haha. ...
TWINS????? ... OH YEAH, ....YOU WILL LEARN TO LOVE COFEE! ... Congratz! Oh man I hope to see pictures of the little wheelers! Lol. Boys or girls or both?
Congrats on the carburetor too... I have had so few problems with the hot rods we built, but that was one thing that often seemed to rear its head and require a bit of adjusting... They just had to make up with 200 parts, right? Lol.
TWINS????? ... OH YEAH, ....YOU WILL LEARN TO LOVE COFEE! ... Congratz! Oh man I hope to see pictures of the little wheelers! Lol. Boys or girls or both?
Congrats on the carburetor too... I have had so few problems with the hot rods we built, but that was one thing that often seemed to rear its head and require a bit of adjusting... They just had to make up with 200 parts, right? Lol.
Aug 11, 2013 | 02:32 PM
#371
Thread Starter
Registered User
iTrader: (1)
Joined: Apr 2011
Posts: 1,220
Likes: 4
From: Memphis, TN
Changed my transmission fluid out this morning, the fluid that came out was in decent shape but probably old. I put 75-90 in it. Also flushed out the smaller resivor under the hood that does the clutch. That crap was nasty! Was pure black. Took a whole big bottle of brake fluid to flush it out and fill it up. The truck does seem to go in out of gears a little smoother now.
Today I also noticed it was still running rich again. I turned the mixture idle screw in a half a turn and it seemed to help. I took a couple pictures today before the storm rolls in.
The classic low to ground upper angle picture lol
and a front shot
Today I also noticed it was still running rich again. I turned the mixture idle screw in a half a turn and it seemed to help. I took a couple pictures today before the storm rolls in.
The classic low to ground upper angle picture lol

and a front shot
 Aug 12, 2013 | 04:35 AM
#372
Registered User
Joined: May 2012
Posts: 396
Likes: 2
From: Jackson, TN
Good looking truck bud. I guess I forget that they changed those headlights to square ones right after mine.
That front bumper..is it new?
I need to replace mine. Pretty big dent on passenger side from years ago my accidentally popping the clutch too close to a pile of wood.
That front bumper..is it new?
I need to replace mine. Pretty big dent on passenger side from years ago my accidentally popping the clutch too close to a pile of wood.
Aug 12, 2013 | 08:20 AM
#373
Thread Starter
Registered User
iTrader: (1)
Joined: Apr 2011
Posts: 1,220
Likes: 4
From: Memphis, TN
Good looking truck bud. I guess I forget that they changed those headlights to square ones right after mine.
That front bumper..is it new?
I need to replace mine. Pretty big dent on passenger side from years ago my accidentally popping the clutch too close to a pile of wood.
That front bumper..is it new?
I need to replace mine. Pretty big dent on passenger side from years ago my accidentally popping the clutch too close to a pile of wood.
Here is a link to the bumper:
http://www.autopartswarehouse.com/sk...ts+%26+Mirrors
If you do end up ordering it I always Google online coupon codes for that company and usually get 5-10% off my order.
Aug 12, 2013 | 02:30 PM
#374
Registered User
Joined: May 2012
Posts: 396
Likes: 2
From: Jackson, TN
The bumper is new from http://www.autopartswarehouse.com/ for $75. It comes a black primer and I painted it black with some tractor paint.
Here is a link to the bumper:
http://www.autopartswarehouse.com/sk...ts+%26+Mirrors
If you do end up ordering it I always Google online coupon codes for that company and usually get 5-10% off my order.
Here is a link to the bumper:
http://www.autopartswarehouse.com/sk...ts+%26+Mirrors
If you do end up ordering it I always Google online coupon codes for that company and usually get 5-10% off my order.

I'll have to put that on my list now.
Aug 15, 2013 | 08:12 AM
#375
Thread Starter
Registered User
iTrader: (1)
Joined: Apr 2011
Posts: 1,220
Likes: 4
From: Memphis, TN
I have decided to sell my spare truck bed that I had pulled off a 2WD truck. I read about the height differences and some pictures and that would bother me a lot. Not sure how much to sell it for, thinking $200 maybe? It has several dents but there rust is very minimal. No tail gate either.
Aug 16, 2013 | 06:51 PM
#378
Thread Starter
Registered User
iTrader: (1)
Joined: Apr 2011
Posts: 1,220
Likes: 4
From: Memphis, TN
Tinkered with the truck tonight still trying to tune it. What a PITA. Thinking about the desmog kit from LCE, I played around and randomly unhooked vacuum hoses to see what happened. There was one that kinda bothered me when I unhooked it. My engine stopped making this noise (not sure how to describe it) when I unplugged a vacuum hose.
The hose was on the device was where the black allen head plug is in the side of the manifold. Stole this pic from KawaZX636 since I was reading his desmog thread.
The sound comes from the drivers side of the engine it sounds like but no idea what it is. Anyways it might be fun to try and do the desmog thing. There are no inspections in the county I live in. Need to count how may bolts are in my water plate to make sure the one in the kit will fit.
Aug 19, 2013 | 01:06 PM
#380
Thread Starter
Registered User
iTrader: (1)
Joined: Apr 2011
Posts: 1,220
Likes: 4
From: Memphis, TN
I put the truck bed on CL and had one person with a Vermont area code wanting to buy it and have it shipped. Well I Googled the number because the whole thing seemed a little strange it turned out to be a scam number. Luckily I had not given out my address or anything yet.


