
83Toyota88's 1983 Pickup Build-Up Thread
 Dec 26, 2014 | 09:53 AM
#563
Thread Starter
Registered User
iTrader: (1)
Joined: Apr 2011
Posts: 1,220
Likes: 4
From: Memphis, TN
Hope everyone had a great Christmas!
Today I played again with tuning my carb again trying to resolve my bad mpg issue. I set the mixture screw to 2 turns out and speed screw to 1 1/2 in per instructions from weber. Well the truck wouldn't stay running lol. I had to raise the speed screw to about 2 1/2 in to get it to idle. All weber literature says no more than 2 in on the screw (1 1/2 is best). If its more than 2 it said to go down a size on the primary idle jet. So i went from a 50 to 45 on the primary idle and from a 55 to 50 on the secondary. They had a one size difference so i figured maybe it was best to keep it that way.
So now I have the speed at 1 1/2 in with an ~800 rpm idle and the mix is at 1 turn out. Seems to run better and is within tolerance according to weber. I also found a not that said you should have no vacuum at the advance port on the carb. I remember before I had about 2" of vacuum and now I have zero so it think I did it right.
I'm also gonna order a the fuel pressure gauge from LCE. I don't really trust the Mr Gasket one I have, its gonna some kinda residue on the inside of the lens so something may have happened to it.
Here is a video of my gauge from idle to high rpms:
Dec 26, 2014 | 11:04 AM
#564
Registered User
Joined: Jan 2012
Posts: 325
Likes: 2
From: Kansas City, Missouri
Hey... nice going! All of my experience with jetting and carb adjustment on mikuni motorcycle carbs (both VM and CV). But it sounds the same, with pilot (idle) and main jet. The main jet needle height can also changed with shims to adjust midrange. Higher needle, fuel sooner as carb opens.
I have a new Weber still in the box sitting in the shop, but won't install it until I do the engine rebuild. Something to look forward to!
Congratulations... hopefully, you'll get more than 16-18 mpg now!
I have a new Weber still in the box sitting in the shop, but won't install it until I do the engine rebuild. Something to look forward to!
Congratulations... hopefully, you'll get more than 16-18 mpg now!
Dec 26, 2014 | 11:12 AM
#565
Thread Starter
Registered User
iTrader: (1)
Joined: Apr 2011
Posts: 1,220
Likes: 4
From: Memphis, TN
Hey... nice going! All of my experience with jetting and carb adjustment on mikuni motorcycle carbs (both VM and CV). But it sounds the same, with pilot (idle) and main jet. The main jet needle height can also changed with shims to adjust midrange. Higher needle, fuel sooner as carb opens. I have a new Weber still in the box sitting in the shop, but won't install it until I do the engine rebuild. Something to look forward to! Congratulations... hopefully, you'll get more than 16-18 mpg now!
 Dec 30, 2014 | 06:00 PM
#567
Registered User
Joined: Nov 2014
Posts: 15
Likes: 0
From: southwest va
I've been reading this thread for a few days now and its been a good read and I really enjoyed all the pics. I really like the look of your truck, and reading this thread makes me want to start wrenching on my yota.
Dec 30, 2014 | 06:43 PM
#568
Thread Starter
Registered User
iTrader: (1)
Joined: Apr 2011
Posts: 1,220
Likes: 4
From: Memphis, TN
If I get brave enough one day I may pull my weber top off and check my float to see if it's correct. I read some threads where they floats have been incorrect out of the box. Now I'm paranoid and want to check mine lol.
Dec 30, 2014 | 06:45 PM
#569
Thread Starter
Registered User
iTrader: (1)
Joined: Apr 2011
Posts: 1,220
Likes: 4
From: Memphis, TN
All I also have to confess I thought my starter was going out which is only about 2 years old. But I figured out I never tightened up the screw for the negative battery cable to body. Just barely in the hole. Noob mistake lol.
Dec 31, 2014 | 05:42 PM
#570
Registered User
Joined: Nov 2014
Posts: 15
Likes: 0
From: southwest va
Let us know if you get the weber straightened out, my choke isn't working on my factory carb and a weber might be a good alternative. Good luck on the flare swap the new bed looks to be in good shape, especially around here you'd be turning heads everywhere.
Jan 3, 2015 | 01:16 PM
#571
Thread Starter
Registered User
iTrader: (1)
Joined: Apr 2011
Posts: 1,220
Likes: 4
From: Memphis, TN
I resealed the block off plate on the manifold and I think the vacuum leak is gone now. I also found this neat diagram for Webers showing their float level settings:
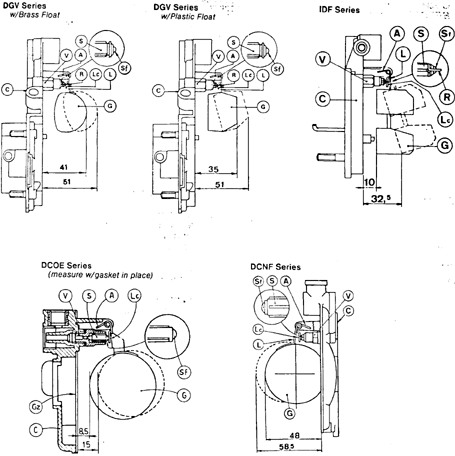
Put my new LCE fuel pressure gauge on too. Reads a lot better than the Mr Gasket one I had before. Had to dial my pressure down a little bit. I also pulled the top of the carb off and checked the float against the diagram I found and my float was incorrect on the high level. the low level was good.
Here is a video of the new gauge and how much better it reads:
I still have an issue with air coming out of the front breather port on the valve cover and not air going in.
Jan 4, 2015 | 07:14 AM
#572
Registered User
Joined: Nov 2014
Posts: 15
Likes: 0
From: southwest va

Thats good you got the carb straightened out, I ordered weber so this gives me a idea on what I need to do to get it to work. Did you notice a difference in power vs the stock aisin carb im hoping to get a little boost to help on the hills
 Mar 29, 2015 | 01:38 PM
#577
Thread Starter
Registered User
iTrader: (1)
Joined: Apr 2011
Posts: 1,220
Likes: 4
From: Memphis, TN
I had a professional mechanic check my timing today and it was at 0 and I had him change it to 8. He also pulled plug #1 and verified TDC was 0 on the timing mark. So guess I'm a retard when it come to changing the timing because I swore it was at 5.
It drove a little better on the way home had more guts in the accel. When I got home I put the idle jets back to the stock size (I had lowered them) and retuned it per weber instructions and all screw settings are within tolerance and it has pretty good acceleration now. I will have to check my mpg later and see how that was affected.
It drove a little better on the way home had more guts in the accel. When I got home I put the idle jets back to the stock size (I had lowered them) and retuned it per weber instructions and all screw settings are within tolerance and it has pretty good acceleration now. I will have to check my mpg later and see how that was affected.
Mar 29, 2015 | 05:34 PM
#578
Registered User
Joined: Jan 2012
Posts: 325
Likes: 2
From: Kansas City, Missouri
Excellent. What did he do? I mean, did you ask him to show you what he did, so you can do it next time?
If not... Defeat the advance -pull and cap/seal the vacuum tube(s) that go(es) to the advance "bulb" on the distributor, clip the timing light on number 1 spark plug wire, connect the light to power (red to battery +, black to ground), then adjust the distributor (loosen bolt and rotate it) until it fires when you want it to (5 to 8 degrees BTDC).
It is really that straight forward. Maybe you tried this already.
If you have EFI, defeating the advance means jumping female connectors on a bus connector, but otherwise, the process is the same.
Did the mechanic show you how to set the timing, so you can confidently do it next time?
Mar 29, 2015 | 05:56 PM
#579
Thread Starter
Registered User
iTrader: (1)
Joined: Apr 2011
Posts: 1,220
Likes: 4
From: Memphis, TN
Excellent. What did he do? I mean, did you ask him to show you what he did, so you can do it next time? If not... Defeat the advance -pull and cap/seal the vacuum tube(s) that go(es) to the advance "bulb" on the distributor, clip the timing light on number 1 spark plug wire, connect the light to power (red to battery +, black to ground), then adjust the distributor (loosen bolt and rotate it) until it fires when you want it to (5 to 8 degrees BTDC). It is really that straight forward. Maybe you tried this already. If you have EFI, defeating the advance means jumping female connectors on a bus connector, but otherwise, the process is the same. Did the mechanic show you how to set the timing, so you can confidently do it next time?


