
83Toyota88's 1983 Pickup Build-Up Thread
 Mar 30, 2015 | 04:17 AM
#581
Registered User
Joined: Jan 2012
Posts: 325
Likes: 2
From: Kansas City, Missouri
While you are in there, here's an easy way to remove the pilot bearing to replace it.
https://www.yotatech.com/forums/f197...l#post52264726
https://www.yotatech.com/forums/f197...l#post52264726
Last edited by 83pingpong; May 26, 2015 at 07:09 AM.


 May 26, 2015 | 07:14 AM
#583
Registered User
Joined: Jan 2012
Posts: 325
Likes: 2
From: Kansas City, Missouri
Looks very good. Do this right the first time and you can forget about them for a while. And it's nice to have dependable slippery locks, and brakes that respond deliberately and stop!
Last time I was in the left front was for a sticky lock (wouldn't lock at all). The grease was like dried out grape jelly! Then after I was done I got nicked for slightly "loose" bearings on the front wheels. I had to get in there and tighten them both for safety inspection. I repacked while I was in there, what the heck. And I also got nicked for a teeny tiny exhaust leak. Jeeez.
Where did you get the new brake line and calipurs? I saw so many options at RockAuto for those prefit brake lines that I decided not to include them in previous orders, but I'd like to replace ALL of mine. Did you just bend it yourself? I've done that, but it is so easy to flatten the tubing by mistake, or worse yet, create a bend/kink. I don't have a brake line bending tool.
Last edited by 83pingpong; May 26, 2015 at 07:36 AM.
May 26, 2015 | 07:25 AM
#584
Thread Starter
Registered User
iTrader: (1)
Joined: Apr 2011
Posts: 1,220
Likes: 4
From: Memphis, TN
Looks very good. Do this right the first time and it's nice to have dependable locks, and brakes that stop deliberately and easily!
Where did you get the new brake line and calipurs? I saw so many options at RockAuto for those prefit brake lines that I decided not to include them in previous orders, but I'd like to replace ALL of mine. Did you just bend it yourself? I've done that, but it is so easy to flatten the tubing by mistake, or worse yet, create a bend/kink. I don't have a brake line bending tool.
Where did you get the new brake line and calipurs? I saw so many options at RockAuto for those prefit brake lines that I decided not to include them in previous orders, but I'd like to replace ALL of mine. Did you just bend it yourself? I've done that, but it is so easy to flatten the tubing by mistake, or worse yet, create a bend/kink. I don't have a brake line bending tool.
May 26, 2015 | 07:51 AM
#585
Just a FYI, you can get Toyota factory brake caliper lines for $5.99 from Low Range Off Road:
http://www.lowrangeoffroad.com/yotam...-hardware.html
I bent all new brake lines for my entire system on my '83, but I still got the short caliper lines from LROR because those short sections can be a pain to bend and flare. For other brake jobs that I have done I have typically used the 8" pre-flared lines with M10-1.0 brake flare nuts. If you do get them from Napa or some other parts store they are typically called "JAPANESE" fittings and won't even have the actual flare nut size and pitch on the label. MAKE SURE YOU GET THE CORRECT SIZE FLARE NUTS! The M10-1.0 nuts are EXTREMELY close to the 3/8x24 nuts - so close that they will actually thread into each other, but they WILL NOT seal up.
Also, for some ungodly reason, flare nuts by themselves are ridiculously expensive - if your parts store even has them. I have found that it is actually cheaper to buy a bunch of 6" sections of pre-flared brake lines with m10x1.0 nuts on them for $3-4 and just take the nuts off. I did my entire brake system doing this - I bought a 25' coil of steel brake line and used the nuts that I removed from the pre-flared sections.
May 26, 2015 | 07:53 AM
#586
Registered User
Joined: Jan 2012
Posts: 325
Likes: 2
From: Kansas City, Missouri
My Mistake! It was flexible hose I am talking about. Dave has a solution ^^ (lowrangeoffroad)
I do have a flaring tool, and remember dealing with that when I put a 4" lift on my 2WD 94 Toyota (a spindle kit). Again, Dave is right-buy the preflared. The lift kit worked out great, but I could not reuse the splash guards, and before long, I had pitted surfaces on the inner seal surface and kept going through bearings after winter (slush/salt).
Rock Auto will work with you on returning those calipurs. If you have a record of the sale, better. You may get a restocking charge, but whatever is left could be credit towards other stuff.
Last edited by 83pingpong; May 26, 2015 at 07:56 AM.
May 26, 2015 | 08:32 AM
#587
Also, Stephen, all brake flaring tools are not created equal. I actually have two myself (well I should throw away one and only have the good one left). I have a cheap one (about $30 from Advance Auto) and a "nicer" one (about $50 from Napa), but they both are the manual kind and look nearly identical. My cheap one never made a very good flare at all, in fact, the "point" on the tool actually has a groove worn into the steel so it will never make a proper flare.
But even still, if the tool isn't damaged, a cheap one can still make a flare but usually a bad flare can be cause by user error. Here are a couple tips to better your chances:
1-SLOWLY cut your brake lines with a tube cutter. I just twist the cutter down until is is barely tight, spin it a couple times, tighten firm again, spin, tight firm, spin.... until it is cut. Doing it slowly will provide a more even cut and less chance of creating burrs.
2-Deburr the inside of the tubing and chamfer the outside of the tubing. For the inside, I use an exacto knife to just lightly scrape the inside of the tubing to make sure there are no stray metal shavings - be careful not to gouge the tubing. To chamfer the outside I actually use a chamfer tool that I use for chamferring casings when I reload bullets, but another way that you can do this is by gently spinning the tubing on a fine file. You don't need an extreme chamfer at all, but the main goal is to get the burrs off and provide an nice, even surface for the die to mate too. Any stray burrs that get left behind will be pressed into your flare and cause leaks.
3-Dip the tube in some brake fluid for lubricant.
4-Set the tube in the clamp at the same height (or just slightly taller) as the "step" on the head of the die (your instructions should tell you this). IMPORTANT: when you clamp down the flare bar you want to tighten the side closest to the die FIRST and clamp it TIGHT! Then tighten the other side, TIGHT! The tube has to be clamped in straight and VERY TIGHT or the tube will slide in the clamp. Tighten it until you can't tighten it anymore. Do not worry about marring the outside of the tube with the clamp bar - you WILL get clamp marks left on the tube, but just remember, that isn't what creates the seal. The important part to making a good seal is the flare itself.
5-Dunk the flaring die into some brake fluid for lubrication as well as the point or "anvil" of the flaring press.
6-Tighten the straddle press down until the die touches the clamp bar - this can take some pretty good torquing. I like to put the bar in my vise after I have the tube clamped down so that I can really torque on it.
7-Remove the die. The die may be slightly stuck in the tube, but you should be able to get it out with your fingers. If it gets stuck in the tube pretty well then you likely had the tube sticking out a little too far in the bar and will need to start over.
8-Press the point or "anvil" down into the flare to finish your double flare. You need to torque it down rather firmly, but not so much that you crush the flare. You'll know that you crushed the flare if the edges are really jagged. You should have a nice even smooth surface inside the flare with rounded edges around the lip.
Also, it can be a pain to bend brake lines after you have the ends flared and the nuts on, but flaring short sections can be much more difficult after they are bent so I would flare first, then bend second. It also isn't absolutely necessary to use a tube bender to make your bends. A lot of times I will take the dies off of the bender and use them to make tight bends in these shorter lines where the bender isn't practical. Larger sockets also work well too, but the main goal is to not pinch or flatten the brake lines when you bend them
Brake lines aren't super hard to make, but having a decent tool and taking your time does make a difference. Hope this helps you out!!
May 26, 2015 | 08:37 AM
#588
I went with braided stainless steel flex lines on mine:
http://www.lowrangeoffroad.com/yotam...ake-lines.html
And the braided stainless steel (Toyota to GM) for my rear disc conversion:
http://www.lowrangeoffroad.com/yotam...onversion.html
http://www.lowrangeoffroad.com/yotam...ake-lines.html
And the braided stainless steel (Toyota to GM) for my rear disc conversion:
http://www.lowrangeoffroad.com/yotam...onversion.html
May 30, 2015 | 09:36 AM
#589
Thread Starter
Registered User
iTrader: (1)
Joined: Apr 2011
Posts: 1,220
Likes: 4
From: Memphis, TN
Just a FYI, you can get Toyota factory brake caliper lines for $5.99 from Low Range Off Road:
http://www.lowrangeoffroad.com/yotam...-hardware.html
http://www.lowrangeoffroad.com/yotam...-hardware.html
Jun 27, 2015 | 05:58 PM
#594
Thread Starter
Registered User
iTrader: (1)
Joined: Apr 2011
Posts: 1,220
Likes: 4
From: Memphis, TN
83Toyota88's 1983 Pickup Build-Up Thread
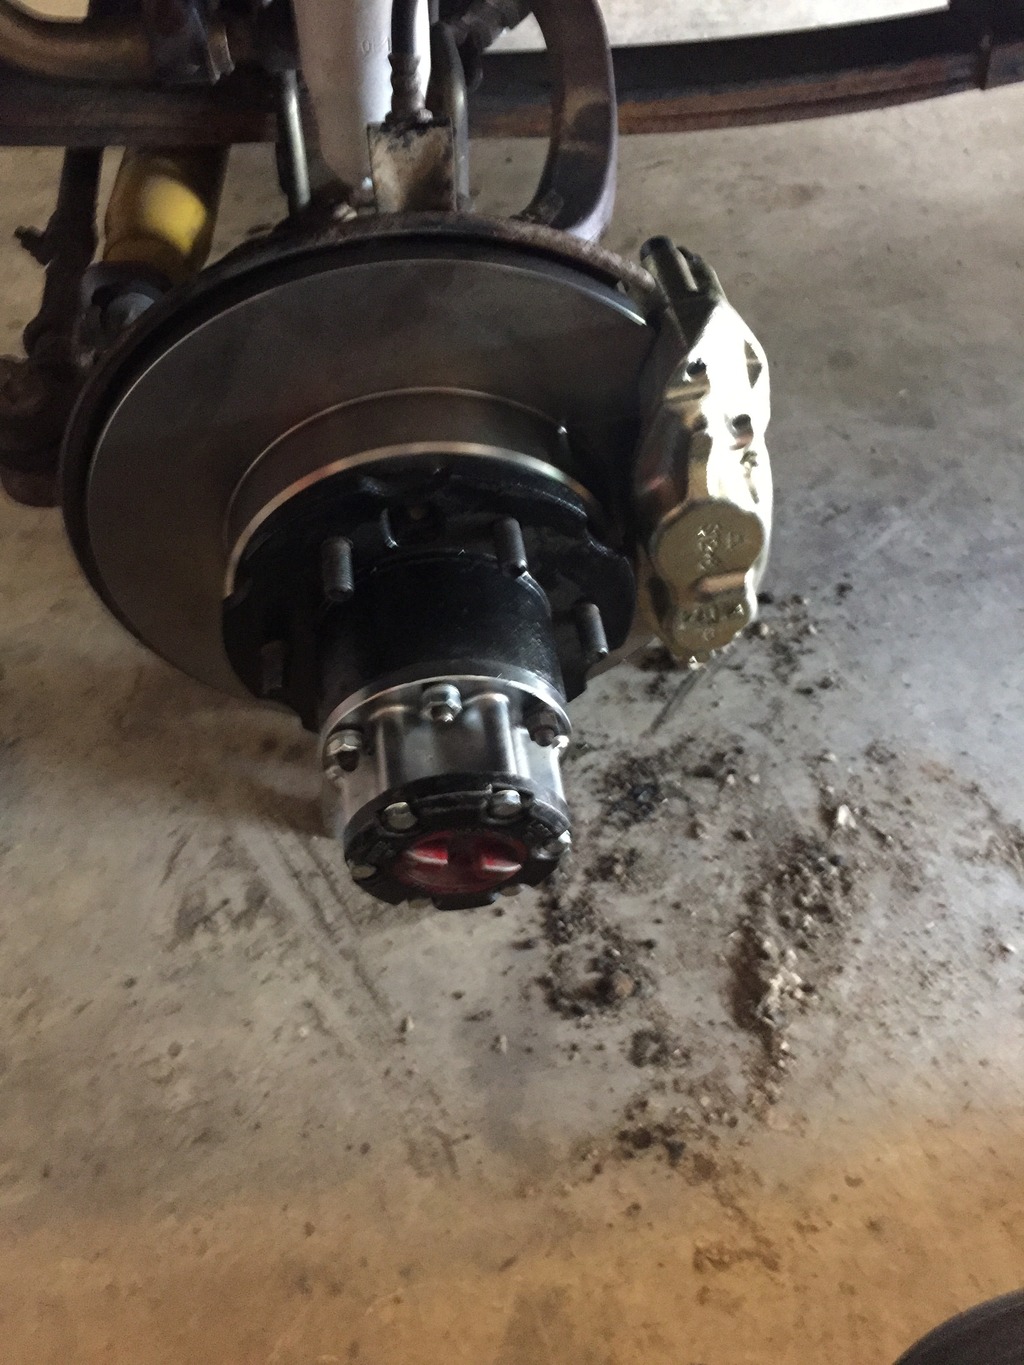
I finished up my drivers side brakes today.
I also worked on the carb a bit yesterday. I went down an idle jet size and re-tuned and also changing my timing to be 8-10 degrees. I drove my truck about 60 miles today and used roughly a 1/4 tank. Assuming the gas tank on my long bed is 12 gallons I got roughly 20 mpg. I'm sure it was actually a little less lol but that is way better than what I used to get. This was all back roads doing 45mph ish so figure I should get at least 15 on the interstate.
Out watching some fireworks tonight with family

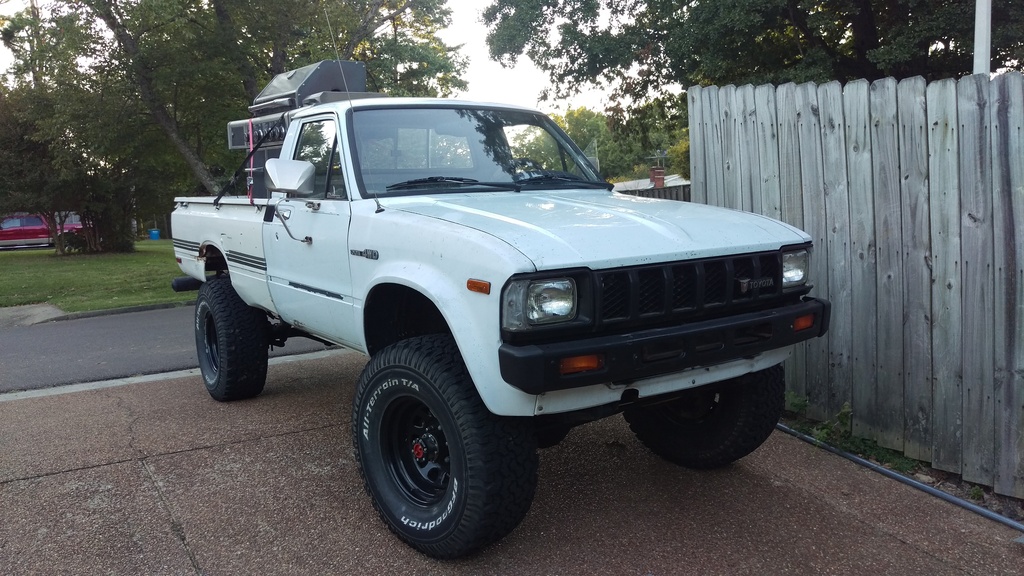
Feels great to drive this again!

I also worked on the carb a bit yesterday. I went down an idle jet size and re-tuned and also changing my timing to be 8-10 degrees. I drove my truck about 60 miles today and used roughly a 1/4 tank. Assuming the gas tank on my long bed is 12 gallons I got roughly 20 mpg. I'm sure it was actually a little less lol but that is way better than what I used to get. This was all back roads doing 45mph ish so figure I should get at least 15 on the interstate.
Out watching some fireworks tonight with family

Feels great to drive this again!
Sep 16, 2015 | 03:27 PM
#595
Thread Starter
Registered User
iTrader: (1)
Joined: Apr 2011
Posts: 1,220
Likes: 4
From: Memphis, TN
Well it's starting to cool off again so I took the old girl out for a spin and picked up my bigger grill out of storage. Everything tan good, no leaks. Me and my pops went for a quick spin (this was my dad's dads truck). Lol he almost fell getting out of it, didn't realize how high it was. Think I'm gonna try and get antique tags put on it Friday. Run $25 one time fee. Tags have been expired since January lol 
 Oct 12, 2015 | 03:44 PM
#596
Thread Starter
Registered User
iTrader: (1)
Joined: Apr 2011
Posts: 1,220
Likes: 4
From: Memphis, TN
I think I'm gonna sell my truck soon. I don't really have time to work on it and what's left is way beyond my skill set. I think in gonna look for a newer 4 door truck to haul the whole family.
Oct 17, 2015 | 08:28 AM
#597
Thread Starter
Registered User
iTrader: (1)
Joined: Apr 2011
Posts: 1,220
Likes: 4
From: Memphis, TN
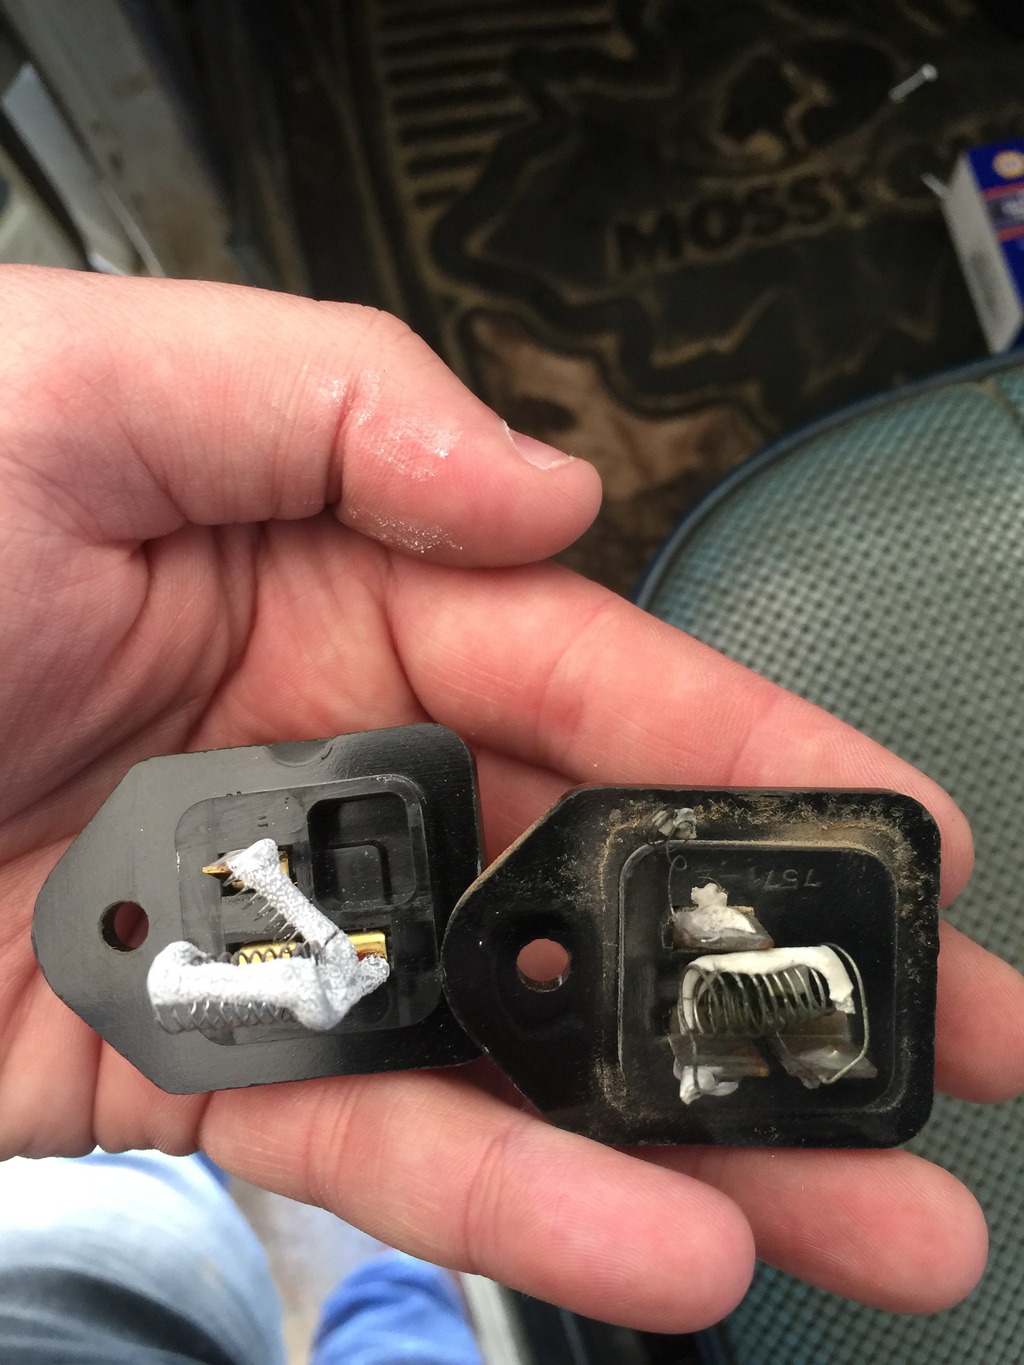
Yea I can't sell it lol. Not gonna happen. I finally bought a new blower motor resistor so o can have more than just high speed on my fan 
So I also want to do a flatbed like this
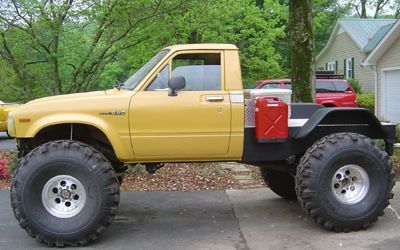

So I also want to do a flatbed like this
 Oct 20, 2015 | 11:27 AM
#598
Flatbed? Really? I say bring that original bed back to life!!
Oct 20, 2015 | 11:45 AM
#599
Registered User
Joined: Jan 2012
Posts: 325
Likes: 2
From: Kansas City, Missouri
By the way... That rotor/caliper/line replacement looks excellent. Those rotors and calipers were kinda' scary. And so close to Halloween!
Hey, I like the topper as well. That one even has the added headroom. I agree... resurrect the OEM bed. I'd repaint the topper as well. I use mine for kid hauling (they just love riding back there tooling through the dirt roads), and once in a while also sleeping. That comes in handy when you need a place to sleep on the road.
Hey, I like the topper as well. That one even has the added headroom. I agree... resurrect the OEM bed. I'd repaint the topper as well. I use mine for kid hauling (they just love riding back there tooling through the dirt roads), and once in a while also sleeping. That comes in handy when you need a place to sleep on the road.


