
PowerstrokeJoe's om617 Turbo Diesel swap/build in 1990 P/up
 Dec 20, 2011 | 09:20 PM
#121
Thread Starter
Registered User
Joined: Apr 2011
Posts: 317
Likes: 0
From: Sedalia, MO
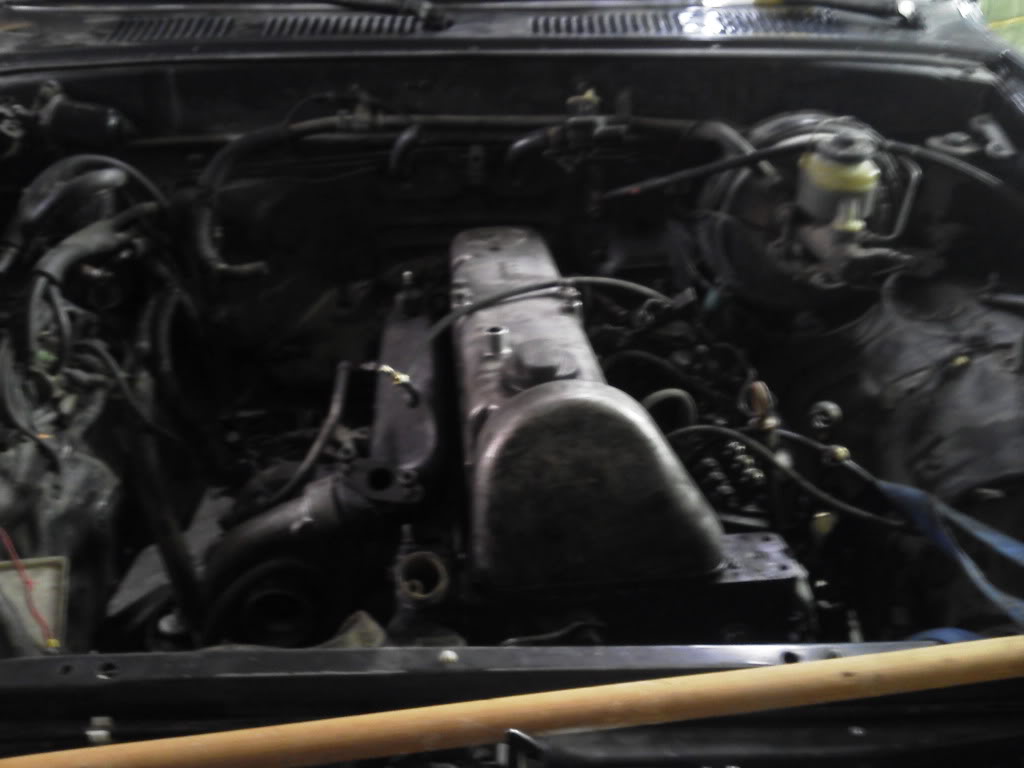
Well I got some pictures off my phone finally as my camera is also not working. This is not my week for technology. I have the engine almost completely re assembled. I'll grab some more pics of it tomorrow. Here is the deck cleaned and ready for the head.  . Here is a shot of the head tightening sequence for those who might need it.
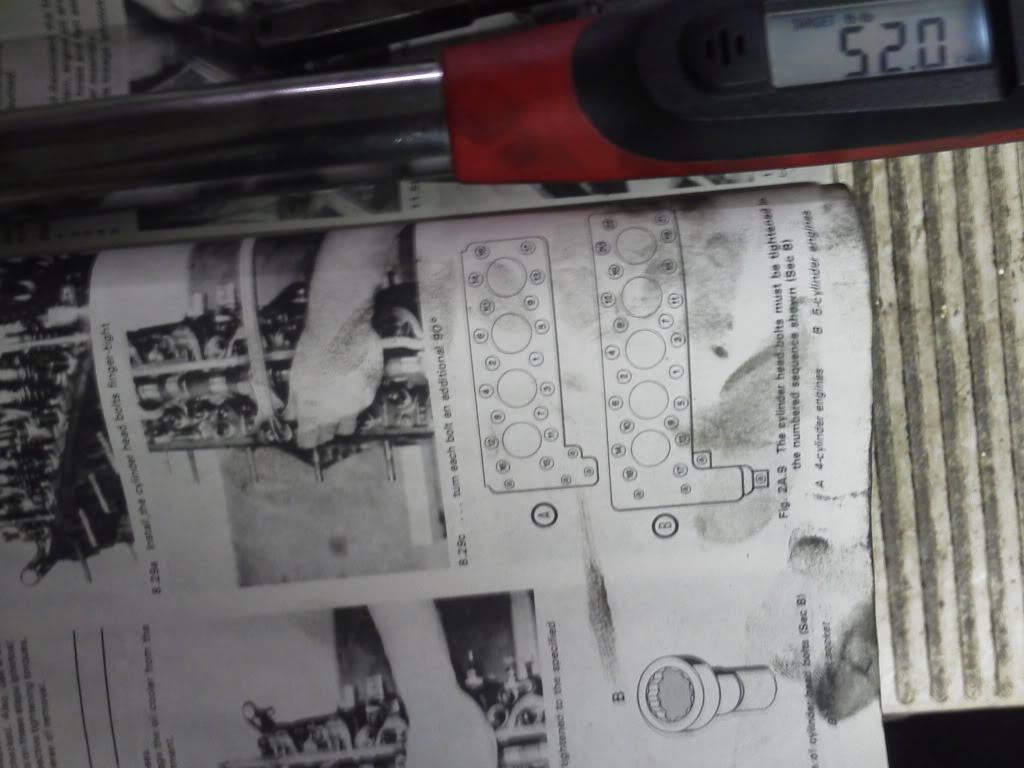
I also got started mocking up my adapter plate. I am using 1/2 plywood to make the mock up first and then I will transfer the pattern to steel. I started by centering the stock Mercedes bellhousing adapter in the piece of wood.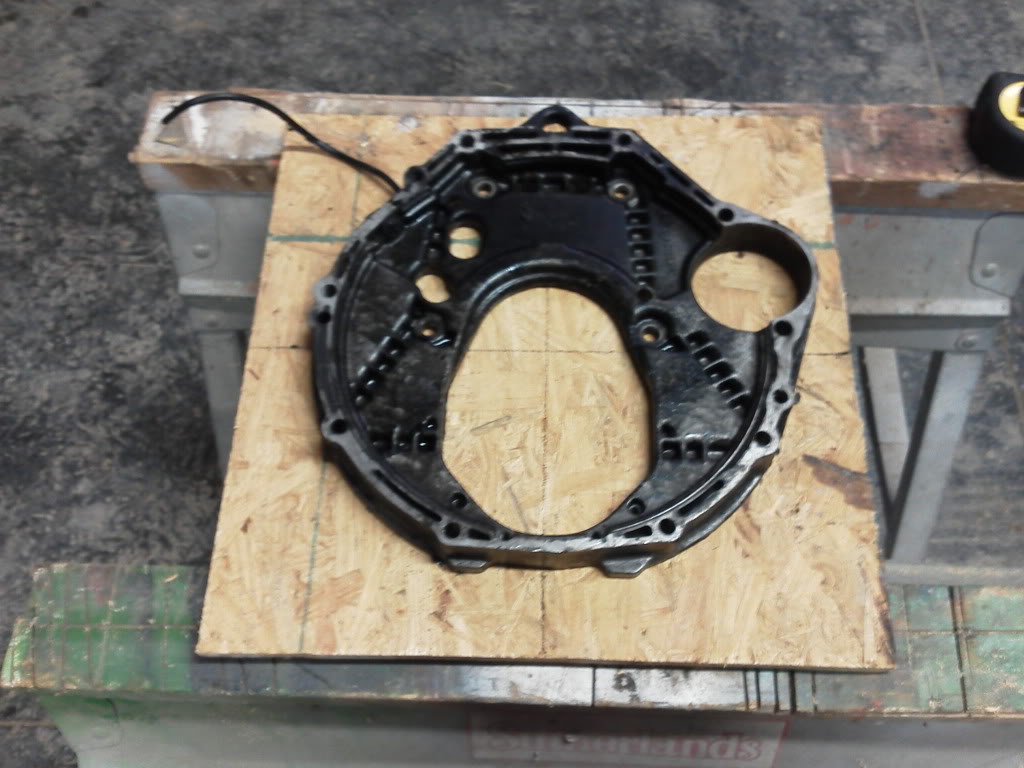 I then marked the dowel and bolt holes that held the adapter to the block and drilled the wood. Next I bolted it to the block.
 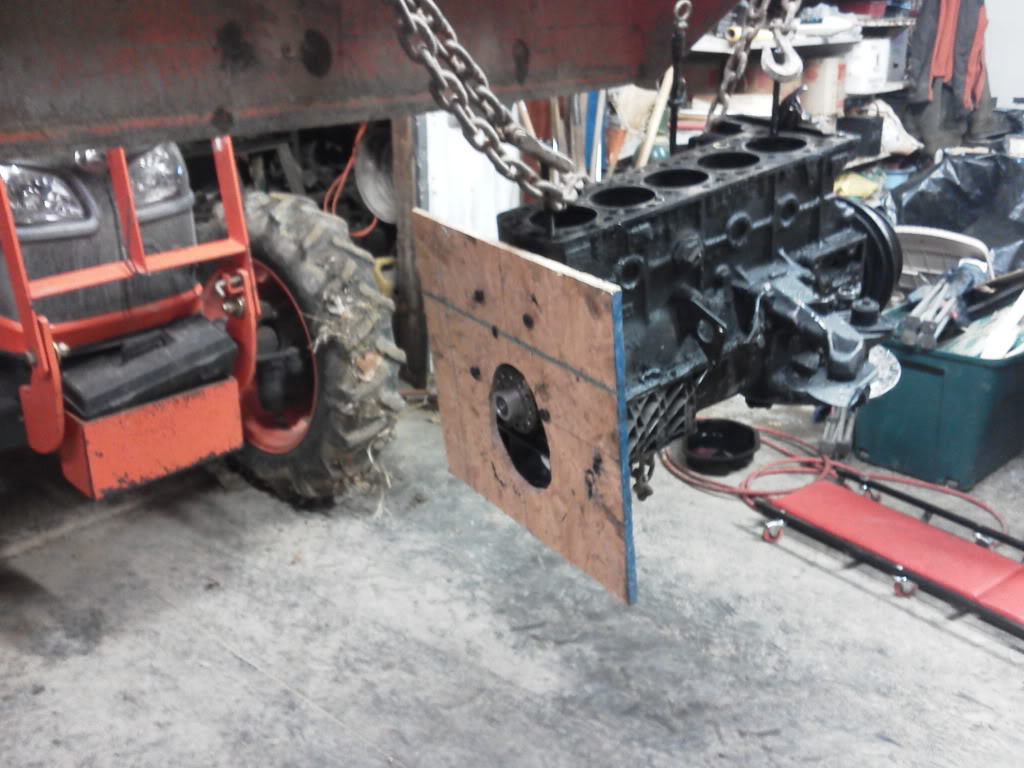 Then I leveled the block on some wood blocks on the floor.
 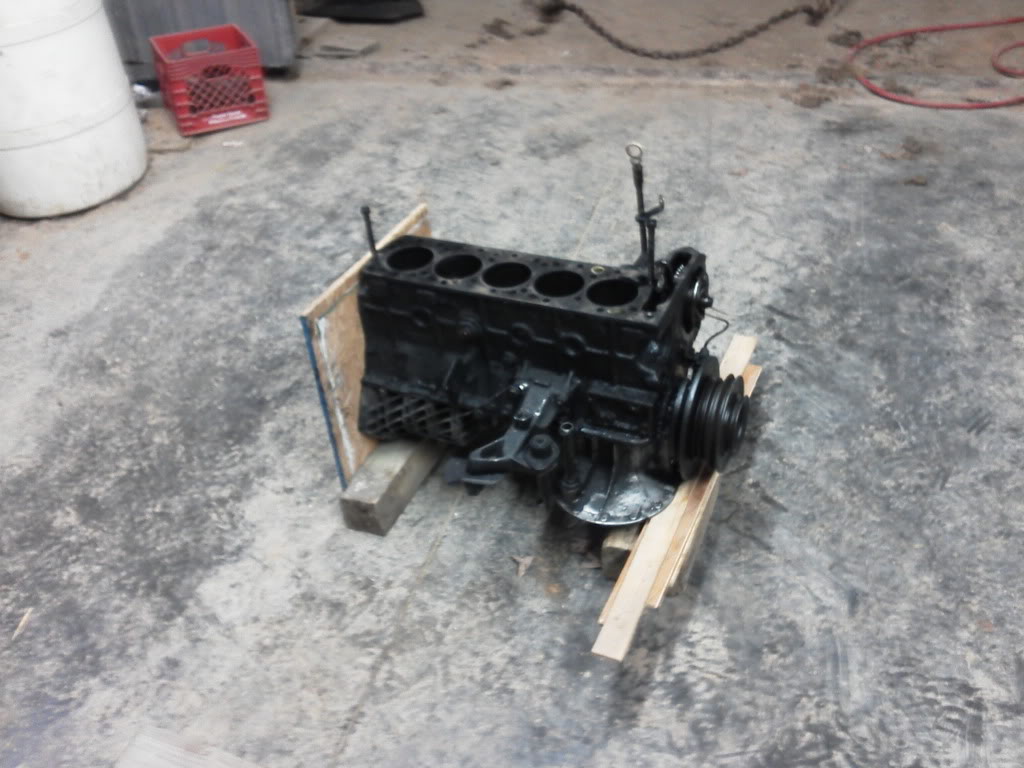 That is as far as I got tonight as My pilot bearing adapter needs to be shortened in the crank because the transmission is too far away from the block. I will be fixing that tomorrow. Grandpa also has a good start on the A/C bracket.
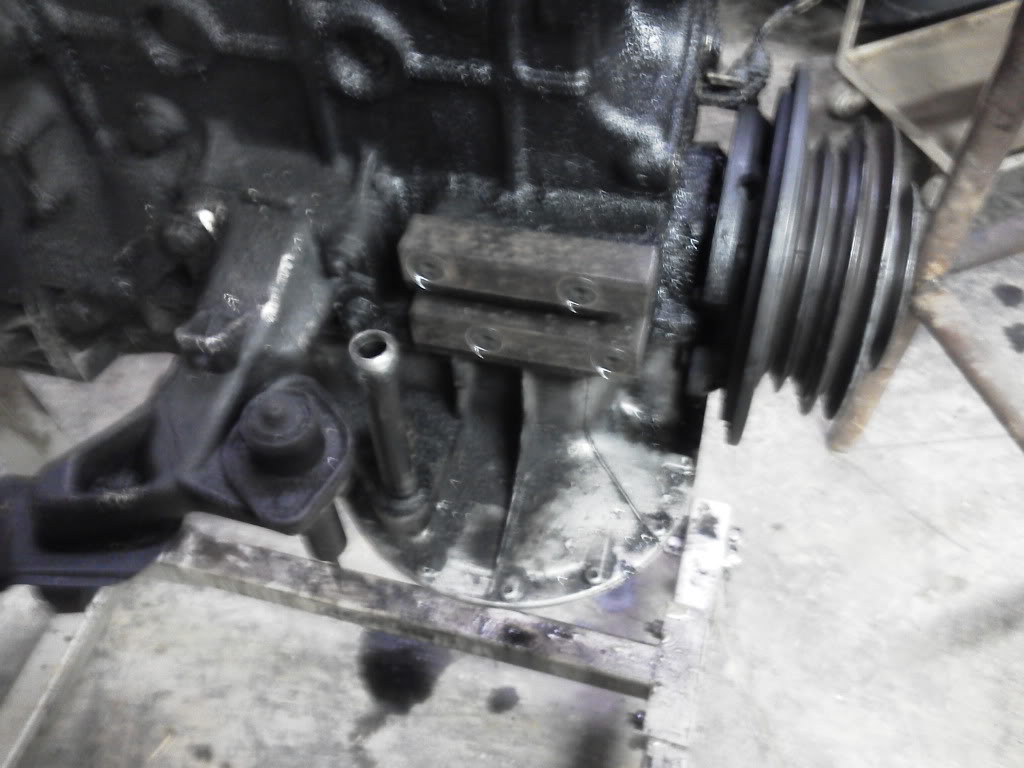 I am going to postpone the alternator until the engine goes in once so I can get some better measurements as I don't want clearance issues. Well that's all I have for tonight. I'll post more progress as it comes.
. Here is a shot of the head tightening sequence for those who might need it. I also got started mocking up my adapter plate. I am using 1/2 plywood to make the mock up first and then I will transfer the pattern to steel. I started by centering the stock Mercedes bellhousing adapter in the piece of wood.
I then marked the dowel and bolt holes that held the adapter to the block and drilled the wood. Next I bolted it to the block. Then I leveled the block on some wood blocks on the floor. That is as far as I got tonight as My pilot bearing adapter needs to be shortened in the crank because the transmission is too far away from the block. I will be fixing that tomorrow. Grandpa also has a good start on the A/C bracket. I am going to postpone the alternator until the engine goes in once so I can get some better measurements as I don't want clearance issues. Well that's all I have for tonight. I'll post more progress as it comes.
Dec 22, 2011 | 08:59 PM
#123
Thread Starter
Registered User
Joined: Apr 2011
Posts: 317
Likes: 0
From: Sedalia, MO
Major progress today. My adapter is for the most part done. I am going to post all the pictures and they are for the most part explanatory. I have a mock up pattern of the adapter plate that I am going to keep around for anyone who may want to use it as a reference in the future. (OM617 to R150). If anyone has any questions ask away. This is the plywood adapter in place getting ready to be drilled. We put a dial indicator on the bell housing and divided the input shaft play in half to center it in the pilot bearing. 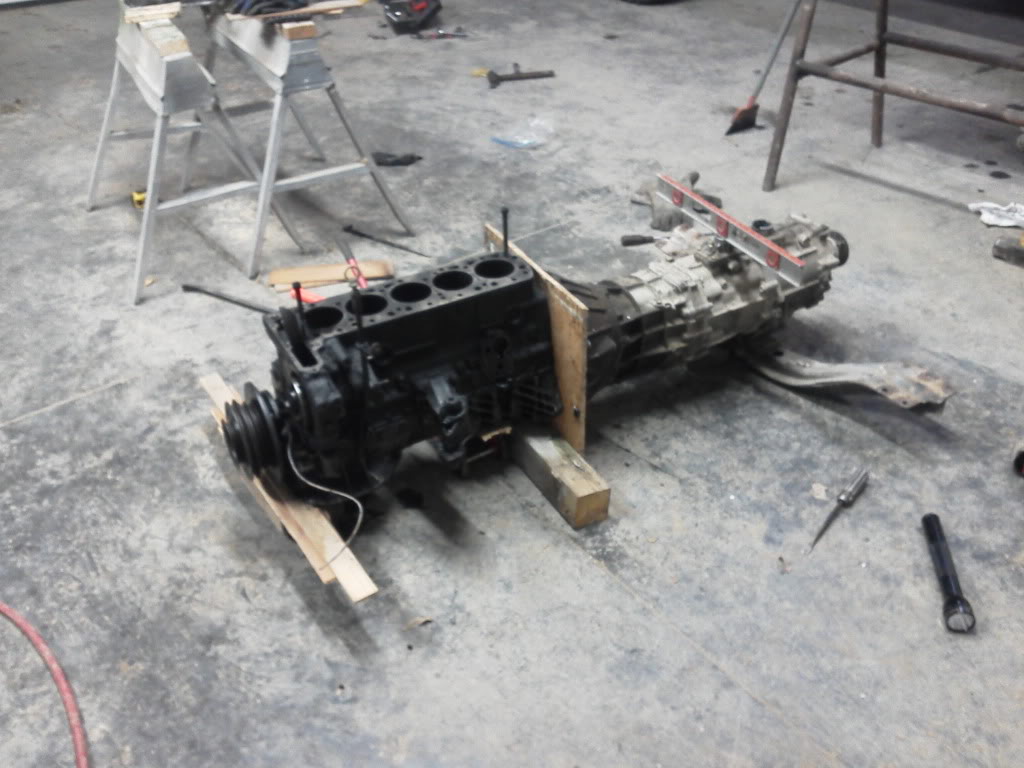
C-clamped the wood over the steel and drilled away.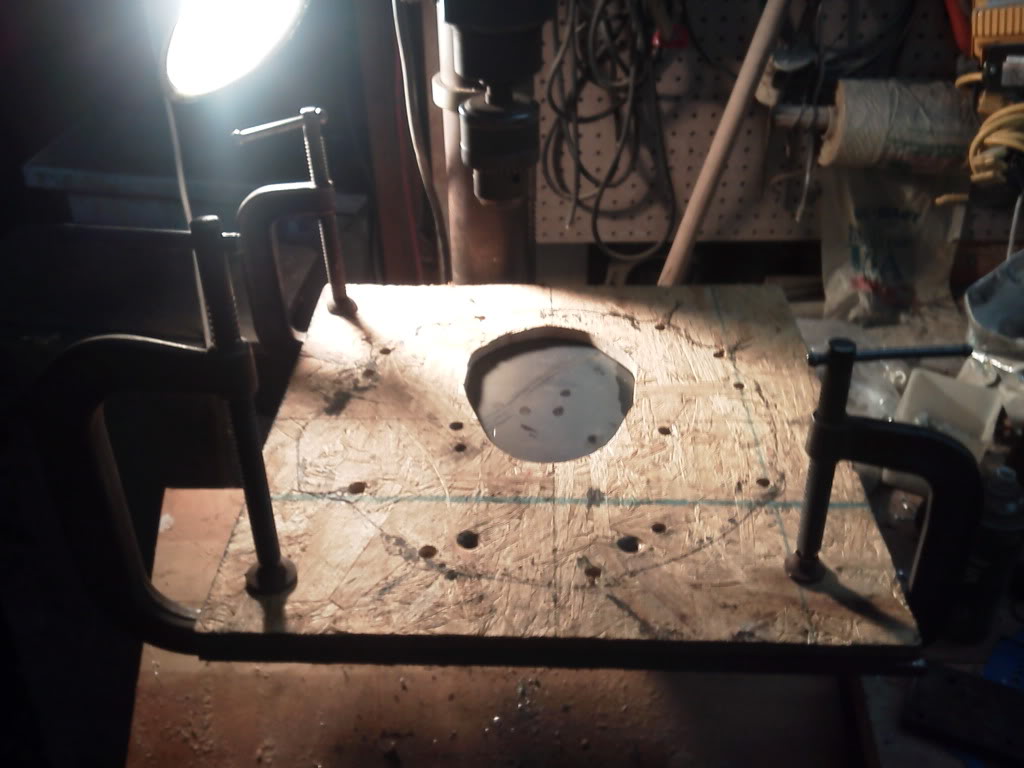
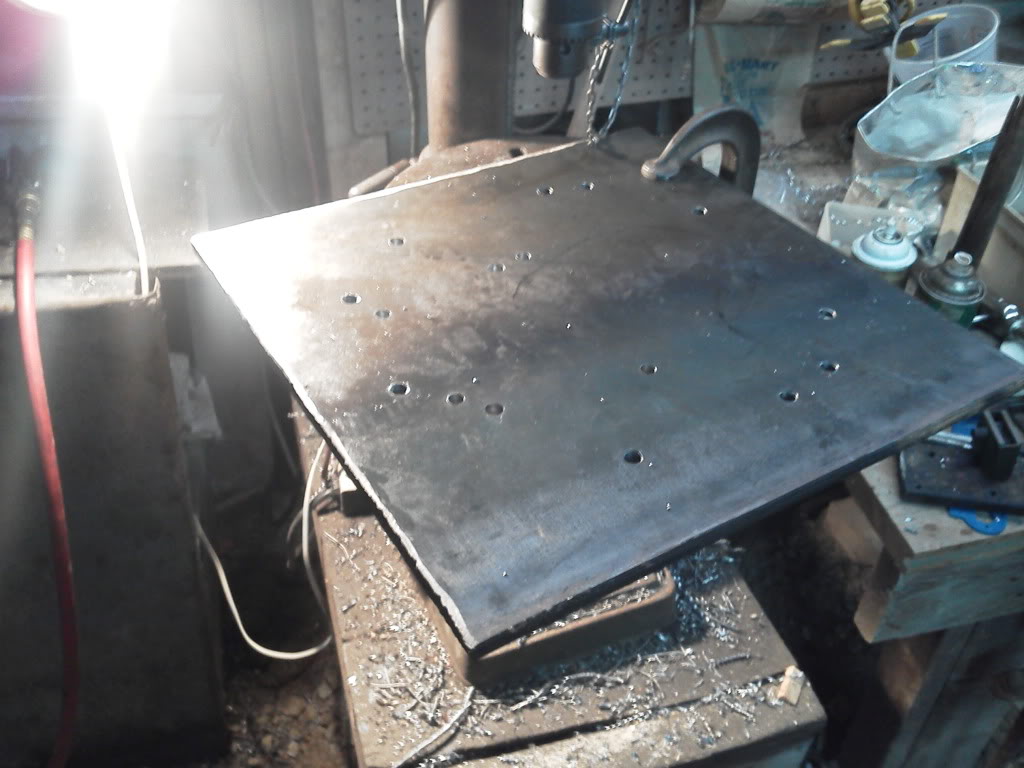
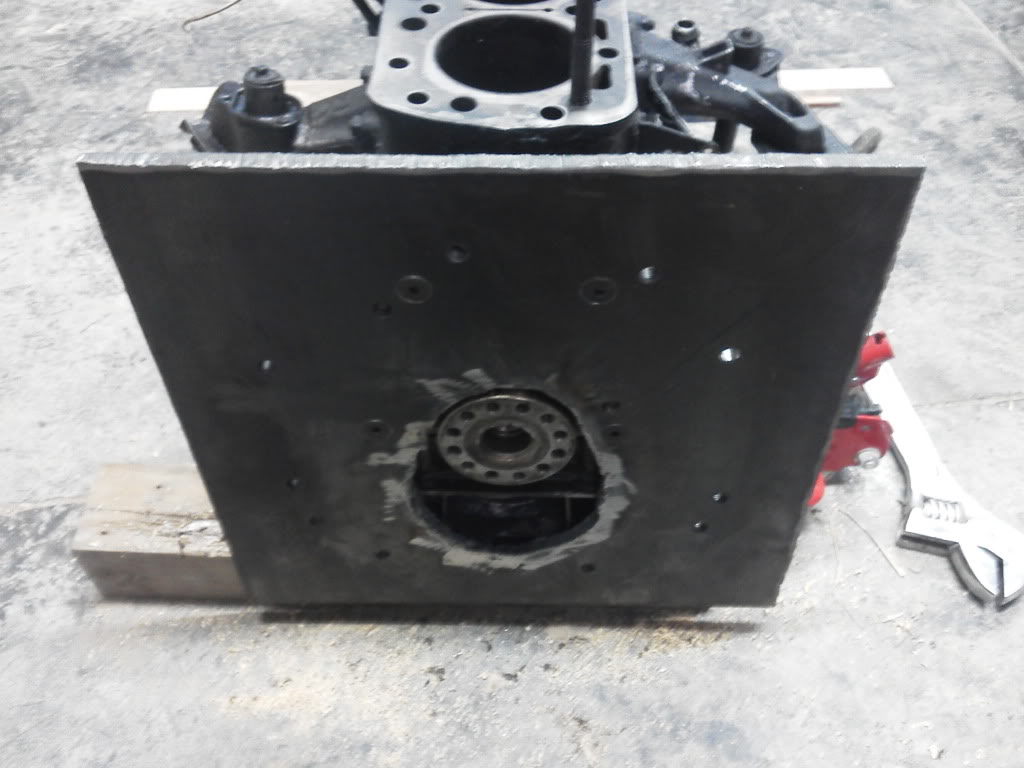

I enlarged all the bell housing holes to 1/2 inch and used grade 8 bolts. The adapter plate has been drilled and tapped to accept these.
C-clamped the wood over the steel and drilled away.
I enlarged all the bell housing holes to 1/2 inch and used grade 8 bolts. The adapter plate has been drilled and tapped to accept these.
 Dec 24, 2011 | 12:49 PM
#126
Thread Starter
Registered User
Joined: Apr 2011
Posts: 317
Likes: 0
From: Sedalia, MO
Aviator- Thank you and I hope you have a Merry Christmas as well!
RBX- no it will fit just fine. I need to trim my plate a little more though.
Dmarsh- it is going in the stock location. My alternator will go where the MB A/C compressor was.
RBX- no it will fit just fine. I need to trim my plate a little more though.
Dmarsh- it is going in the stock location. My alternator will go where the MB A/C compressor was.
Jan 1, 2012 | 09:32 PM
#127
Thread Starter
Registered User
Joined: Apr 2011
Posts: 317
Likes: 0
From: Sedalia, MO
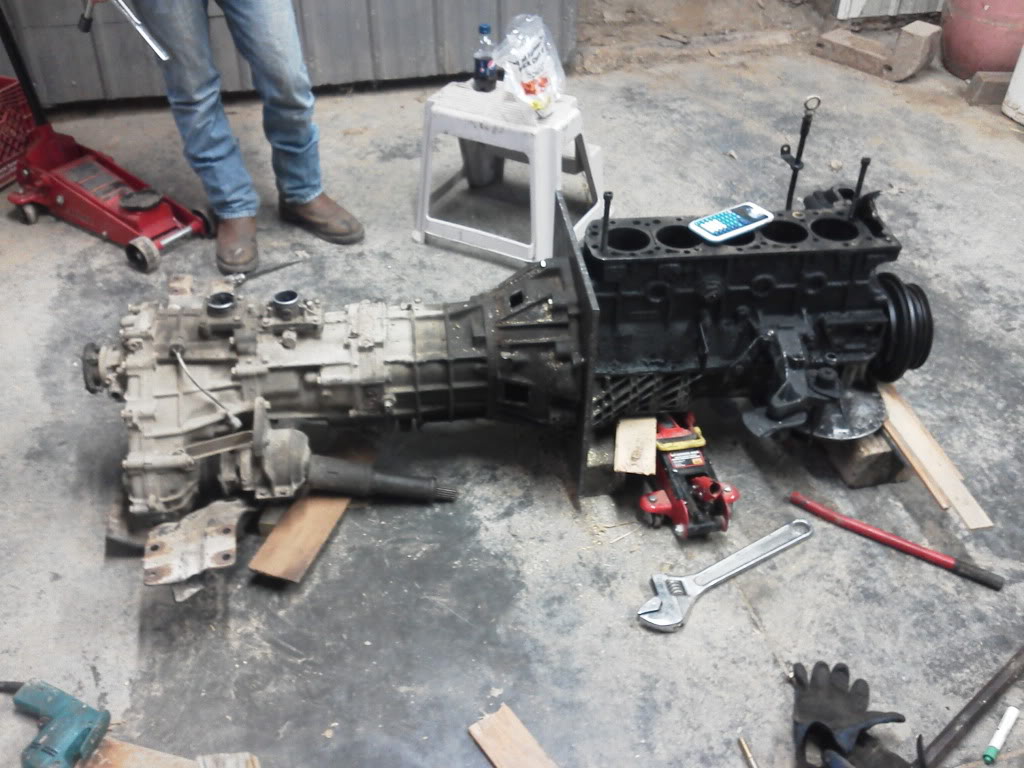
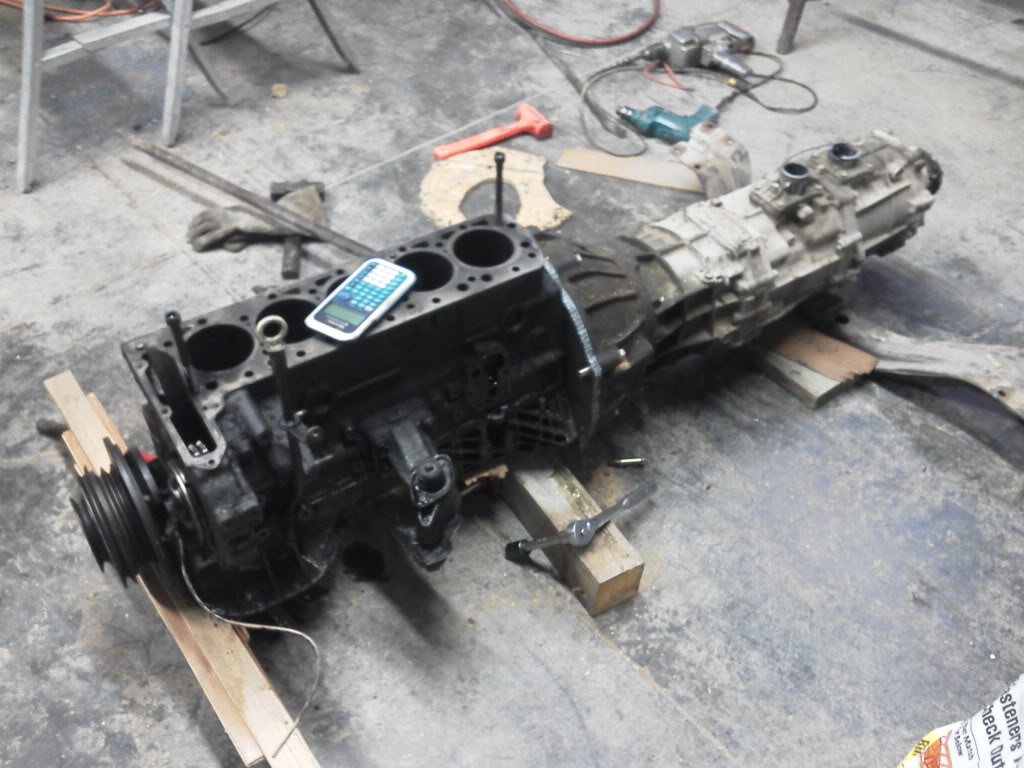
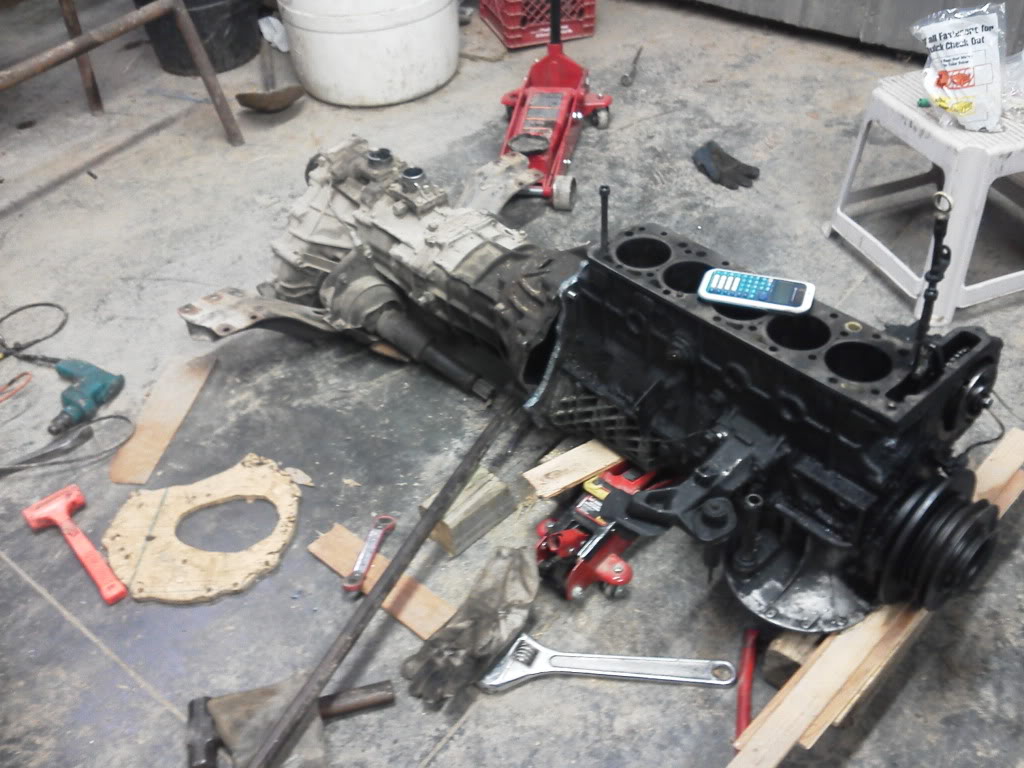
Well first off I hope everyone has a wonderful Christmas and New Year! I took some time away from the shop to spend with my family and some friends. I have a few friends who are gear heads over and they helped me work on the truck a little. I have the engine and transmission in the truck. The transmission is bolted in place but the engine is resting on the oil pan at the moment. Motor mounts are tomorrow's project. I ended up having to notch the oil pan out even though I have a body lift. The way the engine sits the radiator is going to have to go in the bed. I really don't want to cut the core support for a host of reasons. Anyhow on with the pictures. Here is the beginning stages of the flywheel. On the 3vze every other hole is plugged and then it can be re drilled. 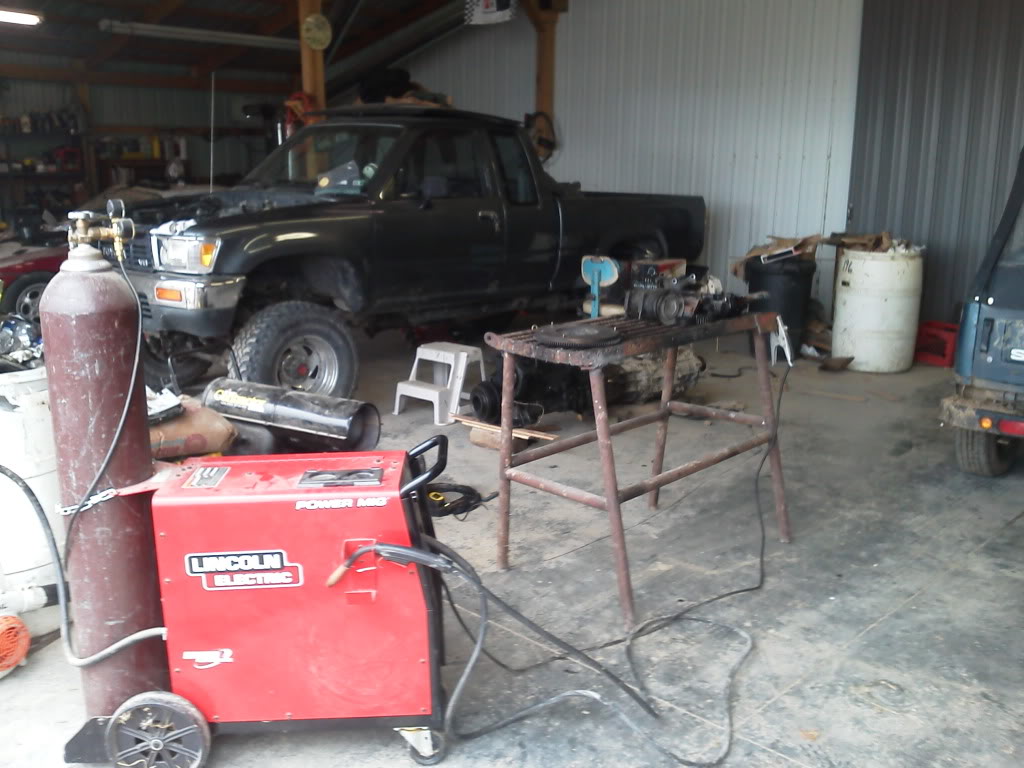
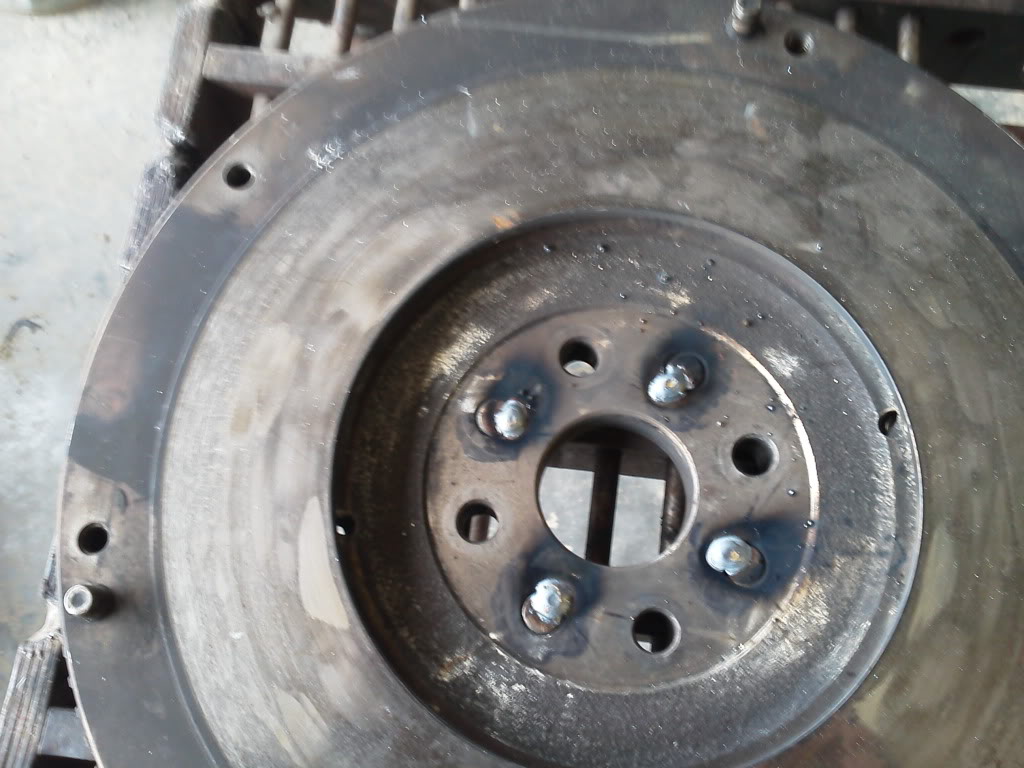
Make sure to tack the plugs in away from where you drill or it will temper the metal. My plugs were almost press fit.

Here is my pilot bearing adapter in the crank.
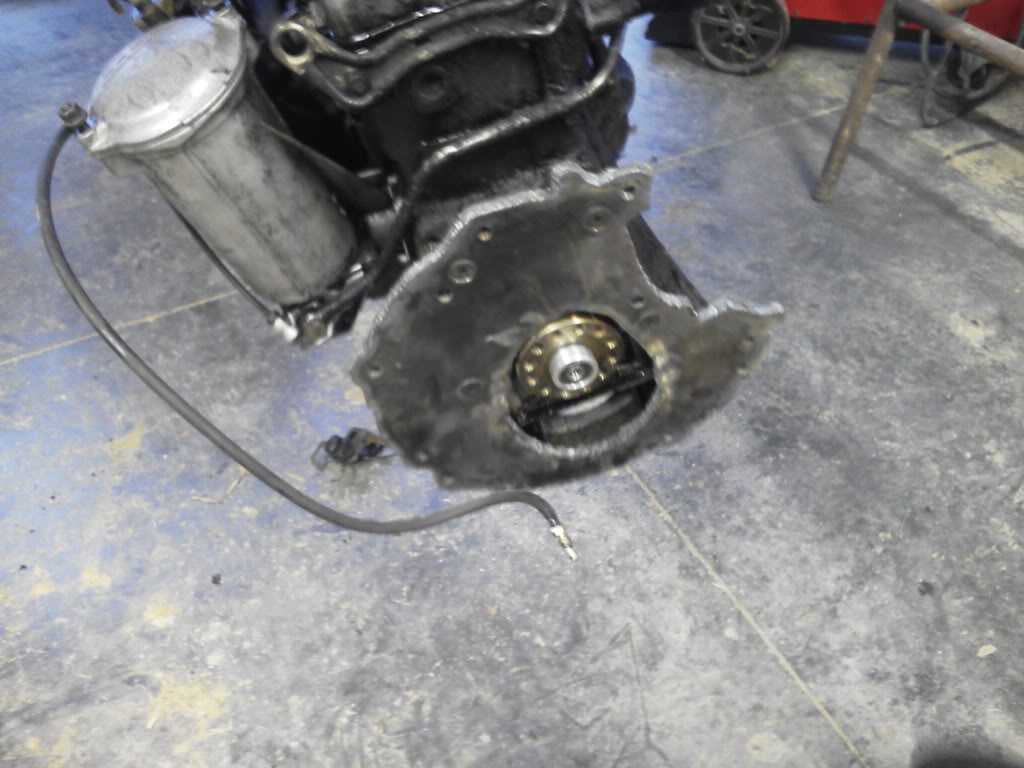
Take note the 85 crank inner diameter is slightly smaller than the 83 I started with.
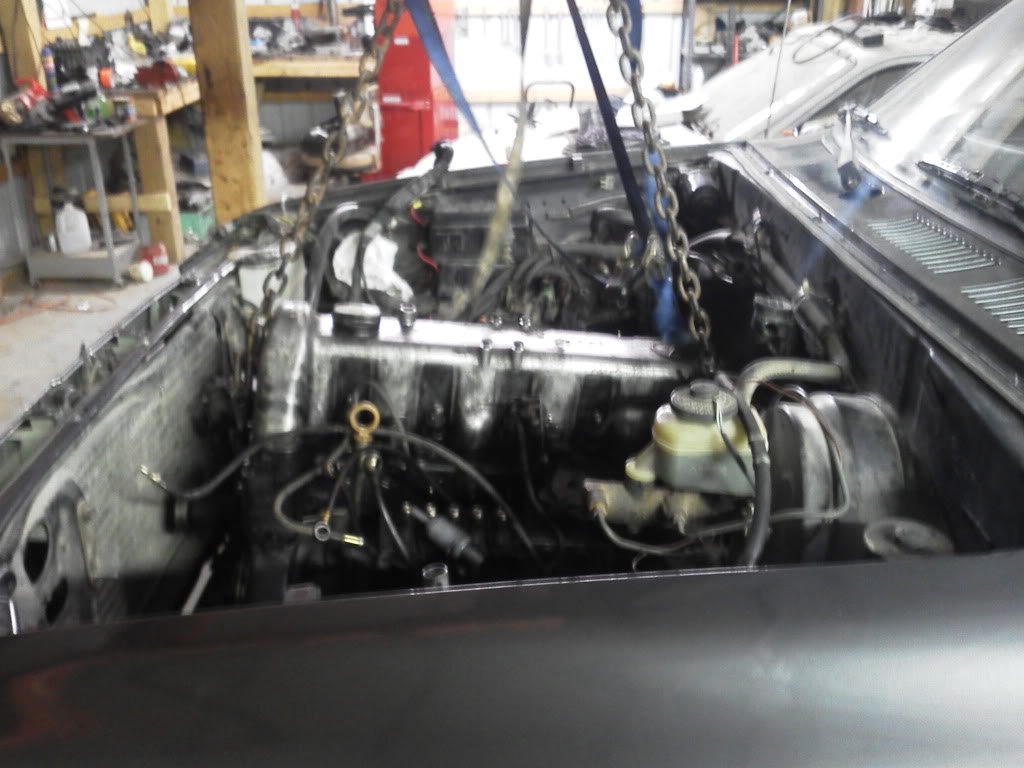
Here is the engine with the clutch bolted up.
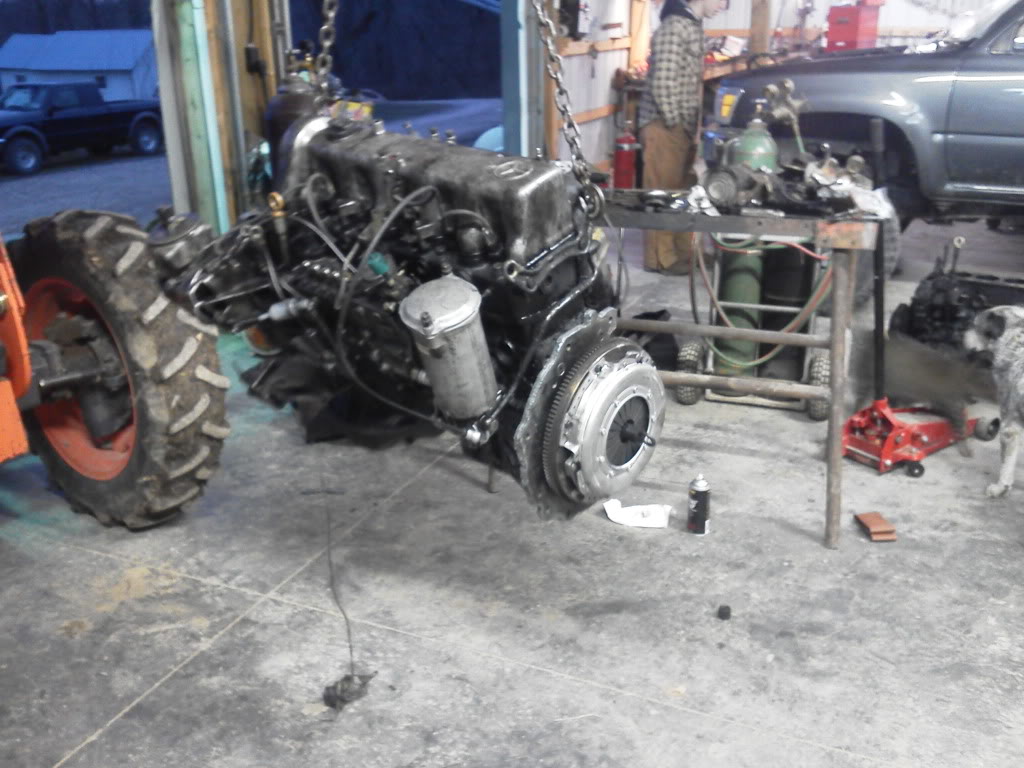
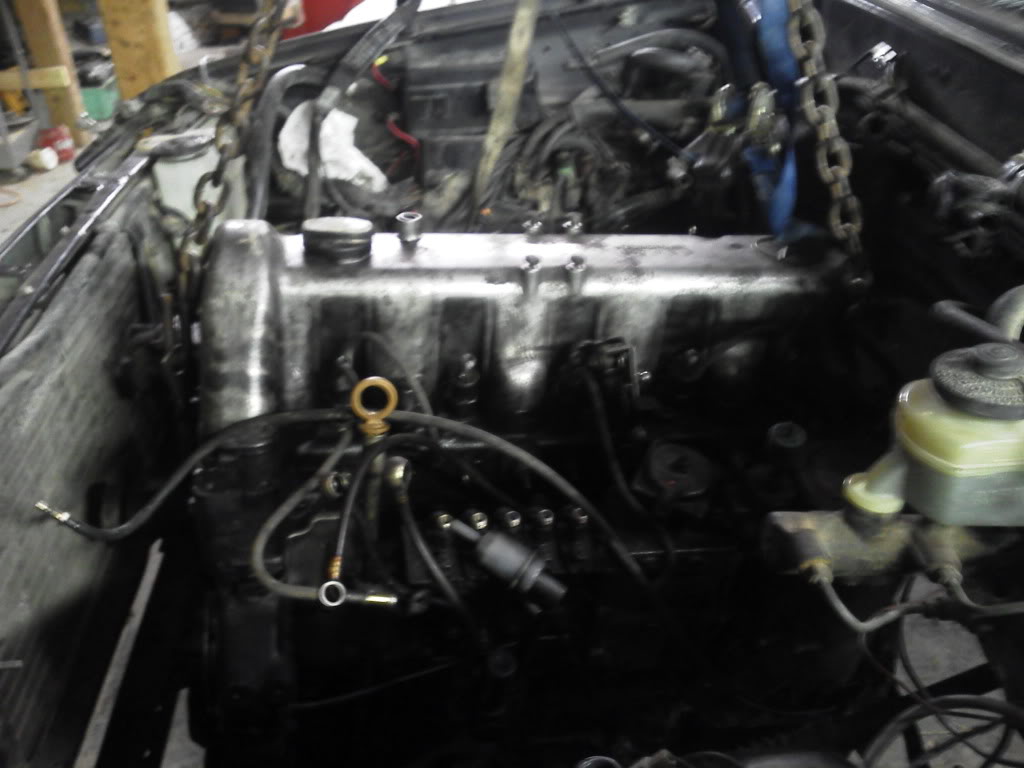
The engine going in the first time. Remove the front pulleys and vacuum pump you will thank yourself.
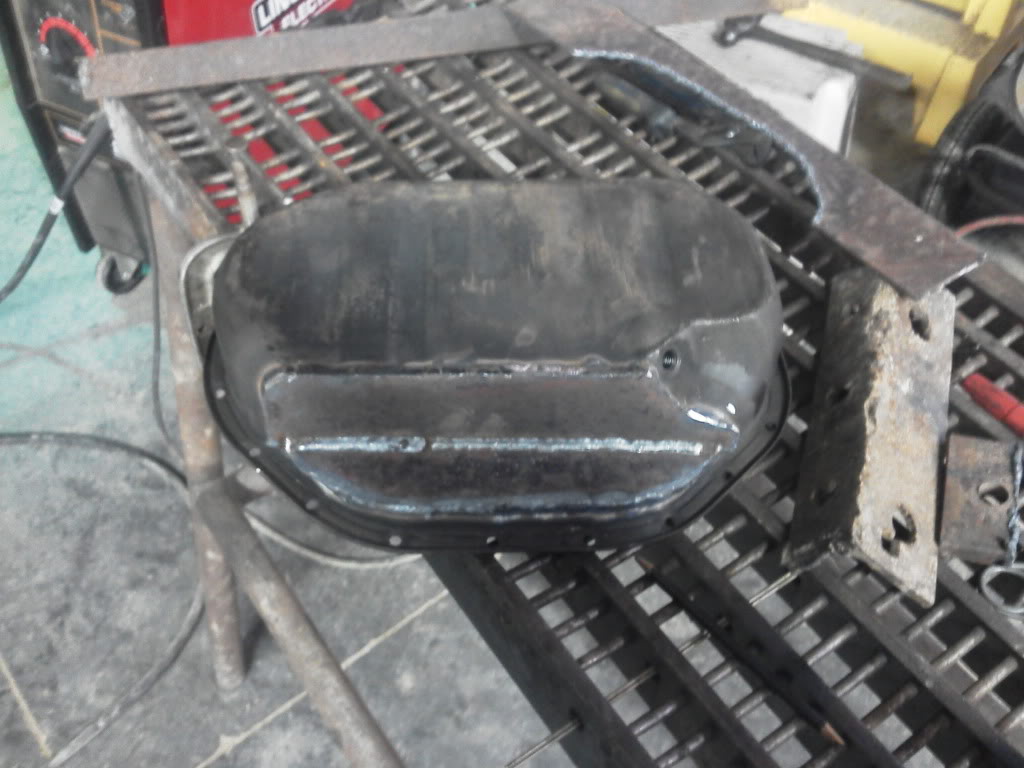
The notched oil pan.
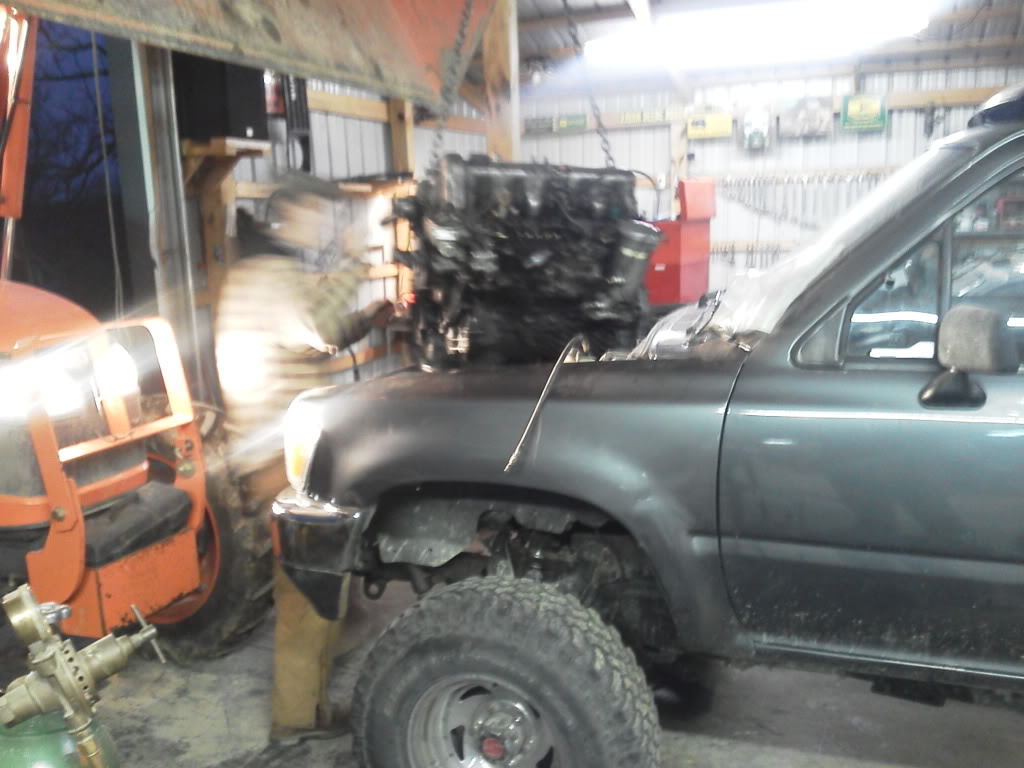
And here is the engine in the truck.
I jumped out of the cab in a hurry and caught the joystick with my coveralls. Luckily this was the only damage.
The whole operation.
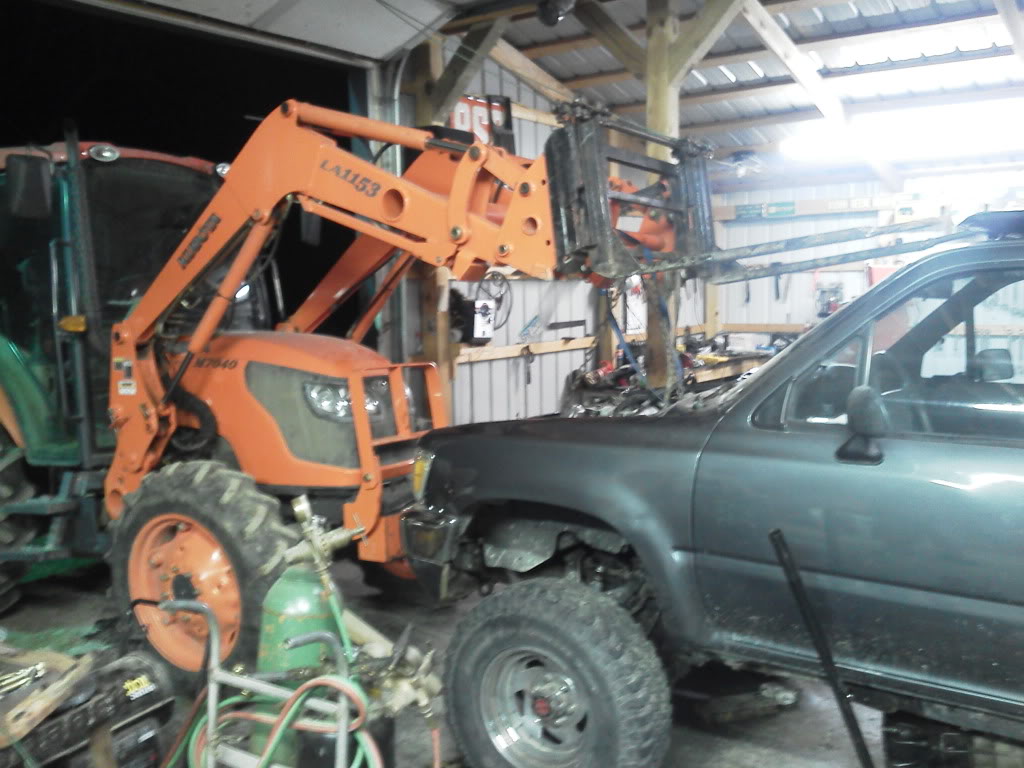
Sorry for the poor quality pictures. My memory card disappeared so I used my phone. I am sure I am forgetting a lot. If anyone has questions ask away. I'll post more tomorrow. I hope to drive it out of the shop Friday.
Make sure to tack the plugs in away from where you drill or it will temper the metal. My plugs were almost press fit.
Here is my pilot bearing adapter in the crank.
Take note the 85 crank inner diameter is slightly smaller than the 83 I started with.
Here is the engine with the clutch bolted up.
The engine going in the first time. Remove the front pulleys and vacuum pump you will thank yourself.
The notched oil pan.
And here is the engine in the truck.
I jumped out of the cab in a hurry and caught the joystick with my coveralls. Luckily this was the only damage.
The whole operation.
Sorry for the poor quality pictures. My memory card disappeared so I used my phone. I am sure I am forgetting a lot. If anyone has questions ask away. I'll post more tomorrow. I hope to drive it out of the shop Friday.
Jan 1, 2012 | 10:16 PM
#128
Contributing Member
Joined: Mar 2003
Posts: 11,334
Likes: 0
From: COTKU,Ontario,Canada
Could you not leave the rad where it is and just change to a front mounted pusher type electric fan?
IK you don't want to cut the core support but what if you were to "step" the support?
ie cut it out just where the rad sits to allow the rad to move forward and then rebuild the support between the engine and the rad.
In other words the rad goes from being attached to the truck on the front side of the rad to being attached on the back side of the rad.
should pick you up at least an 2" of clearance.
Jan 2, 2012 | 10:47 AM
#130
Thread Starter
Registered User
Joined: Apr 2011
Posts: 317
Likes: 0
From: Sedalia, MO
Aviator- as close as everything sits up there it would require a ton of trimming I think. I'll post pics and see what you think. I would rather it be up front.
bigshrek- no I didn't balance. I asked several people and everyone said there was no need to.
bigshrek- no I didn't balance. I asked several people and everyone said there was no need to.
Jan 2, 2012 | 11:24 AM
#131
Contributing Member
Joined: Mar 2003
Posts: 11,334
Likes: 0
From: COTKU,Ontario,Canada
There's a shop up here doing 617 conversions... they have a thread here... they left the rad where it was with out much issue so far as I remember...
IIRC they did switch to an electric fan...
IIRC they did switch to an electric fan...
Jan 2, 2012 | 09:02 PM
#132
Registered User

Joined: Jan 2010
Posts: 610
Likes: 0
From: Nebraska
All that I've seen don't run A/C and remove the condenser and shove the rad forward to where it was. I'm thinking just shove them both forward as much as possible, and probably get a different radiator that fits better but cools well, still. Don't know if I can get one from another car, or if I'll have to get one made. There's a guy up by St Joe that custom makes them if you want to go that route. I can give you his info. He's a real good guy.
Jan 2, 2012 | 09:40 PM
#133
Thread Starter
Registered User
Joined: Apr 2011
Posts: 317
Likes: 0
From: Sedalia, MO
Thank you for the tip Aviator. I looked them up and the reason i am having clearance issues is due to me using the R150. Apparently it sits farther forward than the G and W trannies they are using. I measured and as it sits now the is 3/4 of an inch between the condenser and the water pump pulley.
Joe there is almost no room in my truck to move them forward. I have 2 to 3 inches before I would be in the front bumper I believe. I'll have to give it a closer look in the morning. I am really thinking the remote radiator might not be all bad. I dont want to cut my core support and lose the hood latch. Due to time constraints I am going to get the engine in and running and work on my a/c during the spring. I have a while before its needed.
bigshrek- what transmission are you using. I have a template for the r150f I would be glad to loan you if you needed it.
Jan 3, 2012 | 03:08 PM
#134
Contributing Member
Joined: Mar 2003
Posts: 11,334
Likes: 0
From: COTKU,Ontario,Canada
hmmm 3/4" is not a lot of room to play with but it still clears... if you were to go with those front mounted e-fans it should be good...
curious ? a lot of folks are using the e-fans out of the Nissan Quest the rad therefore must be a similar square size to the toyota but I think it is a little thinner... any body know or have thoughts?
curious ? a lot of folks are using the e-fans out of the Nissan Quest the rad therefore must be a similar square size to the toyota but I think it is a little thinner... any body know or have thoughts?
Jan 3, 2012 | 03:09 PM
#135
Contributing Member
Joined: Mar 2003
Posts: 11,334
Likes: 0
From: COTKU,Ontario,Canada
hmmm 3/4" is not a lot of room to play with but it still clears... if you were to go with those front mounted e-fans it should be good...
curious ? a lot of folks are using the e-fans out of the Nissan Quest the rad therefore must be a similar square size to the toyota but I think it is a little thinner... any body know or have thoughts?
curious ? a lot of folks are using the e-fans out of the Nissan Quest the rad therefore must be a similar square size to the toyota but I think it is a little thinner... any body know or have thoughts?
Jan 4, 2012 | 07:20 PM
#136

Registered User
Joined: Dec 2011
Posts: 10
Likes: 0
Hi Power Stroke, I'm running the same transmission. The use of your wooden templete would be cool. I'll send you a message and give you my information.
How thick is your adapter plate? I was thinking of using 3/8 steel for mine. My bushing was built by a friend who has a machine shop.
Thanks, Carl.
How thick is your adapter plate? I was thinking of using 3/8 steel for mine. My bushing was built by a friend who has a machine shop.
Thanks, Carl.
Jan 6, 2012 | 10:38 PM
#137
Thread Starter
Registered User
Joined: Apr 2011
Posts: 317
Likes: 0
From: Sedalia, MO
Aviator- After many nights of head scratching and measuring I am just putting the rad in the bed. There is no room at all. I'll get pics tomorrow but plumbing it wont be bad. As for the E-Fan I am using a Taurus fan with an adjustable controller from summit.
Carl- I made my plate out of half inch. The starter had to be shimmed out a hair to keep it our of the flywheel but it turns the engine over just fine.
Well Its been a really crazy week. I have the engine mounts done and the engine is setting in the truck. I got my gauges in and started wiring them. I still have a few odds and ends to do and school starts soon. I am going with a rear mounted radiator. The plumbing isn't too bad. I am going to start out with the stock rad and probably move to a larger one a little later on. The exhaust is going to be tricky but I am going to have a local shop help me out with that one.
Jan 7, 2012 | 05:55 PM
#138
Registered User
Joined: Dec 2011
Posts: 23
Likes: 0
From: Front Range, C
powerstroke joe,
What a treat it would be to start off the new year with the platt platt platt of the OM diesel rattling ye ole yota. You are doing a good job from the pics and you seem to be one of the best YT members as far as responses to individual comments and clear descriptions. Consistency and clarity will get you far in life... Anyway, I started my new year off pretty ˟˟˟˟ty by blowing a chunk out of my 22re block with piston #2. I have taken this incident as an omen to stop thinking about the swap and actually doing it. Sooooooo... if you have any pictures or tips on the motor mounts you fabbed, I'd love to take a gander. Thanks bud.
What a treat it would be to start off the new year with the platt platt platt of the OM diesel rattling ye ole yota. You are doing a good job from the pics and you seem to be one of the best YT members as far as responses to individual comments and clear descriptions. Consistency and clarity will get you far in life... Anyway, I started my new year off pretty ˟˟˟˟ty by blowing a chunk out of my 22re block with piston #2. I have taken this incident as an omen to stop thinking about the swap and actually doing it. Sooooooo... if you have any pictures or tips on the motor mounts you fabbed, I'd love to take a gander. Thanks bud.
Jan 7, 2012 | 07:23 PM
#139
Thread Starter
Registered User
Joined: Apr 2011
Posts: 317
Likes: 0
From: Sedalia, MO
mountaingoat- Oh wouldn't that be the truth! I hope to hear it run soon. How soon I have no clue but I'm determined now lol. Thank you for your kind words. My whole purpose and hope behind this thread was to see if I couldn't be some source of help and information to others doing this. (as much as a 21 year old can be lol) Sorry to hear about your engine, but I think you will love the 617. I haven't even started mine yet and I can't tell out how rewarding it has been thus far. I'll have to get some pictures in the morning for you. My truck is out of the shop at the moment because I had to split a tractor this weekend. I used the existing Toyota frame perches and motor mounts. I used 1/2 inch plate to bolt to the Mercedes mounting locations on the block. I bolted the plates on and put a jack under the oil pan and centered the engine. I used cardboard as a template and just went from there with a torch and a grinder. They aren't pretty but they should hold. Are you going to build an adapter or go with the 4X4 labs one? If there is anything I can do to help you holler.
Jan 8, 2012 | 06:57 AM
#140
Registered User
Joined: Dec 2011
Posts: 23
Likes: 0
From: Front Range, C
Thanks powerstroke Joe, I look forward to the pics. No rush. Due to the limitations of my garage shop, I think I'll be going with the 4x4 labs kit. I've spoken with Luke a few times and he pretty much said I've got the easiest vehicle configuration for doing the swap...shorter and most compatible transmission (w56) and the larger engine bay of the 89-95 bodystyle. I think I'll be able to part out all of the 22re parts that are still working and pay for most if not all of the diesel price tag. There is a yard here in Denver with numerous running om617's still in the vehicle, many with low mileage >150,000. I'll stick with ifs for now but eventually plan to do an SAS. Found a guy who kept his overall lift to 4 inches above stock. Seems appealing. Thanks again and good work!


