
PowerstrokeJoe's om617 Turbo Diesel swap/build in 1990 P/up
 Dec 5, 2011 | 08:41 AM
#81
Thread Starter
Registered User
Joined: Apr 2011
Posts: 317
Likes: 0
From: Sedalia, MO
Black Sr5 I'll have to look into that here one of these days.
Pyrojoe- I wish I could help you there but I don't know much about SFA conversions.
Dmarsh- I will find my drawing and scan it and put it up. To be honest I am not sure its going to fit but I measured it to put it the same distance in the flywheel as the Toyota.
Good News engine should be here tomorrow. I have been working on the mounting for my A/C and have really hit a wall. I had to take a step back and I hope that I can figure it out today.
Dec 5, 2011 | 09:05 AM
#82

Registered User
Joined: Jul 2011
Posts: 91
Likes: 3
From: West Texas
PowerstrokeJoe Here is a picture of my A/C mount, I used the stock Toyota mount, mounted to a plate spaced off the Mercedes block.
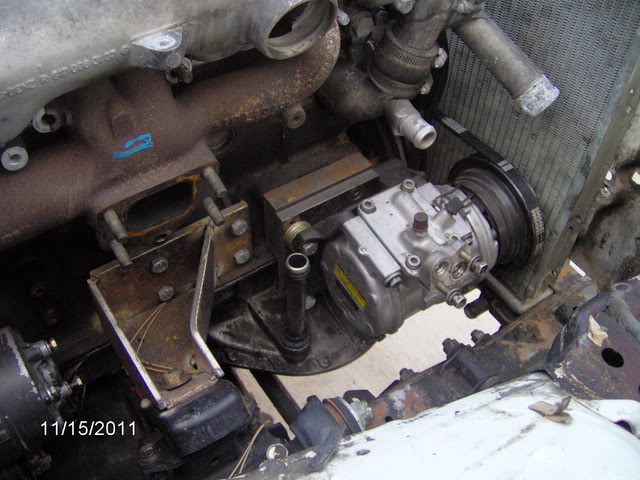
Two 1/2 " plates to space it off the block and another larger 1/2 " plate for the pump bracket to mount on
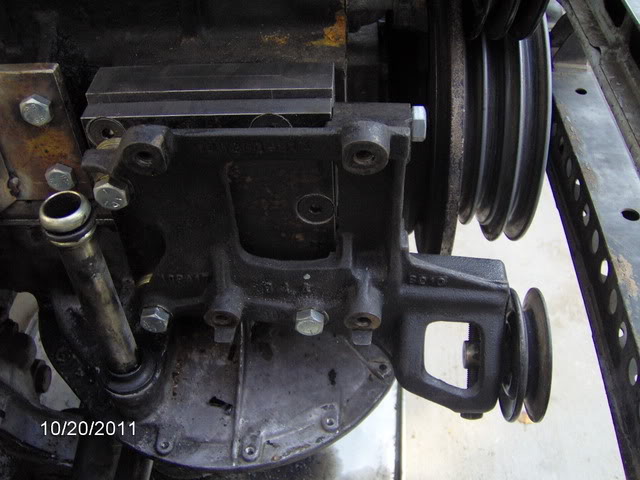
And a few washers to space the bracket out ( washers will be replaced with a spacer later)
Two 1/2 " plates to space it off the block and another larger 1/2 " plate for the pump bracket to mount on
And a few washers to space the bracket out ( washers will be replaced with a spacer later)
Dec 5, 2011 | 09:32 AM
#83
Thread Starter
Registered User
Joined: Apr 2011
Posts: 317
Likes: 0
From: Sedalia, MO
Thank you so much for those pictures. That was exactly what I needed to keep going. I scanned my Pilot bearing adapter design. Everything is measured out in thousandths of an inch.
I tried to resize it but it may be too small to read.
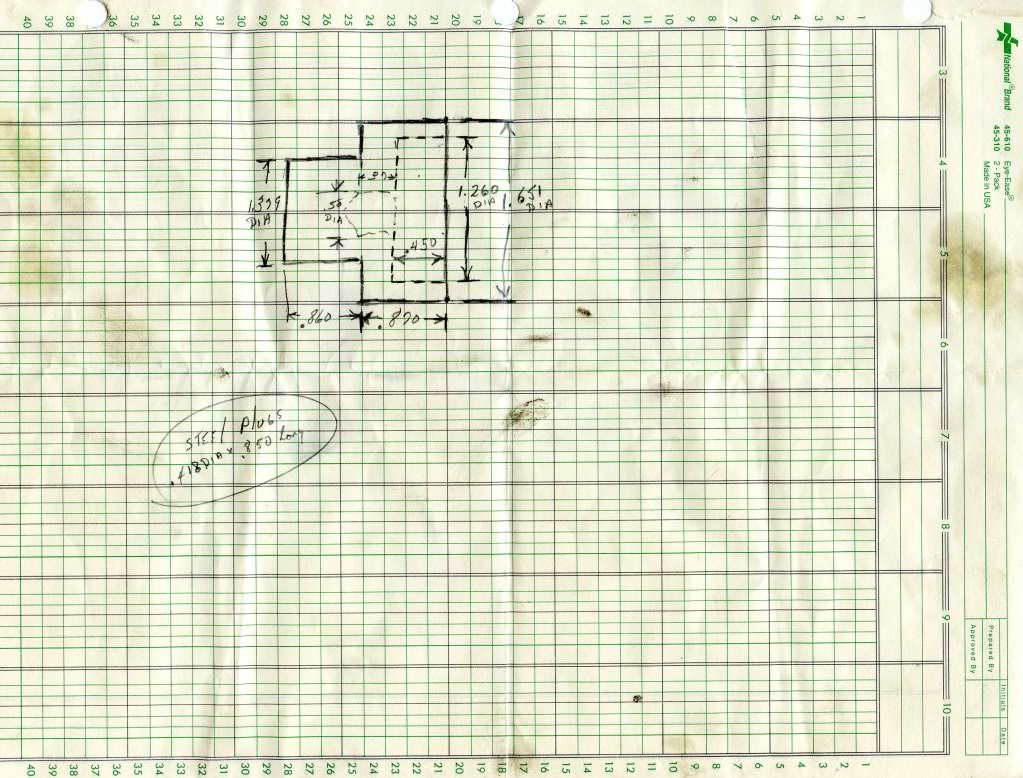
I tried to resize it but it may be too small to read.
Dec 5, 2011 | 11:17 AM
#86
Registered User

Joined: Jan 2010
Posts: 610
Likes: 0
From: Nebraska
so dmarsh, can you explain your belt set up? Looks like you will use one belt for a/c, one belt for p/s, and one belt for the alt. So will you run one long belt around both pulleys for the a/c and another long one around both pulleys for the alternator? (I'm assuming the top two pulleys are for the water pump. Is one belt for that sufficient?)
I'm also interested in how you will put tension on all the belts
I'm also interested in how you will put tension on all the belts
Last edited by pyrojoe22; Dec 5, 2011 at 11:18 AM.
Dec 5, 2011 | 03:42 PM
#87
Contributing Member
Joined: Mar 2003
Posts: 11,334
Likes: 0
From: COTKU,Ontario,Canada
I was suggesting the MB hood hinges because they have a "high lift" release that allows you to open the hood to @90 degrees... much more than you'd get normally. Which would allow much better access to the entire engine bay.
so dmarsh, can you explain your belt set up? Looks like you will use one belt for a/c, one belt for p/s, and one belt for the alt. So will you run one long belt around both pulleys for the a/c and another long one around both pulleys for the alternator? (I'm assuming the top two pulleys are for the water pump. Is one belt for that sufficient?)
I'm also interested in how you will put tension on all the belts
I'm also interested in how you will put tension on all the belts
Dec 6, 2011 | 07:59 PM
#88
Thread Starter
Registered User
Joined: Apr 2011
Posts: 317
Likes: 0
From: Sedalia, MO
YAYYYYYYYYYYYYYYYYY WAHOOOOOOOOOOOOOOOOOOOOOOOO!!!!!!!!!!!!!!!!!!!!!!! Ahem Ok now that that's done. My new engine got here about an hour ago and I am so excited to get this rig ready to roll! The engine looks fantastic! I'll get more pictures tomorrow, but here is one I snagged with my phone. 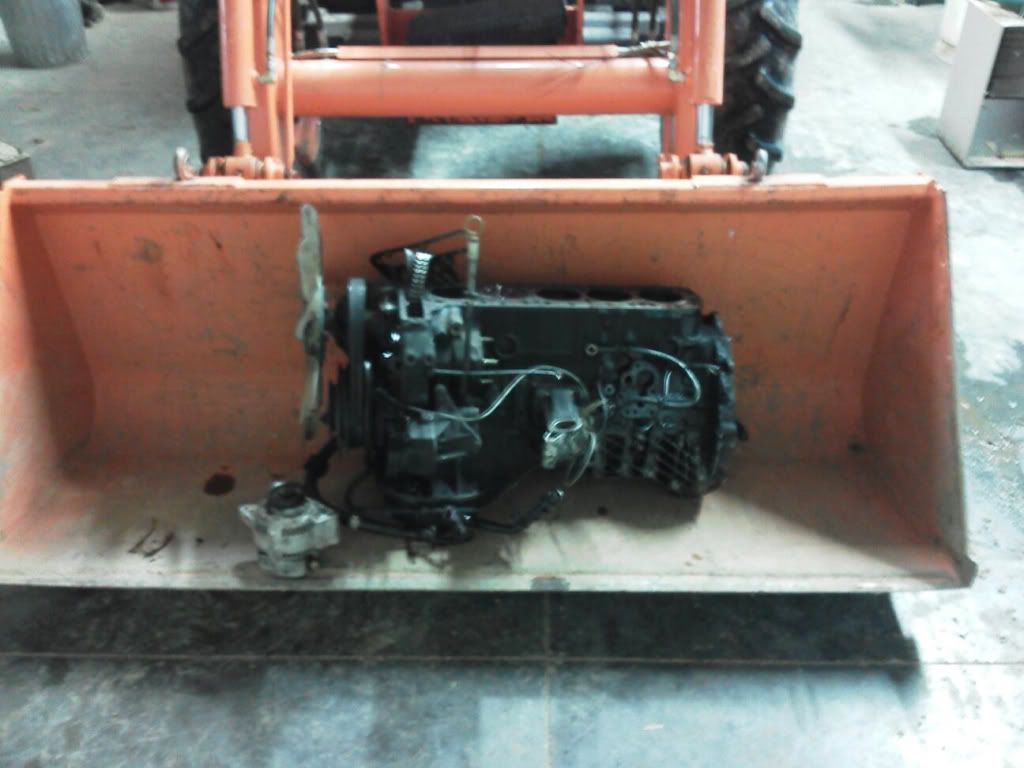
Dec 6, 2011 | 08:07 PM
#89
Registered User
Joined: Jan 2010
Posts: 610
Likes: 0
From: Nebraska
Nice! Now you can swap parts and hopefully get a pretty "fresh" engine!
I have my diesel technician friend coming over tomorrow, and since you just pulled the head on your other engine, I thought I'd ask you how many head bolts there are, since I'm going to probably be replacing all of them. My chilton's shows 22. We just want to get the head off to get a better look at the cylinders and pistons...
I have my diesel technician friend coming over tomorrow, and since you just pulled the head on your other engine, I thought I'd ask you how many head bolts there are, since I'm going to probably be replacing all of them. My chilton's shows 22. We just want to get the head off to get a better look at the cylinders and pistons...
Dec 6, 2011 | 08:53 PM
#91
Thread Starter
Registered User
Joined: Apr 2011
Posts: 317
Likes: 0
From: Sedalia, MO
There are 22 Head bolts and 4 smaller hex head bolts that go in the timing chain housing. If I were you I would get a set of hex bits that go in a ratchet because they are way the hell down in there and if you strip on you are going to cry I promise..... don't ask how I know. Why are you going to replace the bolts. They aren't TTY so you can reuse them just be Sure to make a template of where they came out. Take note you will need that triple square wrench set you asked about earlier. M12 I believe. Remember too that the cam towers are actually held on by head bolts too. Also one thing the manual will not tell you is the timing chain guide on the left side in the head has a pin that has to be pulled. Take one of the bolts out of the oil pan and screw in it it has threads in there and take a slide hammer to it. Thats all I can think of for now.
Dec 6, 2011 | 09:19 PM
#92
Registered User
Joined: Jan 2010
Posts: 610
Likes: 0
From: Nebraska
Many many many thanks! Yea I found a forum describing some generic head patterns, but it didnt go into depth at all on removing the head itself. I saw that you'd have to do something with the timing chain, and my tech friend mentioned pulling a pin. I'm not familiar with "TTY" but I'm assuming that means that these bolts don't stretch? If so that's great news and money saved. 26 bolts is a bit ridiculous... Turns out my parts store had those triple square bits, they were just uneducated about them. I only get my friends service for 2 hours so I want to make the most of it. I'd like to run this engine pretty soon! I dropped the oil pan and only found one piece of gravel, and the oil was somewhat gritty but I didn't see any large metal shavings.
Dec 6, 2011 | 09:50 PM
#93
Thread Starter
Registered User
Joined: Apr 2011
Posts: 317
Likes: 0
From: Sedalia, MO
Yep TTY means torque to yield and those are the ones that do stretch. According to my FSM the 79+ 617 did use TTY so I may be wrong on that. I'll have to do some more checking in the morning. 
 Peach parts seems to be a very affordable place to source parts from. their quality is great and if you have questions they are very eager to help. Do you need a copy of the head removal procedure from the FSM?. As for the chain. I took brake cleaner and cleaned the crap out of the cam gear and marked the where the top link of the chain is. I then took the cam gear off with the chain attached and tied a wire through the link corresponding with my paint mark. People will say that paint will stay on the chain... trust me it wont. I think I got all that right its been a long day lol
Peach parts seems to be a very affordable place to source parts from. their quality is great and if you have questions they are very eager to help. Do you need a copy of the head removal procedure from the FSM?. As for the chain. I took brake cleaner and cleaned the crap out of the cam gear and marked the where the top link of the chain is. I then took the cam gear off with the chain attached and tied a wire through the link corresponding with my paint mark. People will say that paint will stay on the chain... trust me it wont. I think I got all that right its been a long day lol
Dec 6, 2011 | 09:55 PM
#94
Thread Starter
Registered User
Joined: Apr 2011
Posts: 317
Likes: 0
From: Sedalia, MO
Link to head removal from FSM.
http://www.w124performance.com/servi...617/01-415.pdf
http://www.w124performance.com/servi...617/01-415.pdf
Dec 6, 2011 | 10:13 PM
#95
Registered User
Joined: Jan 2010
Posts: 610
Likes: 0
From: Nebraska
Holy crap man, i owe you 2 after that. This is WAY better than my stupid chiltons!!! Thanks so much!!!!!!!! So if theyre TTY then I'm assuming they'll need replaced since they're 30 years old and theyre probably stretched out. $66 for 22 new bolts from peach is still way better than $300 for ARP studs
Dec 7, 2011 | 06:45 AM
#96
Contributing Member
Joined: Mar 2003
Posts: 11,334
Likes: 0
From: COTKU,Ontario,Canada
Not doing one of these myself yet but thanks for the info from me too Joe...
As an aside a guy I used to work with at the airport had a Smart car and he bought an online FSM account (from MB I think) for a very reasonable amt. It actually allowed him to look up FSMs for the whole MB model line. I'll send him an email and find out the particulars and post a link here for you guys.
As an aside a guy I used to work with at the airport had a Smart car and he bought an online FSM account (from MB I think) for a very reasonable amt. It actually allowed him to look up FSMs for the whole MB model line. I'll send him an email and find out the particulars and post a link here for you guys.
Dec 7, 2011 | 04:20 PM
#97
Registered User
Joined: Jan 2010
Posts: 610
Likes: 0
From: Nebraska
Found the xzm triple square bits at O'Reilys for $6. Also, that FSM states that you need a 6mm allen wrench, but it's actually an 8mm (for mine anyways).
As far as rebuilding goes, are you going to be replacing your timing chain? I've been on peach parts for the last 20 minutes compiling a list of stuff I need and it's going to be about $300 by the time I get everything .... and to think, I got this motor for $150.....
As far as rebuilding goes, are you going to be replacing your timing chain? I've been on peach parts for the last 20 minutes compiling a list of stuff I need and it's going to be about $300 by the time I get everything .... and to think, I got this motor for $150.....
Last edited by pyrojoe22; Dec 7, 2011 at 05:32 PM.
Dec 7, 2011 | 08:32 PM
#98
Thread Starter
Registered User
Joined: Apr 2011
Posts: 317
Likes: 0
From: Sedalia, MO
I wish our O'rileys around here would carry some decent tools but they carry basically nothing. I am planning on doing the chain. Mine only has 1.5 degrees of stretch but I might as well do it while I'm in there. Be aware peach does not have the one head bolt that you need 9 of in stock. I had to source mine from Mercedes source at $5.50 a piece but I need them now and I know Kent's stuff is good. Parts for these things are HIGH but they go forever. I think its great for peace of mind that you went on and tore into it. I have a Duramax in the shop right now doing a CP3 and injectors with a friend so progress this weekend will be slow until we get him back on the road. We shall see I have all my parts on order.
Dec 7, 2011 | 08:54 PM
#99
Registered User
Joined: Jan 2010
Posts: 610
Likes: 0
From: Nebraska
I wish our O'rileys around here would carry some decent tools but they carry basically nothing. I am planning on doing the chain. Mine only has 1.5 degrees of stretch but I might as well do it while I'm in there. Be aware peach does not have the one head bolt that you need 9 of in stock. I had to source mine from Mercedes source at $5.50 a piece but I need them now and I know Kent's stuff is good. Parts for these things are HIGH but they go forever. I think its great for peace of mind that you went on and tore into it. I have a Duramax in the shop right now doing a CP3 and injectors with a friend so progress this weekend will be slow until we get him back on the road. We shall see I have all my parts on order.
As far as replacement parts, what else besides gaskets are you replacing? Some things I've been thinking about are glow plugs, thermostat, and the chain tensioner and the tension spring. My glow plugs all have correct resistance so I'll wait on those. I'm not sure about the thermostat and my stock water temp gauge... Also need to figure out how to make the oil pressure gauge work. And get the brake booster to work.
Speaking of Duramax's, we just bout an '05 LLY that won't go over 2k RPM, guessing its the fuel pressure regulator. Does your buddy's have problems or just gettin suped up?
Dec 7, 2011 | 10:13 PM
#100
Thread Starter
Registered User
Joined: Apr 2011
Posts: 317
Likes: 0
From: Sedalia, MO
To be honest no I didn't. Everything has kicked my $%% on this engine so I am going Over kill on this. I am replacing the T-chain and gaskets. My new block has 75k on it and is in very very good shape. I have a set of bearings on hand and enough parts to build 3 of these darn things now lol. My Tstat is brand new too. I know the glow plugs work good as the car started with no problems on a 30 degree day with 3 weak holes. I have all of the gauges and brake booster figured out. It's easier to show with pictures so I'll post that in the morning. I know I am overlooking some things now but I will post as they come to me.
As for the Dmax... Change the Fuel filter first. The symptoms you are describing sound like the truck is going into fuel limp. Most commonly this is done because it doesn't have the desired fuel rail pressure at a given load. It could be a lot of things causing that. First thing I'd do is pull the negative battery cables and reset it and see if it comes back. LLY's are finicky and will do that. If it does come back take it and have the codes pulled. Even if there is no CEL there will be a code. I'd almost bet the farm if it comes back it is P1093 or something along that lines. Most of the time that either means FF or a fuel pressure regulator valve. The Fuel Pressure Regulator can do some crazy stuff to them too. (Those are real fun to replace........) I'm just taking shots in the dark here and going off what I've seen on them. The fuel filter housing may need new gaskets too and they do crack and suck air from time to time.
My friend's is an LB7 which seem to have an appetite for injectors. His developed a nasty miss and started to haze like mad so we are doing the whole fuel system and adding an airdog too.


