

What is broken on YOUR Toyota
 Apr 4, 2012 | 09:34 PM
#821
Registered User
Joined: Mar 2012
Posts: 182
Likes: 0
From: South Carolina
STANZ, did you check your back window where the wires connect to the glass? Sometimes those things are STUCK on there, but have corroded and are not actually connected. A little solder will fix them right up and get them connected again. I had that issue and checked EVERYTHING but those little connectors at the glass...took off the old solder, put on some new and bang.. good to go. Good luck
Apr 5, 2012 | 09:32 AM
#822

STANZ, did you check your back window where the wires connect to the glass? Sometimes those things are STUCK on there, but have corroded and are not actually connected. A little solder will fix them right up and get them connected again. I had that issue and checked EVERYTHING but those little connectors at the glass...took off the old solder, put on some new and bang.. good to go. Good luck
It gets juice, I know that -- the relay clicks and the light on the dash only illuminates if I have the blade connects in place on the window track
Apr 5, 2012 | 09:41 AM
#823
Registered User
Joined: Feb 2011
Posts: 99
Likes: 0
From: macomb oklahoma
The list to what was broken and what still is broken is fewer, but still plenty.... lol iv been trying to get the interior to par, this is way i stripped it. the ebake sensor was messing up, it wouldnt start with out the ebake light being on. so i changed it out with my parts toya. it worked Great after that...... for like 16 hours, started it over and over e-light off and unnin great. i got up this morning and hauled off some things, went to get back in it... and it wont start. you can hear my starter clicking but its a no go... little fella let me down... besides this, i have a bolt in my floor pan snapped off, the steering shock is bad, fuel gauge doesnt work, radio wires are jacked up, bed needs replaced, temp sensor needs fixed and god only knows what else ill discover[IMG]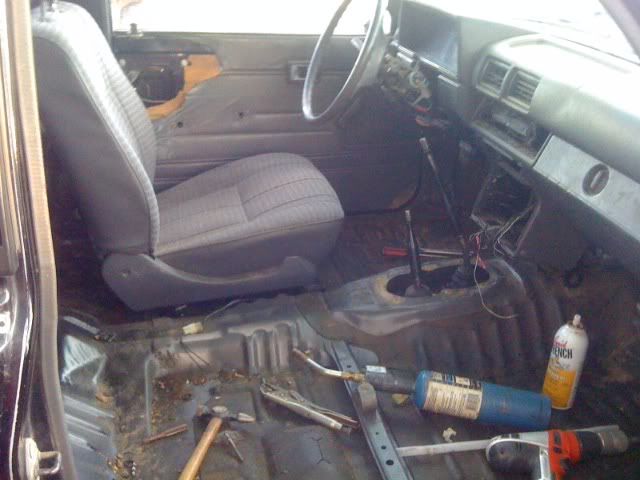 [/IMG]
[/IMG]
 Apr 5, 2012 | 06:37 PM
#827
Registered User
Joined: Aug 2011
Posts: 77
Likes: 0
From: Indio California
I just felt like giving an update on whats broken hahaha!
1995 4runner just rebuilt top end...
-Valves clackin a bunch, not sure if they were adjusted correctly.
-Speedometer stopped working
-trans still does not shift automatically(bad solenoids hopefully?)
-temp gauge is always very cold(maybe installing an extra one to monitor the rad temp?)
-leaks lots of oil..valve cover may not be sealed correctly...poop i hate leaking oil...
 Apr 5, 2012 | 10:15 PM
#829

Registered User
Joined: Mar 2012
Posts: 3
Likes: 0
From: paradice
Problem OIL PAN GASKET
. 1986 TOYOTA
. model PICKUP SR5
. transmission 4 Spd Manual
. drive type 4WD
. standard options Power steering, Power brakes, Tilt Wheel
Usta run good until I started looking for the oil leak now I cant find a oil pan gasket that fits. The standard 20102 gasket is too small. It was made in Japan, the sticker has been ripped off I think it�s a 22 re., never checked if it was just a efi cover. Took of the valve cover to change the gasket and every thing went smooth
I was talking to the people at napa and he told me about LC Engineering wondering ifn I had one of those. Wondering why the gasket won�t fit? When I put up the gasket it was to small, in size, and spacing between bolts.
Apr 5, 2012 | 11:41 PM
#830
Registered User
Joined: Mar 2012
Posts: 182
Likes: 0
From: South Carolina
STANZ, I was speaking in general. Many vehicles with the back glass defogging element have "tabs" that come out of the glass on both upper corners and either plug in (like yours) or solder on connections. You have the plug in kind which is great. I would disconnect the connectors and check the element in the glass with a meter to see if it carries current. If it does, then the glass portion is fine. If it doesn't, you'd need a new glass with element to get it up and running. As for the wires, etc, you can check those as well, but you said they have juice so you should be good. Glad I could help.. that corrosion causes all kinds of problem, but you're bound to have it after decades of no attention. It's difficult to figure out problems when something isn't sitting right in front of you  But don't go buying a brand new back window before you have checked and trouble shot everything, just saying a new back window could be one of the possible problems
But don't go buying a brand new back window before you have checked and trouble shot everything, just saying a new back window could be one of the possible problems
Apr 6, 2012 | 03:38 AM
#831
Problem OIL PAN GASKET
. 1986 TOYOTA
. model PICKUP SR5
. transmission 4 Spd Manual
. drive type 4WD
. standard options Power steering, Power brakes, Tilt Wheel
Usta run good until I started looking for the oil leak now I cant find a oil pan gasket that fits. The standard 20102 gasket is too small. It was made in Japan, the sticker has been ripped off I think it�s a 22 re., never checked if it was just a efi cover. Took of the valve cover to change the gasket and every thing went smooth
I was talking to the people at napa and he told me about LC Engineering wondering ifn I had one of those. Wondering why the gasket won�t fit? When I put up the gasket it was to small, in size, and spacing between bolts.
. 1986 TOYOTA
. model PICKUP SR5
. transmission 4 Spd Manual
. drive type 4WD
. standard options Power steering, Power brakes, Tilt Wheel
Usta run good until I started looking for the oil leak now I cant find a oil pan gasket that fits. The standard 20102 gasket is too small. It was made in Japan, the sticker has been ripped off I think it�s a 22 re., never checked if it was just a efi cover. Took of the valve cover to change the gasket and every thing went smooth
I was talking to the people at napa and he told me about LC Engineering wondering ifn I had one of those. Wondering why the gasket won�t fit? When I put up the gasket it was to small, in size, and spacing between bolts.
Apr 6, 2012 | 06:14 AM
#832
Registered User
Joined: Feb 2011
Posts: 99
Likes: 0
From: macomb oklahoma
does anyone know or have a wiring diagram for the 87 yota fuel wires? tryin to track down why my fuel gauge doesnt work i took out the seats and carpet. and i tested the wires going to the back the only one showing hot is when i turn on the lights.. there should be a constant charge going back for the fuel correct?
Apr 6, 2012 | 10:00 AM
#833
Hey Country...
The gauge is IGNITION activated(IOW< the key has to be on).... BUT, start with "87".... what? Which model? I'm not sure where the wiring goes, from the tank onward.... But I don't think it comes through the CAB...??? I thought it went foward along the frame and then up through the chassis into the dash cluster... But I'd just be guessing at this point. I do have FSM's(A link to them) in my sig. Just go there and grab the 86 or 88 one(Don't think they have an 87 in that site).... download it and hit up the electrical section. It's 84MB(?), so it can take a lil while, depending on the puter.
The gauge is IGNITION activated(IOW< the key has to be on).... BUT, start with "87".... what? Which model? I'm not sure where the wiring goes, from the tank onward.... But I don't think it comes through the CAB...??? I thought it went foward along the frame and then up through the chassis into the dash cluster... But I'd just be guessing at this point. I do have FSM's(A link to them) in my sig. Just go there and grab the 86 or 88 one(Don't think they have an 87 in that site).... download it and hit up the electrical section. It's 84MB(?), so it can take a lil while, depending on the puter.
Apr 6, 2012 | 10:08 AM
#834
PS> As far as "Constant Hot" to the fuel.... Neither for the Pump. That is kicked on through the COR, (Circuit Open Relay)........ You might know that, wasn't meaning to be insulting... Just wasn't sure what you meant at that part, to be honest.
Apr 6, 2012 | 12:22 PM
#835
Registered User
Joined: Aug 2011
Posts: 77
Likes: 0
From: Indio California
Problem OIL PAN GASKET
. 1986 TOYOTA
. model PICKUP SR5
. transmission 4 Spd Manual
. drive type 4WD
. standard options Power steering, Power brakes, Tilt Wheel
I was talking to the people at napa and he told me about LC Engineering wondering ifn I had one of those. Wondering why the gasket won�t fit? When I put up the gasket it was to small, in size, and spacing between bolts.
Apr 6, 2012 | 04:51 PM
#836
Registered User
Joined: Feb 2011
Posts: 99
Likes: 0
From: macomb oklahoma
LOL. i know the key has to be on, i was testing with the ignition on, besides that. the wires run from the tank along the frame through the cab under the seat to the dash. the pump is a manual pump so there wont be power there. but there has to be constant current in order to keep the gauge in the cluster to stay working instead of the gauge gauge showing what its suppose to be and shutting off. ill figure it out.
 Apr 6, 2012 | 08:49 PM
#839
Registered User
Joined: Mar 2012
Posts: 3
Likes: 0
From: paradice
thanks MANG
chekin out the silicone gasket sealant FIP orange. im trying to change it without pulling oil pan all the way out. already started and dono weather to put pull the tranny or keep going with the inches i have. or if it goes out the front already cleaned it off. took hours . im thinkin going along with it under the truck got enough to fit my hand in there. been carefull to scrape away from the pan with a flat head screw driver.
. wondering how big of a bead to put on it? one corn nut size bead or 2 Q tip size beads. . or :
. if one, should i put it on the inside or outside of the bolts?
. worried about oozeage and if i can over titen.
. or wait for it to dry then titen.
. or combination of all q tip size bead on inside of bolts and let dry then corn nut size the outside to creat a tight silicone seal without pushing silicone in the pan.
i bet the sealant has directions tho
Apr 7, 2012 | 03:27 AM
#840
So your not taking the pan all the way off? Even though it is possible to do it that way, I would recommend to pull it all the way off and seal it right.
I like to make sure I have a good even coat across the mating spots on the oil pan and block with my finger, then add a bead as necessary. You want good coverage, not so much it runs into the pan. Run the bolts up with your fingers until it starts to push out a little. Wait an hour for it to harden up some and then torque to spec. That way it will kind of form to the pan and the block and harden to it and when you tighten it down it will seal it up tight!
While it's still wet I like to run all the way around the pan with the excess..kind of like your caulking a bathtub, just for extra insurance.


