
Philbert's 87 4Runner Head Gasket & head replacement - take II
 Feb 24, 2013 | 10:10 PM
#41
Thread Starter
Registered User
iTrader: (2)
Joined: Dec 2009
Posts: 2,159
Likes: 7
From: Pleasanton, CA - SF Bay Area
Phil, I know you've probably already read everything posted on the entire internet about this but I'm still going to link Roger Brown's write up.
http://www.4crawler.com/4x4/CheapTri...l#CylinderHead
Two things that I took away from it was to get the tap (12x1.25mm) he mentions in there to clean out the headbolt holes. I got one when I did mine and the amount of crap that I got out with it was impressive. And this was after I thought I had them "pretty good". It isn't a standard size though so you may have to hunt around for it. I found mine at a NAPA here in town. I was going to offer to mail it to you but now I can't find which just pisses me off and means I'm going to have to clean the garage now
The second thing is his trick with the studs to help line up the head when replacing it. I didn't get studs but I did have new bolts so I picked out the best 4 and cut off the heads and loosely started them in the holes to be a cheap redneck alternative to Rogers idea. Worked great! Dry fit it first though to make sure you don't screw 'em in too far and can't get them out again with the head on. This of course assumes you are getting new bolts...
Scope's suggestion of a mortar tub is great. I did the same with all my stuff. This way you can soak it long term and then just brush alot of stuff off. I used some orange/citrus degreaser from ZEP that I found at Home Depot that worked great. Also, a lot of guys on the motorcycle boards soak their carbs in Pine Sol without issue. As long as you're going to be out of town you might as well have that stuff soaking and let time do some of the work for you. You might have to coax/beg/cajole/bribe/threaten your wife to add some water to it while your gone though. At least here in the AZ desert nothing stays wet for a whole week. Good luck.
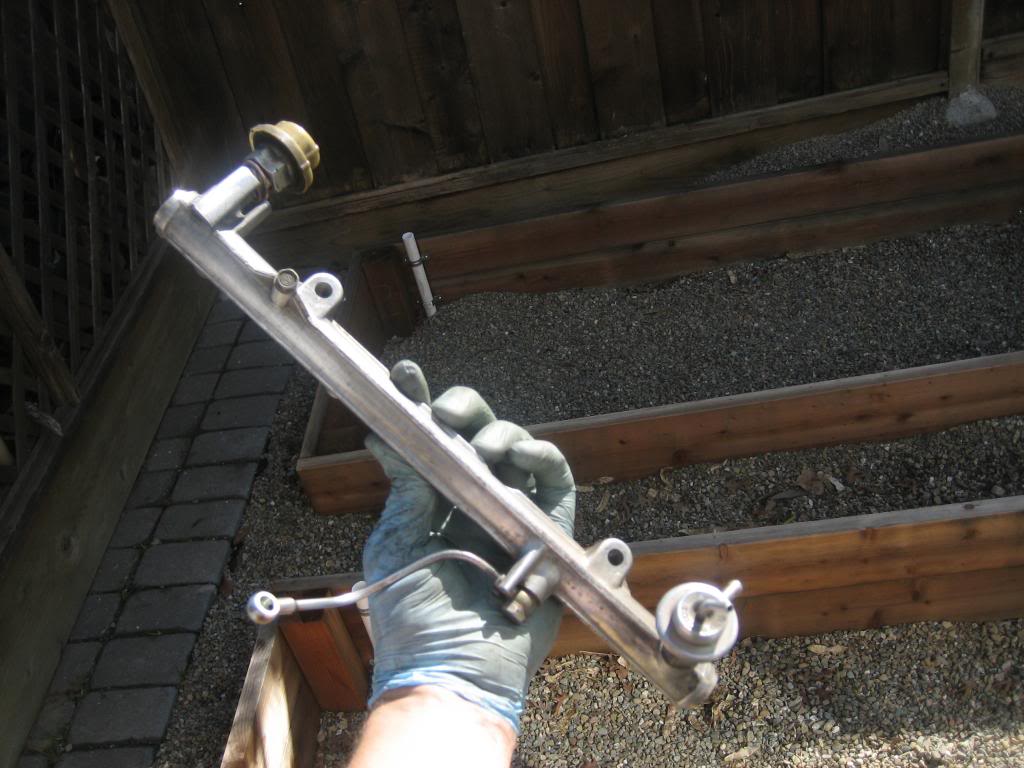
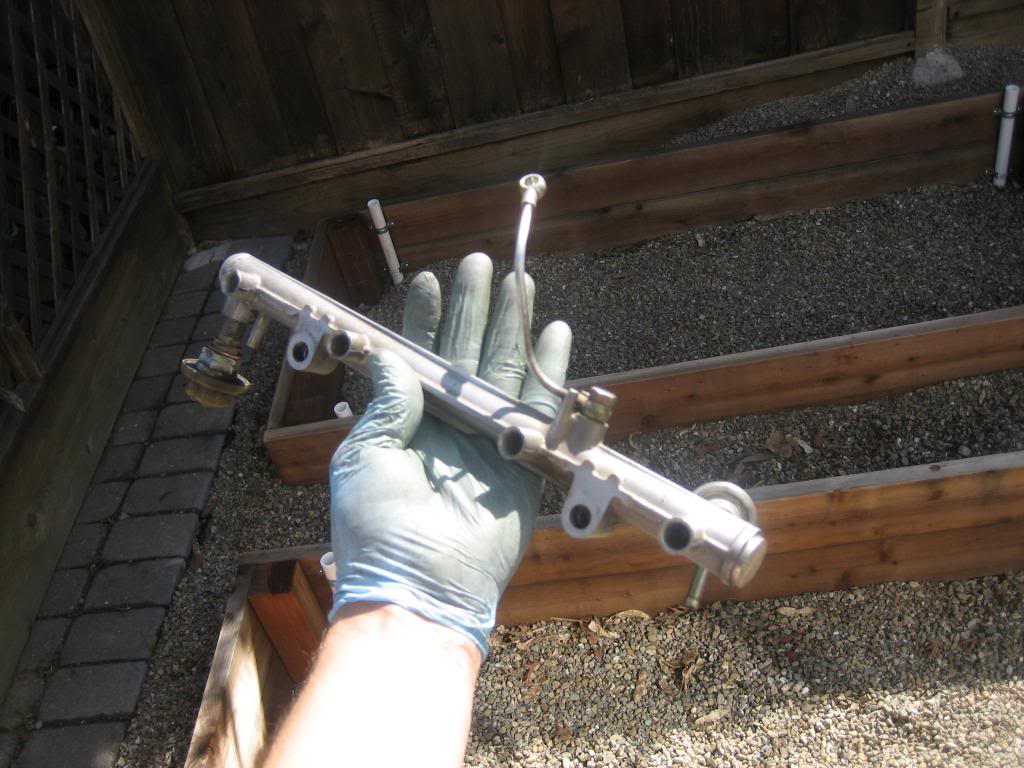
Oh, and I didn't post earlier - here are the "after" photos of my cleaned up fuel rail:
Hey stranger, thanks for following along and the great tips!
I'm actually already out of town, so I can't do anything till the weekend at the earliest. My wife's out of town much of next week so I'll be dedicating evenings after work to this project. I'm going to look into hot tanking at a machine shop but may try soaking overnight with dish soap per scope - we have some larger old bins that you'd use for drinks and ice at an outdoor party and are currently our yard waste bins...should be fine.
That's a great idea on the studs for alignment - I plan to get new bolts (not studs) from ENGNBLDR, and I Could cut off the tops of the old bolts - great idea!
Good call on the tap too - I've read you can make your own tap out of an old bolt by cutting a vertical groove/channel in the threads, so that the gunk will work its way up as you screw down, but I don't know if I can cut that straight. If you find the tap, I'd love to borrow it...if not I can just call around and get one...pretty sure my tap and die set doesn't have that size but I've made a note to look.
Side note not related to the head but I do have a GM alternator that I'm hoping to hook up during this mess. When I took out the OEM one I noticed that the positive/charging post on the back attached to a wire hardness on that side of the engine bay - same harness that the plug on the alternator came from. With all the swap guides they say to run a positive (thicker gauge than I see on OEM) from the post direct to the battery, with an inline fuse. So, do I just do that and ignore the wire in the harness that WAS attached to the back of the alternator? Tape it up with electrical tape?
Feb 25, 2013 | 07:19 AM
#43
Thread Starter
Registered User
iTrader: (2)
Joined: Dec 2009
Posts: 2,159
Likes: 7
From: Pleasanton, CA - SF Bay Area
Outsane - honestly no idea about the resistor box...haven't come across anything like that in the teardown....you have a photo? What does high impedence do?
I feel like I've come across this in the past, but Witchhunter cleans and installs new screens and grommets/seals correct? Or do I need to source those and send along?
I feel like I've come across this in the past, but Witchhunter cleans and installs new screens and grommets/seals correct? Or do I need to source those and send along?
Feb 25, 2013 | 07:30 AM
#44

Registered User

Joined: Sep 2007
Posts: 8,381
Likes: 873
From: San Francisco East Bay
"older" 2d gen's use low impedance injectors, so that they switch faster with the higher current. But because the ECU runs off 12v, there is a resistor box to keep the otherwise higher current from burning up the injector.
"later" 2d gen's (I'm not sure of the change date, but I'm pretty sure MudHippy knows) use "high impedance" injectors that don't require the resistor box. I'm surprised outsane has such good luck with the switch, because I thought there was more to it (waveform) than just the resistor.
As usual, take a look at www.autoshop101.com / EFI#3 Fuel Delivery & Injection Controls.pdf (page 12-13)
Feb 25, 2013 | 07:44 AM
#45
Registered User
Joined: Jun 2006
Posts: 2,711
Likes: 4
From: San Diego
http://www.importsupportcars.com/pho...9499451411.JPG

here is the resistor box
So the resistance is in the resistor instead of the box, just bypassed it.. I still need to to the write up.
I got all new injectors, with the 4 ports instead of 1 or 2, supposed give more power and better fuel economy.
here is the resistor box
So the resistance is in the resistor instead of the box, just bypassed it.. I still need to to the write up.
I got all new injectors, with the 4 ports instead of 1 or 2, supposed give more power and better fuel economy.
Feb 25, 2013 | 08:01 AM
#46
Thread Starter
Registered User
iTrader: (2)
Joined: Dec 2009
Posts: 2,159
Likes: 7
From: Pleasanton, CA - SF Bay Area
Thanks guys - that's a great resource scope, will bookmark and continue to read up there!
I found an article online just now that seems to state I have low resistance injectors due to the model year. That finned resistor box looks familiar too, I think I have it on the inner fender in the bay...will have the check.
I found an article online just now that seems to state I have low resistance injectors due to the model year. That finned resistor box looks familiar too, I think I have it on the inner fender in the bay...will have the check.
Feb 25, 2013 | 08:21 AM
#48
Thread Starter
Registered User
iTrader: (2)
Joined: Dec 2009
Posts: 2,159
Likes: 7
From: Pleasanton, CA - SF Bay Area
How much extra did it cost for the high impedence injectors from witchhunter? Do you also need to do a higher impedance cold start injector? I had planned to get that cleaned too.
Feb 25, 2013 | 10:25 AM
#50
Thread Starter
Registered User
iTrader: (2)
Joined: Dec 2009
Posts: 2,159
Likes: 7
From: Pleasanton, CA - SF Bay Area
Scope - I just called those guys and bad news:
They don't have a hot tank anymore They have a spray cleaner but it only does the outside of the parts, not the inside of the manifolds.
Also got some pricing on checking out/rebuilding the head:
- $40 just to check it (if they end up working on it, I can apply this credit to the job)
- $220 labor to hone/clean/reassemble head
- About $150 in valves/stems/seals/etc - the hardware
The more I think about this the more I'm thinking of just getting the ENGNBLDR head/cam new instead and selling my used head for cheap.
I want to call Witchhunter but their website says to avoid calling since they are so busy LOL....
They don't have a hot tank anymore
They have a spray cleaner but it only does the outside of the parts, not the inside of the manifolds.Also got some pricing on checking out/rebuilding the head:
- $40 just to check it (if they end up working on it, I can apply this credit to the job)
- $220 labor to hone/clean/reassemble head
- About $150 in valves/stems/seals/etc - the hardware
The more I think about this the more I'm thinking of just getting the ENGNBLDR head/cam new instead and selling my used head for cheap.
I want to call Witchhunter but their website says to avoid calling since they are so busy LOL....
Feb 25, 2013 | 10:46 AM
#51
Registered User
Joined: Jan 2010
Posts: 953
Likes: 21
From: Imperial County CA
Sounds like the new head is the way to go. For a difference of $90 I'd go with engnbldr. If they found something else wrong with your head in the process it might make the new head cheaper. Just my $.02
Feb 25, 2013 | 10:56 AM
#52

Scope - I just called those guys and bad news:
They don't have a hot tank anymore They have a spray cleaner but it only does the outside of the parts, not the inside of the manifolds.
Also got some pricing on checking out/rebuilding the head:
- $40 just to check it (if they end up working on it, I can apply this credit to the job)
- $220 labor to hone/clean/reassemble head
- About $150 in valves/stems/seals/etc - the hardware
The more I think about this the more I'm thinking of just getting the ENGNBLDR head/cam new instead and selling my used head for cheap.
I want to call Witchhunter but their website says to avoid calling since they are so busy LOL....
They don't have a hot tank anymore
They have a spray cleaner but it only does the outside of the parts, not the inside of the manifolds.Also got some pricing on checking out/rebuilding the head:
- $40 just to check it (if they end up working on it, I can apply this credit to the job)
- $220 labor to hone/clean/reassemble head
- About $150 in valves/stems/seals/etc - the hardware
The more I think about this the more I'm thinking of just getting the ENGNBLDR head/cam new instead and selling my used head for cheap.
I want to call Witchhunter but their website says to avoid calling since they are so busy LOL....

I wouldn't bother trying to find a dip tank for those aluminium bits, a parts washer with brush, or maybe even a power washer(aka car wash) should get em clean.
Oh And quit washing parts in your garden before the wifey finds out you've ruined her organic rating
 Feb 25, 2013 | 11:46 AM
#53
Thread Starter
Registered User
iTrader: (2)
Joined: Dec 2009
Posts: 2,159
Likes: 7
From: Pleasanton, CA - SF Bay Area
Just called these guys - they are a mile from my work and recommended by another local machine shop I called. Really nice on the phone and said it would likely be about $20 to clean my parts - sounds really reasonable. I'm going to bring in my autometer sender as well to see if they can tap a fitting for it too.
Griffen’s Auto parts across from Home Depot
950 Shulman Avenue
Santa Clara, CA 95050
(408) 988-4025
Griffen’s Auto parts across from Home Depot
950 Shulman Avenue
Santa Clara, CA 95050
(408) 988-4025
Feb 25, 2013 | 11:55 AM
#54
Thread Starter
Registered User
iTrader: (2)
Joined: Dec 2009
Posts: 2,159
Likes: 7
From: Pleasanton, CA - SF Bay Area
Just called these guys - they are a mile from my work and recommended by another local machine shop I called. Really nice on the phone and said it would likely be about $20 to clean my parts - sounds really reasonable. I'm going to bring in my autometer sender as well to see if they can tap a fitting for it too.
Griffen�s Auto parts across from Home Depot
950 Shulman Avenue
Santa Clara, CA 95050
(408) 988-4025
Griffen�s Auto parts across from Home Depot
950 Shulman Avenue
Santa Clara, CA 95050
(408) 988-4025
Feb 25, 2013 | 11:58 AM
#55
Thread Starter
Registered User
iTrader: (2)
Joined: Dec 2009
Posts: 2,159
Likes: 7
From: Pleasanton, CA - SF Bay Area

I'm going to take my parts in early next week to work and have these guys wash them. Will try to call ENGNBLDR this week to order stuff...
Feb 25, 2013 | 02:03 PM
#56
Thread Starter
Registered User
iTrader: (2)
Joined: Dec 2009
Posts: 2,159
Likes: 7
From: Pleasanton, CA - SF Bay Area
Just ordered my head, cam and bolts
Just got off the phone with ENGNBLDR and ordered a street RV cam with 268*C cam, and their head bolts. Should be at my work when back Monday
He gave me a good break in procedure that I'm going to document here for myself and others later:
The ENGNBLDR Head and cam come pre lubed.... but they said use black moly grease for cam lobes, rotate assembly before final installation.
Before the valve cover goes on, dump first quart of oil across rockers.
(once everything is buttoned up I plan to bump the starter without the coil hooked up in order to circulate oil inside the motor)
1) Once everything is installed, put a fresh oil filter and oil in the motor and start it. Let it idle in your driveway, varying RPM between 1500 and 2000 every 5-10 minutes.
2) Adjust timing and valves (7* & 9*, unlike the 8* and 10* for stock cams)
3) Let it sit 15 minutes
4) Drain oil and change filter; add new oil.
5) Drive 500 miles of normal wear but nothing crazy on the motor (no hill climbs or drag racing!)
6) change oil and filter again
7) re torque head bolts (don't loosen, just tighten!)
8) Check valves for any needed adjustment
9) At 1,000 miles, change oil and filter one more time and you're good!
Last edited by Philbert; Feb 25, 2013 at 02:31 PM. Reason: wording
Feb 26, 2013 | 06:13 PM
#58

Hey stranger, thanks for following along and the great tips!
I'm actually already out of town, so I can't do anything till the weekend at the earliest. My wife's out of town much of next week so I'll be dedicating evenings after work to this project. I'm going to look into hot tanking at a machine shop but may try soaking overnight with dish soap per scope - we have some larger old bins that you'd use for drinks and ice at an outdoor party and are currently our yard waste bins...should be fine.
That's a great idea on the studs for alignment - I plan to get new bolts (not studs) from ENGNBLDR, and I Could cut off the tops of the old bolts - great idea!
Good call on the tap too - I've read you can make your own tap out of an old bolt by cutting a vertical groove/channel in the threads, so that the gunk will work its way up as you screw down, but I don't know if I can cut that straight. If you find the tap, I'd love to borrow it...if not I can just call around and get one...pretty sure my tap and die set doesn't have that size but I've made a note to look.
 beer being the confounding factor in that scenario) Promise to return it when you're done and PM me your address if you still want it.
  Feb 27, 2013 | 10:55 AM
#60

Registered User
Joined: Feb 2013
Posts: 11
Likes: 0
That^^^ made my day!!! Thanks for the compliment.
I wasn't clear that you meant cleaning the piston tops. In the FSM, is shows a scraper being used. slow-and-steady-wins the race. so, with that in mind, I would say, any means you can use that doesn't damage or leave grit, would be applicable. with that said, I would just be diligent with gentle scraping, brake cleaner, acetone, lather rinse repeat.
yes. I had the timing cover off and turned the crank by hand. when I was doing my motor, and Joe's, I constantly thought to myself that I hoped I never had to be THIS deep into the motor again, or any time soon. I do believe you referenced doing the timing cover not so long ago...so, that is not a concern, right? But why I am saying that is just simply for the purpose of turning the crank. and only that.
make sure you clean out those head bolt holes very well. I did not have an air compressor at the time I was doing mine, so I was meticulous with the q-tips and acetone.
as far as the appearance of the blocked passages....indeed, it looks that way. I used a paper clip and a sheetrock screw to pull that crap out on mine (mine wasn't that bad). on Joe's motor, they were that bad....and when I replaced the freeze plugs on his, I cold not believe the amount of crap I could see inside the water jacket.....veritable pebbles and larger of stuff that was the equivalent of solidified talcum powder. my assumption is that it was from the previous owner(s) likely using tap-water in the radiator and this was the accumulation of mineral deposits solidifying. as you can see, the passages on the head gasket are smaller than the actual passages on the block and head. not sure why that is. but just like the arteries in a human, narrowing equals a place to accumulate stuff.
I am new here, but I am having a similar problem to the one you had. I have an 88 pickup with 22R-E engine. It looked very similar to yours. For the head gasket kit, did you buy a 22R kit, or a 22REC kit. I think mine should work with the 22R, just wanted to make sure.
Thank you.


