
Head Rebuild
 09-24-2007, 08:00 PM
#41
Registered User
Thread Starter
Join Date: Aug 2007
Location: Texas
Posts: 128
Likes: 0
Received 0 Likes
on
0 Posts
Welp I've got the thing back together finally. At 9:00 this morning I could see the pistons and I started it up again a couple of hours ago. But I think the timing belt is off a notch, what is a bullet proof way to set the gap? How many teeth should be between the marks on the cam sprockets? I do not have a belt with marks on it so that is out.
 09-24-2007, 08:46 PM
#42
Registered User
Join Date: Mar 2007
Location: Orange, CA
Posts: 318
Likes: 0
Received 0 Likes
on
0 Posts
Welp I've got the thing back together finally. At 9:00 this morning I could see the pistons and I started it up again a couple of hours ago. But I think the timing belt is off a notch, what is a bullet proof way to set the gap? How many teeth should be between the marks on the cam sprockets? I do not have a belt with marks on it so that is out.
rotate another few times just to be sure and you're golden.
09-25-2007, 07:35 AM
#43
Registered User
Thread Starter
Join Date: Aug 2007
Location: Texas
Posts: 128
Likes: 0
Received 0 Likes
on
0 Posts
alright I'm having trouble. I lined the marks up and set the crank to 0* When I put the belt on both of the marks on the sprockets line up just left of the marks on the backing. If I move them over one nothc they are just to the right. The belt it tight throughout the system and it is not jumping teeth. I left them at the position just to the left of mark and buttoned it up. How much power are these things supposed to have? It runs smooth but has a complete lack of power. Such as, hammer down it takes me around 3 seconds to hit 30mph. Think I should move the timing belt?
Last edited by naadomail; 09-25-2007 at 08:09 AM.
09-25-2007, 02:12 PM
#44
Registered User
Join Date: Aug 2007
Posts: 211
Likes: 0
Received 0 Likes
on
0 Posts
it has been said a million times but the marks on the timing belt are not necessary. what you need to do before touching the belt is make sure the cam sprockets are pointing right at the notches on the backing plate then rotate the crank until your #1 cyl is at top-dead-center. once you have done this, wrap the belt around the crank then up around the driver side cam. it takes some fenageling but next you put the timing belt around the passenger side cam. make sure your tensioner is on then rotate the crank several times. after each full cycle, your cam sprockets should point perfectly to the notches on the backing plate and the crank pulley should go right to 0* TDC.
rotate another few times just to be sure and you're golden.
rotate another few times just to be sure and you're golden.
What about the distributor jumper so the ECU doesn't auto time? HOW AND WHERE do you set this jumper? It's just a temporary jumper correct?
09-25-2007, 06:49 PM
#45
Registered User
Thread Starter
Join Date: Aug 2007
Location: Texas
Posts: 128
Likes: 0
Received 0 Likes
on
0 Posts
Good news everyone, I have determined that the timing belt is set correctly. However my electronic timing was retarded. I set it by ear and gained a good 10 horses. Man this thing is still slow though. My 0-60 time is dead on 17 seconds. Is this normal? Love driving it around though and can't wait to get it dirty. BTW the entire project, parts and tools only ran me into the $450 price range. (one head mind you) Thanks for all your help. And I can't wait to further tax your minds.
09-26-2007, 03:50 AM
#46
Registered User
Thread Starter
Join Date: Aug 2007
Location: Texas
Posts: 128
Likes: 0
Received 0 Likes
on
0 Posts
threw code 71 last night. (egr) any thoughts? sensor is connected and no leaks. I do have an exbhaust leak at the end of the passenger exhaust manifold. Can this be the cause? Also at 65 mph on the gauge my truck is sitting at 2750rpm. Normal?
09-26-2007, 05:29 PM
#48
Registered User
Thread Starter
Join Date: Aug 2007
Location: Texas
Posts: 128
Likes: 0
Received 0 Likes
on
0 Posts
Yes, clean it....how? Carb cleaner? Also, the grond that is attatched to the top intake manifold right on top of the engine. What does it connect to? I can't seem to find the dang wire. Thanks
10-02-2007, 08:50 PM
#50
Registered User
Thread Starter
Join Date: Aug 2007
Location: Texas
Posts: 128
Likes: 0
Received 0 Likes
on
0 Posts
I cleaned out the egr valve and sensor that gos into it very well. However I am still showing a code. Infact I can't get it to turn off even for a second. I will reset to codes and the light is still there, same code. (71) Any ideas? Also, anyone on that wire?
10-03-2007, 09:52 AM
#51
Registered User
Join Date: Mar 2007
Location: Orange, CA
Posts: 318
Likes: 0
Received 0 Likes
on
0 Posts
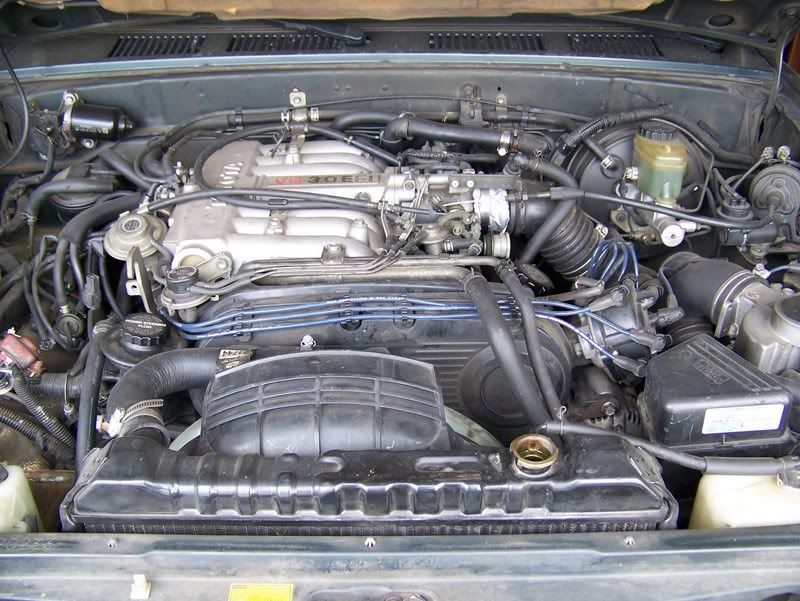
the ground wire has a quick release clip that connects it to a wire that is attached to the firewall. this pic doesn't show it that clearly but you can see that one end is bolted to the rear plenum bolt
10-03-2007, 09:15 PM
#53
Registered User

Join Date: Jul 2007
Posts: 11
Likes: 0
Received 0 Likes
on
0 Posts
you will have to remove the power steering pump mounting bracket bolts on top and loosen the bottom one and then slide the pump backwards towards the passenger fenderwell then the egr valve has a jic fitting where it connects to the head remove it and then the two bolts that hold it to the head i dont know if you have a 3-4 in 3/8 wobbly extension mines snap on but maybe sears has one. anyways those also have to come off. did you check the crossover pipe for the exhaust. just for future reference snap on has the tool for the cam sprockets part no Ya9680 they make the world of difference just a thought though. www.snapon.com good luck to you hopefully this will help you. sorry i wrote this post too late to help you with anything good luck with your 4runner
Utah 4runner
Utah 4runner
Last edited by utah 4runner; 10-03-2007 at 09:26 PM.
10-06-2007, 08:48 PM
#54
Registered User
Thread Starter
Join Date: Aug 2007
Location: Texas
Posts: 128
Likes: 0
Received 0 Likes
on
0 Posts
Cleaned out the Valve very well and checked it with a vacuum pump, it is working well. I have no vacuum coming from the little hose that actuates the valve (the one on top) Light is still on. Could it be the sensor that is connected directly to the valve? What does it do?

Thread
Thread Starter
Forum
Replies
Last Post
FS[PacSouthWest]: 2- 8"3rd members:4.88 ratchet lockers,new setup kit, rear axle rebuild kit,diff armor
jerusry
Axles - Suspensions - Tires - Wheels
1
10-19-2015 05:28 PM


