
Head Rebuild
 Aug 10, 2007 | 04:58 PM
#1
Thread Starter
Registered User
Joined: Aug 2007
Posts: 128
Likes: 0
From: Texas
I just bought a 1995 4Runner with the 3.0 as a project vehichle. One of the exhaust valves sounds burnt and needs replacement. I am an old Jeep guy and will need help along the way. Can anyone point me in the direction of a good how-to for re-working the valves? Thank you in advance for your help.
Aug 10, 2007 | 06:17 PM
#3

Registered User
Joined: Dec 2006
Posts: 611
Likes: 1
From: Virginina Beach
http://personal.utulsa.edu/~nathan-b...fsm/index.html
Click engine and then make sure you are looking at the correct manual as far as the 3.0 versus the 22re
Click engine and then make sure you are looking at the correct manual as far as the 3.0 versus the 22re
Aug 10, 2007 | 06:34 PM
#4
Thread Starter
Registered User
Joined: Aug 2007
Posts: 128
Likes: 0
From: Texas
problems are a low rpm/idle vibration. Also there is a intermittent popping noise from the exhaust that sounds like blow by. There seems to be a loss of power all around, but especially on the top end. Also when cruising at 45 mph there is engine vibration like a cylinder is misfiring.
Last edited by naadomail; Aug 10, 2007 at 06:36 PM.
Aug 13, 2007 | 12:30 PM
#6
Thread Starter
Registered User
Joined: Aug 2007
Posts: 128
Likes: 0
From: Texas
I have pulled the valve covers off and revealed some interesting things. I believe the exhaust valve on the #4 cylinder is burnt. seems that they make a "whoomp" sound when the valve is depressed. There is also some burnt oil on the right valve cover. Here are some pictures:
Right Valve Cover:

Left Valve Cover:

Nothing remarkable about the cams. Any comments? Also what is the easiest way of going about taking the head off?
Right Valve Cover:
Left Valve Cover:
Nothing remarkable about the cams. Any comments? Also what is the easiest way of going about taking the head off?
Last edited by naadomail; Aug 13, 2007 at 12:35 PM.
Trending Topics
Aug 13, 2007 | 01:44 PM
#8
Thread Starter
Registered User
Joined: Aug 2007
Posts: 128
Likes: 0
From: Texas
yeah, bought a manual, but it's not much help. It just tells you the order one should diassemble an engine lol. It also recommends pulling the engine out before removing the heads. That's not happening.
Aug 13, 2007 | 03:05 PM
#10
Thread Starter
Registered User
Joined: Aug 2007
Posts: 128
Likes: 0
From: Texas
Well I got the Intake manifold off. The question is, do I go out and buy an air compressor and impact wrench, take the head off, and do the valve job myself. Or do I take it to my mechanic? He wants to charge $500 to take the head off, rework it, replace the burnt valve at cost, and put it back on. I'd finish the work. He said he could rework the head for $200 plus parts.
Here is a pic of where it stands:

Also, if anyone needs pics of anything I'll be glad to provide them.
Here is a pic of where it stands:
Also, if anyone needs pics of anything I'll be glad to provide them.
Aug 13, 2007 | 04:20 PM
#11
Registered User
Joined: Mar 2007
Posts: 318
Likes: 0
From: Orange, CA
you're better off removing the heads with a 1/2" breaker bar. to properly remove the heads you need to detorque the headbolts in several passes. it would be difficult to do this properly with an impact wrench. save yourself some $$$ and take the heads off yourself and take them to your guy for the valve job.
Aug 13, 2007 | 06:46 PM
#12
Thread Starter
Registered User
Joined: Aug 2007
Posts: 128
Likes: 0
From: Texas
Well, I used a nice sized wrench with a cheater pipe and could not get them to budge. Once I worked on a boat motor and twisted off the head bolts. I'm still living with that mistake. So I'm trying to be cautious. Thanks for the info about the impact BTW. Another problem is that I cannot figure out a good way to take the cam pulley off. I've broken 2 screwdrivers by sticking them in the little holes behind the pully with no success. Also I found that the previous owner apparently did not know how the tighten the timing belt. It was so loose I could turn the pully that mounts on the intake manifold with my hand. I don't think this was the problem...but still I don't think this is normal.
Aug 13, 2007 | 08:18 PM
#13
Registered User
Joined: Mar 2007
Posts: 318
Likes: 0
From: Orange, CA
Well, I used a nice sized wrench with a cheater pipe and could not get them to budge. Once I worked on a boat motor and twisted off the head bolts. I'm still living with that mistake. So I'm trying to be cautious. Thanks for the info about the impact BTW. Another problem is that I cannot figure out a good way to take the cam pulley off. I've broken 2 screwdrivers by sticking them in the little holes behind the pully with no success. Also I found that the previous owner apparently did not know how the tighten the timing belt. It was so loose I could turn the pully that mounts on the intake manifold with my hand. I don't think this was the problem...but still I don't think this is normal.
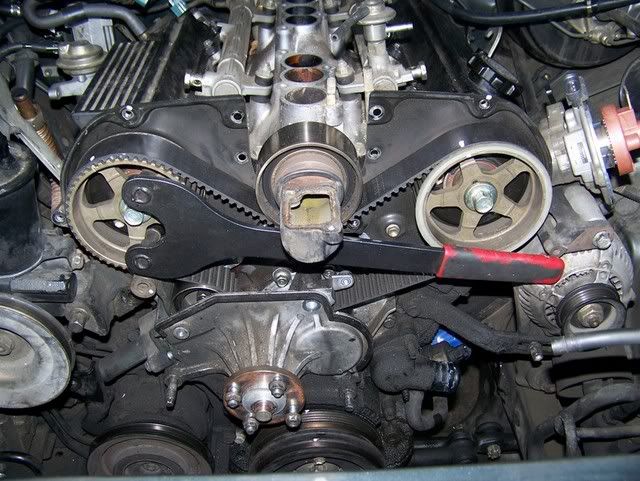
i broke my tools prior to using this holding tool, it did the trick by keeping that sprocket absolutely still will i layed into that bolt with about 2 feet of cheater pipe.
Aug 13, 2007 | 09:19 PM
#14
Thread Starter
Registered User
Joined: Aug 2007
Posts: 128
Likes: 0
From: Texas
wow, how hard were the head bolts to remove on your project? Mine are just as tight as the cam sprocket. Also, how hard is it to just remove the passenger side head? As I am just looking to replace a valve and check things out.
Aug 14, 2007 | 07:20 PM
#16
Thread Starter
Registered User
Joined: Aug 2007
Posts: 128
Likes: 0
From: Texas
Got a gasket set in for my runner. Bought it online for real cheap. They are out of Arlington Texas. Have a look at thier store.
http://www.jisengine.com/
Here is thier ebay store:
http://stores.ebay.com/JIS-Engine_W0...Q3amesstQQtZkm
http://www.jisengine.com/
Here is thier ebay store:
http://stores.ebay.com/JIS-Engine_W0...Q3amesstQQtZkm
Aug 15, 2007 | 05:15 PM
#17
Registered User
Joined: Dec 2006
Posts: 611
Likes: 1
From: Virginina Beach
OK, first - cam sprocket- get a 10mm socket and a 12 or 18 inch extension(whicher will allow you to get it over the rad support) and put it on the 10mm bolt behind the sprocket. get a 1/2 ratchet with a 17mm(make sure it is a 6 point for strength) on the cam sprocket bolt and slowly turn to get the 100mm with extension to tighten up - it will break free, but you will need a cheater bar on it - i used a 4 foot piece of conduit(its what I had around)
next -
The head bolts - you need a 12 or 14(cant remember which) TWELVE point socket - 1/2" drive will be required. You will also need a 3 or 4 inch 1/2" extension and a strong 1/2" ratchet. You should be able to break them free without twisting them off - They are very tight - you may need a cheater bar again - I broke 3 brand new craftsman sockets on mine(had 1 that was that tight) but they came out - if it were me I would get a spare or two to have on hand(take them back if it doesnt break)
NOTE - you realize that you are not supposed to put those bolts back in right - they are torque to yield bolts and are supposed to be replaced - you are risking a HG failure if you dont do it
After you get your heads off, unless they need machine work, I would redo them yourself - its not too hard - A good tutorial would be nice to have on here as well (wink, wink) - I am getting ready for the same project and I am planning to make a guide for it as well.
Kat
Aug 15, 2007 | 06:55 PM
#18
Thread Starter
Registered User
Joined: Aug 2007
Posts: 128
Likes: 0
From: Texas
Thanks for all the info. I'm going to be out of town for the weekend camping (without the runner)  But Monday i will go shopping and take it on. know a good place to get cheap head bolts?
But Monday i will go shopping and take it on. know a good place to get cheap head bolts?
Aug 16, 2007 | 10:05 AM
#20
Registered User
Joined: Oct 2005
Posts: 587
Likes: 0
From: Berkeley, CA
The cam sprockets would have been a lot easier to get off if you had loosened the bolts before you removed all the other top end stuff. Look at the FSM that is linked in the sticky on top of this page for the procedures.


