
Another 88 rebuild/questions thread (in Hawaii)
 Mar 21, 2010 | 01:33 PM
#61
YotaTech Milestone-Two Millionth Post
Joined: Jan 2009
Posts: 12,009
Likes: 122
From: Northeast Pennsylvania
no , not hard but not sure entirely necessary. I had followed instructions in another thread to do that....maybe just see what happens.
I used 2 bottle jacks as well....so I had , 2 bottle jacks, 2 jack stands and 1 floor jack.
I used 2 bottle jacks as well....so I had , 2 bottle jacks, 2 jack stands and 1 floor jack.
Mar 21, 2010 | 02:12 PM
#62
Thread Starter
Registered User
Joined: Jul 2005
Posts: 195
Likes: 0
From: Currently Hilo Hawaii, Saipan 670 Is Home
Ok I'm opening up shop now. I'm gonna work top to bottom. I figure by removing the cover and what not I'll be able to leverage the oil pan out instead of blindly wedging stuff in between.
Mar 21, 2010 | 03:49 PM
#63
YotaTech Milestone-Two Millionth Post
Joined: Jan 2009
Posts: 12,009
Likes: 122
From: Northeast Pennsylvania
yes.
once I had the timing cover off i was able to see a good inch or so of the pan and when i loosened up the pan i just pushed on that part. no wedging or anything like that.
Mar 21, 2010 | 03:58 PM
#64
YotaTech Milestone-Two Millionth Post
Joined: Jan 2009
Posts: 12,009
Likes: 122
From: Northeast Pennsylvania
let me just give you a little disclaimer.
everything I've written or done is by research or trial and error, or in the case of my crankshaft bolt and oil pan, were things I figured out .
I am not a mechanic...i have a clue how stuff works and want to know what each and every part is for etc etc....
so please understand that...I am a novice mechanic, feeling way over my head sometimes. though, right now, a timing chain and head gasket are repairs that CAN be done by someone with little or no experience.
carry on........
Mar 21, 2010 | 08:22 PM
#65
Thread Starter
Registered User
Joined: Jul 2005
Posts: 195
Likes: 0
From: Currently Hilo Hawaii, Saipan 670 Is Home
It's all good 92!
Today I was hoping to get everything off the head but taking off brackets ended up being more difficult than I thought.
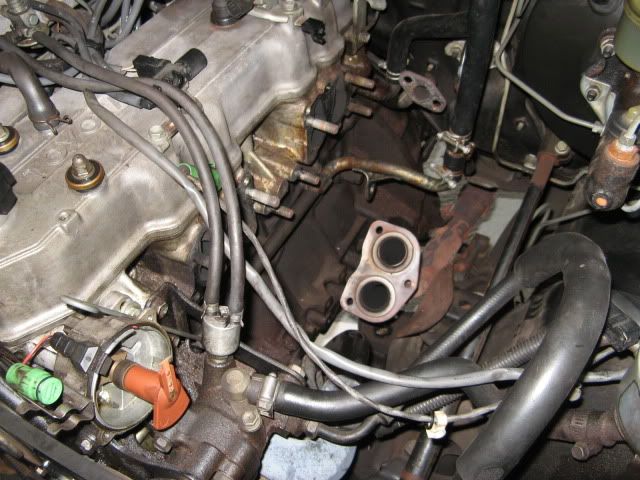
First started with taking the exhaust stuff off. I didn't realize but I'm missing a bolt on the exhaust manifold to head and a bold on exhaust manifold to down pipe D:
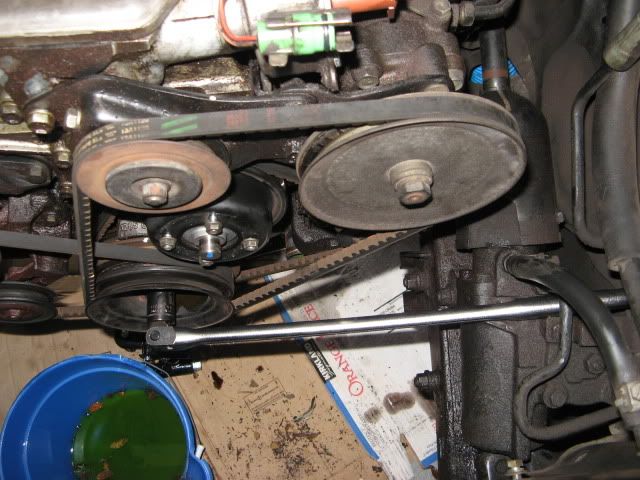
After that I decided that it was time to remove the infamous crank bolt. I will tell you right now that the starter bump trick is amazing! Only took two bumps and the bolt was loose. ( I know that the breaker bar is on the steering box and not tied down. I am luck that it worked and nothing bad happened.)
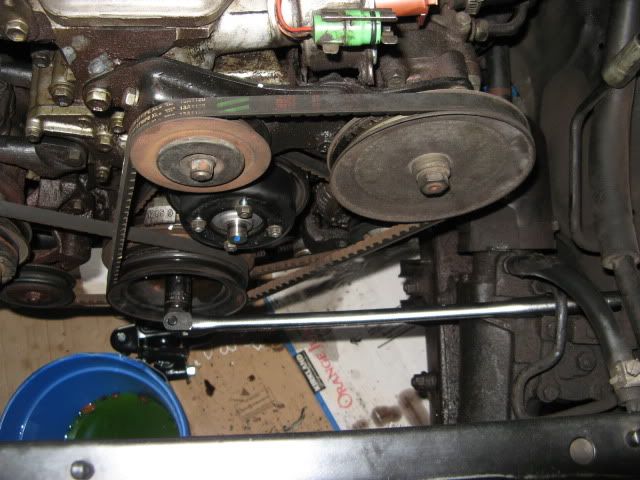
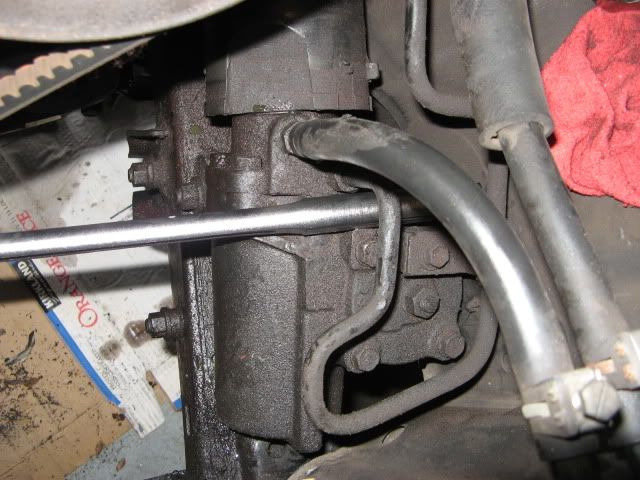
Note: I realized while comparing my truck to 4crawlers engine bay shot and creating new cuss words, that my steering box is bigger than his.
In preperation for accesorie removal I noted the belts and their locations
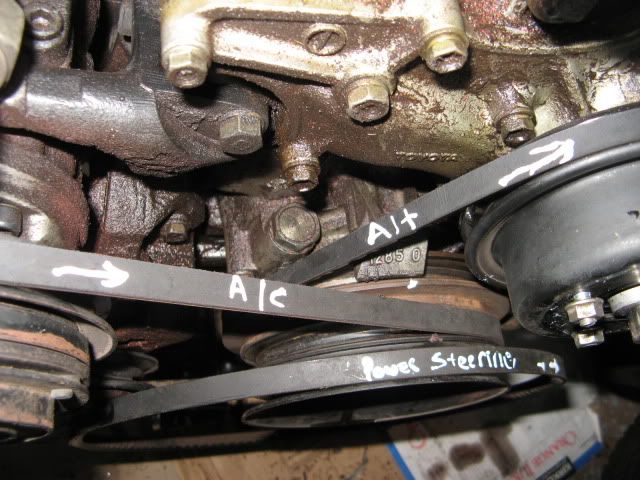
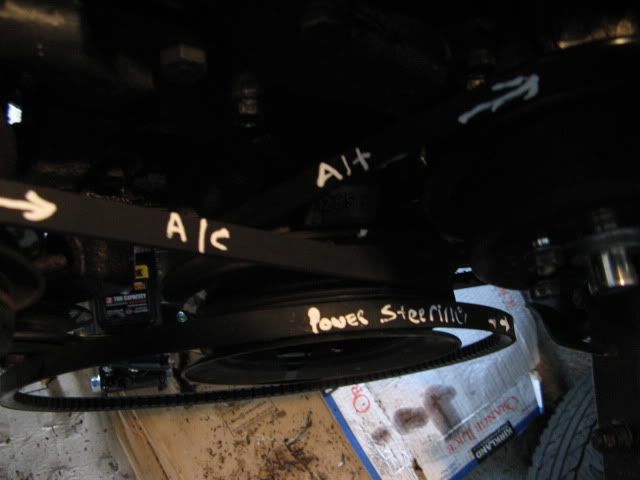
Next step was to remove the accesories (Power steering, AC, Alternator)
This step is easy to write out but let me tell you, Removing all that junk is a real pain.

I yanked for atleast 15 mins on the AC bracket only to realize it was still attached by one bolt.


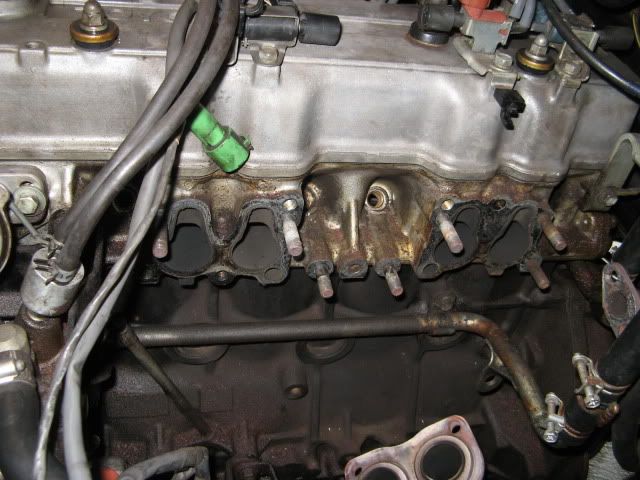
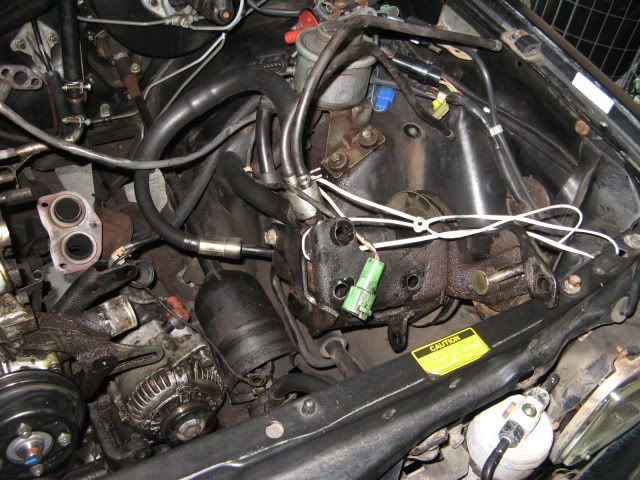
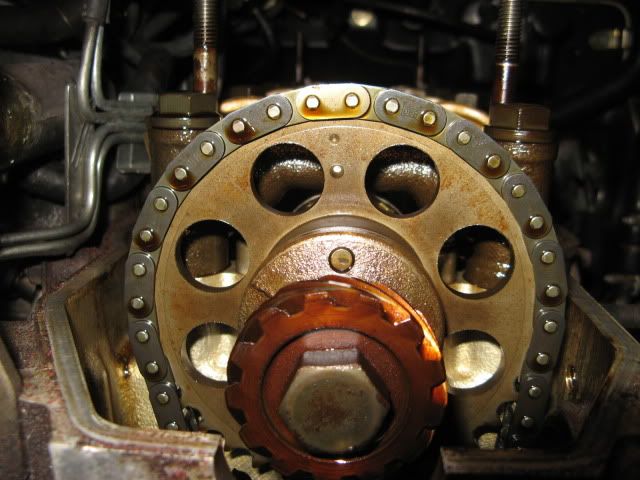
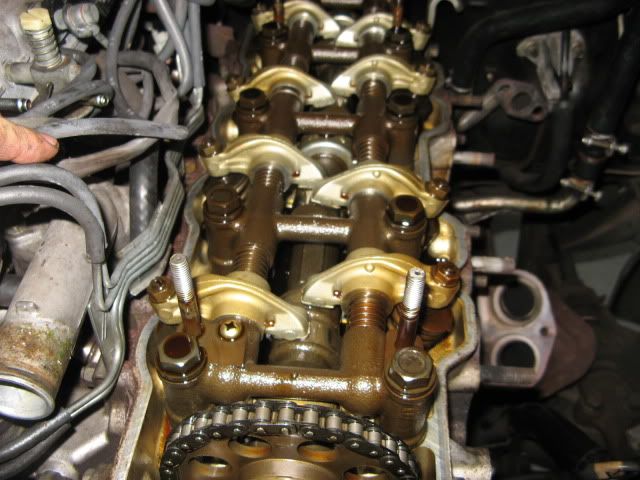
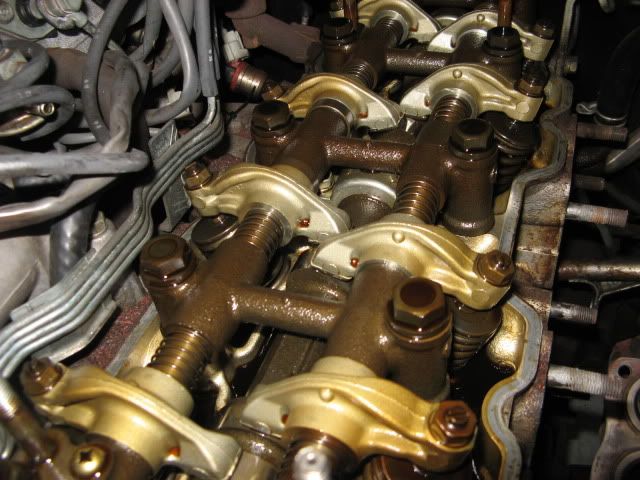
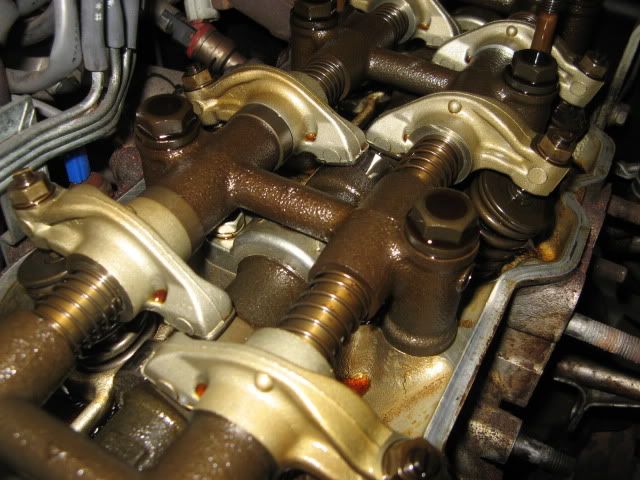
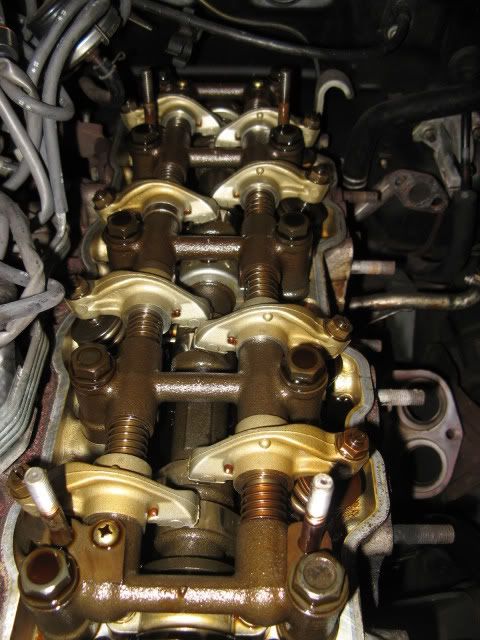
By the time I was done with all this light was dimming due to it raining all day in Bloody Hilo. But for Shhhhs and giggles I took off the valve cover to be delighted. For 212xxx miles the top end looks really good! Wayy better than my 92 at like 100K
Today I was hoping to get everything off the head but taking off brackets ended up being more difficult than I thought.
First started with taking the exhaust stuff off. I didn't realize but I'm missing a bolt on the exhaust manifold to head and a bold on exhaust manifold to down pipe D:
After that I decided that it was time to remove the infamous crank bolt. I will tell you right now that the starter bump trick is amazing! Only took two bumps and the bolt was loose. ( I know that the breaker bar is on the steering box and not tied down. I am luck that it worked and nothing bad happened.)
Note: I realized while comparing my truck to 4crawlers engine bay shot and creating new cuss words, that my steering box is bigger than his.
In preperation for accesorie removal I noted the belts and their locations
Next step was to remove the accesories (Power steering, AC, Alternator)
This step is easy to write out but let me tell you, Removing all that junk is a real pain.
I yanked for atleast 15 mins on the AC bracket only to realize it was still attached by one bolt.
By the time I was done with all this light was dimming due to it raining all day in Bloody Hilo. But for Shhhhs and giggles I took off the valve cover to be delighted. For 212xxx miles the top end looks really good! Wayy better than my 92 at like 100K
Mar 21, 2010 | 08:26 PM
#66
Thread Starter
Registered User
Joined: Jul 2005
Posts: 195
Likes: 0
From: Currently Hilo Hawaii, Saipan 670 Is Home
Tomorrow I'm Going to get the intake manifold off and crack the head open! I have a feeling putting this all back together is going to be a real pain.
Mar 22, 2010 | 05:21 AM
#68

Nice. I kind of lost track of this thread. Looks like you're moving right along. Good work.
Edit: Isn't ther just something extra cool about having new parts around the house?
Edit: Isn't ther just something extra cool about having new parts around the house?
Last edited by BLKNBLU; Mar 22, 2010 at 05:23 AM.
Mar 22, 2010 | 08:27 AM
#69
Registered User
iTrader: (2)
Joined: Dec 2009
Posts: 2,159
Likes: 7
From: Pleasanton, CA - SF Bay Area
Nice work - that IS in great shape - lucky you!
You may want to plug the intake mani with a clean rag while you're working, so you don't get any bad stuff inside.
If you can, clean all the parts as you take them off - wire wheel, solvent, braek cleaner, carb cleaner (that stuff is nasty on skin, be careful!). My stuff was all gummed up and yours looks to be in better shape.
Keep the pics coming!
Mar 22, 2010 | 04:30 PM
#70
Thread Starter
Registered User
Joined: Jul 2005
Posts: 195
Likes: 0
From: Currently Hilo Hawaii, Saipan 670 Is Home
i'm freaking out right now. I got the upper part of the intake manifold off and i'm looking at the lower half and wondering if it's worth it to take the head off. Maybe I'm better off just doing the timing chain and leaving the head on. Maybe I bite off more than I can chew.. The mess of stuff on it is crazy and I don't have a combo wrench big enough for the fuel rail thing on the very far end closest to the front. I think its 17 mm. Damn craftsman sets are not complete enough for the price! ohh boy..
Mar 22, 2010 | 05:11 PM
#71
You can just leave the intake stuff attached to the head if you want. Thats what I did. I disassembled it after the head was off and really I only did that because I sent out the injectors for cleaning and refurbishing. If your head doesn't need any work, just leave it all in place.
Mar 22, 2010 | 05:12 PM
#72
YotaTech Milestone-Two Millionth Post
Joined: Jan 2009
Posts: 12,009
Likes: 122
From: Northeast Pennsylvania
stop and take a break now. maybe stop for a while. i don't know what kind of deadline you have for yourself but i always make a mental list or written list and end up doing about half, if that.
I'm not sure exactly what you are talking about (what bolt) but disassembly for the most part was not terrible....so you can press on....
as far as NOT taking the head off....well, I know there is plenty of discussipn about doing a timing chain w/o taking the head off....it can be done....it was all I intended on doing myself....but one thing led to another and I'm not unhappy I did it.....overwhelmed more often than not, yes, but not unhappy.
you have now touched alot of parts.....you can name them by name and you now find yourself easily able to tell a 10mm from a 12mm from a 14mm bolt just from your eyes....you couldn't do that little trick so long ago, could you?
read you books...read your write-ups......take pics of everything and compare it all......most of all step away if you are getting confused or frustrated.......my Polish mother has a saying I've heard millions of times in my llife..."the hurrier I go, the behinder I get" think of it..........
Mar 22, 2010 | 05:19 PM
#73
That's good advice too from 92 TOY. Take a breath. Have a beer or coffee or whatever works for you. Take a shower. Take some pics of everything. Refocus, even if it means you're done for today.
Mar 22, 2010 | 05:28 PM
#74
YotaTech Milestone-Two Millionth Post
Joined: Jan 2009
Posts: 12,009
Likes: 122
From: Northeast Pennsylvania
ME doing this for the 1st time (of course,with help of the YOOTATECH brood) is VERY intimidating....so I know it's best to walk away sometimes.
Mar 22, 2010 | 05:42 PM
#75
Thread Starter
Registered User
Joined: Jul 2005
Posts: 195
Likes: 0
From: Currently Hilo Hawaii, Saipan 670 Is Home
thanks for all the support guys. I want to be done with this project before school starts this monday. about a week to do it. I took a break and went on ebay and surfed for a bit.I came out and looked hard for a while and said "hell, lets try some stuff out." i vice gripped and tried and nope. then just grabbed my 22 mill combo wrench from my shocks project and that bia worked!! i leaped for joy and broke my over head light D: I fixed that and back to work. I decided on taking the head off since I overheated once climbing up a mountain and I need a big bandaid since i'm not rebuilding the whole engine.
Mar 23, 2010 | 04:25 PM
#77
Thread Starter
Registered User
Joined: Jul 2005
Posts: 195
Likes: 0
From: Currently Hilo Hawaii, Saipan 670 Is Home
fml I just broke the knock sensor! me and my buddy were pulling the head with the lower intake manifold off and the I forgot about the knock sensor and the wire didn't snap, no that would be too convenient the whole sensor snapped in half! man and I don't have any money to buy a new one and all the junkyard have no 22re's. Man really bummed right now.
Mar 23, 2010 | 04:53 PM
#78
Thread Starter
Registered User
Joined: Jul 2005
Posts: 195
Likes: 0
From: Currently Hilo Hawaii, Saipan 670 Is Home
damn noone checks this thread huh?
Which knock sensor is correct for my 88 22re?
http://cgi.ebay.com/ebaymotors/Toyot...item563a7af5ad
OR
http://cgi.ebay.com/ebaymotors/Toyot...item35a7f76260
Which knock sensor is correct for my 88 22re?
http://cgi.ebay.com/ebaymotors/Toyot...item563a7af5ad
OR
http://cgi.ebay.com/ebaymotors/Toyot...item35a7f76260
Mar 23, 2010 | 06:15 PM
#80
Well I came up with part #89615-35020 from Toyota but inputting it to a Toyota sales site shows it for 84-85 only. $163
Nothing at Autozone or Rock Auto
Checker/Schucks/Kragen/O'reilly or whatever they are in your area had 'em for $179
Running my '86 came up with one part
Running your 88 came up with 2 parts. One of those was the same as mine, and that one looked just like the the one in your first e bay listing. I have also purchased from that particular seller (mmccul3797) too and had good experiences. I'd try him. Tricky part will be getting it to HI in a timely manner.


