
22R Desmog Tutorial

 Jun 15, 2014 | 04:55 PM
#222

Registered User
Joined: Jun 2014
Posts: 9
Likes: 0
Got it running without any issues; thanks for the help dudes! Noticed that fuel pressure was at 2.5ish lbs and tried adjusting, doesn't seem to go anywhere so I just spun it back lol. Runs so much better, I was barely able to accelerate before let alone get above 40 mph.


Last edited by elitegunslinger; Jun 15, 2014 at 05:00 PM.
 Jun 16, 2014 | 05:34 AM
#224
Thread Starter
Super Moderator
iTrader: (3)
Joined: Jan 2012
Posts: 3,218
Likes: 26
From: Salisbury, MD

On another note, had my fuel lines ran slightly differently. Instead of having the fuel return going down to the hard line by the starter like yours, I had mine going to the hard line on the passenger fender wall next to your fuel delivery line and completely removed the hard line down by the starter. Both ways are correct, I just did it that way for looks and simplicity.
Also, what is that fitting for on the manifold just behind the brake booster hose (in the picture above)? Looks like a brake flare fitting on an NPT fitting.
Jun 16, 2014 | 05:36 AM
#225
Thread Starter
Super Moderator
iTrader: (3)
Joined: Jan 2012
Posts: 3,218
Likes: 26
From: Salisbury, MD
Got it running without any issues; thanks for the help dudes! Noticed that fuel pressure was at 2.5ish lbs and tried adjusting, doesn't seem to go anywhere so I just spun it back lol. Runs so much better, I was barely able to accelerate before let alone get above 40 mph.

 Jun 29, 2014 | 06:02 PM
#226

Registered User
Joined: Jul 2011
Posts: 74
Likes: 0
From: mississippi
What exactly is the point if the new plate under neath the intake? Couldn't I block off the water on the back of the pass side timing cover and block the port on the center of the head and then just run my heater line to the factory plate that's on the intake since there is already a barb on there? I just ordered a weber, fpr, and the block plates for the egr on head and manifold and air injection plates.
Jun 30, 2014 | 07:17 AM
#227
Thread Starter
Super Moderator
iTrader: (3)
Joined: Jan 2012
Posts: 3,218
Likes: 26
From: Salisbury, MD
What exactly is the point if the new plate under neath the intake? Couldn't I block off the water on the back of the pass side timing cover and block the port on the center of the head and then just run my heater line to the factory plate that's on the intake since there is already a barb on there? I just ordered a weber, fpr, and the block plates for the egr on head and manifold and air injection plates.
Jun 30, 2014 | 07:33 AM
#228
Registered User
Joined: Jul 2011
Posts: 74
Likes: 0
From: mississippi
Ok so for the sake of me being cheap could I do away with the water going to the passanger side timing cover and do away with the heater line in the center of the head and just run my heater off of the straight barb on the factory plate on the intake? Seems like it would work the same only difference is I would retain my sensor?
Jun 30, 2014 | 08:16 AM
#230
Registered User
Joined: Jul 2011
Posts: 74
Likes: 0
From: mississippi
I meant the heater sorry.. Did you use just reg rubber line to plumb it back to the fire wall. I noticed the factory is a molded line. I'm guessing it makes no difference molded or not as long as it doesn't pinch anywhere. Great write up by the way. I'm following it to the t minus the plate under the intake and the crossover plate behind the head
Jun 30, 2014 | 11:01 AM
#231
Thread Starter
Super Moderator
iTrader: (3)
Joined: Jan 2012
Posts: 3,218
Likes: 26
From: Salisbury, MD
When I originally desmogged my engine, I used the original hose (utilizing the factory fitting under the manifold) to run the heater hose. I have rebuilt my engine since, but I haven't finished the rest of my truck so it isn't installed and fully plumbed yet. I plan on using a new hose to keep everything clean. Having a molded hose makes no difference as long as it isn't kinked, like you said. On other things I have done in the past where I wanted or needed a molded hose, I took some rough measurements to the auto parts store to find a preformed universal hose. I have a pretty good rap with my local stores so they let me go in the back and rummage through their hoses to find one that matches well. A lot of times the preformed hoses will fit multiple applications, but need to be trimmed to fit a particular application. It's basically the manufacturer's way of meeting several needs without actually producing several different hoses. Follow me?
Jul 15, 2014 | 05:18 AM
#232
Registered User
Joined: Jan 2014
Posts: 83
Likes: 0
From: Alabama
Got a few questions:
What do I do with these all the electrical stuff on the various smog sensors? Just unplug them and tie them up?
Here's what I'm talking about:


Three or four in this one:

Next question:
What about this line that ran into the charcoal canister, if I remember correctly?

What about this? Can I just remove the sensor/pump thing and plug it without getting a plate?

Also what do I do with this?

The large tube ran into the air intake.
Jul 15, 2014 | 08:47 AM
#233
Thread Starter
Super Moderator
iTrader: (3)
Joined: Jan 2012
Posts: 3,218
Likes: 26
From: Salisbury, MD
There are a couple things that you could do with your old, unused connectors. You can just wrap everything up with electrical tape and let it hang or you can remove it all from the wiring harness.
If you choose to keep it all, you need to make sure that you see it up well with electrical tape to ensure that it doesn't cause any kind of short or issues if it gets wet or contacts something that it shouldn't. Also, it is VERY important that if you keep all all of the vacuum switches that you cap all of the vacuum ports with plugs - especially the ones directly attached to the manifold. If you fail to do so, you'll end up with vacuum leaks and false vacuum readings at the Emissions Control Computer. I'm not sure how the false readings would affect anything since the ECC shouldn't be controlling anything any more, but it could.
Originally, I just taped everything up and let it hang and everything was fine, but in my build I decided to completely strip the wiring harness of all emissions wiring. I started at the ECC and worked my way back through the harness to remove everything that I no longer needed. I had it completely done in an evening. It really isn't hard to do - just takes a pair of wire cutters/strippers, a soldering gun and a whole bunch of electrical tape.
As for to the fuel line going to the charcoal canister, it shouldn't have anything going through it now and the charcoal canisters should be gone so you can either just leave it there (capped or uncapped-doesn't matter) or you can yank the hard line completely.
Jul 15, 2014 | 08:52 AM
#234
Thread Starter
Super Moderator
iTrader: (3)
Joined: Jan 2012
Posts: 3,218
Likes: 26
From: Salisbury, MD
oh, and BTW, it helps if you don't take pictures so close up. A lot of the equipment on these trucks look different from year to year, but do the same job. A close up picture doesn't help as much since you can't see where exactly the part is located under the hood. Try to take pictures with more points of reference in them. Like that last picture - I have no idea what that is and I didn't take anything like that off of my truck, but if you backed up a bit I would likely know what it is and what it does based off of where it is located.
Jul 15, 2014 | 10:05 AM
#235
Registered User
Joined: Jan 2014
Posts: 83
Likes: 0
From: Alabama
The last picture is the thing directly under the fuel pump. It has a large line (the size of a radiator hose) that ran into the bottom of the stock intake.
Good to know I can just pull the sensors and wrap up the wiring.
What about the sensor directly behind the carb and beside where the new PCV line will run? Its in the middle of the intake between the two separate sections.
Good to know I can just pull the sensors and wrap up the wiring.
What about the sensor directly behind the carb and beside where the new PCV line will run? Its in the middle of the intake between the two separate sections.
Jul 15, 2014 | 11:14 AM
#237
Thread Starter
Super Moderator
iTrader: (3)
Joined: Jan 2012
Posts: 3,218
Likes: 26
From: Salisbury, MD
You shouldn't have to worry about removing anything - it can all be removed. I'm not kidding when I tell people to remove everything that isn't a carburetor, cylinder head, distributor, fuel pump, intake manifold or exhaust manifold. If you remove something that creates a hole in the head, intake manifold or exhaust manifold then you need to plug or plate it off - all of which is available from LCE. It's really that easy.
That vacuum port in the center of the head between the intake runners is removed and blocked off with this:
http://www.lceperformance.com/Water-...-p/1016011.htm
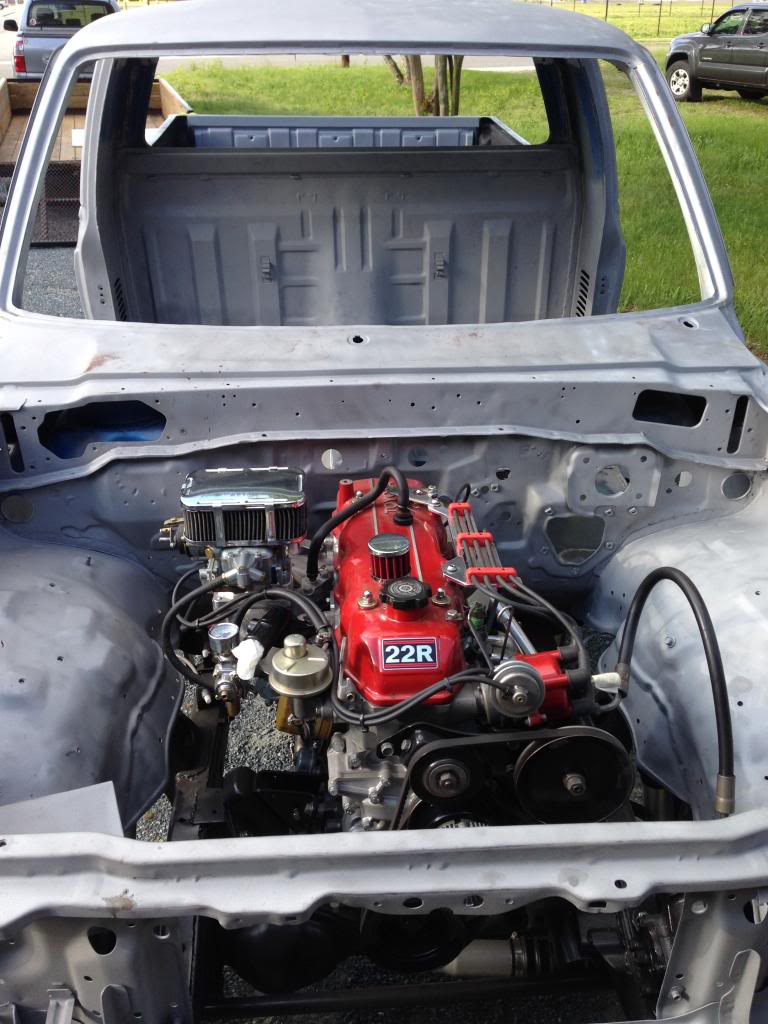
Your engine bay will look like this plus radiator hoses, brake booster hose, heater core hoses and fuel lines:
I recommend the LCE Emissions Block Off Plate Kit to anybody who isn't as familiar with engines because it has everything you need to do the job right. It then turns into a simple jigsaw puzzle; you remove something and find the plate with the right shape to cover the hole you just made. Plus it comes with instructions - You can't go wrong with it:
http://www.lceperformance.com/Emissi...-p/1016035.htm
That vacuum port in the center of the head between the intake runners is removed and blocked off with this:
http://www.lceperformance.com/Water-...-p/1016011.htm
Your engine bay will look like this plus radiator hoses, brake booster hose, heater core hoses and fuel lines:

I recommend the LCE Emissions Block Off Plate Kit to anybody who isn't as familiar with engines because it has everything you need to do the job right. It then turns into a simple jigsaw puzzle; you remove something and find the plate with the right shape to cover the hole you just made. Plus it comes with instructions - You can't go wrong with it:
http://www.lceperformance.com/Emissi...-p/1016035.htm
Aug 3, 2014 | 02:21 PM
#238
Registered User
Joined: Jun 2014
Posts: 9
Likes: 0
I've finished my install, idle works great however when I snap the accelerator it will bog and backfire through the carb. I've added a new distributor cap, rotor, plugs wires, and fuel filter since and am still having the issue. Any ideas?
Aug 4, 2014 | 01:34 PM
#239
Registered User
Joined: Jul 2011
Posts: 74
Likes: 0
From: mississippi
Gunslinger I've had mine complete for a few weeks now. Complete desmog and weber 32/36 installed and I have the same problem. Idles and runs/drives fine unless I go from idle to WOT very fast. If I have the RPMs up a good bit going down the highway and floor it it's not really noticeable. Mine doesn't backfire through the carb though, just bogs down really bad for just a sec or two then picks right back up. I've tried my timing at just about every adjustment possible and I've adjusted the carb time after time according to webers directions. I've made zero headway on resolving the problem and every thread I read never has an ending with a fix. If you figure it out please post up on this thread and I'll do the same. Good luck
Aug 4, 2014 | 03:25 PM
#240
Registered User
Joined: Jun 2014
Posts: 9
Likes: 0
Gunslinger I've had mine complete for a few weeks now. Complete desmog and weber 32/36 installed and I have the same problem. Idles and runs/drives fine unless I go from idle to WOT very fast. If I have the RPMs up a good bit going down the highway and floor it it's not really noticeable. Mine doesn't backfire through the carb though, just bogs down really bad for just a sec or two then picks right back up. I've tried my timing at just about every adjustment possible and I've adjusted the carb time after time according to webers directions. I've made zero headway on resolving the problem and every thread I read never has an ending with a fix. If you figure it out please post up on this thread and I'll do the same. Good luck


