When you click on links to various merchants on this site and make a purchase, this can result in this site earning a commission. Affiliate programs and affiliations include, but are not limited to, the eBay Partner Network.
Look at my post if you want to see what I'm doing about this. I have the same problem and I'm working pretty hard to get it stopped. Good luck and post pictures if you find the source
Could be leaking in under the windshield. Pull the cowl off under the windshield and check the seams under where the fresh air intake vents are.
thanks, I just got it last friday! i've always wanted an ol' Yota to pimp and offroad with. Its in great shape, just needs a few fixes like a new UV joint(i think).
thanks, I just got it last friday! i've always wanted an ol' Yota to pimp and offroad with. Its in great shape, just needs a few fixes like a new UV joint(i think).
lol U-joint? UV's come from the sun! Unless you meant CV... but that's for 86 and up trucks.
My 84 leaks as well. It drips down from the rubber trim between the windshield and the headliner onto my seat and leg. I'll have to add some silicon to the top of the windshield to see if that helps. Somebody also drilled a couple of holes in the top (lightbar maybe??) so I need to weld them shut.
I solved the leaking problem using a Toyota weatherstrip used in Japanese Hilux minipickup from 1984 to 1988, the toyota code is 56121-89117. Maybe you could not find it in U.S. (I live in Chile South America).
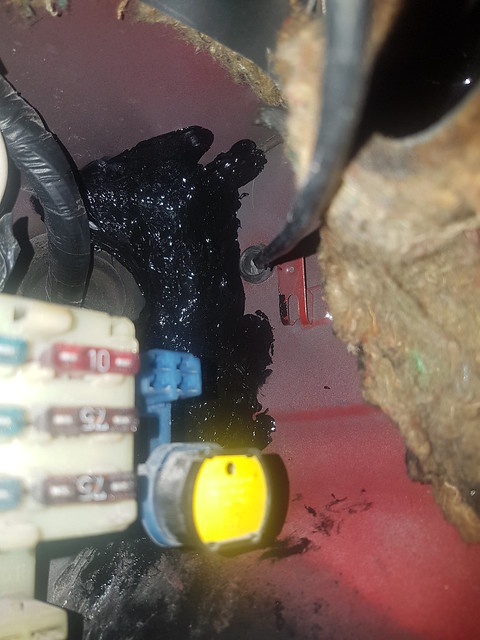
I own a 1985 4runner. So this is my experience with this. For the longest time my passenger side floor was soaking wet after a hard rain. I could not for the life of me figure out where the leak was coming from. I tried resealing the windshield, that wasn't the issue. I tried cleaning out the AC drain. That was not the issue. After removing the carpet on the passenger side I was able to replicate the the leak by running water into the cowl (the vents on the outside just under the windshield) with a hose an a sock over the tip of the hose. With the constant water running through the cowl, I could see that water was somehow making its way through the body of the truck and trickle down underneath the glove box to the right hand side near the passenger door. I had discovered from other posts on the internet that the cowls were poorly designed, and overtime, can corrode away the firewall and cause a path for water to infiltrate. So! I removed the cowl and wow, they were clogged up good with debris. I took my hose sprayer and shot it from the top and side of the cowl multiple times. I cleaned it out good, but there was still a leak. So, to fix the leak, I took some FlexSeal (yes, the seen on TV ˟˟˟˟) and covered the interior of the cowl outlet by the fender, paying special attention the the part of the cowl that is flat and water sits, as well as along the seams of the cowl were water might be infiltrating. I was generous with this, but not so much that it would restrict water flow from the cowl to the inner fender. I was surprised to find that there wasn't any visible rust inside the cowl, which I'm grateful cause I've seen some pretty horrific pictures!
so in summary, if you just bought one of these trucks, clean out the cowls! If you have water leakage onto your floor, you might consider trying to replicate the problem by running water through the cowl and removing the interior floor carpet to find a stream of water. If you do, you might try and seal up your cowl with some FlexSeal! It worked for me.
Another thing I noticed was water was also dripping onto the antenna cable that goes up through the fender and through the firewall as you can see in the last picture. The rubber seal that holds it in place on the firewall was old and worn out. I noticed that water dripping from the cowl outlet would land on this cable and due to surface tension properties of water, It was also acting as a source for water infiltration by running down the cable and into the cab! So I also coated this with some silicone gel. Good luck and happy hinting! What an amazing site to get information on regarding these old and awesome trucks. A big shout out to all that post. This is my way of giving back, hopefully it helps someone out!
-Joe
Cowl cover removed. Remove screens to get inside the cowl. The passenger side cowl outlet with FlexSeal The interior of the cowl outlet where water collects and sits cause it's a crappy design! I think this was the source but not positive. Another view of the cowl outlet, as you can see it has a crack in it.
That's cool Joe. I had decided that the water in my floorboard was due to a leaking windshield so I finally bit the bullet and decided to remove it, clean / paint the channel and reinstall / replace. I just cracked my windshield after about 6" of separation. I figured I'd crack it and am kind of glad I did it after five minutes instead of five hours. Jumped on here to find a current windshield thread and brag about my broken glass when I saw your post. Wouldn't you know that I have the same issue. I'm going to just pretend the windshield was leaking too and tell myself I needed those two little rust spots fixed.
. I'm going to just pretend the windshield was leaking too and tell myself I needed those two little rust spots fixed.
Seeing your photos in RAD thread, I can say that you did need those two little rust spots fixed.
If it's possible, upload photos of your repair.
Thanks!
Hello, I realize that the op solved the problem but I just wanted chime in because I had a similar leak. It turned out that the leak was coming from inside the cowl where the fender meets the firewall, much like Blue_85 said. I found it by removing the cowl, cleaning it and running a hose down there. I was able to clearly see where it was coming in as well as a little corrosion.
To fix it took the fender off, scraped the old seam sealer out and removed all the rust I could get to. I then prepped, POR-15'ed and applied new seam sealer. I also drilled a small hole in the cowl where water pools in hopes that it'll drain better. I ran a hose in the cowl for 10 minutes and no leaks. Now I gotta repeat it on the passenger side.
Here are some pic of the outside of the repair. I couldn't really get any good shots of the inside but I did the same thing on the inside under the kick panel.
I apologize if this is a thread-jack but thought I'd add to what Blue and others have posted, the windshields do leak but the cowl can also give you problems.
Pics (I hope it'll work, this is my first post).
Seam sealer removed, clean metal This was where the leak was, a tiny gap. I added this hole to hopefully help it drain better. A close up of the location of the hole, I tried to get it in the lowest spot (and don't worry I touched up the paint).
I know this is an old thread, but I want to share my experience as the common first response to water leaking into the cab is always "it's the windshield." However, per some posts I've found across multiple forums (including this thread), the intersection of the cowl, firewall, and inner fender on driver/passenger side is definitely a huge culprit that can contribute to this issue. I was able to nail the problem down to rust in that intersection of seams on the driver side across all three surfaces. At first, I simply wire brushed off the rust, cleaned it with some degreaser, and used POR-15 Patch but didn't get a good application with the applicator tube. Tip: get some gloves and use your finger. I found the hardest part of this repair (if you don't want to take the entire dash off and remove the loom/fusebox) is getting access to the area to smear in the product for good coverage. When it started leaking the next rainstorm, I went this route and liberally applied this product all over the place:
Not to be content, as I had taken the fender/bumper off 2 times prior, I went back to the cowl side. The main issue here being there is a very tiny opening not big enough to get your hand into, let alone see anything, to apply any type of sealant properly. So, I had my first experience with an angle grinder (fireworks!) and a cut off wheel, and cut just a big enough hole to expand the factory hole in the cowl. I then grinded down the lip where it meets the fender so as to make an easier path for the water to drain and not pool with the metal now removed. I could finally see some of the rust, though it wasn't as apparent from the cowl side. I did the same thing with the POR-15 Patch (cleaned first wire brush, vacuum, degreaser) and sealed it all across the cowl/firewall joint (sorry, forgot to take pictures, needed to get the fender back on).
Lastly, I went under the hood. I noticed someone had used some more flexible seam sealer or RTV at the same intersection seams near the hood hinge. There were some minute gaps that I thought could be suspect and I wanted this problem squashed for good. So same story, went to town with gloves and my finger to smear the POR-15 patch along all those seams. I then did the same on the passenger side, even though there were no leaks. Finally, I used some black RTV on the tops of the grommets on each side as they were looking a bit cracked and brittle.
And after an all day rainstorm this week, my leak is finally fixed and I can move forward with finally putting carpet in my truck! I hope this helps anyone dealing with this problem in the future.
It was in my case, YMMV. Other common source of leaks is the fender/cab seam inside the front cowl area. Have someone outside with a hose while you look inside for the leak. Or for the seal, pull the trim and look for air pockets around the seal area. On mine, the good seal was a dark color and there you could easily see lighter spots in that area where the glass and polyurethane sealant had separated.
I just did a bunch of rust repair on this area on my 85. Take the inner wheel liners out and take a look.
 10-09-2007, 05:19 PM


 yeah, i ment U-joint. man, had alot on my mind yesterday. Going skiing and don't wont to forget anything!