
Younguy's 1990 4Runner build "The Phoenix"
 Aug 17, 2012 | 11:40 AM
#1
Thread Starter
Registered User
Joined: Aug 2011
Posts: 72
Likes: 0
Hello everyone on yotatech!  I've been an observer of yotatech for around a year now, and i thought i would do a sort of build thread for my rig that all of you have helped to inspire.
So just as some background knowledge, i am a 17 year old kid who lives in Washington state, so i frequently visit elbe and evans. But when my dad bought me my 1990 4runner just over a year ago when i turned 16, it was bone stock and in pristine condition, i had no plans of initially building a wheeler out of it.

unfortunately, a whole 26 days after i got my license this happened

I rear ended a subaru forester while going 40, the reason only the driver's side was damaged was because i tried to swerve
In any case, my punishment was i had to pay the ticket and i had to fix my truck all on my own... little did my father know that this hands on experience would spark what would soon be the largest money pit i have ever had! (i spend even more money on my truck then i did on my girlfriend of the time)
Long story short, me and my buddy decided we were going to explore the wonderful world of offroading, so i started mowing lawns and saved up for a rough country 5in lift.

Though i spent all my money on the lift that i had none left to spend on new tires! So i rolled around on some 31x10.5 street tires for a few months
Lucky i made friends with some of the other wheelers at school and i scored a 5 set of 33x12.5 bias ply super swampers already mounted for $125

That really helped the look of my truck, though that didnt stop me from pushing the limits

It took both my buddies and a whole lot of snatching to pull my truck out of that muck at belfair's mud lake!
Now is about the time that i got a job, and money started rolling in, so i scored a detroit locker off of LowRangeOffroad's scratch and dent section for $200 bucks! Installed it myself, thanks to a bunch of write ups on here
Then i welded up some marlin crawler rock sliders to protect my rockers, and then i tore off my stock rear bumper on a trail... Sooooo that prompted me to fab my own bumper


Ohh and i forgot to mention that somewhere else in that time span i found a thread on how to make a snorkel and so after coming close to hyrolocking my engine, i decided to give it a shot. I did it with full 3" tubing and as clarifacation for anyone else like me. when you order a snorkel head, and it says 3" head, it actually fits a 2.5" tubing, due to the taper they have on it So i had to cut the taper off, file new grooves for a metal clamp and trim new flex grooves so the head can hold onto the pipe. Lucky for me, i actually think that it looks better by cutting out the taper

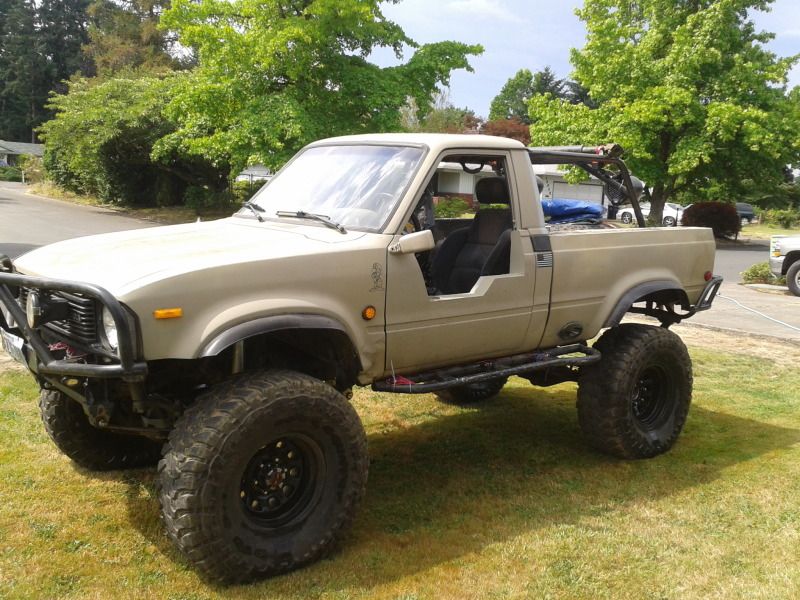
In any case here are just a few more photos of my rig:


Please disregard the missmatched body panels in some of the pictures haha ive been debating what color to paint it, but i've finally decided and will hopefully have it done soon
So let me know what you guys think? How do you like the bumper? And thanks again for all your help! the Phoenix couldn't have been reborn without all the help ive gotten from all of you here on yotatech! Rock on!
-Austin-
I've been an observer of yotatech for around a year now, and i thought i would do a sort of build thread for my rig that all of you have helped to inspire. So just as some background knowledge, i am a 17 year old kid who lives in Washington state, so i frequently visit elbe and evans. But when my dad bought me my 1990 4runner just over a year ago when i turned 16, it was bone stock and in pristine condition, i had no plans of initially building a wheeler out of it.
unfortunately, a whole 26 days after i got my license this happened
I rear ended a subaru forester while going 40, the reason only the driver's side was damaged was because i tried to swerve
In any case, my punishment was i had to pay the ticket and i had to fix my truck all on my own... little did my father know that this hands on experience would spark what would soon be the largest money pit i have ever had! (i spend even more money on my truck then i did on my girlfriend of the time)
Long story short, me and my buddy decided we were going to explore the wonderful world of offroading, so i started mowing lawns and saved up for a rough country 5in lift.
Though i spent all my money on the lift that i had none left to spend on new tires! So i rolled around on some 31x10.5 street tires for a few months
Lucky i made friends with some of the other wheelers at school and i scored a 5 set of 33x12.5 bias ply super swampers already mounted for $125
That really helped the look of my truck, though that didnt stop me from pushing the limits
It took both my buddies and a whole lot of snatching to pull my truck out of that muck at belfair's mud lake!
Now is about the time that i got a job, and money started rolling in, so i scored a detroit locker off of LowRangeOffroad's scratch and dent section for $200 bucks! Installed it myself, thanks to a bunch of write ups on here
Then i welded up some marlin crawler rock sliders to protect my rockers, and then i tore off my stock rear bumper on a trail... Sooooo that prompted me to fab my own bumper
Ohh and i forgot to mention that somewhere else in that time span i found a thread on how to make a snorkel and so after coming close to hyrolocking my engine, i decided to give it a shot. I did it with full 3" tubing and as clarifacation for anyone else like me. when you order a snorkel head, and it says 3" head, it actually fits a 2.5" tubing, due to the taper they have on it
So i had to cut the taper off, file new grooves for a metal clamp and trim new flex grooves so the head can hold onto the pipe. Lucky for me, i actually think that it looks better by cutting out the taper In any case here are just a few more photos of my rig:
Please disregard the missmatched body panels in some of the pictures haha ive been debating what color to paint it, but i've finally decided and will hopefully have it done soon
So let me know what you guys think? How do you like the bumper?
And thanks again for all your help! the Phoenix couldn't have been reborn without all the help ive gotten from all of you here on yotatech! Rock on!-Austin-
 Aug 17, 2012 | 03:55 PM
#6
Registered User


Joined: Oct 2011
Posts: 2,712
Likes: 339
From: Denver CO
Ahhhh to be young again my dad bought me a cherry 64 beetle that was the original 6 volt system from the original owner and it had 65k on it original. Wrecked it first snowstorm I drove in had it 2 weeks. I still ask my dad why the hell he gave me such nice car this early. Anyway welcome
my dad bought me a cherry 64 beetle that was the original 6 volt system from the original owner and it had 65k on it original. Wrecked it first snowstorm I drove in had it 2 weeks. I still ask my dad why the hell he gave me such nice car this early. Anyway welcome
Aug 18, 2012 | 12:01 AM
#7
Thread Starter
Registered User
Joined: Aug 2011
Posts: 72
Likes: 0
Yeah i know, im saving for a daily driver then i can get really deep into fun stuff
SAS is in the future, plan on doing it myself. Though there isnt really a rush, Here in washington, there isnt nearly any rock crawling on the west side, so flex really isnt an issue. More than anything it's tight technical trails like at evans or a thick, swampy mess that you're constantly fighting for traction in; that would be at elbe. Though i like the peace of mind that a solid axle provides, so i shall make the leap eventually.
SAS is in the future, plan on doing it myself. Though there isnt really a rush, Here in washington, there isnt nearly any rock crawling on the west side, so flex really isnt an issue. More than anything it's tight technical trails like at evans or a thick, swampy mess that you're constantly fighting for traction in; that would be at elbe. Though i like the peace of mind that a solid axle provides, so i shall make the leap eventually.
Trending Topics
 Aug 18, 2012 | 01:02 AM
#9
Registered User
Joined: Aug 2012
Posts: 8
Likes: 0
From: Sandpoint, ID
Looks really good man! Cant believe you scored those tire and wheels for $125! Want to sell them? Haha i live in North Idaho and i hear ya about tight trails and mud pit in peoples back yards that dont have a bottom! Lol sweet runner btw. I have a '90 also
Aug 21, 2012 | 12:40 AM
#10
Thread Starter
Registered User
Joined: Aug 2011
Posts: 72
Likes: 0
Hey Dropzone, is that krylon ultraflat camouflage sand? which is the lighter of the two tan's that krylon sells in their camouflage set?
and yes it looks amazing on your truck i have honestly read over your build thread multiple times! haha love your rig
  especially those rock lights you put in, boat lights, super slick in my opinion!
and yes it looks amazing on your truck
i have honestly read over your build thread multiple times! haha love your rig especially those rock lights you put in, boat lights, super slick in my opinion!
Aug 21, 2012 | 02:37 PM
#12
Thread Starter
Registered User
Joined: Aug 2011
Posts: 72
Likes: 0
SAS will soon be in the works haha after a few other expenses get paid for. Yeah, building the bumper wasn't hard as long as you make sure to triangulate ends and make the bracing smart enough to withstand more than one impact. Took me about 30 hours and a lot of thinking lol. But for being a 17 year old and having no one who knows how to weld or fabricate, i think i did a pretty good job of teaching myself (:
Aug 21, 2012 | 02:45 PM
#13
Thread Starter
Registered User
Joined: Aug 2011
Posts: 72
Likes: 0

well i got some updates with the rig. Went to a few fred myers and bought out all their Krylon Ultra Flat Camouflage Sand paint lol have 12 cans at the moment and just finished using 4 to paint the front end.
Hope that the rain stays away so i can finish, but you never know here in washington


This is my ghetto paint booth -->

All in all, i think i like the color, coulda gone with the one shade darker, but whatever. Looks good for a while


 Nov 7, 2012 | 10:51 PM
#15
Thread Starter
Registered User
Joined: Aug 2011
Posts: 72
Likes: 0
Ive got a sad update guys

The inevitable happenes and i rolled my truck straight to the roof...
As of the moment it is covered with a tarp and ive been working on getting the motor to run. By starting with removing all the oil that leaked into plaxes it shouldbt be... such as thw cylinders.
I have a few ideas in my head for the future of my rig. Two incolve streetability while the rest involve a trailer queen. But I'd like to hear what you guys think??
Nov 8, 2012 | 08:57 AM
#17
Registered User
Joined: May 2011
Posts: 1,751
Likes: 0
From: pensacola FL
judgeing by the looks of the gravel pit behind you im thinking there was a "hey yall watch this" followed by whatever you did, sorry to hear man, ive almost flopped by luckly i caught a stump, it shouldnt be to hard to fix the roof as it looks the back end idnt get to badly beat
Dec 19, 2012 | 09:25 AM
#18
Thread Starter
Registered User
Joined: Aug 2011
Posts: 72
Likes: 0
Well I haven't updated for a while because ive been so disgusted. But here are some more pictures of my roll

But I finally started working ut out again because I miss wheeling too much to give it up!
Anyways. The problem I was having os getting the doors to sit tight at the top of the door line. And considering i live in washington, with so much rain, I really won't be happy unless I can seal the cab! So I did the only logical yotatech solution!

Yuup grabbed that sawzall and cut the roof off cuz I worked a deal with the local picknpull to grab a new one for 50bucks (:
So with a couple hours of more accurate trimming with the angle grinder to get a close fit and here it i, just clamped on at the moment but ill start welding tomorrow if the weather is decent!

Thanks for the inspiration guys. Ill keep you updated.
But I finally started working ut out again because I miss wheeling too much to give it up!
Anyways. The problem I was having os getting the doors to sit tight at the top of the door line. And considering i live in washington, with so much rain, I really won't be happy unless I can seal the cab! So I did the only logical yotatech solution!
Yuup grabbed that sawzall and cut the roof off cuz I worked a deal with the local picknpull to grab a new one for 50bucks (:
So with a couple hours of more accurate trimming with the angle grinder to get a close fit and here it i, just clamped on at the moment but ill start welding tomorrow if the weather is decent!
Thanks for the inspiration guys. Ill keep you updated.
Dec 19, 2012 | 11:31 AM
#20
Registered User
Joined: Aug 2011
Posts: 1,507
Likes: 2
From: Fraser Valley, British Columbia
Nice work.
I'd love to see progress welds of putting the body back on. I picked up a welder a few months back and need to lean body work cutting and welding.
So how did you get it tits up?
I'd love to see progress welds of putting the body back on. I picked up a welder a few months back and need to lean body work cutting and welding.
So how did you get it tits up?


